Notifications
Clear all

Topic starter
I may have this wrong, but I thought with the new FW you could try out a new sound while retaining the Super Knob functionality. Doesn't seem to be working for me.
For example: If I take the (Best of Montage) Concert Piano - EP performance and replace the EP with an organ sound, I would expect this to be activated by turning the Super Knob or FC7, going from Piano only, to Organ only. This isn't happening and I'm wondering what I have to do to get that to easily edit a performance in such a manner. That would terribly useful and time saving.
Thanks for helping answer this dilemma for me.
Posted : 19/03/2017 8:45 pm

I believe you are thinking of Parameter With Part
Parameter with Part - When adding Parts to a Performance, you can choose to inherit settings from the Part. For example, when adding a string layer, you may want to bring in just the Arpeggio, Motion Sequence and Scene data but retain the mix settings of your currently selected Performance. This is great for auditioning different sounds while mixing or creating Performances.
I haven't used this feature - but considering your existing performance's assignable knobs could point to very specific destinations not available in a different part (like specific effect parameters, or FM vs. AWM, etc ...) I think anything which tries to keep the destinations "in tact" would be difficult and would have many cases where it just couldn't do the assigned task. "Arpeggio", "Motion Sequence", and "Scene Data" do not seem to include Control Destinations as choices.
Not having messed with this - and not having the keyboard setup now - maybe someone else can sweep in and show it can be done somehow. In the meantime, this sort of thing of simply using superknob to turn up one PART while turning down another PART is about the most simplistic form of destination programming you can do involving superknob. Part 1 is already taken care of you (the part you're not replacing). Follow the steps for just part 3 in the following article: https://www.yamahasynth.com/component/k2/montage-skills-three-way-super-knob-transition
You only need 2-way transitions so the middle (part 2) can be ignored. Or reference https://www.youtube.com/watch?v=bUyKeTQ8LPM&feature=youtu.be
Posted : 19/03/2017 9:58 pm

While PART Assign Knob programming and functionality is maintained when you select it for use in a Performance, the link to the Super Knob is not. To understand this we need to discuss the two COMMON parameters.
Within the Part, there are parameters that concern all 8 AWM2 Elements in common, or the entire FM-X sound, in common, if the Part is FM-X. So a Part has its COMMON parameters.
When that Part is placed in a Performance, there are a second set of parameters that apply to all 16 Parts in common. Things they all share together. System Effects, Master Effects, Master EQ, etc.
The Part has 8 Assign Knobs - things assigned to the Part's own Assign Knobs are maintained wherever the Part is used. Each Part has 8 Assign Knobs of its own... the parameter Destinations, 251 of them, concern functions of the instrument sound being fashioned, including its Insert Effect assignment and control.
The Performance has 8 Assign Knobs -these are those that are directly linked to the Super Knob. This is on the upper Common/Audio area of the architecture. Here the 8 Knobs can be assigned to parameters common to all sixteen Parts (System Effect, Rev/Var, parameters, Master FX, etc), they can also be assigned to A/D Input and its two Insert Effects, and it acts as the Super Knob Assign area. This means, you can link the movement of any of the 16 Part's Assign Knobs to the movement (and direction) of one of these 8 upper level knobs.
Say you set this COMMON/Audio area AssignKnob 1 to move counterclockwise, max to min; and you set AssignKnob 2 to move normally, min to max. This would allow you link any Knob assigned Part parameter from any Part, to Knob 1 this would cause the parameter to decrease values, and for any values you want to increase movement you would link its Part assigned Knob to AssignKnob 2.
The important point is, when you add a new Part to a Performance, there already exists a setup for the 8 upper Common Knobs - add a Part, new relationships will need to be formed. A Part is joining an already existing layout.
Linking the Part's Assign Knob to the upper level Assign Knob, is fairly easy. And dear I say, is best done as you add the Part. Chaos would ensue if the current setting were just added (as the Knob assignment that already exists would be serendipitously changed) or what you add might be wildly random. Besides you are going to want to ensure what gets changed when you turn that Super Knob.
A maximum of 16 Source/Destination Sets can be created for each Part, and another 16 at the upper Common/Audio area.
Okay, let's use the Organ you want to substitute into the "CFX + FM EP" Performance.
The "FM EP" is in Part 5.
Part 5 Assign 1 is set to control Volume ( you can discover this by using the "Auto Select" function on the Control Assign screen
As the Part 5 Assign Knob #1 is turned up (clockwise), the value of the Volume is turned down (Ratio = -32; Param = 7)
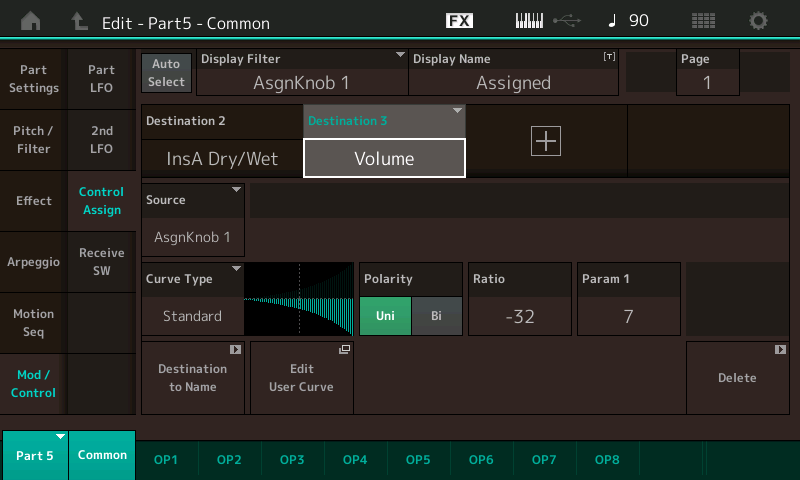
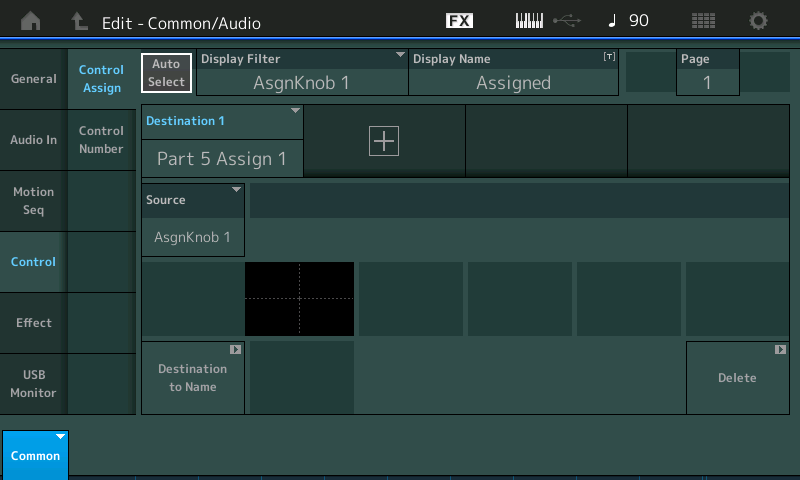
If we now look for how this Part Assign Knob is linked to that upper COMMON/Audio area, we can then learn what we must do to substitute the organ.
On the Common/Audio level we can see that Assign Knob 1 is controlling the movement of "Part 5 Assign 1"
If you go to the Home screen
Touch "Part 5"
The pop-in menu appears
Touch "Search"
Substitute a Single Part (green) Organ
I selected "Dave's Nu Organ"
I must look in this Part to find out what, if anything, is assigned to control Part VOLUME. (To avoid unnecessary conflicts)
Using the Auto Select feature I turn each Knob in turn ...
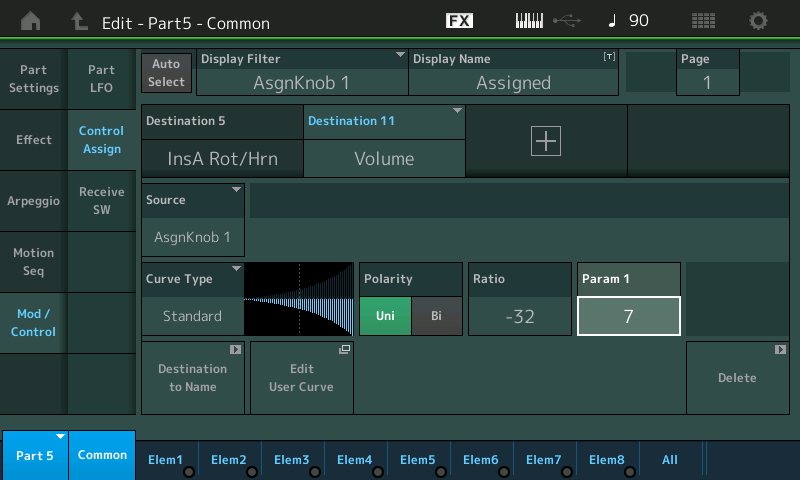
I discover it is "Assign Knob 5" in the Organ Part, (and it is also controlling Coarse Tuning...)
I highlight the DESTINATION 11
Touch "Source"
Use the Data Dial to select "Assign 1"
Touching the SOURCE box allows me to reassign this set
Press [ENTER]
Now I set the Ratio = -32, Param = 7
To match movement of the FM EP...
We have now substituted a Single Part Organ (Dave's Nu Organ) for the Single Part "FM EP", And we have assigned this new member of the Performance to use the link that the FM EP was using to crossfade.
Extra Credit: from the Home screen
Touch "Motion Control"
Touch "Super Knob"
Here you see how Assign Knob 1 on the upper Common level is working in reverse.
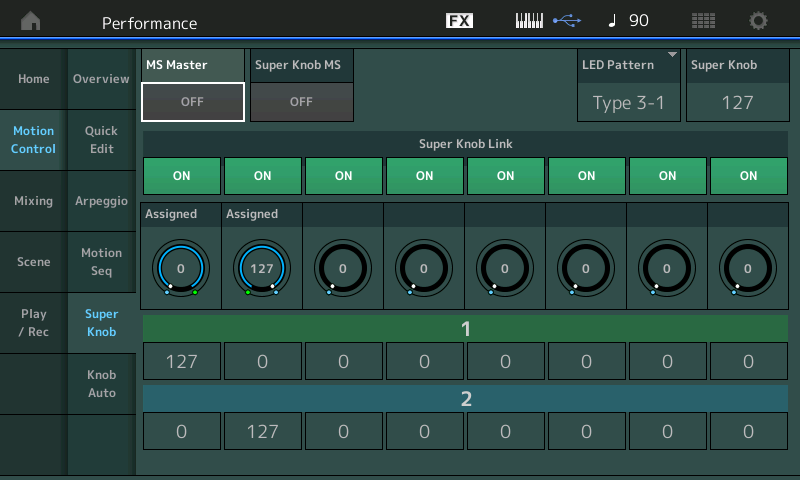
Knob 1 has been set so minimum is 127 and maximum is 0 so it works in reverse... any Part Assign Knob linked to this upper level Assign Knob will decrease as the Super Knob is turned up.
Posted : 20/03/2017 1:00 pm

Bad Mister wrote:
While PART Assign Knob programming and functionality is maintained when you select it for use in a Performance, the link to the Super Knob is not. To understand this we need to discuss the two COMMON parameters.
Within the Part, there are parameters that concern all 8 AWM2 Elements in common, or the entire FM-X sound, in common, if the Part is FM-X. So a Part has its COMMON parameters.
When that Part is placed in a Performance, there are a second set of parameters that apply to all 16 Parts in common. Things they all share together. System Effects, Master Effects, Master EQ, etc.The Part has 8 Assign Knobs - things assigned to the Part's own Assign Knobs are maintained wherever the Part is used. Each Part has 8 Assign Knobs of its own... the parameter Destinations, 251 of them, concern functions of the instrument sound being fashioned, including its Insert Effect assignment and control.
The Performance has 8 Assign Knobs -these are those that are directly linked to the Super Knob. This is on the upper Common/Audio area of the architecture. Here the 8 Knobs can be assigned to parameters common to all sixteen Parts (System Effect, Rev/Var, parameters, Master FX, etc), they can also be assigned to A/D Input and its two Insert Effects, and it acts as the Super Knob Assign area. This means, you can link the movement of any of the 16 Part's Assign Knobs to the movement (and direction) of one of these 8 upper level knobs.
Say you set this COMMON/Audio area AssignKnob 1 to move counterclockwise, max to min; and you set AssignKnob 2 to move normally, min to max. This would allow you link any Knob assigned Part parameter from any Part, to Knob 1 this would cause the parameter to decrease values, and for any values you want to increase movement you would link its Part assigned Knob to AssignKnob 2.
The important point is, when you add a new Part to a Performance, there already exists a setup for the 8 upper Common Knobs - add a Part, new relationships will need to be formed. A Part is joining an already existing layout.
Linking the Part's Assign Knob to the upper level Assign Knob, is fairly easy. And dear I say, is best done as you add the Part. Chaos would ensue if the current setting were just added (as the Knob assignment that already exists would be serendipitously changed) or what you add might be wildly random. Besides you are going to want to ensure what gets changed when you turn that Super Knob.
A maximum of 16 Source/Destination Sets can be created for each Part, and another 16 at the upper Common/Audio area.
Yes the control on this synth is mind bogglingly powerful and all of the possibility is future proof for a long long time. I am a big big big fan! 🙂
So much so that I designed software a few years ago (2011/2012) for my Masters portfolio that is incredibly similar (albeit orders of magnitude more powerful than Montage). In other words, I really like the way it works. It makes sense to me because I've designed software myself that can do exactly what Montage is doing (from control perspective). I am so happy to see such control in a hardware synth, particularly one that has such an impressive sound quality. Some day, when I am inspired to, I will use my software to control the Montage as I have all my other synths. While I look forward to that day, I'm still having so much fun using Montage on it's own! (Most especially with my own Waveforms).
🙂
Posted : 20/03/2017 1:44 pm
Topic starter
Jason, thanks for your reference to that article. BM - your explanations have always been of great assistance, and I have successfully created performances using the Super Knob/FC7 to add/subtract other sounds, so I'm not totally incapable of this, though simple, it's not always.
Following your example above, my only hiccup occurs when trying to locate Destination 11. Once finding this elusive location, should I leave all other destinations in tact?
Posted : 21/03/2017 12:52 pm
Following your example above, my only hiccup occurs when trying to locate Destination 11. Once finding this elusive location, should I leave all other destinations in tact?
Sorry, I should have emphasized using the "AUTO SELECT" function - when green you simply turn the Assign Knobs, one after the other, to change the DISPLAY view - making it easy to find what is assigned to each. This makes it easy to find the different DESTINATIONs (and we were only looking for Knob assignments)
Yes, leave the other DESTINATIONS in tact, I simply wanted to point out that - it is wise to look around, see what else is programmed. Because you may be creating a conflict or inheriting something that just is, well, unfortunate. Some times the PART you want to substitute might have VOLUME assigned elsewhere or to several different controllers...
Posted : 21/03/2017 3:18 pm
To reiterate - when you add a new part you want to control volume using this procedure, this "Destination 11" thing is the end result of a search - not something to begin searching for. You are searching for "Volume" which you may or may not find using a different PART than "Dave's Nu Organ". Incidentally, "Dave's Nu Organ" actually has two controls assigned to Volume: PART Assignable Knob 5 and also [ASSIGN 1] (assignable switch). [ASSIGN 1] doesn't cause a problem because moving the super knob doesn't change [ASSIGN 1] - so only the Assignable Knobs (1-8) need to be turned to find possible conflicts. Also, if a no "Common/Audio" level assignable knob links to the possibly conflicting "PART" level assignable knob - then again there is no contentious conflict. Just two different controls which would offset the volume (one PART assignable knob not controlled by superknob and another PART assignable knob that is). It doesn't hurt to MOVE the PART assignable knob from a non-contentious knob to the one controlled by superknob just to keep the control surface more simplified.
... using a different replacement PART (not "Dave's Nu Organ") and searching for "Volume" - you may not find any of the assignable knobs have "Volume" as a destination. If this happens, you'll want to turn the assignable knob that is linked from the "Common/Audio" system/global assignable knob to the PART level assignable knob (assignable knob #1 for CFX+FM EP) and then press [+] to add a destination for "Volume". The destination number will be anything between 1 and 16 depending on how many destinations your new PART (replacement PART) uses.
... and maybe you do find "Volume" assigned to one of the assignable knobs - but it's not the "Dave's Nu Organ" PART - you're using something else. It's unlikely to be "Destination 11" - you have a 1-in-16 chance of it being "Destination 11". It may be "Destination 3" - who knows. You're searching for "Volume" - and target whatever destination number is assigned to this parameter.
There's no real reason to keep track of what the destination number is for any given assignment except to know how close you are to running out (there are more gory details about destination management - how the keyboard does it - and how you can "figure out" how many destinations you have left - I'm leaving that detail out). Otherwise, the number is just an internally used assignment which has little relevance for you as the programmer.
Posted : 22/03/2017 9:01 am
Topic starter
Thanks BM and Jason, you're a wealth of info and assistance. This is no simple beast! Onward I explore.
Posted : 22/03/2017 2:17 pm

Hi BM,
Im struggling to get the super knob working how I want it to,
I want to do a simple fade between Parts 1-6 and Part 7 in a performance. Ive followed the instructions as far as I can tell.
Two problems I have.
1. I cannot get the super knob to move the assignable knobs
2. I cannot get the FM sounds in the performance to go to a volume level of zero.
I have worked out how to assign volume to the assignable knobs ok, and have set the relative volumes I want to fade between in the performance common page, eg 1 to 66 or 55 to 0 etc etc on different sounds. So I tried muting all other sounds except one of the FM sounds in the performance. When I turn that assignable knob it gets quieter but doesnt go to zero. I had the ratio set to 32 and a linear shape for the volume.
Is there another Im missing? The assignable knob works fine for the organ sound i have in the performance.
Scott
Posted : 30/03/2017 10:39 pm
A bit more info to diagnose one of the issues.
Some of the sounds will change in volume when i turn the superknob, but not with the pedal, superknob itself still wont turn the volume of the fm parts to zero though.
My Pedal which is set to move the super knob, works in another performance which i created, but does not move the superknob in this particular performance, what setting do I change to make it work?
Posted : 30/03/2017 11:24 pm
For the superknob turning assignable knobs, there are two levels of assignable knobs. You must make sure there is a connection from the superknob to the common assignable knob (1st level of connection) - then from the common assignable knob to the PART level assignable knob.
To make the common-level assignment, press [PERFORMANCE] (HOME), then [EDIT], then touchscreen maneuver to the "Control" -> "Control Assign" menu. You should see the menu that looks like this:
The only problem with the picture is "Auto Select" is not highlighted. Make sure yours is not grey (is selected). Then turn any of the 8 assignable knobs to see the destination setting. As you move the assignable knobs, you are moving the common level knobs when looking at this screen. The destinations available are "PART X Assign Y" where X=the part you want to target and Y=the PART-level assignable knob (1-8) you want to "string together" to superknob through this common-level assignable knob you are turning to auto-select. Also, while at this level, do turn the superknob and watch the LEDs for the assignable knobs 1-8 to make sure the common-level assignable knob you are looking to use is directly controlled by superknob and is going full-swing between 0 and 127 (you can determine this visually by the LEDs around the knob - all off - and all on ; although there is another screens you can also see the actual value of all the common-level assignable knobs). If the knob you are targeting is not turning at all - newer firmware lets you disconnect the common-level assignable knob from superknob control - you can check for that under the:
[PERFORMANCE] (HOME) then touchscreen "Motion Control" -> "Super Knob" menu to get this picture:

The super knob link "OFF" and "ON" are what turn off common-level assignable knobs from spinning. Here, you also see the values of the assignable knobs as you spin the superknob. The common-level assignable knob you want to "route" to a PART-level knob needs to a) be "ON" in this menu for super knob link and b) needs to be full-swing from 0 to 127 or 127 to 0 (either way depending on how you want this knob to turn relative to the superknob direction). Notice in the above picture that common-level assignable knob #1 (left most) is ON and has a range of 0 through 127. Common-level assignable knob #2 is turned OFF (from superknob control), Common-level assignable #3 is ON and has a range of 0 through 127. C-L A knob #4 is OFF, C-L A knob #5 is ON - HOWEVER the range of motion is set from 0 to 0. So this knob is not going to turn. Maybe the knob you are targeting also does not have a full range of motion. Worst case is no motion like 0 through 0. You would tap on the knob's "1" (green) and "2" (blue) area values - which in this picture are "0" and "0" - and change to 0 to 127 or 127 to 0 depending on the direction you want the assignable knob to travel relative to super knob direction (clockwise vs counterclockwise).
Incidentally, this is the same screen I was talking about earlier where you could see the current values of the common-level assignable knobs.
That covers the common-level knobs.
Next you would go the PART you want to control the volume (FM part, or otherwise). You should know which PART because you should have made link between the common-level assignable knob (one of the 8) to a destination of "Part X Assign Y" in a previous step. Where PART "X" is the part number you should be editing. When editing the PART - you should traverse to the menu that looks like the following to edit the PART-level assignable knob:
In the above picture the PART that is being edited is PART 5. But this will match PART "X" (the PART you want to change volume) for you. Again, the issue with this picture is that "Auto Select" is not highlighted so it is off, you should have it turned on. In the common-level you made a link between the common-level assignable knob #? (one of the 8) and "PART X Assign Y" assignable knob. You are currently editing PART X, so with auto select turned on, spin Assign "Y" (where "Y" is the part-level assignable knob you linked to in the common-level). This is the destination you set previously. This will bring you to the proper area for editing as shown in the above picture. And this is where the "Volume" destination should be added.
The full picture of the link is:
Super Knob --(linked to, moves)--> Common-level Assignable Knob #? --(linked to, moves)--> PART-level (PART X) Assignable Knob #Y
As far as the volume not going all the down - this is a function of what the level is programmed to be with no offset (output of volume destination as 0, meaning zero offset) and the range of your destination offset values (offset from negative ? to 0). There's lots of flexibility here since there are two interacting settings - the volume programmed setting and the volume offset as controlled by superknob->common-level assignable knob->part-level assignable knob. You could, for example, set (program) the PART volume to 0, then use a positive ramp so your destination is always adding to the programmed value. Then you would likely have the issue (if everything stayed the same) of the PART not able to raise to a high enough value. Your destination has the ability to output an offset of +127 (or -127) for uni-polar curves - and nothing can be higher than 127 or lower than 0. So there's certainly a way to offset the volume so it goes full swing.
Posted : 30/03/2017 11:51 pm
Thanks for the reply Jason,
Ive got it working but think I went the long ay around and couldnt get the volumes to stay low, for some reason they would keep going to 127, so i changed the dry level, but with a bit more trial and error I think I can get it working as explained. Takes some time to set everything up but Im getting a little quicker using the Auto Select feature which is handy.
Cheers
Scott
Posted : 31/03/2017 6:39 am
