

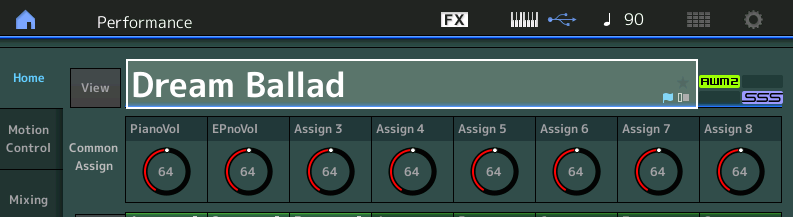
“Dream Ballad”:
- Part 1 – Concert GrandPiano (Acoustic Piano)
- Part 2 – Contempo (Electric Piano)
- Part 3 – Back Ground (Strings)
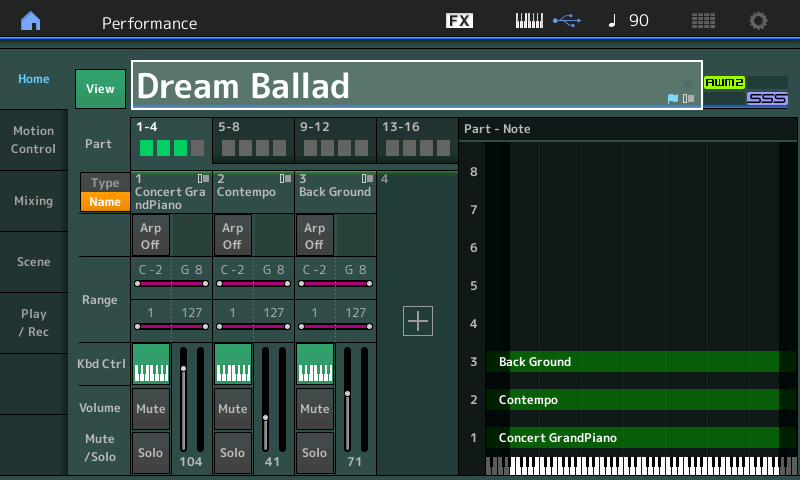
If you have not done so, download the free “MOTIF XF Performance Bank” from the linked article – we have been using this programmed data as starting points to learn about some of the features of the Motion Control Synthesis Engine. This week we’ll use the multi Part “Dream Ballad” Performance to explore MONTAGE functions. This is the quintessential Piano/Electric Piano/and Strings layered sound (Stevie Wonder “Overjoyed”, Hall & Oates, etc.). As you work with this data feel free to substitute PARTS, if you so desire. But the key is to work with the synthesizer as you go through the article. It is designed to navigate you through the architecture, revealing certain specific functions, shortcuts and concepts – so that you are better prepared to customize your own Performance data.
In the MOTIF XF converted version, all Parts play together. In our MONTAGE CONNECT version, we have setup the Super Knob so we can morph between electric and acoustic pianos, starting with a combination of both in the middle. String pad is ubiquitous with negative Part Volume on the MW. You can balance the amount of the string pad sound by positioning the MW, and you can freely morph the acoustic/electric piano balance with the FC7 set to control the Super Knob. Full counterclockwise is the Electric Piano, and full clockwise is the Acoustic Piano. The MW also increases the AUTO PAN Depth on the Electric Piano. When you morph to the electric piano, you can control the amount of string pad (MW), Effects (Ribbon) and, as we’ll see, by selecting the Part, directly, you can control any other selected parameters with its set of custom Assign Knobs.
This is how you should be thinking when you need several instruments that need to be accessed within a single composition. Too often the first thought is to change programs, but one of the strengths of MONTAGE and Motion Control is you can ‘Merge’ Performances so that they contain multiple instruments and that can support the kind of transitions you need to perform. Yes, it requires programming, and that’s why you bought a synthesizer. Multiple sounds with individually customized control.
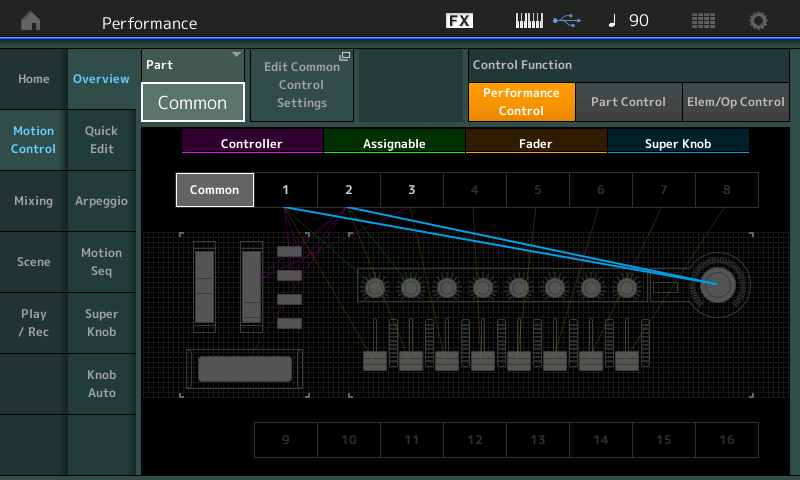
Lets see how this can be approached. Let’s start with the assignable controller OVERVIEW screen.
Overview:
You can get a quick idea of what is going on within the program by studying this view [SHIFT] + [PERFORMANCE (HOME)] = Overview: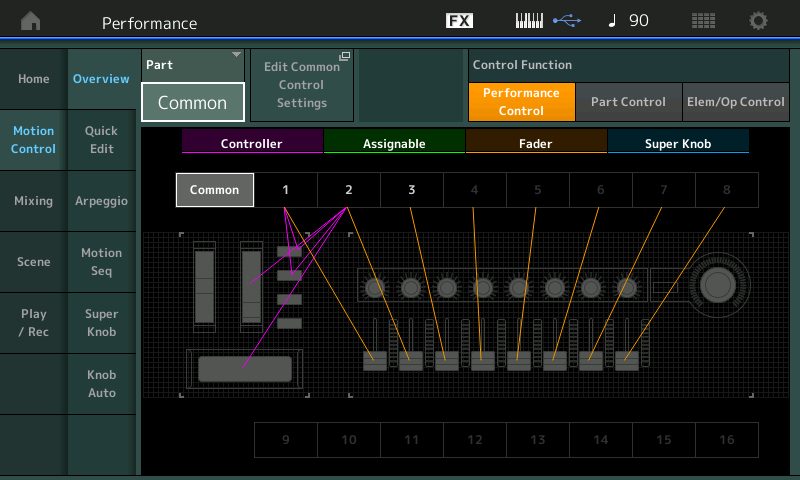
While “COMMON” is selected, the color coded physical devices are shown: the Controller (magenta) indicate Ribbon active to PART 2, MW active to PARTS 2, AsSw1 affects PARTS 1 and 2, AsSw2 affects PARTS 1 and 2. The upper level Common Assign Knobs (green) have yet to be assigned (the MOTIF XF did not have upper Common Assign Knob Function). The Faders (tan) are acting as PART Volume, and the Super Knob (blue) has no assignment.
You can explore each assignment by selecting the active PART 1, 2 or 3, then using the “Edit PART x Control Settings” shortcut box that appears. This will take you directly to the Control Assign screen.
The data was originally programmed for the MOTIF XF, where the Part Assign Knobs were limited to just two per Part, and no Super Knob existed at all; Control Set Source /Destination assignments were limited to just six per Part. You now have sixteen per Part.
At the very bottom of this article, download a MONTAGE CONNECT .X7B file, featuring the edits discussed in this article. This data can be bulked to your instrument’s Edit Buffer. You can see how we have added a few things: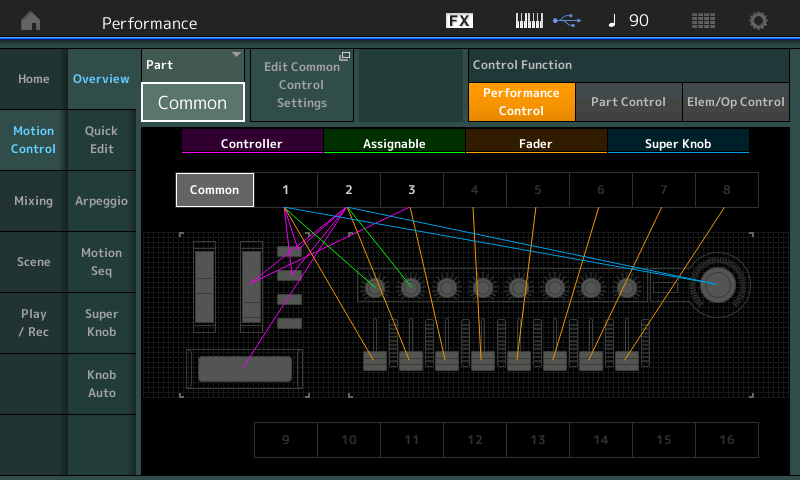
We’ll take a look at these as we go through the article.
How to decipher the OVERVIEW COMMON screen:
If you touch the Ribbon, the MONTAGE will spotlight that assignment. You can clearly see that the Ribbon is interacting with PART 2. If you would like to quickly explore this assignment you would: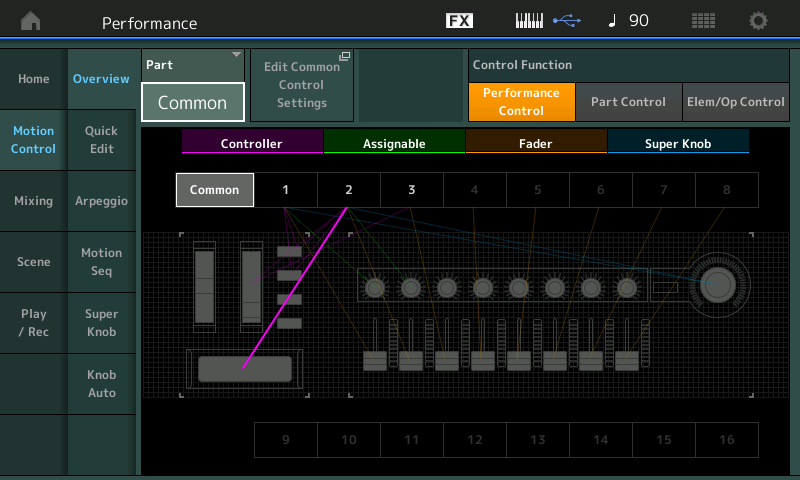
- Set the PART = “PART 2”
This recalls the assignments specific to PART 2. The Controller (magenta) remain the same, but since each PART has its own eight Assignable (green) Knobs, you can expect that this will be different. Below our version has Assign Knobs 1, 2 and 3 interacting with PART 2. The Faders (tan), when PART 2 is selected, become Element Level controls. The Super Knob (blue) is interacting with PARTS 1 and 2: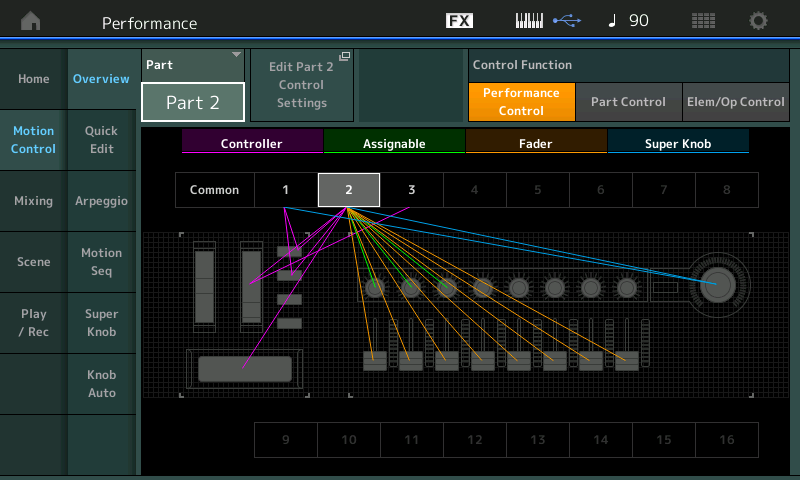
Above you can see the OVERVIEW for PART 2. Touch the box “Edit Part 2 Control Settings” to take the shortcut to the CONTROL ASSIGN screen in PART 2; Activate the “AUTO SELECT” (green) function and touch the Ribbon: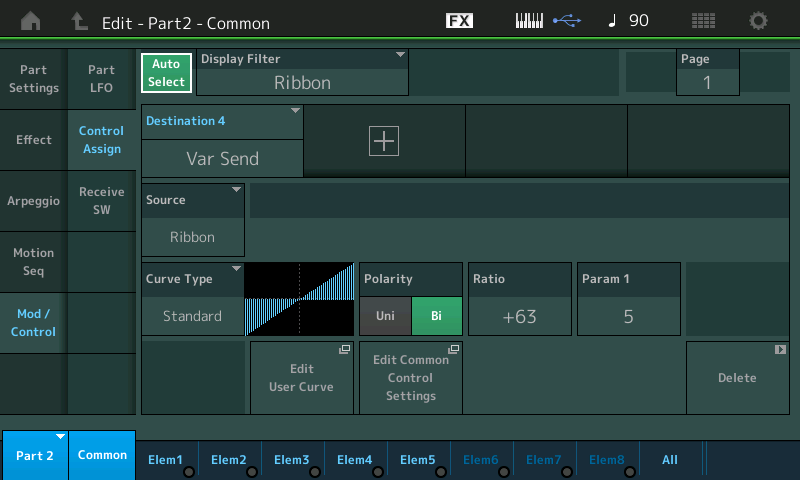
Touching the Ribbon on the right side will increase the VAR SEND (which is a Chorus Effect) and you can reduce the Send by touching the Ribbon on the left side. Set the SEND amount by where your finger is along its length, left-to-right.
- Navigation tip: You can instantly return to the OVERVIEW screen by pressing the [EXIT] button or touching the “return” icon located just to the right of the little house (Home) icon on the very top left of the screen.
Electric Piano crossfades to Acoustic Piano with String Pad in the background – an instant classic. Let’s take a look at the Acoustic Piano in PART 1 and study how it behaves in response to Controller (Super Knob) movement.
Foot Controller 2 = Super Knob
Our first edit in adding MONTAGE functions to a MOTIF XF Performance would be to retask the Foot Controller 2 to act as our surrogate SUPER KNOB. Although all of the Factory Performances in the MONTAGE feature the Foot Controller 2 set to the Super Knob, the converted MOTIF XF Performances wouldn’t because the XF did not have a Super Knob.
In playing keyboard oriented sounds, often you will want to keep both hands engaged on the keys while you switch instruments and/or transition the sound using a Yamaha FC7 pedal with its ability to move multiple parameters. By navigating to the PERFORMANCE EDIT > uppper [COMMON] > “Control” > “Control Number” screen, you can assign Foot Ctrl 2 = Super Knob: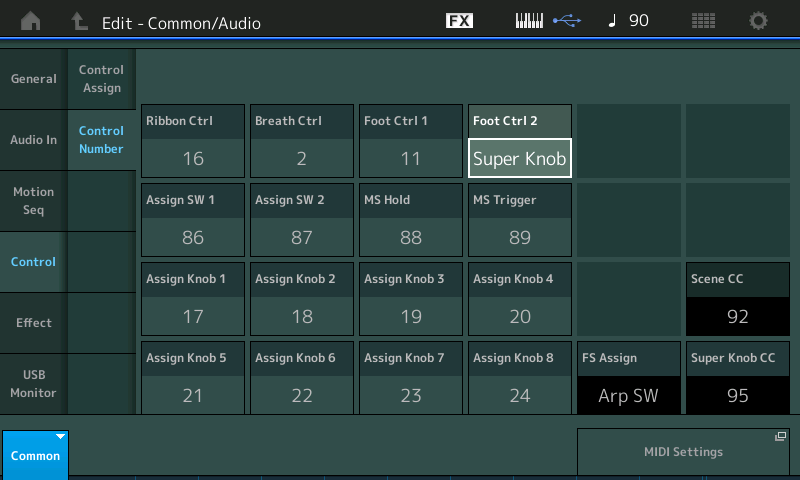
While in [EDIT], lets navigate to PART 1 (Acoustic Piano: ConcertGrandPiano):
- Press the upper [SOLO] button
Using the SOLO button not only isolates the one PART we want to concentrate on, but it allows us to use a single “Select” button to move between PARTS:
- Press [PART SELECT 1] this will isolate just the “Concert GrandPiano” in PART 1
- Touch “Mod/Control” > “Control Assign”:
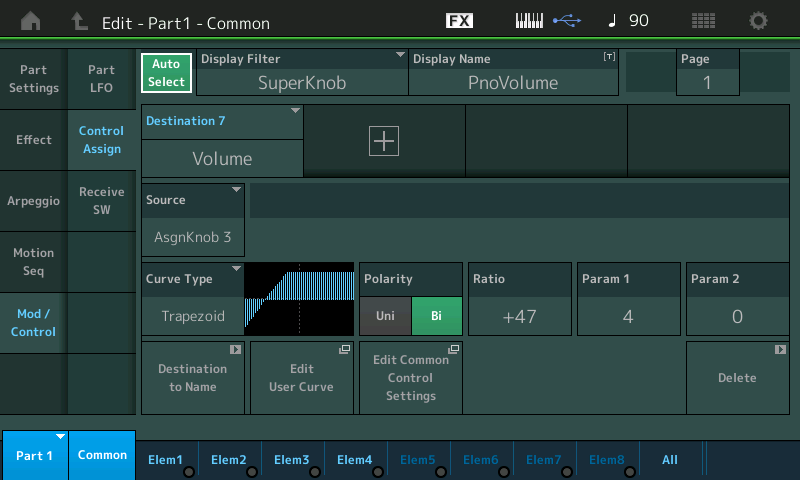
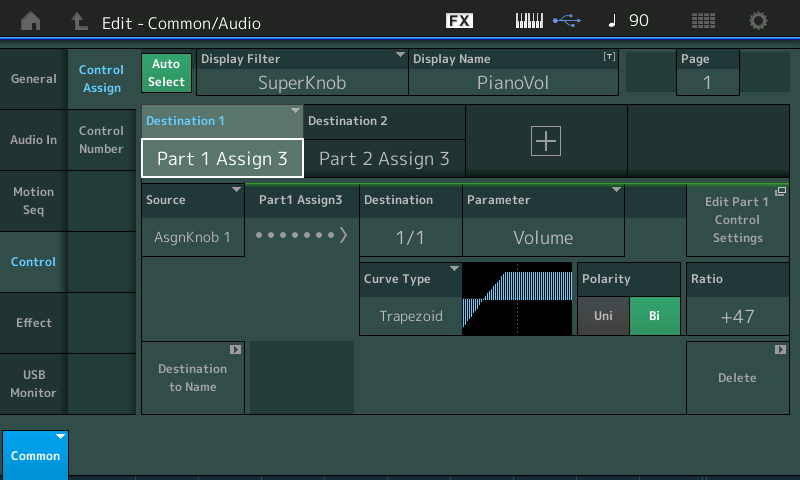
- With “Auto Select” active (green) physically touch the Super Knob to view what is assigned to the physical control.
Although the FC7 pedal can act as the Super Knob, it is not the same as physically moving the Super Knob itself when it comes to the Auto Select “learn” function. Reading the CURVE (left-to-right), you can follow the VOLUME response of the acoustic piano. The acoustic piano begins at silence and fades in as the controller is increased, once it comes in, it remains in.
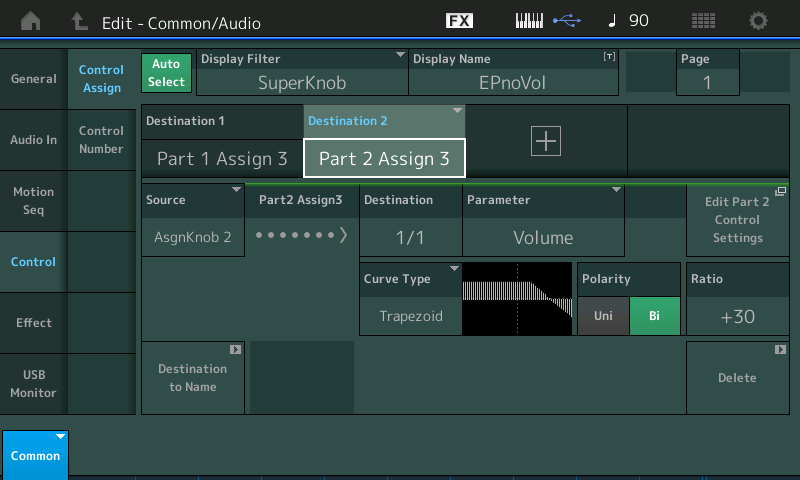
- If you now press [PART SELECT 2] you will be soloing the electric piano sound and viewing its Control Assign screen:
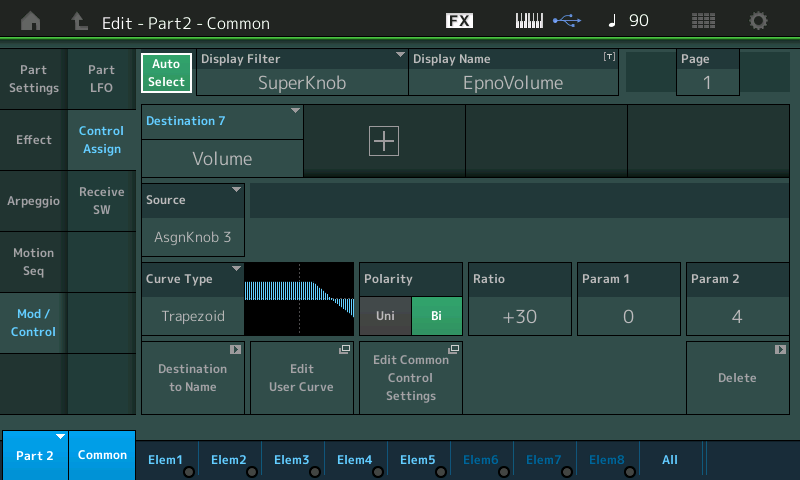
You can see (and hear) how as you move the Foot Controller heel down toward toe down – which is the same as turning the Super Knob from minimum to maximum – the electric piano is in initially, and fades out as the controller is increased.
You are starting with no acoustic piano and fading it in – where it will join the electric piano; they both remain sounding until finally the electric piano fades out leaving just the acoustic. This is a modified TRAPEZOID shape. We are using PARAM 1 and PARAM 2 to ‘shape’ or reshape the Trapezoid to create this situation.
The best way to learn about controlling the PART Volume with the Super Knob, is to experiment with a single Part, first. Begin to understand how the CURVE, POLARITY, RATIO, and PARAMETER 1/2 (shapers) work together to apply the change in volume, you learn by doing.
Let’s review these parameters. The starting default is a “Standard” Curve, “Uni” Polarity, “+32” Ratio, and “5” for Param1. The “Standard” is your basic steady increase or steady decrease, similar to controls on your standard synth. Don’t be afraid to branch out and experiment. For Curve we’ve selected the “Trapezoid” shape. The “Polarity” determines how the control behaves. Basically is it one direction and back (UNI), or can it be both increased or decreased (BI).
Uni
You will apply, minimum-to-maximum, a controller to increase the setting from the stored value, returning the controller to minimum will restore the starting value. If the “Part Volume” is stored as 0, then the position of the Controller determines the volume, minimum to maximum. If Part Volume is stored at 127, then there will be no increase or decrease in volume, as you cannot increase Volume beyond the 127 maximum. If Part Volume is stored in between, say 104, then this configuration sets 104 as the minimum, increasing the controller will increase volume, and when you return the controller to minimum it returns to output level equivalent to a setting of 104.
Below: CURVE = Trapezoid, RATIO = + positive value: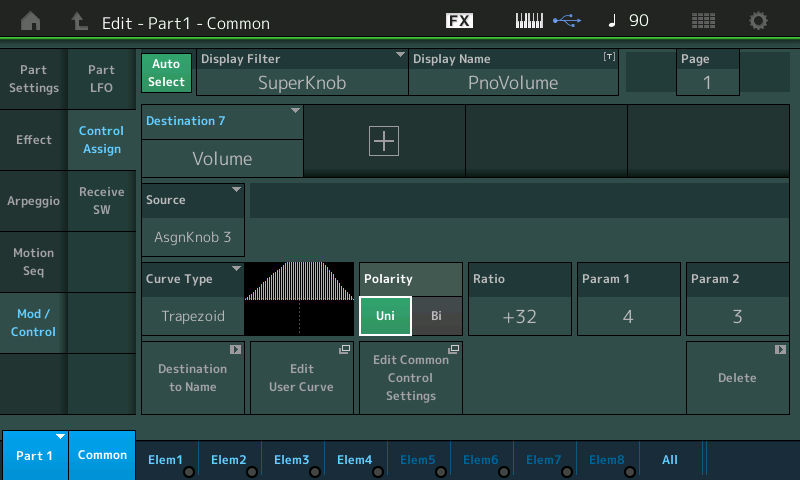
Turning the Super Knob from minimum to maximum and back, increases from the initial stored volume and back to the original Volume setting. “Part Volume” is the setting that determines the overall volume for this PART: In the PART 1, the stored PART Volume is 104, so when Polarity is “Uni”, you can turn up and back to Volume equivalent to the value of 104. You can get louder than 104 but you will not be able to reduce the PART Volume below what a setting of 104 would allow. When UNI is the “Polarity”, think of the stored value as the ‘minimum’ Output allowed.
Bi
When storing a parameter at a particular value, and you want to be able to both increase and decrease it from that stored value. Try switching to Polarity = “Bi”: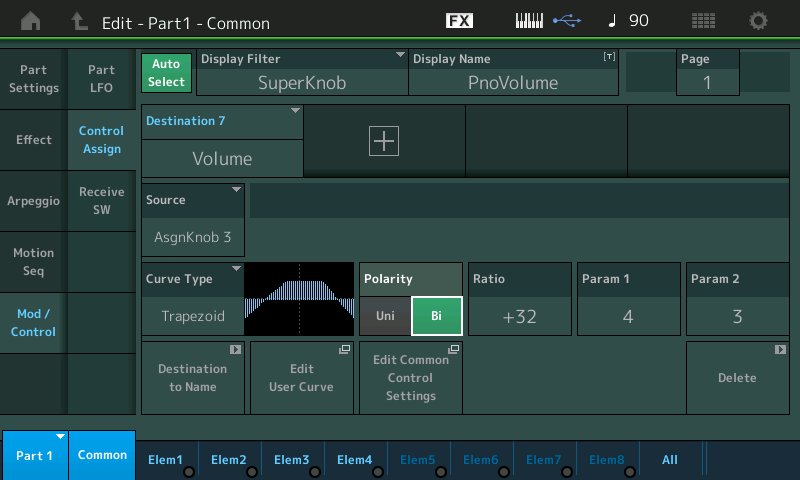
You begin to understand that the volume here can be reduced at the extremes. With this shape the Piano is almost silent when the Super Knob is at minimum and the Volume is loudest in the middle and it reduced as the Knob reaches its maximum. Notice that as you increase the RATIO higher than +32, it increase the volume in the middle and reduces the volume at the extremes. If you wish to have the piano completely silent when the Super Knob is at minimum, you would set the RATIO to a higher positive value, by ear. When the “Curve Type” allows there may be two additional “Parameter” shapers. These will allow you to alter the shape of the Curve. We started with the default Trapezoid and by using the PARAM 1 and 2 settings we were able to create the Electric Piano to Acoustic Piano movemnet that is “Dream Ballad”.
The PART VOLUME is the Part COMMON parameter that is represented by FADER (and its red LED indicator):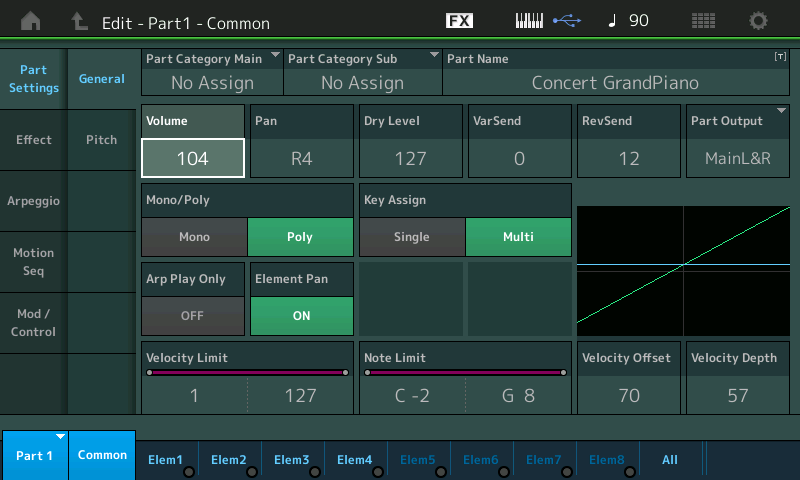
COMMON ASSIGN KNOBS and PART ASSIGN KNOBS
Here let’s take a look at what is available on the 8 Rotary Encoders and when they are available:
- When you select [COMMON] (the upper Common) – as on the “HOME” screen, if the [ASSIGN] button is lit, you will see the Assign Knobs illustrated in the screen. These are automatically linked to the Super Knob movement:
Above: The Piano Volume is shown on Assign Knob 1 and the Electric Piano Volume is shown on Assign Knob 2. When you move the Super Knob, observe the reaction of the COMMON ASSIGN Knob icons. Both Knobs 1 and 2 move together in tandem with the others and the Super Knob – indicating that we are applying some change to these two paramters:
- In the COMMON view of the OVERVIEW screen, you can see the Super Knob (blue) and its relationship with PARTs 1 and 2:
- Press the “Edit Common Control Settings” button to see how on the COMMON level the Assignments are made:
Here you can see Source AssignKnob 1 (left) is controlling PART 1, via Assign Knob 3, Volume; While Source AssignKnob 2 (right) is controlling PART 2, via its AssignKnob 3, Volume.
As you explore each PART, you can see how it is interacting with its controllers. When [PART SELECT 1] is selected, the screen Knob icons reflect the eight Assign Knobs for PART 1: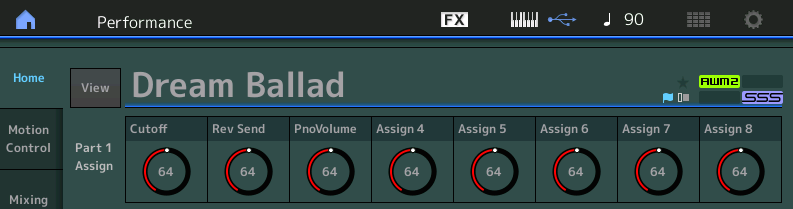
You can view the “nicknames” that have been given to the first three PART 1 Assign Knobs: Cutoff, Rev Send and PnoVolume. On the CONTROL ASSIGN screen you can give a “Display Name” for each Knob assignment, if you wish.
Turning the Super Knob while viewing the “Part 1 Assign” as shown above, will reveal that it is Assign Knob 3 which is linked to the Super Knob movement.
To see these assignments, from the OVERVIEW screen, touching the shortcut box will take you to the related PART CONTROL ASSIGN screen: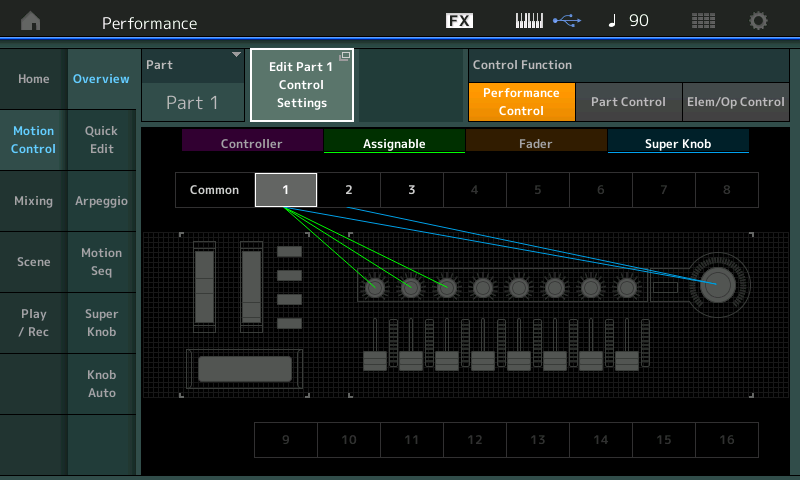
The PART Assign Knobs should be used for any parameter you would like to have real time access to when you select that PART. Then you can consider which of these needs to be linked to the Super Knob movement. You do so by considering whether it will benefit you while performing to have this parameter available. There are parameters you want to “set and forget” and there are those you want real time interaction with – these are going to be your choice.
Select PART 2 (the electric piano). The screen shows “PART 2 Assign” Knobs called “InsB LfoSpd”, “KeyOff” and “EpnoVolume”. This translates to individual real time control over the INSERTION EFFECT “B” (Auto Pan) L/R Low Frequencey Oscillation Speed; The Electric Piano’s KeyOff sound can be mixed up or down for effect; and a Knob (Knob 3) that is linked to the Super Knob position: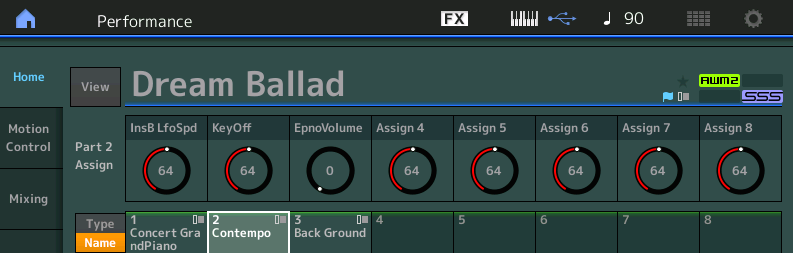
When the Super Knob is at minimum (your FC7 is fully heel down), you will be playing the “Contempo” Electric Piano sound, with the String Volume based on the position of the MW. You can fade the strings down by raising the MW. As the MW is increased so will the L/R Auto Pan of Insert B. So you can get a very pronounced PAN EFFECT with the MW all the way up; you can control the speed of the Left-Right movement with PART 2 Assign Knob 1 (InsB LfoSpd).
Enjoy!
Want to share your thoughts/comments? Join the conversation on the Forum here.
Missed some of the other MONTAGifying MOTIF lessons? Catch up here.