

Whether you have an MX49/MX6 BK/BU/WH or MX88, this article is for you. We’ll use the 49/61 as the example. Let’s get started!
Macintosh OSX: Launch Cubase
If you have multiple ASIO audio drivers installed on your computer, you may see a screen that allows you to select which driver you wish to use. Cubase, unlike many DAWs, allows you to “hot swap” ASIO drivers mid-Project. That is, you can switch drivers without having to close down and re-launch Cubase – you simply switch drivers. This is very convenient when more than one of your devices can act as an audio interface:
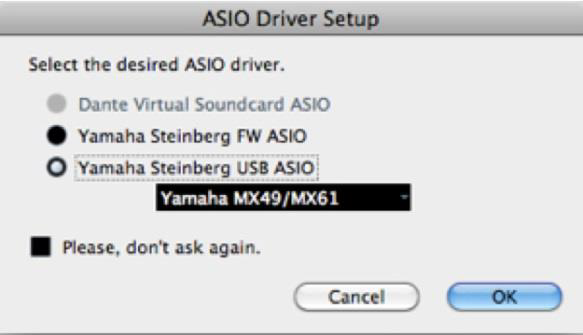
Shown, above, is the ASIO Driver select screen on a Mac OSX. Note: If you have not downloaded and installed your MX items yet or if you don’t know what to download, please go to this article before proceeding here: Yamaha MX and Your Computer.
MIDI PORT SETUP
On the Cubase Menu Bar go to:
DEVICES (called “Studio” in Cubase series 9) > DEVICE SETUP (called “Studio Setup” in Cubase series 9) > MIDI > MIDI PORT SETUP
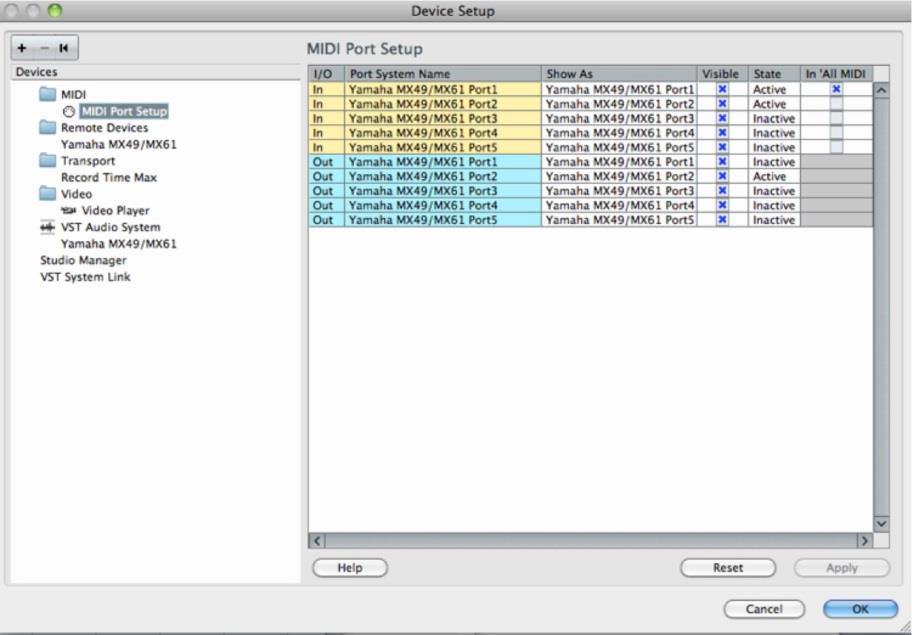
The column labeled “In ‘All MIDI Inputs'” should have the “Yamaha MX49/MX61 Port 1” marked with an ‘x’. This will make the MX the default input device for recording data to MIDI Tracks within Cubase. The others should remain unmarked. If you are using an alternate MIDI controller you can connect it to the MX via its 5-pin MIDI jack. You then would mark “Yamaha MX49/MX61 Port 3”. Port 3 is the so-called MIDI THRU port as any device connected will send its data through the MX directly to the computer via PORT 3.
The column labeled “STATE” is a status report of what is being used currently. You do not make a setting in this column. Rather it reflects the current status of your MIDI Ports – whether they are in use or not:
– MIDI Port 1 – is always for musical performance events like note-ons, controllers, and tempo.
– MIDI Port 2, as we will discuss next, is for Remote Control functions.
– MIDI Port 3, is for any external device connected to the MIDI jacks while you are setup for USB.
– MIDI Port 4, is not used.
– MIDI Port 5, is for the MX REMOTE EDITOR (which lets you create custom control templates for VSTi).
REMOTE DEVICES
Move the cursor down to the REMOTE DEVICES folder. Here you can see that USB Port #2 is setup for Remote Control communication between the MX and Cubase. You can understand that above we setup PORT 1 for communication of MIDI data to be recorded to a MIDI Track (Note-ons, Controller movements, Tempo, etc.), now we are setting a separate Port on which to communicate Remote Control commands. These must be kept completely separated from our musical performance commands.
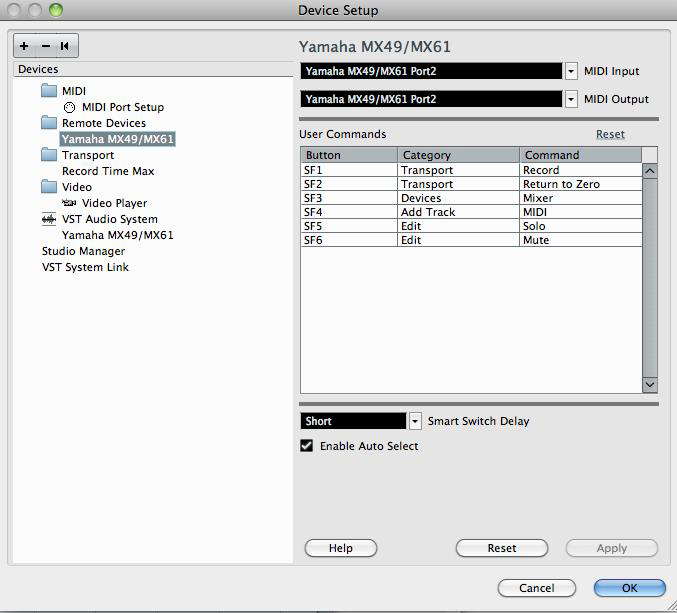
You will notice that in the screen shot (above), I have additionally assigned some COMMANDS to the Cubase USER COMMANDS Buttons. You can customize these as you desire. But for now, lets just state that the REMOTE DEVICES setup here will allow you to use the front panel of your MX to control functions within Cubase. This is very useful when you are trying to concentrate on playing and don’t want to have to CLICK and then find a place to put the mouse down during the count-in – you simply want to get ready to play. This is something you’ll really appreciate later!
REMOTE mode is activated on the MX by pressing the [DAW REMOTE] button. At that point the front panel buttons are retasked to control functions of the selected DAW. In addition to a control template for Cubase, you will find templates for Sonar, Digital Performer and Logic.
The items written below the bottom row of buttons (9-16) with the white background are the DAW REMOTE functions. These include selecting the function for the DATA WHEEL/AI KNOB, Controlling external VST instruments, activating Automation, a Delete function:
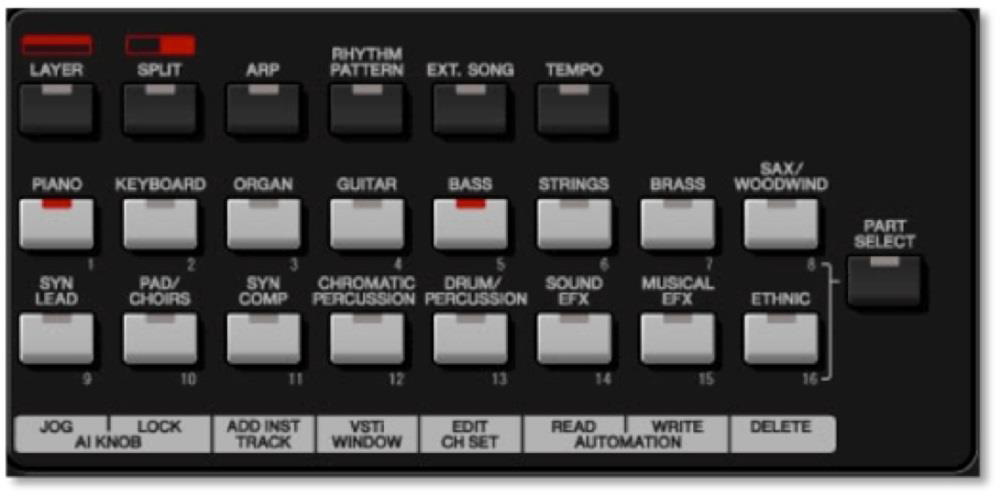
The top row buttons [1]-[8] feature button [1] and [2] which will increment/decrement through your VSTi when setting up to control external VSTi. While buttons [3] through [8] translate as follows:
– [3]/Organ = Cubase COMMAND key [SF1] – I have it setup to be my RECORD Button.
– [4]/Guitar = Cubase COMMAND key [SF2] – I have it setup to be my RETURN TO ZERO.
– [5]/Bass = Cubase COMMAND key [SF3] – I have it setup to open the Cubase MIXER.
– [6]/Strings = Cubase COMMAND key [SF4] – I have it set to ADD a MIDI Track.
– [7]/Brass = Cubase COMMAND key [SF5] – I have it set to be my SOLO button.
– [8]/SaxWoodwind = Cubase COMMAND key [SF6] – I have it set to be my MUTE button.
What can you select to assign to these six buttons? The answer is truly, what can’t you. Cubase allows you total flexibility in assigning parameter to these Sub Function buttons – please see the Cubase Documentation for more details on items that are available.
VST AUDIO SYSTEM
Up until now we have been dealing with the MIDI side of the Yamaha Steinberg USB driver. Both musical performance communication (Port 1 and 3) and DAW remote control communication (Port 2) are functions of MIDI data. The VST AUDIO SYSTEM deals with how audio is going to move from the MX to your computer (Cubase) and how audio recorded in the computer is routed back to the MX and then on to your speakers.
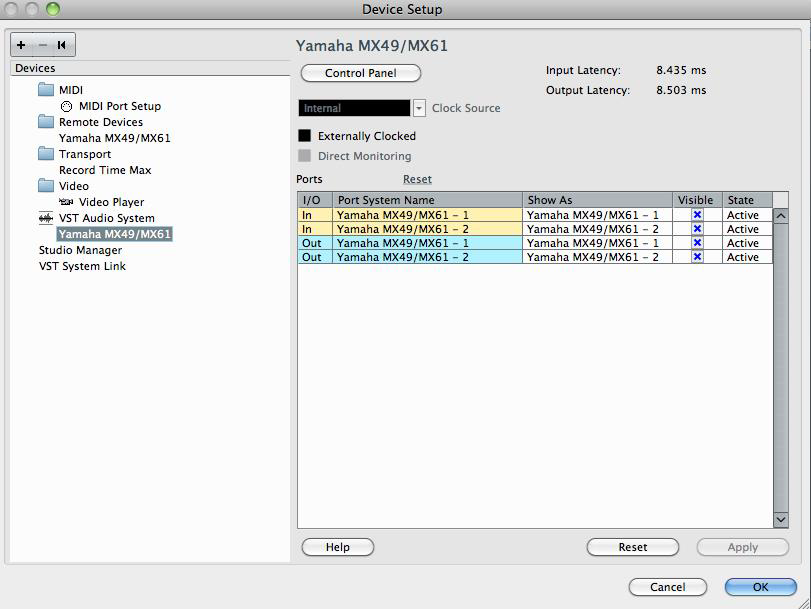
Typically, you are asked when you first launch Cubase what audio interface (ASIO Driver) you are going to use. If ever you have to select it manually – this is where you find it: in the VST AUDIO SYSTEM option.
Again you see a column labeled “STATE”, and again you do not set or change anything here. It is simply informing you that, indeed the Yamaha MX49/MX61 is communicating both AUDIO INPUT and AUDIO OUTPUT (the 1 and 2 here refer to Left and Right audio channels in a stereo setup).
Click OK.
You now have moved through the items you need to setup in Cubase > DEVICES > DEVICE SETUP. Next we will install the MX49/MX61 VOICE LIST for CUBASE.
IMPORTING the “MX49/MX61 VOICE LIST for CUBASE” into MIDI DEVICE MANAGER
This item contains a list of the VOICES found in your MX (file type = .XML), and will allow you to use the Cubase MIDI Track Inspector to conveniently select Voices by CATEGORY directly on each Track. Download and unzip the file to a known location on your computer. You will need to navigate to this file and IMPORT it into the Cubase MIDI Device Manager.
Go to DEVICES (called “Studio in Cubase series 9) > MIDI DEVICE MANAGER
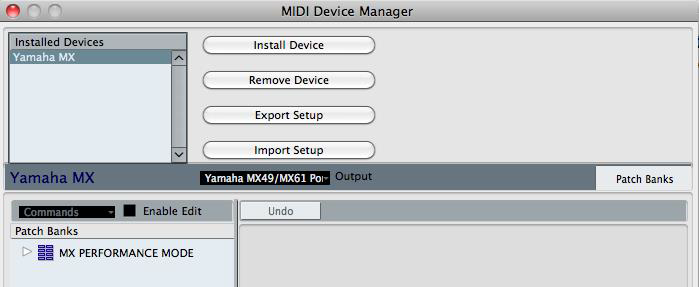
– Click on “IMPORT SETUP”.
This will open your navigator:
– Direct it to the .XML file that you downloaded (Voice List for Cubase).
– Select it.
– It will appear in the “INSTALLED DEVICES” column.
– Highlight it in the “INSTALLED DEVICES” column and set the “OUTPUT” window to “Yamaha MX49/MX61 Port 1” (the music port).
 You have now installed the MX MIDI Device called: “Yamaha MX”. What this means is now is when you are setting the MIDI OUTPUT for a TRACK, you will select this installed device – it will in turn address the MX via Port 1. This way when you select a Voice from the List, it will automatically send that information on PORT 1 to the MX and change the VOICE.
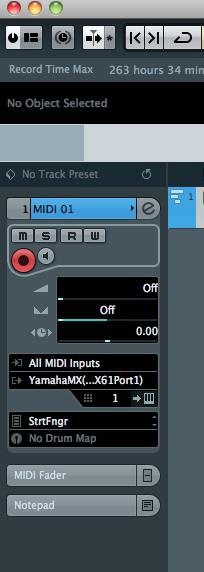
Here is how you select a MIDI OUT. We’ll jump ahead here a bit and talk about how this XML file will allow you to select VOICES conveniently for each MIDI Track you assign to the MX49/MX61.
You can create a MIDI Track by either going to PROJECT > ADD TRACK > MIDI TRACK or you can right click in the appropriate column of the main Project window and select ADD MIDI TRACK.
When the Track appears you will see the MIDI IN by default is set to “ALL MIDI INPUTS” (which if you recall we setup to the MX’s music port).
The MIDI OUT needs to be set to the MIDI DEVICE we just INSTALLED: “Yamaha MX”.
Click on the MIDI OUT space and see the options. You will see the five MIDI PORTS of the MX listed at the bottom of the list – but you will also see the MIDI DEVICE MANAGER item we just created listed separately. Select this “Yamaha MX”.
Just below the MIDI OUT setting on the Track Inspector is the MIDI Channel. You will need to create a new MIDI Track for each PART you want to record using the MX tone engine. As you add additional track they will increment the MIDI channel – but you are free to change it as you desire.
Just below the MIDI Channel, is the VOICE Select function of the MX VOICE LIST we installed in the MIDI DEVICE MANAGER. Here you can click and search through the Voices of the MX and double click a NAME to assign it to the Track.
If you click where it indicated “OFF” the MX Voice List will drop down and you can select a VOICE for this Track.
Go for it!
Have questions or want to discuss your experiences? Join the conversation on the Forum here.