

MONTAGifying MOTIF: “Piano Electro”
It is the MOTIF XF Library that forms the core of the MONTAGE sound set. MONTAGE contains all 1354 Motif XF VOICES as Single PART Performances. Additionally, most of the 7881 MOTIF XF Arpeggio Phrases can be found among the 10,000 MONTAGE Arpeggios – therefore it is possible to recreate almost any of the 4-Part Performances found in the MOTIF XF. These Performances were a way to “jump start” your own original compositions. By “merging” the identical four Single programs into a MONTAGE Performance, we can recreate the XF Performance, “Piano Electro”. We can use this as a launching point to learn about how MONTAGE handles Part and Common Assign Knobs, how we can decide on and add Super Knob control of certain parameters and how we can expand on the now classic Performances of the MOTIF XS/XF and MOXF. Taking this older content to the next level by adding many levels of deep realtime parameter control is where MONTAGE excels. This control, coupled with the higher fidelity Pure Analog Circuit D/A conversion, improved on-board DSP, the FM-X synthesis engine and integrated multi channel USB Audio and MIDI connectivity is what is added to MOTIF XS/XF and MOXF content when imported into MONTAGE. We call this conversion process “MONTAGification”.
Piano Electro
4 PARTS; Each of the PARTS existed as individual Motif XF VOICES, they are found in the Factory Preset Bank as Single (green) Part Performances. This is why we can use a MONTAGE CONNECT .X7B Bulk File, (download found at the bottom of this article), to distribute this Performance.
PART 1 – Drums: Hip Hop Kit 1 (Arp)
PART 2 – Bass: Analog Bullet Bass (Arp)
PART 3 – Piano: Natural S6
PART 4 – Pad: Brass Motion Pad
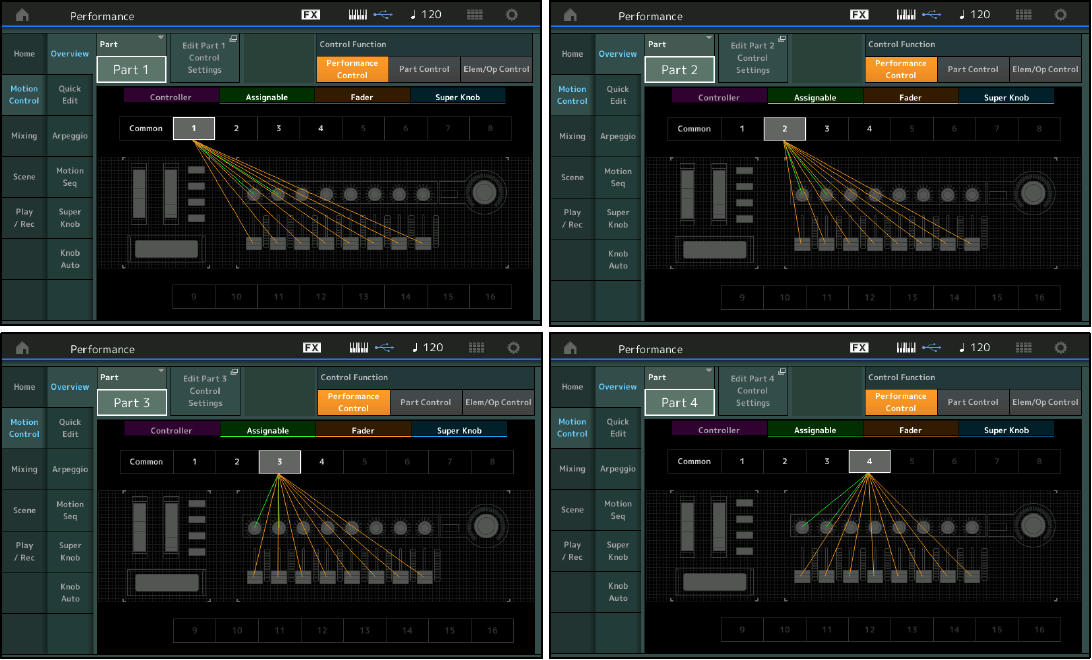
The OVERVIEW screen ([SHIFT] + [HOME]) will show you how Controllers (purple), AssignKnobs (green), Faders (tan) and the Super Knob (blue) are setup. Each purple line (Controller) indicates a Source/Destination assignment to a physical controller. In the Motif XF you had the “CTRL SET” where you could make your controller assignement. Each XF Voice had six Control Sets. As we will see, each PART now can have sixteen Control Sets:

Ribbon – sends the Drums to Variation Effect (G Chorus). As you move and hold your finger toward the right side of the Ribbon you increase the VAR SEND (Variation Send) amount for PART 1. It also changes the filter cutoff for the piano in Part 3.
MW – increases REV SEND (reverb Send) for the Drums, filters highs from the Bass, sends Piano to the Variation (G Chorus), add PMD to the Pad
AS SW1 – sends Bass to the Variation, increase Reverb on the Piano, and dramatically opens the filter on the Pad
AS SW2 – lowers the level of arpeggiated Bass Osc1 and boosts Osc2 adding bite to the Bass sound; Coarse tunes the slowly sweeping portion of the PAD
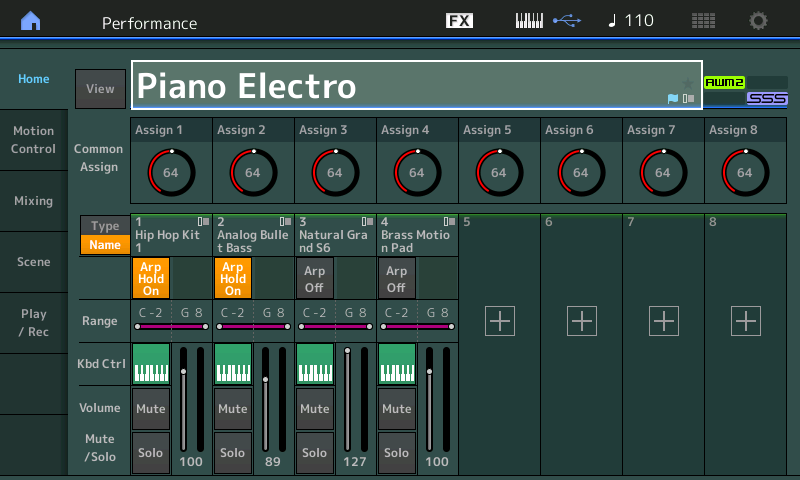
In the screenshot above ”COMMON” is selected. Notice, currently, none of the COMMON Assign Knobs are engaged.
We will separate our discussion of the Assign Knobs from the above common controllers because the above controllers work at all times – it does not matter which PART is selected at the time – the Ribbon, MW, Assign Switches are active whether “Common” or a “Part” is selected. However, the PART Assign Knobs (each PART has its own 8) will work only when you select the specific PART. If you were to change the Overview setting from “Common” to PART 1, PART 2, PART 3 and then PART 4, you would see that each of the PARTS has its own relationship with the Assign Knobs 1 and 2, and that instead of the FADERS each controlling a PART, all eight FADERS are controlling levels within the selected PART. (See four screenshots below).
AsKn1 – Increase REV SEND (Reverb send) amount for Drums, slows the Filter EG (Attack) for the Bass; increases the GAIN on the High-Mid EQ on the Piano; Coarse tunes the Pad sound down by an octave
AsKn2 – Increase/decrease VAR SEND amount for Drums, increase/decrease Filter EG (Decay1) for the Bass; KeyOff Noise on Piano; increase/decrease Element LFO Filter Modulation Depth
(We will cover the AssignKnobs in depth below. In the XF, there were but two Assign Knobs per Part, in order to activate the Knobs you needed to SELECT the Part. You did so by pressing the [PART SELECT] buttons and then the parameters that you selected would appear. This works exactly the same in MONTAGE, except you have eight Assign Knobs per Part. To activate the PART’s Assign Knobs you press the [PART SELECT] button associated with that PART. Its data will appear written over the Knob icons in the screen. Later we will see how you can select certain of the individual assignments to be linked to the SUPER KNOB. This will allow you to change the Drums, Bass, Piano and Pad as you desire with a single gesture. Instead of having to individually select a PART in order to move its parameters, you can link them to the upper COMMON ASSIGN KNOBS, which are directly controlled by the SUPER KNOB. This means you have access to them across multiple PARTS and you do not have to *select* the Part to change it – items assigned to the Super Knob are always available whether you’ve selected the Part or not. We will see and hear that happen).
At present there are no Knobs assigned on the upper Common level of the architecture – after all, the Motif XF did not have this capability to Assign Knobs across multiple PARTs. The upper Common/Audio level of editing is where the Super Knob can be linked to its 8 Common Assign Knobs.
The first five Scenes feature Drum Arps and Bass Arps, as programmed in the Motif XF version of this Performance (there were but five Scene and ARP buttons in the XF). We’ve added the following three Scenes, to provide direct play only (no Arpeggio) to the non-arpeggiated PARTS:
– Scene #6 features just the Piano + Pad.
– Scene #7 is just the Piano.
– Scene #8 is just the Pad.
SCENE #6
Natural S6 + Brass Motion Pad – The Yamaha S6 is a 6’9″ Acoustic Grand Piano that has a smokey, woody, stately tone – this character lends itself well to situations where it is layered with a “synth pad” sound. In this Performance, PARTS 1&2 are under Arpeggio control; while the direct control PARTS, 3&4, make for a great chordal play combination. In this Scene the Arpeggio Parts have been MUTED. Velocity here not only increases the output of the piano, as you would expect, but notice how velocity is directly affecting the amount of movement in the Brass Motion Pad’s Filter Cutoff. The harder you strike a chord the more movement in the Filter.*
*Scuba diver note: Each AWM2 Element has its own Filter. Filter response can be dynamically controlled by Velocity – both Cutoff and Resonance parameters can be directly influenced by Velocity input. You can see the FILTER by navigating to the ELEMENT edit and exploring the “Filter”. Velocity is not a controller found in the SOURCE/DESTINATION “Control Assign” area, rather Velocity, is found within the AWM2 and FM-X engine where it is applied. You will find it can be assigned to Pitch in the Oscillator, to Timbre in the Filter, and to Output level in the Amplifier. These are so fundamental throughout the synthesizer, Velocity is not listed among the controllers you find in the “Control Assign” area.
From the HOME screen touch or press [PART SELECT 3], you will see the ASSIGN KNOBs for PART 3. (”Part 3 Assign“ close-up):
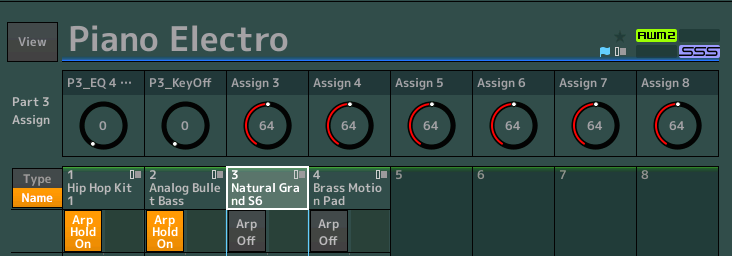
Assign Knob 1 and 2 are active in Part 3. (Because this was imported from the Motif XF, there are only two Assign Knobs. Later in this tutorial we will cover how to add your own assignments).
ASSIGN KNOB 1 is nicknamed “P3_EQ 4 Gain” this is High-Mid Gain for the piano (Part3). Notice how you can brighten the piano tone by increasing AssignKnob1. This will work while PART 3 is selected.
ASSIGN KNOB 2 is doing the amount of level for the “P3_KeyOff” – the Key Off noise in the piano, while PART 3 is selected.
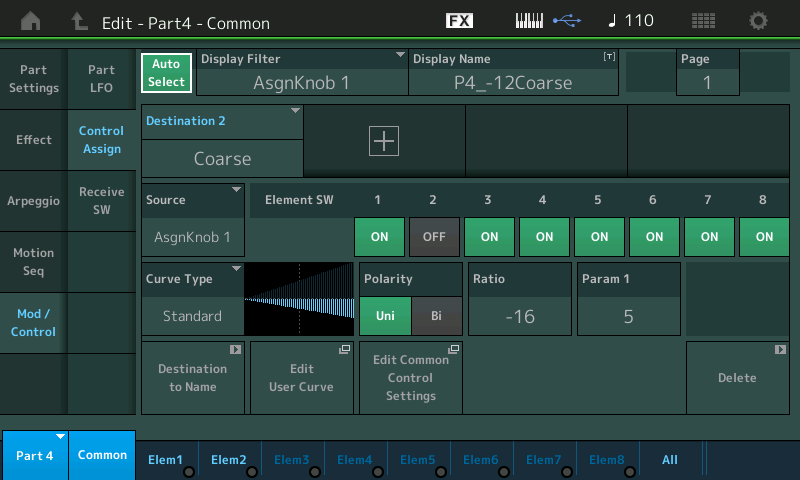
Touch or press [PART SELECT 4], you will see the ASSIGN KNOBs for PART 4:
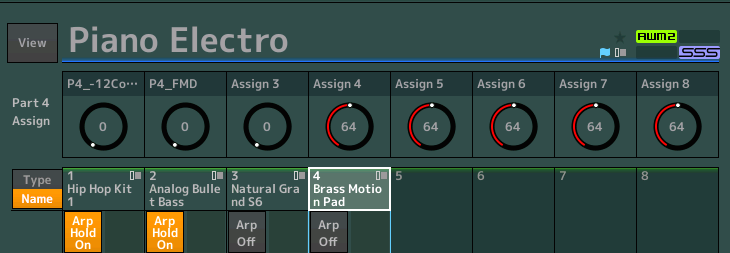
ASSIGN KNOB 1 is nicknamed “P4_-12Coarse” because turning this all the way will drop one of the two Oscillators of the PAD sound by an Octave. You will hear the Element (Elem1) in your left speaker smoothly drop one Octave, while the other Element (Elem2) right speaker, stays at original keyed pitch.
ASSIGN KNOB 2 is nicknamed “P4_FMD” because turning this knob will add/increase Filter Modulation Depth. This is assigned to control the Element Low Frequency Oscillator by applying it (Depth is always about actually applying the change). Here you hear the LFO opening and closing the filter at a fixed rate.
HINT: You can see how Assign Knob 1 of PART 4 (the smooth octave drop) is a candidate for Super Knob control – you might want to keep both hands on the keyboard to play the “Brass Motion Pad” and use the FC7 (Super Knob) to implement the pitch movement. We’ll come back to that in a moment.
EXPERIMENT 1
Lets work with the BRASS MOTION PAD sound, Part 4, which is using ASSIGN KNOB 1 for Coarse tuning an Octave drop, and ASSIGN KNOB 2 for Filter Modulation Depth. To see how this works, add an ASSIGN KNOB to control the Filter Modulation Speed:
Press [PART SELECT 4]
You can see the “Part 4 Assign” Knob assignment nicknames appear
Press [EDIT]
Press the lower [COMMON] button or touch “Common” in the lower left of the screen (both “Part 4” and “Common” will appear blue)
Touch “Mod/Control” > “Control Assign”
Activate the “AUTO SELECT” box (green) so that the DISPLAY FILTER will change to show us the controller’s assignment when we touch it.
Turn ASSIGN KNOB 1 to recall the COARSE tune assignment. It is showing a graphic that as you increase (left to right) the value will decrease:
Turn ASSIGN KNOB 2 to recall the E.LFO FMD assignment. See how it is able to be increased or decreased from the stored value by turning the Knob left or right from the 12 o’clock position.

Turn ASSIGN KNOB 3 (it will be blank, as mentioned the Motif XF had but two Assignable Knobs available, we now have 8 Assign Knobs per PART). Touch the “+” to ADD a new assignment Destination (Destination 7 appears – the Motif XF had but six Source/Destination Control Sets, we now have sixteen such setups per Part and another 16 on the upper COMMON level of editing)… the default (first parameter) appears “InsA EQ 1 Freq”… touch the parameter box to see a list of all the parameter options. They are divided into those that apply to the PART’s two Insertion Effects “A” & “B”, Part Parameters, and Element Parmeters.
Select “Element” > “E.LFO Speed” > Press [ENTER]:
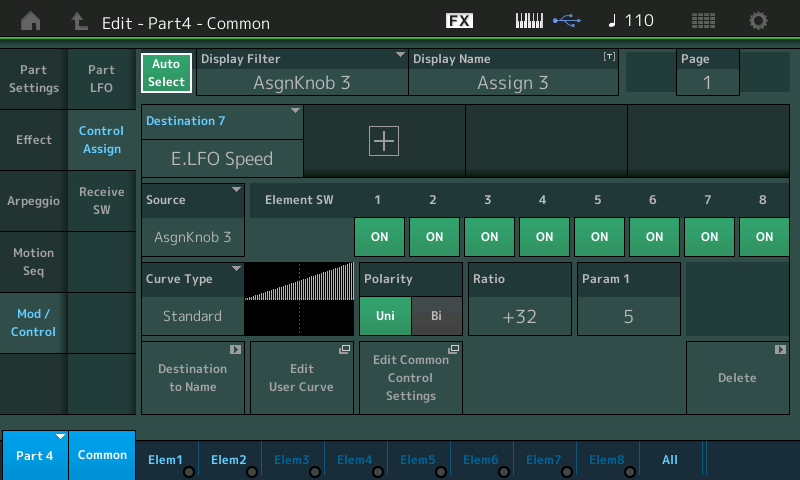
The initial setting has the CURVE TYPE = Standard; POLARITY = Uni; RATIO = +32 and PARAM 1 = 5
Slowly turn up the Assign Knob 3 to observe the results. Make sure that Assign Knob 2 (LFO FMD) is turned up – there must be some Filter Modulation Depth, in order to hear the Speed change).
If you touch the box labeled “Destination to Name” you can have the PART Assign Knob named “E.LFO Speed” – or you can simply type in your own nickname, in the DISPLAY NAME box. The default name is “ASSIGN 3”
The “Curve Type” Standard is a linear ramp You will be increasing as you turn the Knob.
The “Polarity being Uni directional means that it will increase and return to point of origin as you turn this knob up and then back down.
The “Ratio” being a positive value determines how much (depth) is applied.
The “Parameter 1” shapes that application of Curve Type – lower numbers mean immediate change, higher numbers mean the values are applied later in the movement of the knob.
Try moving these parameters to get a feel for how you can, to a great degree, detemine how “change” is applied. You will observe that if ASSIGN KNOB 2 is at minimum (FMD), then no matter where ASSIGN KNOB 3 is (now doing LFO Speed) you will hear no Filter Modulation. Set the ASSIGN KNOB 2 so you are getting LFO movement, then apply ASSIGN KNOB 3 to hear the speed change. As you slowly dial up the speed from a few times per second, it eventually reaches the point where you cannot count the number of oscillations. It crosses into the audible frequency range. Once it exceeds about 20 times per second we stop hearing separate pulsations and start identifying it as a pitch of its own. You can hear it beginning to sound like motor revving up.
Make note, the RATIO setting affects the amount of speed change that the Knob will apply. You can limit how much change is allowed by any Controller Assignment and you can determine the direction of application by how you set the Ratio. As you can tell that Element LFO Filter Modulation Depth and the Element LFO Speed are interdependent; if no Depth is applied a speed change is meaningless.
Extra Credit: By adding a SOURCE/DESTINATION Control Set, PART 4 now has a relationship with AsKnbs 1, 2 and 3. Below I’ve isolated just the “Assignable” (green) knob assignments for PART 4. We have added a third Knob) Use [SHIFT] + [HOME] to view the Overview screen:
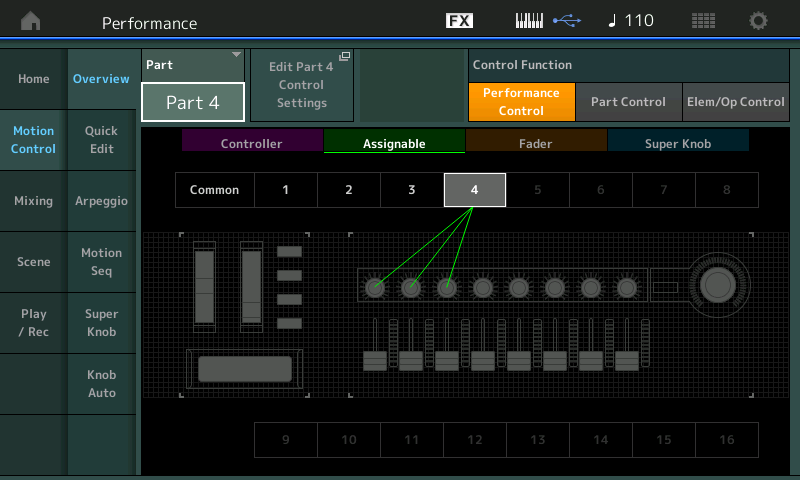
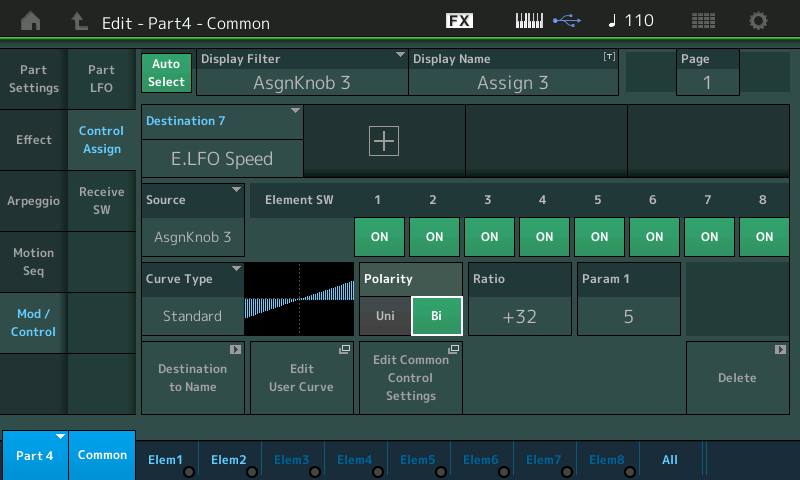
Use the “ Edit Part 4 Control Settings” shortcut box to go to the assignments (Shown below). Switch the POLARITY from “Uni” to “Bi”, what you observe now is that you can turn the Knob in either direction from the center location and get different results. You can actually make the speed slower than the default/stored value, or faster:
Turn the ASSIGN KNOB 3 to minimum. At the extreme slow speed, you can hear that Element 1’s Filter movement (left channel) is slightly ahead of Element 2’s Filter movement (right channel); this is due to the Key On Delay “Length” parameter* – which can be used to great affect, like when using the two Elements panned to opposite sides to create a stereo Pad sound, the Element comes on delayed causing the filter sweep of one to be slightly ahead of the other which can give the sound an intense left-right swirling movement – you can even have it sound like a L-R delay or like a repeat (echo) – make it swirl around in the stereo field. In headphones this is quite dramatic, and is part of what Motion Control is all about.
*Scuba Diver note: The KEY ON DELAY “Length” parameter allows you to offset the start of the sound. This is found as a per ELEMENT parameter in the AWM2 engine.
While in PART 4 – Common Edit… Touch “ElemX” > “Osc/Tune”
The Key On Delay can be sync’d to Tempo or simply run free (as is the case here). Shown below Elem2 Length is offset by a value of 22, which is the cause of it lagging behind Element 1:
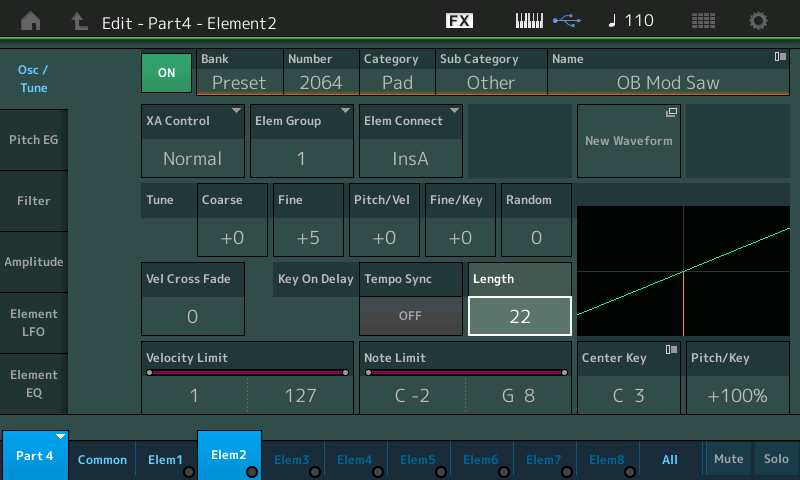
This parameter can also be assigned to real time control – which would allow you to vary how much Key On Delay is applied to this Element. This setting is always done to taste, by ear (if not using the Tempo Sync).
Linking a Parameter to the Super Knob
While we are editing PART 4, Common > “Mod/Control’ > “Control Assign”, move Assign Knob 1 to recall its parameters:
Touch “Edit Common Control Settings”
No assignments are made yet for this Performance…
Touch the “+” to ADD a Source/Destination Control Set
The default (first parameter) will appear, touch the parameter box to see a full list of options.
Set it to “PART 4 ASSIGN 1” > press [ENTER]:

What we’ve done can be summarized: On the top COMMON/Audio level of editing, PART 4’s Assign Knob 1 is linked to COMMON Assign Knob 1 (Source), which is controlled by the SUPER KNOB.
On the upper Common/Audio level of the editing architecture, you can see that Control Set is shown and a shortcut link “Edit Part 4 Control Settings” appears to whisk you back to the PART Control Assign screen. Now as you move the Super Knob, it will move Common Assign Knob 1, Common Assign Knob 1 will move the PART Assign Knob 1. The position of the Super Knob will now determine the COARSE Tuning of the Element 1 portion of the Brass Motion Pad. We may now want to store the PERFORMANCE with the Super Knob set to 0. This will cause both Oscillators to start in tune.
Experiment: try the Coarse tuning with Bi-directional POLARITY. This way the 12 o’clock position will be normal pitch and turning clockwise will drop the pitch, and counterclockise will raise the pitch. Setting the RATIO to -32 will give you an Octave down going clockwise from 12 o’clock, and an Octave going up from 12 o’clock counterclockwise.
HINT: when the Super Knob is precisely at 12 o’clock (straight up and down) four LEDs will light; two pairs of lights
You can always look at an OVERVIEW of your assignments by pressing [SHIFT] + [PERFORMANCE (HOME)] and selecting the PART to view its assignment. You can activate the view of Controllers (purple), Assignable Knobs (green), Fader (tan) and Super Knob (blue):

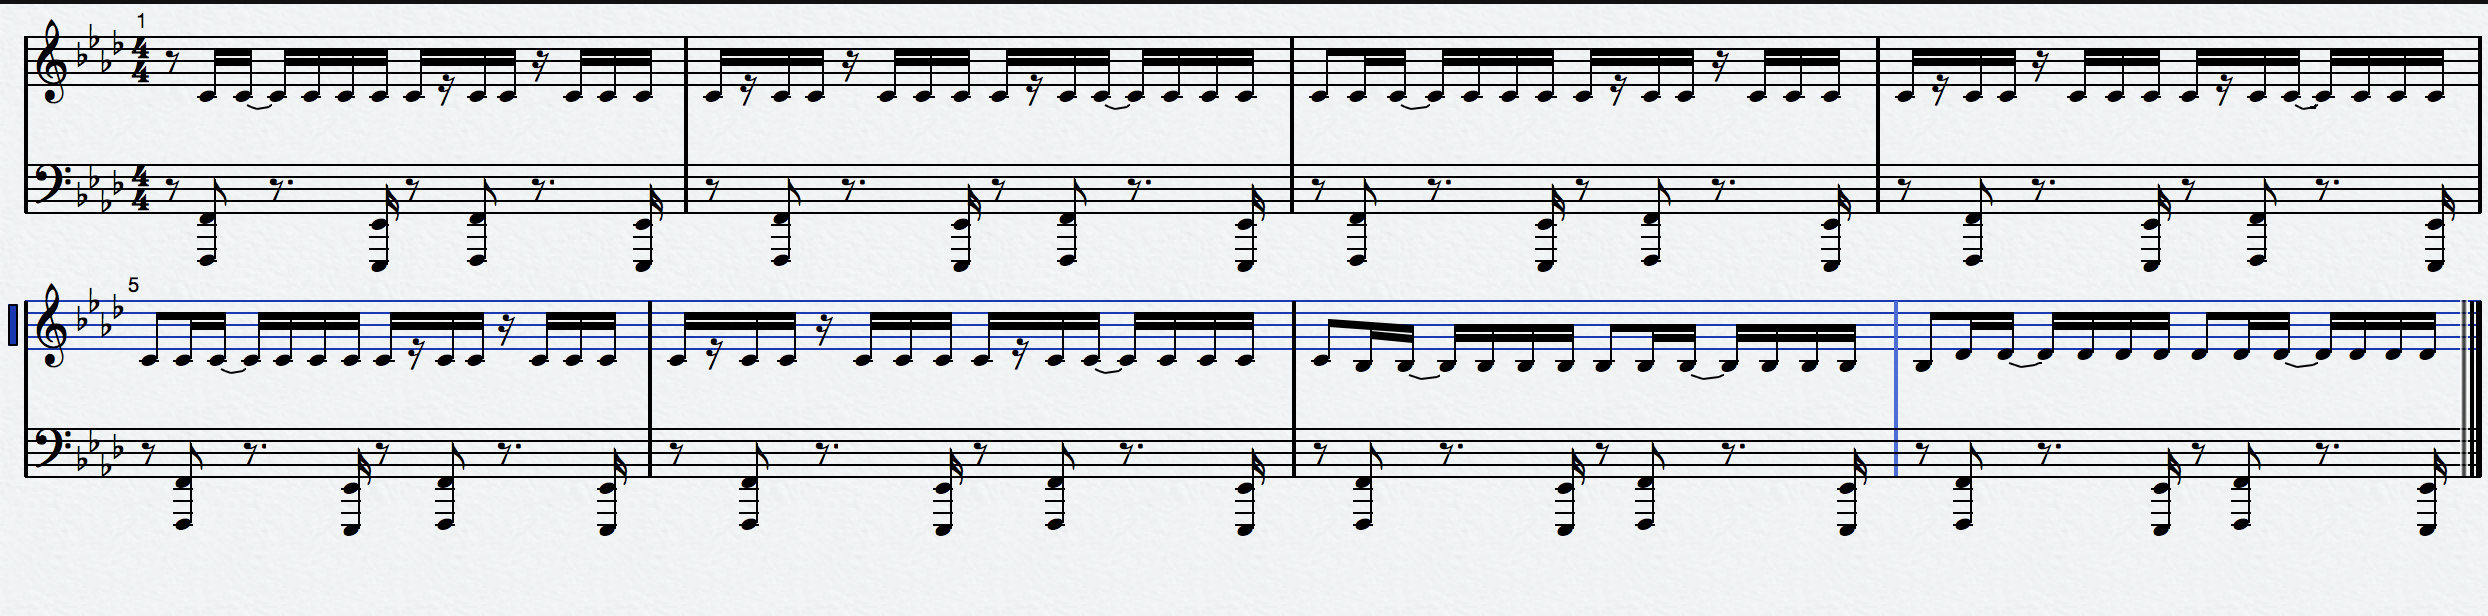
Below: The Output of PART 2 is both a Bass line and a single note line that is eight measures in length. (Cubase SCORE function was used to recreate this chart). The following phrase is created by simply triggering a single note: “F1”:
You can use this type of multiple PART PERFORMANCE to jump start your recording – say I want to begin using this drum and bass groove to build a musical section.
I would activate the PLAY/REC function and record Measures of Drums and Bass (Parts 1 and 2) as MIDI data. I can choose to play the Acoustic Piano/Pad layer (Parts 3 and 4) now or overdub my chords later – this is a production decision. The quickest easiest way to begin is to record this directly into the MONTAGE Performance Recorder. Later, I can move it into my DAW. In fact, often, you can “play around” and experiment… see what works. Capture yourself trying out ideas. Later, once you move it to your DAW, you can cut and paste your best ideas into a finished outline.
Remember, you can re-record, Edit, Change and otherwise mangle any of the musical parts as you desire, because the MONTAGE will make each Part you engage on a separate channel.
Activate Cubase, and open MONTAGE CONNECT inside of Cubase. Drag and drop the recorded measures into an empty Project – it will automatically be split to separate Tracks by MIDI Channel.
Want to share your experiences, have questions or comments? Join the conversation on the Forum here.
Missed some of the other MONTAGifying MOTIF lessons? Catch up here.