Mastering YC: Menus vs Settings

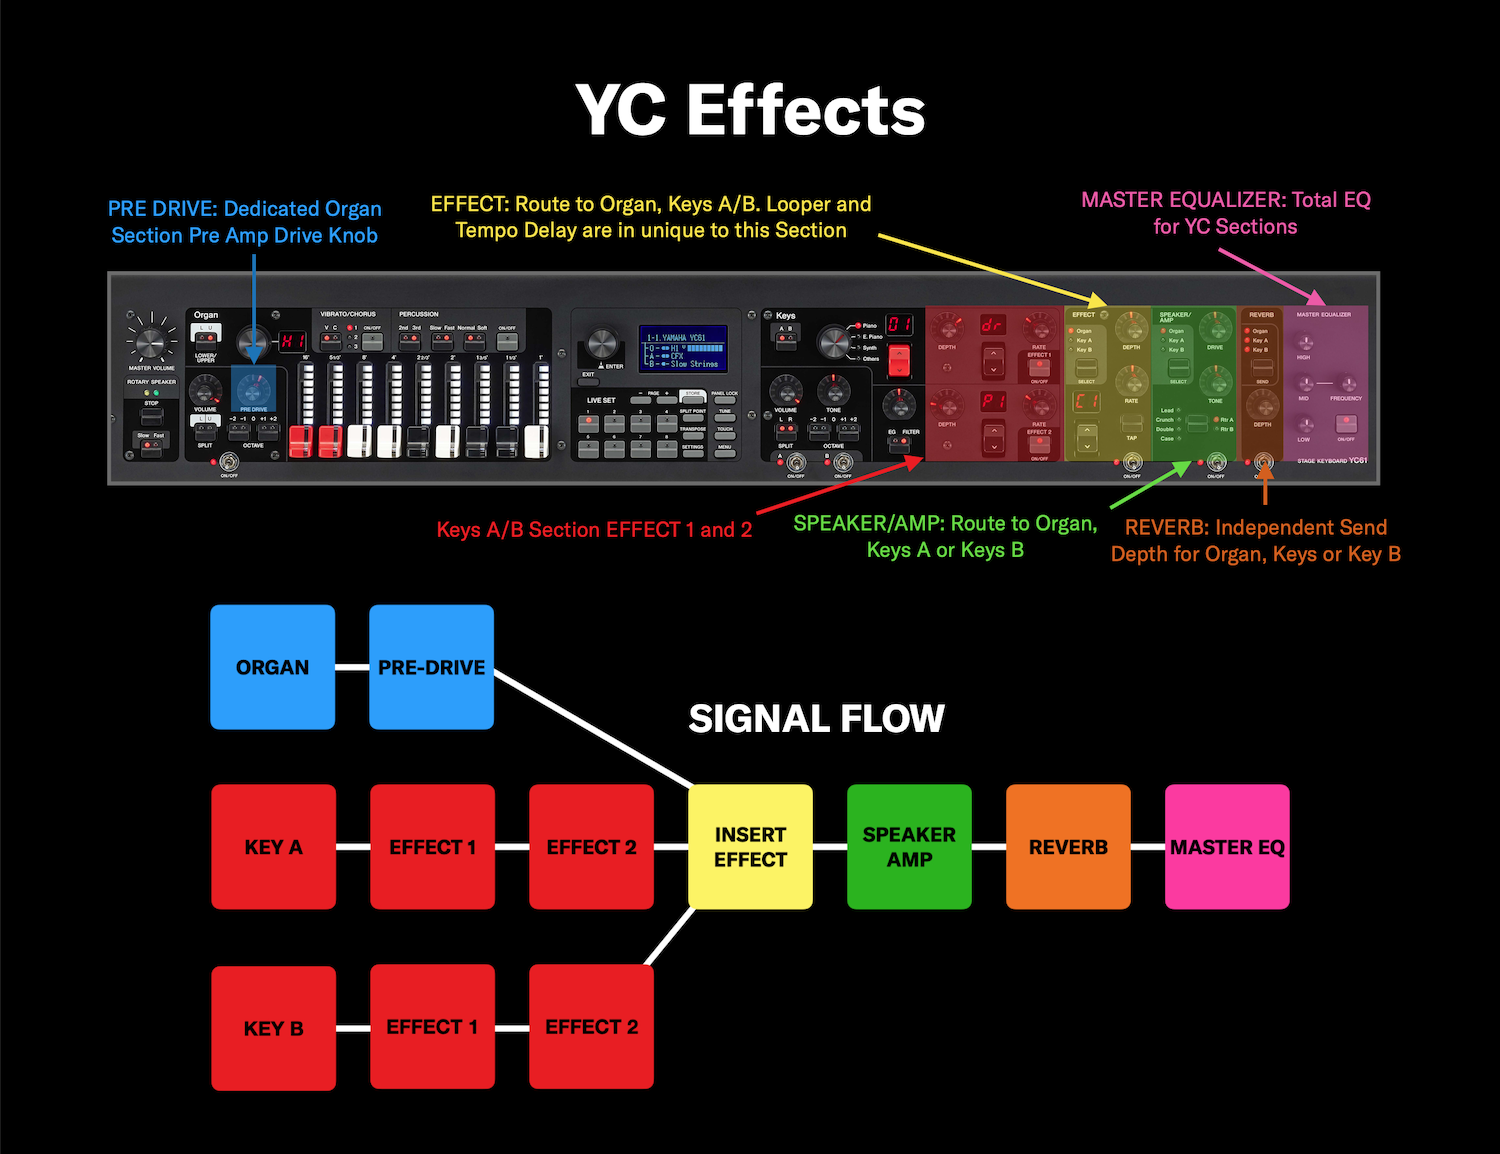
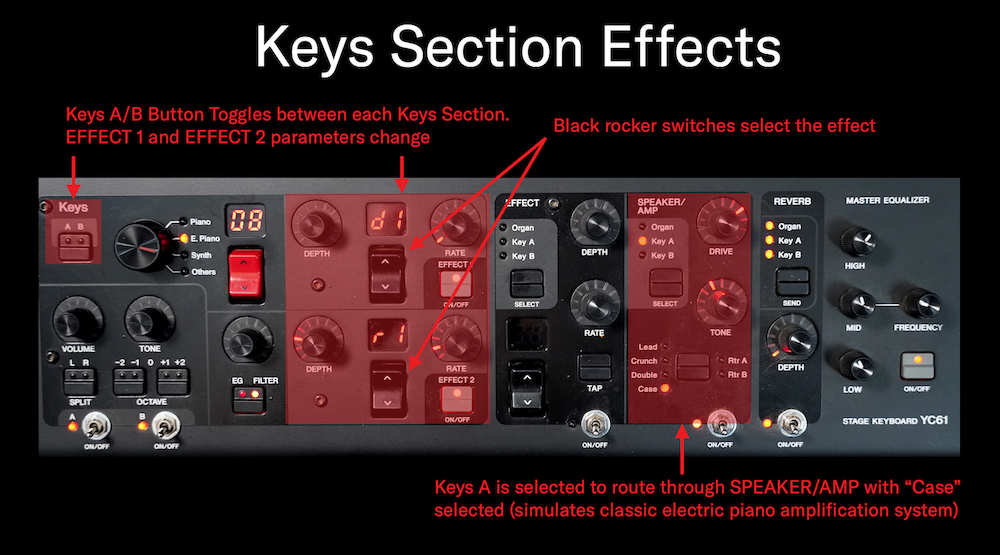
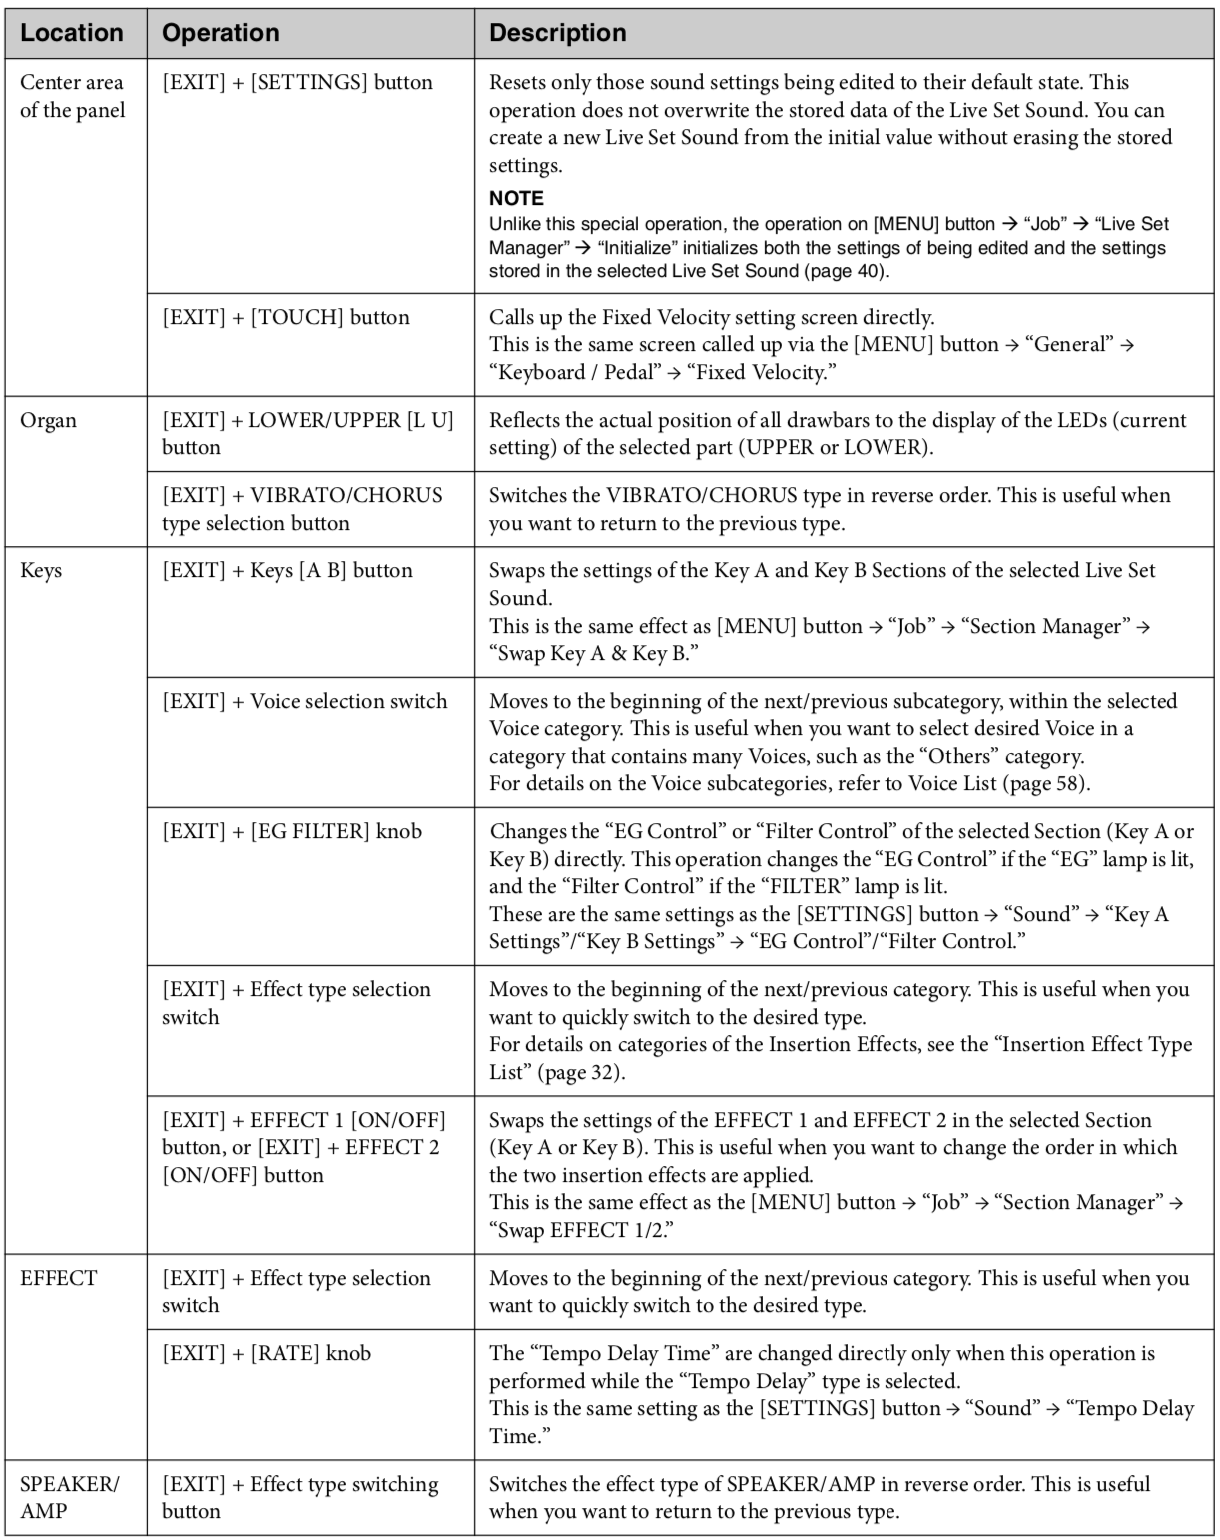
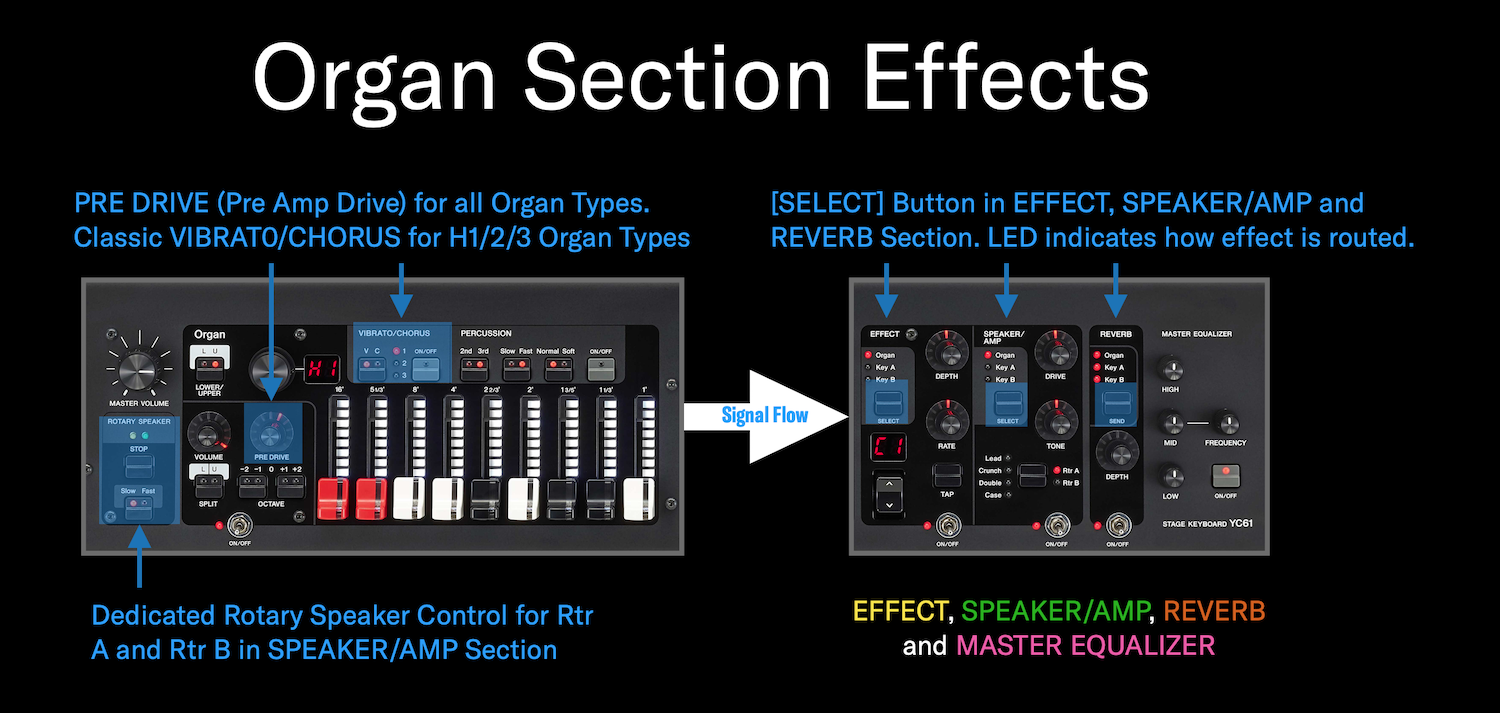
The YC61 Stage Keyboard interface puts the important controls on the front panel. For deeper customization, you have Menus (for making global adjustments) and Settings (specific to each Live Set. Let’s take a look at each.

MENU

MENU items are global for the entire instrument. Press the [MENU] button and you’ll see the top-level list of items:

MenSet3

Use the Encoder dial to select an item and press down on the dial (the [ENTER] button. Top level YC61 menu items are the top heading, next level are in Bold Underline and below that items are bulleted.

GENERAL

Under the “General” item you will see the following selections:

MASTER TUNE

This sets the overall tuning of from the default of A=440 Hz to a range between 414.72-466.78 Hz. In situations where you need to adjust this setting you will find this useful. There also is a dedicated [TUNE] button on the front panel for easy access.

MIDI SETTINGS

There are a few important items under MIDI settings.

MIDI PORT

Selects USB and MIDI for MIDI transmission. BOTH USB and MIDI are active when they are set to ON and both default to ON.

Cool tip, you can use the YC as a multi-port MIDI interface. When the MIDI Port is set to OFF, you can use USB port 2 to send and receive MIDI to the 5-pin DIN jacks. This allows you to use the YC MIDI terminal as a second set of MIDI ports for external gear.

  • MIDI Channel: Sets the MIDI receive and transmit channel for CP independently. Default is set to channel 1 for both transmit and receive.
  • MIDI Control: This setting turns MIDI control changes On, Off or Invert.

“Invert” has some interesting use cases. In Invert mode, all panel lights illuminate and MIDI control changes only send or receive when a Section is switched OFF. This is cool when using YC61 with a DAW. For example, say you want to have the Keys “A” Section ON layered with a virtual instrument in a DAW. With Invert On, you can use the Sub Section controls to change the virtual instrument parameters when that section is switched OFF.

Invert is like a hybrid mode where I can play the YC61 Keys “A”, record the note data and automate the Section controls when the Keys “A” is in the ON position and simultaneously control a virtual instrument using the Sub Section in the OFF position.

You cannot change the CC# for the YC61 controls, but most if not all DAW support “learn” modes so you can assign specific controls to controllers.

  • Tx/Rx Pgm Change: Determines whether program changes are transmitted or received to an external device.
  • Tx/Rx Bank Select: Determines whether bank select messages changes are transmitted or received to an external device.

CONTROLLER RESET

Resets controllers to default states when switching between LIVE SETS. The default is “Reset”.

KEYBOARD/PEDAL

  • Octave: Sets the octave settings +/- 3 Octaves. There is a dedicated [OCTAVE] button on the front panel as well.
  • Transpose: Transposes the pitch of the YC61 -12 to +12. There is a dedicated [TRANSPOSE] button on the front panel as well.
  • Touch Curve: This sets the velocity sensitivity of the YC61. 

This is an important setting to get the best experience with the instrument. I like to play acoustic pianos with the “Hard” setting but that is ENTIRELY subjective. Experiment with these settings to find what works for you. One thing to try is the Wide setting for Electric Piano voices which functions a bit like a velocity compressor/expander. I like it with the 75Rd Funky Voice to really grab the “bark” of the sound!

  • Fixed Velocity: When fixed velocity is “On” you can fix the note velocity between 1 and 127. This is useful for instruments that don’t respond to traditional velocity like harpsichord or organ experience.
  • Sustain Pedal Type: Determines the type of foot switch you are using. The YC61 includes an FC3A sustain pedal which is capable of half-damper like an acoustic piano. When set to “FC3A (HalfOn)” it functions in this half-damper mode. When set to “FC3A (HalfOff)” half-damper is bypassed and it will function as a standard switch pedal. 

The last setting “FC4A/FC5” is what you would select if you are using the Yamaha FC4A or FC5 which are both switch pedals.

  • Foot Switch Assign: Determines the assignment of the Assignable Foot Switch. This is a global setting and you can set it to do some useful things like engage a Section effect, adjust the volume of a Section, engage the Reverb/Delay or advance incrementally from one LIVE SET to another which is the default.

LOCAL CONTROL

Turns Local Control On or Off.

I/O VOLUME

Adjusts the incoming USB audio level from computer/DAW or iOS device.

AUTO POWER OFF

Determines whether or not Audio Power Off is engaged.

CONTROL PANEL

PANEL LOCK SETTINGS

Determines which features you want locked out when engaging Panel Lock. For example, you can choose to lock out the Section Switches but allow control over the Delay/Reverb Section.

DISPLAY LIGHTS

This allows you to set how the panel lights illuminate. You can choose to turn all the Section Lights ON (default is OFF) or turn the Ins Effects ON (default is OFF). You can also turn the LCD light OFF (default is ON) and LCD Contrast allows you to change the LCD screen contrast from 0 to 63. The default value is 32.

ADVANCED SETTINGS

DRAWBAR MODE

This sets the conditions for a drawbar position to be reflected when the drawbar’s actual position and the LED display (setting called up) do not match. When this is set to “JUMP” the LEDs will instantly jump to the position of the drawbar as soon as it’s moved. When set to “CATCH,” the current setting holds until the drawbar’s position matches (catches) the LED display. Once they have matched, the drawbar’s position changes.
The default setting is JUMP.

SECTION HOLD

This setting lets you maintain settings from one LIVE SET to other LIVE SETS.

Example: Say you want to keep the same Reverb Setting for every LIVE SET but you don’t want to save that setting in a LIVE SET. With Section Hold enabled, switch the Reverb Section ON and HOLD THE SWITCH on until the red Reverb Section LED blinks. You can now switch between different LIVE SETS and the Reverb setting will remain the same, overriding what was saved with the LIVE SET. An entire Section can be set to “Hold” as well and will override whatever is set to Live set, so if you wanted to keep a Sub Voice like a string pad the same regardless of the LIVE SET selected switch the Sub Section ON and HOLD THE SWITCH until the red Sub Section lamp blinks. The screen will say “Sub Section Hold On” to confirm.

LIVE SET VIEW MODE

Determines whether to maintain the LIVE SET View (Keep) or return to the Top screen (Close) when switching between LIVE SETS. When this is set to “Keep,” eight LIVE SETS are displayed in one screen.
The default is “Close”.

VALUE INDICATION

Determines whether or not to display the values of each of the knobs on the LCD. Default is ON.

SW DIRECTION

Determines whether if a switch turns a Section On by switching UP (the default) or DOWN.

EG/FILTER RESET

Determines whether to reset (On) or maintain without resetting (Off) the parameters of EG and FILTER when Voices are switched in the Key A/Key B Sections.

JOB

MenSet2
LIVE SET MANAGER

This function allows you to move LIVE SETS. You can choose between “Swap”, “Copy” and “Initialize”.

SECTION MANAGER

The next level down from LIVE SET Manager is Section Manager. This allows you to “Copy” one LIVE SET Section and “Paste” that Section into another LIVE SET Section. This is useful if you want to select a cool Sub Section Pad with all the Section Effects and levels set exactly how you want them and use it with a different LIVE SET.

EDIT RECALL

This lets you recall the contents of the edit buffer.
If while editing a LIVE SET you have not yet stored, you select a different LIVE SET and then return to the one being edited, the latest stored version will be selected. Using this function, you can restore your latest edits and keep them intact.

MENU INITIALIZE

Resets the settings of MENU screens to the default values.

FACTORY RESET

Restores this instrument to its default (factory) condition.

FILE

This is all about saving, loading, renaming and formatting.

MenSet3

BACK UP FILE

Saves or loads all the data stored in YC61 including the system settings to a USB flash drive as a “Back Up File” with the extension “.Y0A”.

LIVE SET ALL FILE

Saves or loads all the LIVE SET data stored in this instrument but NOT the system settings to a USB flash drive as a “LIVE SET All File” with the extension “.Y0L”.

LIVE SET PAGE FILE

Saves or loads a LIVE SET Page (Eight LIVE SETS) stored in YC61 to a USB flash drive as a “LIVE SET Page File” with the extension “.Y0P”.

LIVE SET FILE

Saves or loads a single LIVE SET stored in YC61 to a USB flash drive as “LIVE SET File” with the extension “.Y0S”

FILE UTILITY

Allows you to “Rename” a file, “Delete” a file or “Format” a USB flash drive.

VERSION INFO:

This shows the YC OS Version currently installed in your YC61.
Those are some of the highlights in the MENU section. Now let’s take a look at the SETTINGS which work with LIVE SETS. SETTINGS are saved with each Live Set Sound.

SETTINGS

Press the [SETTINGS] button to see the items you can select:

MenSet4

SOUND

In this section there are several important parameters that allow for changing sound characteristics for the ORGAN and KEYS A& B blocks.

MenSet4

ORGAN SETTINGS

Determines the detailed settings for the Organ Section. Items marked with an asterisk (*) can be configured only when the VCM Organ type (H1–H3) is selected. If at least one of the items marked with (*) is changed from the default, a “+” will be displayed on the upper right of “H1”– “H3” on the Top screen.

LEAK LEVEL

Adjusts the volume of the leakage sound (sound leaked from the tonewheel to the electric circuit).

KEY CLICK LEVEL

Determines the volume of the key click sound produced when you press a key.
Perc. Link to 1feet- Determines the operation of the [1′] (one foot) drawbar when switching the PERCUSSION on or off. When PERCUSSION is turned on, the sound of the [1′] drawbar stops.
When off, the [1′] drawbar generates sound regardless of whether PERCUSSION is on or off.
Default: On

EXPRESSION TYPE

Determines the position in the organ’s signal path where the expression pedal is applied.
Drive+Vol: The pedal effect is applied to the pre-amplifier in the Organ. Operating the pedal changes both the volume and the distortion of the Organ sound. If the VCM Organ type is selected, this faithfully reproduces the effect of the expression pedal on a vintage organ.
Volume: The pedal effect is applied directly before the REVERB Section after the Organ sound is generated. Operating the pedal changes the volume, but not the distortion, of the Organ sound.
Default: Drive+Vol

KEYS A & B SETTINGS

MONO/POLY

Selects whether to play the Section as monophonic (Mono) or polyphonic (Poly). When set to “Mono,” the icon is displayed to the right of the Section name (A, B) on the Top screen.

Default: Poly

PORTAMENTO

Determines settings regarding the portamento function, which continuously changes the sound from one played note to the next.
This can only be set when “Mono/Poly” is set to “Mono.”

  • Switch: Determines whether the portamento effect is applied (On) or not (Off).
  • Time: Determines the time (speed) that it takes for the portamento effect to shift in pitch between notes.
  • Mode: Determines how the portamento effect should be applied depending on how you play the keys.
  • Full-time: The portamento effect is always applied.
  • Fingered: The portamento effect is applied only when you play legato performances (playing a key while still holding the previous key). Default: Full-time
  • Time Mode: Determines the time standard for portamento pitch shifts.
  • Rate: The pitch shifts at a speed corresponding to the distance between sounds (notes). The further the pitches between the two sounds, the more time it takes.
  • Time: The pitch shifts over a particular amount of time, regardless of how far apart the pitches between the two sounds are. Default: Rate 

FM UNISON

FM Unison is a cool setting for lead sounds found in many classic FM Synthesizers. Unison adds a thickness and spaciousness to the sound by duplicating notes when a single note is played. This setting is available only FM Voices.

  • Mode: Selects the number of notes played when a single note is struck. When set to “Off” only one note is played. When set to “2 Unison” the note is duplicated twice; when set to “4 Unison” the note is duplicated 4 times. Default: Off
  • Detune: Determines the difference in pitch between the two or four notes, which affects the degree of thickness of the sound. Detune adds a cool chorusing effect. Default: 0
  • Spread: Determines the difference in panning between the two or four notes, which adds a nice spaciousness to the sound. Default: 0

EG CONTROL

Selects the EG control type. For details on the types that can be selected, see “EG/Filter Control Type List” (page 34). Default: Atk&Dcy&Rls A

FILTER CONTROL

Selects the Filter control type. For details on the modes that can be selected, see “EG/Filter Control Type List” (page 34). Default: Flat Reso

ROTARY SPEAKER

These parameters control the detailed operations of the 2 VCM Rotary Speaker types: RtrA and RtrB (Located in the SPEAKER/AMP Section). It is an integral part of the organ sound and you can adjust the various components of the rotary speaker in this area.
Such parameters include level of the Horn and Rotor, the speed of the Horn and Rotor, acceleration/deceleration control of those components, switch and Level control of background noise ( yes, there is actual simulation of the noise a rotary speaker device generates!), and a switch to determines whether to use stereo or monaural output for RtrA and RtrB.

FUNCTION

Under the Function Sub Menu you have two selections: “Sound Transpose” and “Split Point”. You can transpose YC61 by +/- 12 semitones and you can set a Split anywhere on the keyboard. There are of dedicated buttons directly above the [SETTINGS] button to accomplish these same functions, for easy access while playing the YC61.

TEMPO DELAY TIME

This determines the delay time in note lengths relative to the tempo for the “Tempo Delay” effect.

EXTERNAL KEYBOARD

Determines the generation of sound for each Section when the YC61 receives performance information (key-on, key-off) MIDI messages from an external MIDI device. You can make settings so that combine the YC61 with an external keyboard for a two-manual organ, or performing only the Key A and/or Key B Sections on an external keyboard, etc.

ExKeys
For Sections/parts that are set to generate sound only when playing an external keyboard the display
of the Split on the Top screen changes from the icon on the left to the “EX” icon on the right.

Each of the YC61 tone blocks has its own External Keyboard settings. They are as listed below:

ORGAN

  • Ext+Int: Sound is generated for both key-on signals received from an external MIDI device and performance on this instrument’s keyboard.
  • ExtOnly: Sound is generated only for key-on signals received from an external MIDI device. Sound is not generated when the keyboard on this instrument is played.
  • 2ManualUp: This setting is for performances on a two-manual organ. The UPPER part generates sound for key-on signals received from an external MIDI device, and the LOWER part generates sound when the keyboard on this instrument is played.
  • 2ManualLo: This setting is for performances on a two-manual organ. The LOWER part generates sound for key-on signals received from an external MIDI device, and the UPPER part generates sound when the keyboard on this instrument is played.
  • Off: Sound is not generated for key-on signals received from an external MIDI device. Sound is generated when the keyboard on this instrument is played. Default: Ext+Int

Note: When “2ManualUp” or “2ManualLo” is set, the settings of the Organ Section Split become invalid, and the lamps for the SPLIT [L U] button both automatically light.

KEY A & KEY B

  • Ext+Int: Sound is generated for both key-on signals received from an external MIDI device and performance on this instrument’s keyboard.
  • Ext Only: Sound is generated only for key-on signals received from an external MIDI device. Sound is not generated when the keyboard on this instrument is played.
  • Off: Sound is not generated for key-on signals received from an external MIDI device. Sound is generated when the keyboard on this instrument is played.

Default: Ext+Int

MASTER KEYBOARD

This function is for using the YC61 as a master keyboard. It allows the keyboard to be split into as many as four different zones, each of which can control separate sounds of an external tone generator. For example, you can make a Live Set Sound combining Voices from this instrument and the connected external tone generators, or a Live Set Sound composed with Voices of external tone generators only.

MODE SW

Mode Switch

This switches the Master Keyboard Mode settings. When “On” is selected, the Master Keyboard Mode is enabled, and the indication appears on the LIVE SET screen.

When the Mode SW is ON. basic parameters can be set. In the image below I skipped down to “Zone Settings” to view the basic parameters available when the Mode SW is ON:

MenSet9
If you want more detailed Zone control, you will want to engage the Advanced Zone SW.

ADVANCED ZONE SW

With the Mode SW ON you get the settings above, but turning the Advanced Mode SW ON allows the following parameters (Advanced Mode parameters in BOLD):

Advanced Settings
So where do you edit these control settings? That’s what Zone Settings are all about.

ZONE SETTINGS

This is where each of the four Zones are configured. Selecting any of these gives you the parameter selections mentioned above.

CONTROLLERS

Here you can set up physical controllers for each Section. Take a look at the YC61 screen below:

MenSet10

In this screen you can make the following settings for each selection.

BEND LEVER

You can set the pitch bend range for each Section independently +/- 24 semitones. Default is +2 for each Section

MODULATION LEVER

This has several different parameters.

  • Assign
    • Determines the function to be assigned to the Modulation Lever
    • You can assign Control Change numbers 1 to 119 as well as the USB Audio volume.
  • Limit Low
    • Determines the lower limit for the Modulation Lever values.
  • Limit High
    • Determines the higher limit for the Modulation Lever values.
  • P. Mod Depth
    • Determines the depth of the vibrato effect applied to keyboard notes
    • This can be set individually for each Voice Section.
    • This can be set for the Organ Section only when the FM tone generator organ type (F1 to F3) is selected.
  • P. Mod Speed
    • Determines the speed of the vibrato effect applied to keyboard notes
    • This can be set individually for each Voice Section
    • This can be set for the Organ Section only when the FM tone generator organ type (F1 to F3) is selected.

FOOT CONTROLLER 1

This is where you can set the MIDI CC for Foot Controller 1 and a High and Low limit value. Default is CC11, Expression. Default Low and High Limit values are 0 and 127 respectively.

FOOT CONTROLLER 2

This is where you can set the MIDI CC for Foot Controller 2 and a High and Low limit value. Default is CC4, Foot Controller which internally controls the Pedal Wah effect. Default Low and High Limit values are 0 and 127 respectively.

SUSTAIN PEDAL

This allows the sustain Pedal to be assigned to either Sustain, which is the default, or to be assigned to control the Rotary Speaker speed.

RECEIVE SW

Here you can set whether or not Foot Controller or Foot Switch messages are received or ignored for each Section. This works if you are using an external MIDI controller as well. Expression, Sustain, Sostenuto and Soft are can be set to ON or OFF for each section. The default is all ON.

DRAWBAR COLOR

These settings determine the color of the drawbar LEDs. This can be set individually for the UPPER and LOWER parts so that you can tell the difference between the two active manuals by color of the drawbar LEDs.
Settings: White, Red, Yellow, Green, Cyan, Blue, Magenta
Default: Upper = White, Lower = Red

NAME

Last but not least, this is where you name your LIVE SET.

Understanding how the MENU and SETTINGS function will help you get the most out of your YC61. Stay tuned for more articles in the “Master YC” article series coming soon!

Have questions or wnat to share yout thoughts/comments? Join the conversation on the Forum here.
FM 101, Part Two: The Basics

Digital FM: two words that strike fear in the hearts of many synthesists.

Too complicated, some say. Too cold-sounding. And anyway, it’s only good for things like bells and electric pianos.

Well, let’s face facts. It is a little complicated — certainly more so than standard analog subtractive synthesis or additive techniques — but by no means impossible to understand. (And no, you don’t need a degree in mathematics to use it, either!)

On the other two counts: Wrong, and wrong again. Sounds created with digital FM don’t have to be cold or edgy — in fact, there are lots of tools that let you add warmth and movement. And FM sounds are by no means limited to bells and electric piano (though admittedly it’s a technique that does both well) — you can actually craft a broad palette of tonalities such as brass, wood tones, even a decent approximation of the human voice.

In this series of articles, we’ll cover all the basics and tell you what you need to know in order to program FM sounds. While we’ll be referencing two specific Yamaha synthesizers that have digital FM capabilities (MONTAGE and MODX), the information will be applicable to other FM synths too — just check your instrument’s owners manual for the equivalent button-pushes.

Now let’s get started … right at the very beginning!

What Is A Sound?

At first glance, this may seem too basic, but the question of what makes up a sound is actually a lot deeper than it may appear. At its essence, a sound is anything we hear as a result of vibrations in the air. These vibrations in turn, cause our eardrums to vibrate in a similar fashion. The back-and-forth movements of the eardrum are converted by tiny bones in our inner ear into electrical signals that travel up nerves into our brain, where they are finally perceived by us as a sound.

Obviously, there’s an enormous gamut of sounds in existence — everything from a violin to a jackhammer, the wings of a butterfly softly beating to a crack of thunder. What is it that differentiates sounds from one another?

Actually, there are three factors:

  1. The sound’s degree of loudness (in technical terms, this is known as amplitude).
  2. Its pitch or lack of pitch (in technical terms, this is known as frequency).
  3. Its quality (in technical terms, this is known as timbre).

Interestingly, all sounds can be described in terms of these three aspects, and these three only. What’s more, all sounds exhibit all three aspects. Think about it: Can there be a sound that has no loudness? (If so, it’s not a sound.) Can there be a sound that has no particular quality? Not possible. And while there can be (and are) plenty of sounds that have no pitch, they can then be described in terms of their lack of pitch.

Let’s take a look at each of these factors in turn.

Amplitude

The amplitude (loudness) of a sound is easily measurable in a number of different ways. There are, for example, hardware devices and software apps called sound pressure level (SPL) meters that measure amplitude in real time. Or you can record a sound into your favorite DAW (Digital Audio Workstation) and see the resulting waveform on your screen afterwards. Such a display might look something like this:

FM101P2 1
The height of the waveform shows its amplitude: the louder the sound, the higher the wave. (The “dB” at the top and bottom of the vertical scale are units called decibels — dB for short.) This makes perfect sense, since it’s a reflection of the displacement of air (the backwards and forwards vibrations) created when the sound occurred.

Here’s the same sound a little softer:

FM101P2 2

… and a little louder:

FM101P2 3

Obviously, every sound always changes amplitude during its existence (eventually dropping to and remaining at 0 dB) since there is no such thing as a perpetual sound that lasts forever. We’ll be talking a lot more about amplitude in future installments, but for the purposes of this article, let’s stop here and move on to …

Frequency

Just as you can determine the amplitude of a sound by the height of its wave, so too can you determine its pitch by the number of waves that occur in a given period of time — in other words, how frequently those waves occur (hence the name “frequency”). The lower the pitch, the fewer the number of waves in any given time period; the higher the pitch, the more waves occur.

The unit of measurement for frequency is the Hertz, or Hz for short. (There’s also a unit called the kiloHertz, or kHz, that represents a thousand Hertz.) This describes the number of waves that occur in one second of time, so a sound with a frequency of 1 Hz generates one wave (one backwards and forwards movement of air) per second; a sound with a frequency of 100 Hz generates a hundred waves per second; a sound with a frequency of 1 kHz generates a thousand waves per second, and so on.

We humans can only perceive pitches between roughly 20 Hz and 20 kHz (that is 20,000 Hz), though unfortunately the high end of this range gets reduced somewhat as we get older (and the rate of deterioration is accelerated when you’re exposed to lots of loud sounds, so turn those speakers down!). This is known as the audible range. Sounds do exist both above and below this 20 Hz – 20 kHz range; those below 20 Hz are termed subsonic (they’re the rumbling “feel” frequencies that make your chest pound and the dance floor vibrate), and sounds above 20 kHz are termed supersonic (they’re the invisible sounds that make your dog’s ears perk up!).

Frequency has a lot to do with whether or not we perceive a sound as being musical. For the most part, if you can determine a clear pitch (as, for example, in a violin note), the sound is considered musical. If you can’t (as in a jackhammer), it’s non-musical. But there’s a big gray area in-between. Can you clearly make out the pitch of a bass drum or a snare drum? Most people can’t, but drummers spend a lot of time tuning their drums, so maybe they can perceive something that the rest of us are missing. The same goes for other percussive instruments, like cymbals, shakers and tambourines. On the flip side of a coin, some individuals are able to perceive pitches in what most of us would consider non-musical sounds like a breeze blowing or the hum of an engine. The bottom line is that it’s somewhat subjective, though most of us can agree that most (but not necessarily all) musical instruments have a clear pitch component.

Every time a musical sound goes up an octave, its frequency doubles. For example, here’s the waveform of the A above middle C played on a piano:

FM101P2 4
And here it is played an octave higher:
FM101P2 5
… and an octave lower:
FM101P2 6

The Western musical system divides each octave into 12 equal components (more or less) called semitones, and the distance between any two notes is called an interval. The interval known as the fifth (actually seven semitones higher than the starting, or root, note) is the frequency midpoint. In other words, the fifth above the A note (the E) has 1 1/2 times its frequency, which is why it’s so pleasing to our ears. In standard tuning, the frequency of A is 440 Hz, so the E above it has a frequency of roughly 660 Hz (it’s “roughly” and not “exactly” because pianos use an equal temperament tuning system — a subject that’s well beyond the scope of this article, but Google it if you’re curious). These kinds of mathematical relationships will have a great deal of relevance when creating FM sounds, so it’s important to have a good grasp of them.

Now let’s move on to …

Timbre

At first glance, timbre may seem to be the toughest concept to grasp. Sure, we can call a sound “soft” or “warm” or “harsh” or “bright,” but those are all such indistinct, subjective terms, no?

Well, it may surprise you to learn that timbre, like every aspect of music, can actually be described in pure mathematical terms — one reason why computers are so good at synthesizing sounds. To understand this, let’s return to our example of an A440 piano note. When you depress that key, what happens is that, via a series of mechanisms, a hammer strikes a string (actually two or more strings, but that’s not especially relevant to this discussion just yet), which begins vibrating at a rate of — you guessed it — 440 times per second.

FM101P2 7But that only happens for a split second, because as soon as those vibrations reach the back of the piano’s sounding board, the string begins rebounding back towards the front of the instrument, again at a rate of 440 times per second. But the original vibration continues, which means that the two vibrations criss-cross … resulting in a vibration of both 440 times per second and twice that amount (880 times per second):
FM101P2 8So now our string is vibrating at both 440 Hz and 880 Hz, although the original 440 Hz movement (known as the fundamental frequency) will be stronger and therefore louder. But it doesn’t stop there, because once that 880 Hz vibration reaches the front of the instrument, it begins rebounding back again, causing a third vibration (of 1320 Hz — three times the amount of the original 440 Hz). This process continues over and over again until the string loses energy and the sound dies down to nothingness (in the case of an undamped piano note, this can take 30 seconds or longer, depending upon the length of the string and how hard the hammer strikes it).
So what we end up with is a string vibrating at many different rates, all at the same time, with each of these vibrations a mathematical multiple of the starting (fundamental) frequency. These extra vibrations are called harmonic overtones or partials. The overtone that’s twice that of the fundamental is called the second harmonic; the one that’s three times the fundamental is called the third harmonic, and so on.
FM101P2 10But the story doesn’t end there, because no string or musical instrument is perfectly constructed, nor is there any such thing as a perfect acoustic space (don’t forget, the air surrounding the string is set into vibration too, and that in turn affects the string to a small degree). For these reasons, a number of extra vibrations always occur that are not mathematical multiples of the fundamental frequency — say, 441.2 Hz or 967.8 Hz. These “outliers” (which have only random mathematical relationships to the fundamental) are known as inharmonic overtones (or inharmonic partials).

This is not specific to piano (which we used here just for the sake of illustration), or to any particular musical instrument, for that matter; it’s actually a feature of all sounds in existence. And it’s the number and type of overtones, and their relative strength to one another, that determines a sound’s timbre. Musical sounds (piano, flute, birdsong, etc.) will tend to have more harmonic than inharmonic overtones, while non-musical ones (cymbal, tambourine, jackhammer) will have the reverse. But all naturally occurring sounds consist of a particular blend of overtones, and that’s why we can tell the difference between a piano and a flute and a cymbal and a tambourine, even if they’re all played at the same loudness level, and even if we’re in a room with all the lights out.

One of the inexplicable wonders of nature is that the timbre of a sound is reflected in its waveform in an almost poetic manner. The smooth sound of a flute, for example, is displayed as a gentle, rounded waveshape that looks like this:

FM101P2 11

… while the brighter tone of a twanged guitar string has a waveform that’s more jagged:

FM101P2 12

In contrast, the sizzle of a cymbal is thoroughly spiky and irregular:

FM101P2 9

In general, the gentler and smoother the sound (the result of fewer overtones), the more rounded and regular the waveform; the brighter and buzzier the sound (the result of more overtones), the more jagged and irregular the waveform.

If you want to learn more about the relationship between music and mathematics, check out my Yamaha blog “The Numbers Game.” For now, though, let’s start our exploration of digital FM — a great synthesis technique precisely because it gives us extremely fine control over all three aspects of sound: amplitude, frequency and timbre.

The Operator

The basic building block of digital FM synthesis is called an operator. It’s actually quite a simple software device (the fact that it’s “software” means that it doesn’t exist physically, just as a series of numbers — but no need to concern yourself with that), consisting of just three components: an oscillator (“OSC” for short), an amplifier (“AMP” for short) and an envelope generator (“EG” for short). Here’s the way they’re interconnected:

FM101 2 13X

As you can see, the signal starts with the oscillator (same as it does in analog synthesis methods); it’s then sent into an amplifier, under the control of an envelope generator, which enables its amplitude to be varied over time (more about this in Part 4). The signal then leaves the operator, to be routed either to the output of your instrument so you can hear it … or, more intriguingly, to the input of another operator. (We’ll unravel this particular mystery in Part 3.) For now, let’s focus on an operator whose output can be heard directly, either through your synthesizer’s main outputs or its headphone output.

Such an operator is called a carrier, and up until the introduction of FM-X synthesis (available today in MONTAGE and MODX), most digital FM carriers were only capable of producing one kind of waveform — the simplest one known to man. This is the humble sine wave, which contains no overtones at all.

Wait, you say! Didn’t I tell you a just few paragraphs back that all sounds consist of a particular blend of overtones? Well, check the fine print, because what I actually said was that all naturally occurring sounds have overtones. (Sneaky, I know.) And sine waves do not exist in nature; in fact, they can only be generated by electrical circuits (such as the ones in analog synthesizers) and in digital emulations of electrical circuits (such as the ones in digital synthesizers.)

We’ve seen that the timbre of a sound is reflected in its waveform, with gentler sounds having more rounded shapes, so you might expect that the waveform of a sine wave would look something like that of a flute, only even more rounded … and you’d be absolutely right. Here’s what a sine wave looks like:

FM101P2 14

Ready to listen to a sine wave on your MONTAGE or MODX? It’s super-easy, since both instruments offer a simple procedure for calling up basic “initialized” sounds, including one for FM. Simply perform the following steps:

  • Press [CATEGORY SEARCH]
  • Touch Init
FM101P2 15
  • Select “Init Normal (FM-X)”
FM101P2 16

You’re nearly there, but in order to be able to more clearly hear the various exercises we’ll be giving you, you’ll want to turn off the reverb. This is also a very simple process, but if you’d rather skip the button-pushes, just go to Soundmondo (our way-cool social website that allows you to discover new synth sounds, as well as organize and share your own sounds) and click here to download the Performance named “Part 2_01.” (This is simply “Init Normal (FM-X),” saved without reverb.) For more information about Soundmondo, check out this blog article.

For you do-it-yourselfers, here’s the step-by-step procedure:

  • Press [PERFORMANCE (HOME)]
  • Press [EDIT]
  • Press [COMMON]
  • Touch Effect
  • Touch ON (green box) next to Rev (circled in red in the illustration below) so that it turns OFF (gray)
FM101P2 17
FM101P2 18

Here’s what it sounds like — the smooth, gentle tone of a pure sine wave, without any reverb:

Whether you downloaded this from Soundmondo or created it with button-pushes, press the Store button to store it in your MONTAGE/MODX. (If you created it with button-pushes, rename it “Part 2_01” — the name under which it appears in Soundmondo).

Now we’re ready to move on to another basic concept, called …

Ratio

To begin this discussion, let’s go back to the illustration of an FM operator we presented earlier:

FM101 2 13X

Obviously, this graphic is a bit lacking since an operator doesn’t decide on its own when to start playing, nor does it decide what pitch to play — those decisions are made by you, via control and pitch inputs. These two signals are generated by your synth’s keyboard when you play a note (or notes), or by an external MIDI device (such as a MIDI sequencer or external MIDI controller), or both. So here’s a more accurate picture of an operator:

FM101 2 XX
The pitch that an operator plays is actually determined by three factors: the note you play, any transposition being done by your instrument (in MONTAGE or MODX, by pressing either of the front-panel TRANSPOSE buttons), and a crucial setting called Ratio. The Ratio number is used as a multiplier, so that, for example, if it is set to 1.00 and you play A above middle C (assuming no keyboard transposition), the operator multiples 440 (that note’s frequency — see above) by 1.00 and the resulting output will have a frequency of 440 Hz. If, on the other hand, you set the Ratio to 2.00 and play A above middle C, the frequency of the operator’s output will be 880 Hz. You can also insert fractional Ratio values; if an operator’s Ratio is set to 1.5 and you play A above middle C, you’ll hear a frequency of 660 Hz (440 times 1.5).

It will of course be easier to understand this concept if you can hear it, so call up the “Part 2_01” Performance you downloaded or created earlier and do the following:

  • Press [PERFORMANCE (HOME)]
  • Press [EDIT]
  • Press [PART SELECT 1/1]

This calls up the Edit – Part 1 – Common screen, which looks like this:

FM101P2 20
  • Next, either touch the OP1 tab at the bottom of the screen or press the [MOTION SEQ SELECT 1] button (this button calls up Operator 1 when working with an FM-X part). This will bring up the Edit – Part1 – Operator1 screen, which looks like this:

FM101P2 21

  • Play a few notes, then touch the Coarse box, shown in the red circle
FM101P2 22

Use the INC/YES button or data dial to change the Coarse setting to 2. The value in the Ratio box (circled in red) changes to 2.00:

FM101P2 23

Play the same notes again, and notice that they are now transposed up an octave. That’s because the operator is applying a Ratio of 2.00 (in other words, double) to each note being played. Entering in a Ratio of 3.00 multiplies each frequency played by 3 … which means you’ll hear not the note you’re playing on your keyboard, but that note an octave and a fifth higher. (In other words, if you play A above middle C, you’ll hear a sine wave of not 440 Hz, but 1,320 Hz [1.32 kHz], which is not an A but an E.) Try entering in different Ratio values — you’ll soon get the hang of how it works.

The Fine box next to the Coarse box allows you to enter in fractional Ratio values in 1/100th (.01) increments, from .01 to .99. To see how this works, return the Coarse value to 1.00, then touch the Fine box and move the data dial clockwise. Set the Fine value to 27, for example, and you’ll see (and hear) a Ratio of 1.27, which will result in some in-between microtuning notes not found in the Western scale:

FM101P2 24
Sharp-eyed readers will notice that there are two different “Freq Mode” (Frequency Mode) options — Ratio and Fixed — on the bottom row. We’ll be discussing the difference between these modes in the next installment.

So far, we’ve just been listening to a single Operator – Operator 1. But FM synthesizers always offer multiple operators; in the case of modern instruments like the MONTAGE and MODX, there are eight of them, all functionally identical, labeled OP1, OP2, OP3, etc. (Even early FM instruments like the original Yamaha DX7 offered six operators.) Let’s see what happens sonically when we bring in these extra operators.

Begin by again calling up the “Part 2_01” Performance (this will remove any changes you made and restore the sound the way it was) and then do the following:

  • Press [PERFORMANCE (HOME)]
  • Press [EDIT]
  • Press [PART SELECT 1/1]
  • Touch the OP1 tab at the bottom of the screen or press the [MOTION SEQ SELECT 1] button to once again bring up the Edit – Part1 – Operator1 screen.
  • Touch the Level tab on the left-hand side of the screen to bring up the OP1 level screen, then touch the Level box on the bottom row (circled in red).
FM101P2 25
  • Note that the level of OP1 is currently set at 99 (maximum). Use the DEC/NO button or the data dial to lower its level, playing some notes on the keyboard and listening as you do so. Obviously we are only hearing Operator 1 at the moment.
  • Restore the OP1 Level to 99, then touch the OP2 tab at the bottom of the screen or press the [MOTION SEQ SELECT 2] button to switch to Operator 2. Note that its level is currently at 0 — this explains why we haven’t been hearing it (until now, that is).
  • Use the INC/YES button or the data dial to increase the level of Operator 2, playing some notes on the keyboard and listening as you do so. Other than being a bit louder, it doesn’t sound any different, does it? Touch the Form/Freq tab on the left-hand side of the screen to discover the reason why:
FM101P2 26
  • Aha! Operator 2’s Ratio is 1.00, same as Operator 1. Touch the Coarse box and use the INC/YES button or data dial to change the Coarse setting to 2, then play a few notes and listen. You’ll hear two notes an octave apart.
  • Experiment by changing the Ratio of Operator 2 to various Coarse values and listen. When you set its Ratio to 3.00, for example, you’ll hear two notes an octave and a fifth apart, which sounds a lot like an organ. Setting it to 4.00 means that you’ll hear two notes two octaves apart, etc.
  • Restore the Coarse value to 1 and then experiment with changing the Fine value, playing the keyboard as you do so. With each new setting, you’ll hear the note you’re playing plus a second note, which, most of the time, will be completely unrelated and dischordant. The exceptions occur when you set Ratio values of 1.25 (which will result in your hearing the root note plus an interval of a third, which is very pleasing to the ear) and 1.50 (which will result in the root note plus an interval of a fifth, which is even more pleasing to the ear).
  • Continue your experimentation by changing various Coarse and Fine values for Operator 2, keeping Operator 1 at its root note Ratio setting of 1.00. When you’re done, restore the Ratio for Operator 2 to 2.00.
  • Now it’s time to bring in the other Operators; simply touch the OP3/OP4/OP5/OP6/OP7/OP8 tabs at the bottom of the screen or press the equivalent [MOTION SEQ SELECT] buttons to access each in turn. Set the Ratios for Operators 3 – 8 so that each has a Ratio one integer higher than the preceding one (i.e., Operator 3 should have a Ratio of 3.00, Operator 4 = 4.00, Operator 5 = 5.00, etc.).
  • Here comes the fun part — listening to them all together. But rather than having to laboriously go to each Edit screen in turn and use the data dial or INC/DEC buttons to alter the level of each Operator in turn, the MONTAGE/MODX offers a wonderful shortcut: the Control Sliders on the left-hand side of the instrument. Whenever you are working with an FM-X Part, these sliders are preset to control the levels of Operators 1 – 8 respectively. And because the settings you’ve entered in this case will result in a sound that’s very organ-like, the Control Sliders will essentially act like organ drawbars. Try it! If you go to the level screens of any of the operators (accessed by touching the Level tab on the left-hand side of the screen), you’ll notice that the Level value for each Operator changes as you move its associated Control Slider, and vice versa (changing the Level value in the screen alters the LEDs to the right of each slider). Note that you may have to move each Control Slider past its “zero” point to activate it — if a slider doesn’t seem to be working at first, just jiggle it up and down for a moment, and it will quickly become operational.
  • When you’re done experimenting with adjusting the relative levels of each Operator, set them all to a level of 78 and then store the Performance, renaming it “Part 2_02.” (Alternatively, you can find this Performance on Soundmondo by clicking here.)

Finally, let’s talk about the subtle pitch changes you can make with the Fine control. It’s easy to pick out the sound of two notes played an octave apart, or two completely different notes (say, an A and an E), but whenever you play two sounds that are close in frequency to one another (such as, for example, the two or three strings for each piano key), the human ear can no longer perceive them as being separate. Instead, we hear one sound, and if the frequencies are even slightly different, the sound may have a pulsation (a “beating”) occurring at a rate equivalent to the difference between the two frequencies. (This, by the way, is the technique used by piano tuners as well as many guitarists and bassists — at least in the days before electronic tuners and software tuning apps!)

To demonstrate this phenomenon, load the “Part 2_01” Performance and then do the following:

  • Use the Fine control to set Operator 2 to a Ratio of 1.01, then store the Performance and rename it “Part 2_03.” (You can also find this Performance on Soundmondo by clicking here.)
  • Play a single note on the keyboard and raise Control Slider 2 so that you can hear Operator 2 along with Operator 1. Because they are so close in pitch, you’ll hear a single sine wave with a gentle pulsation — and this beating is something you can even see in the waveform:
FM101P2 27

Now play the octave above that same note. The movement is more rapid now — in fact, it’s occurring twice as fast. The reason this is happening is because the Ratio value is used as a multiplier, so with these settings, if you play A above middle C, for example, you hear a sine wave with a frequency of 440 Hz (Operator 1), plus another sine wave at 444.4 Hz (Operator 2); the difference between the two is 4.4 Hz, which is the rate of the movement you’re hearing. But if you play that same note an octave higher, you hear a sine wave at 880 Hz (Operator 1), plus another sine wave at 888.8 Hz (Operator 2), for a difference of 8.8 Hz — double the rate of movement you heard when playing the note an octave lower.

These multiple movements in the sound make for a very pleasing effect. For example, try playing a C major triad (middle C and the E and G above it), which sounds (and looks) like this:

FM101P2 29

Last but not least, let’s talk about a similar function in that same screen, called Detune, shown here circled in red:

FM101P2 30This works similarly to the Fine parameter, except that it’s even finer … plus it allows you to alter the frequency of operators negatively (that is, to Ratios below the Coarse setting) as well as positively. You’ll find that a Detune value of 13 (plus or minus) is roughly equivalent to a Fine value of .01.

You can, of course, add in the other operators and set each to different Fine and/or Detune values to create intricate movements within your sound … even if that sound just consists of simple sine waves. Now imagine the possibilities with complex waves (that is, waves that have overtones). Tune into Part Three (“The Magic of Modulation”) to see just how that works … and a whole lot more!

If you missed the first part of the series and want to know more about the history of FM synthesis check out Part One: Discovering Digital FM…John Chowning Remembers.

Want to share your thoughts/comments? Join the conversation on the Forum here.

© 2024 Yamaha Corporation of America and Yamaha Corporation. All rights reserved.    Terms of Use | Privacy Policy | Contact Us