Mastering MONTAGE: Smart Morph
Among the great new additions to MONTAGE in OS v3.5 is Smart Morph. Smart Morph is a new feature that uses machine learning to take multiple FM-X Parts and morph them into a new FM-X Part.
Morphing vs Crossfading
Morphing is related to crossfading, but while crossfading is simply fading one sound out while another fades in, morphing interpolates between one parameter and another. Yamaha developed synthesizers in the past that interpolate between parameters using Scene morphing. Products like the AN1x and EX5 synthesizers had two Scene buttons, each with different parameter settings and you morph between the two Scenes with a Modulation Wheel:
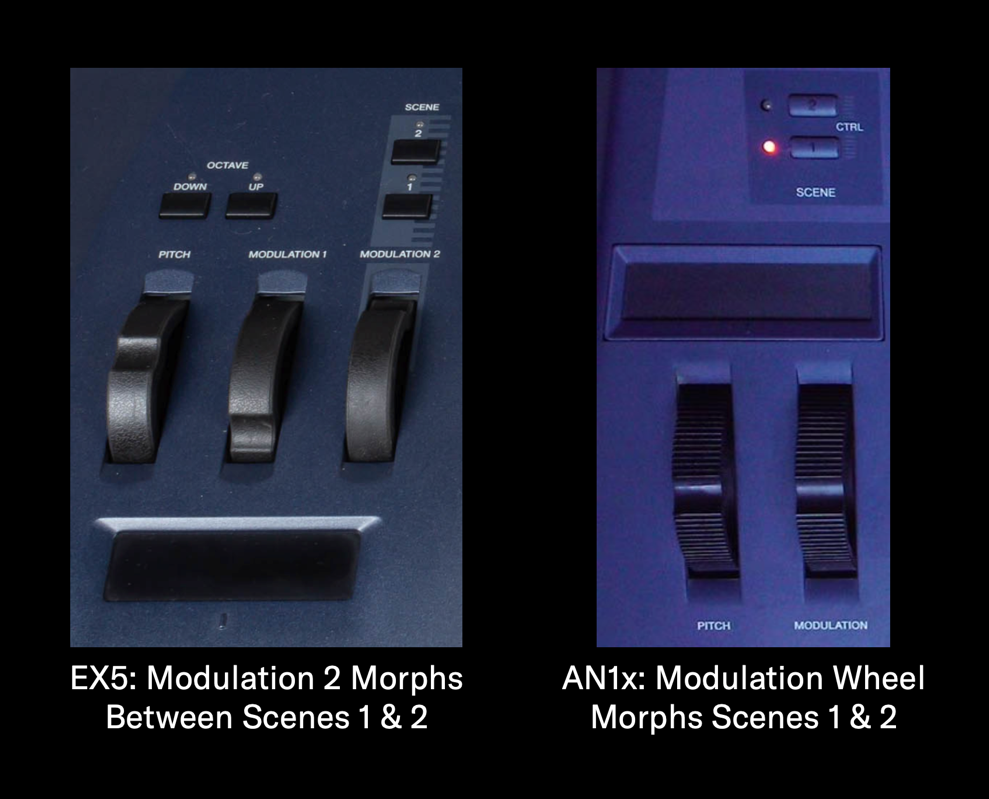
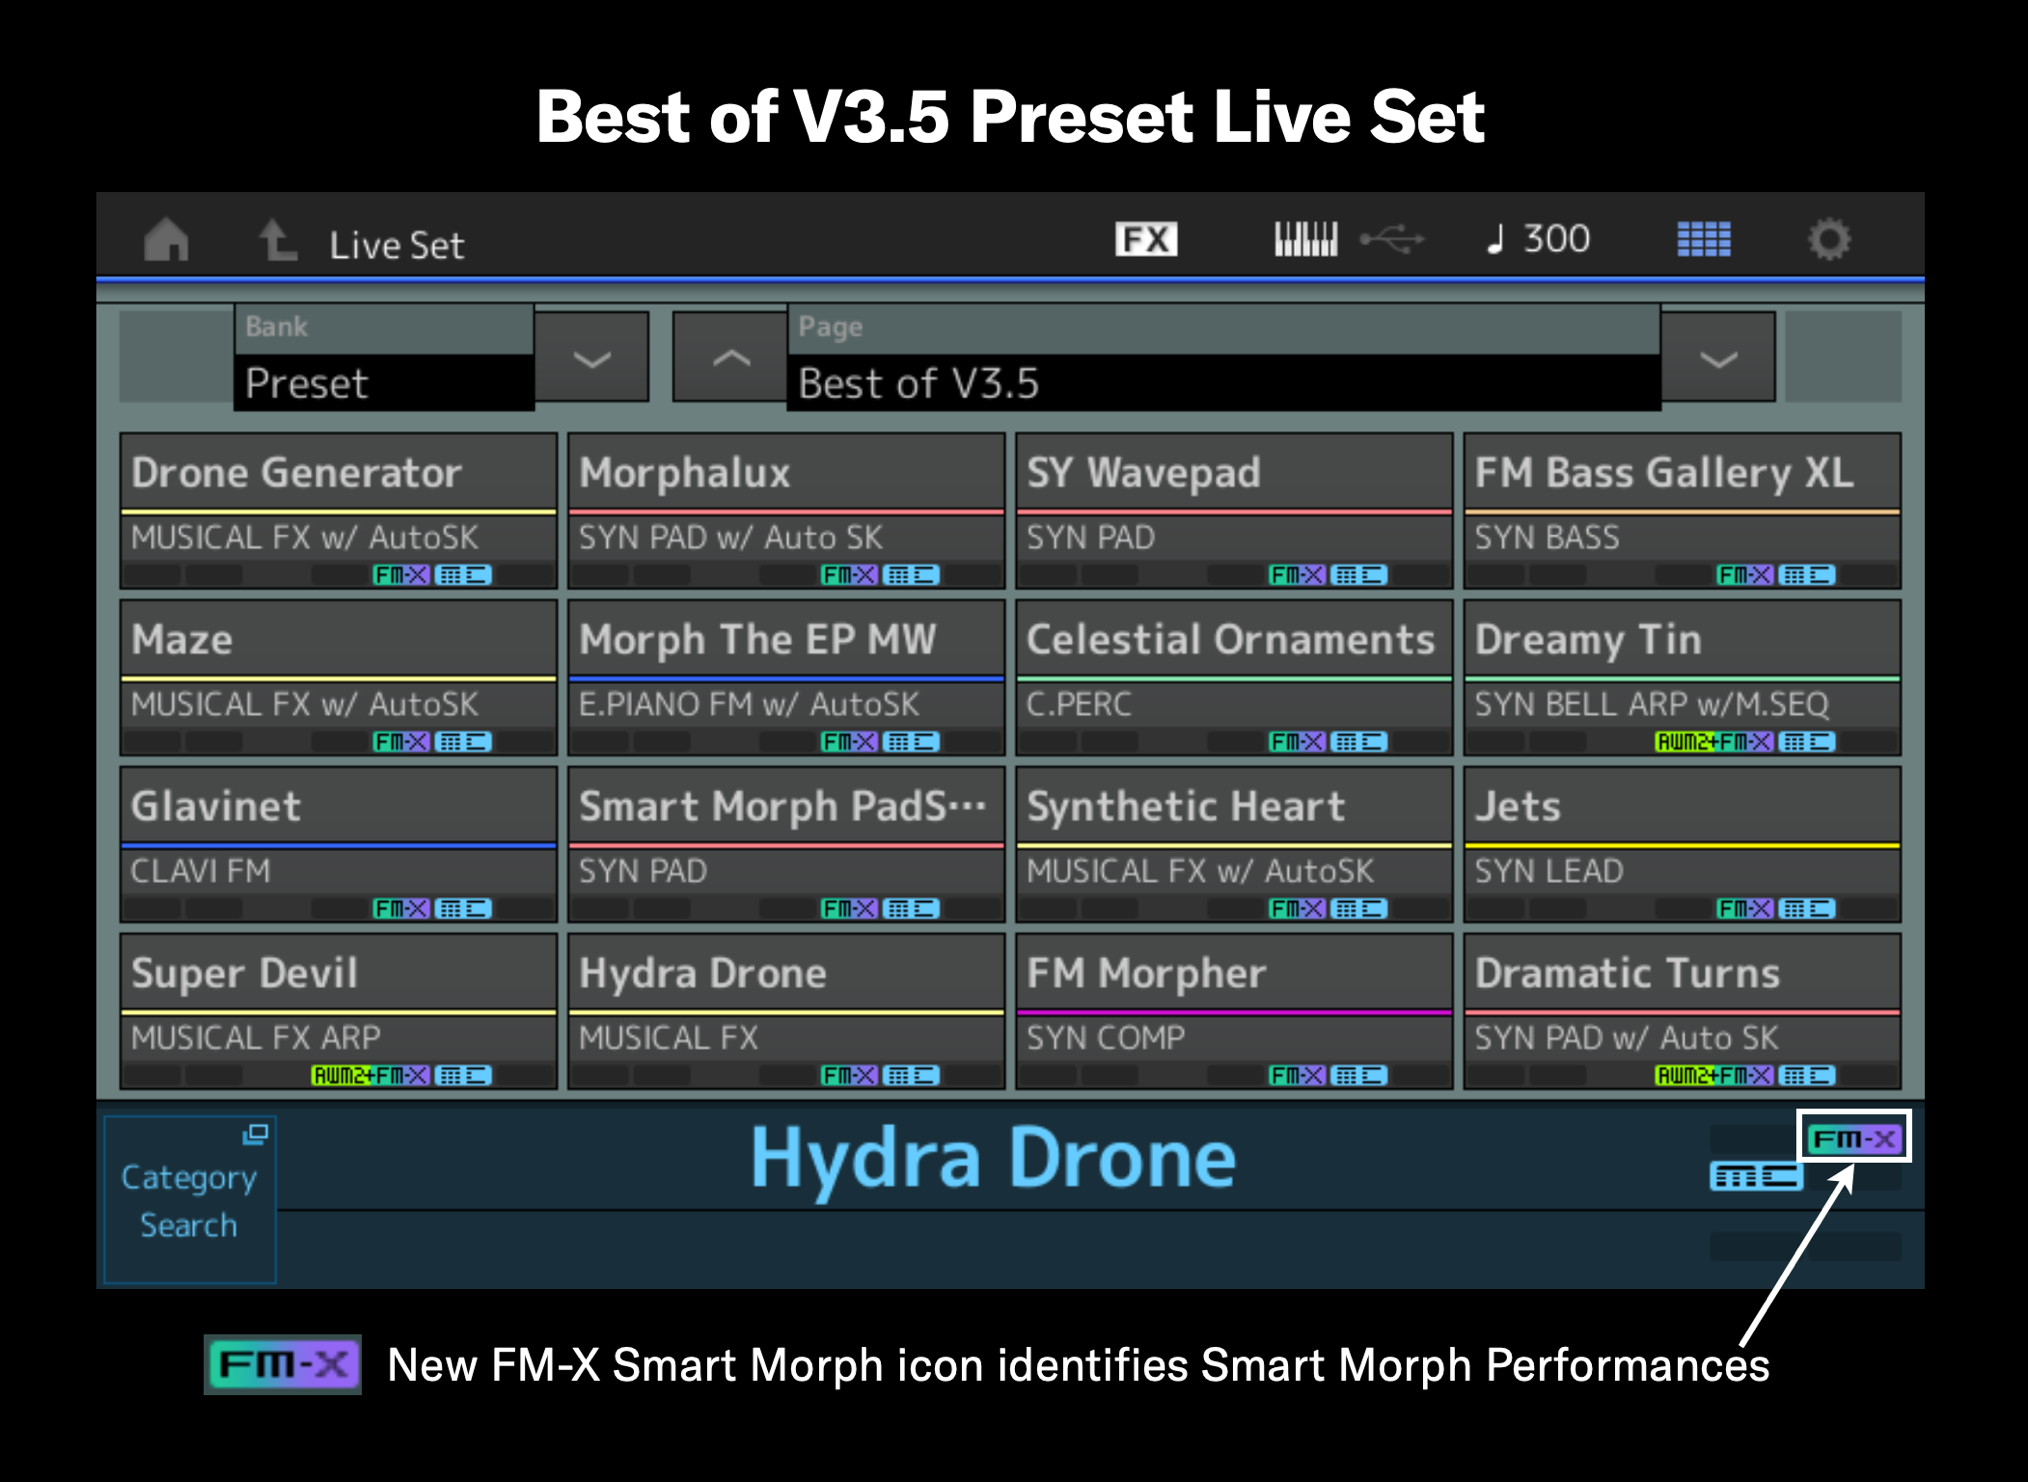
Yamaha MONTAGE adds a new chapter to morphing with Smart Morph. Smart Morph is a new feature added to the FM-X engine that levels up the morphing concept. Smart Morph uses sophisticated machine learning (specifically a “self-organizing map” or “SOM”) to analyze several different FM-X sounds and creates an interpolated FM-X sound based on the analysis. There are 32 new Performances added with MONTAGE OS v3.5 and all of them are Smart Morph Performances. 16 of these new Performances can be found in the Preset Live Set “Best of V3.5”:
Smart Morph Defined
A Smart Morph Part is created from an analysis of up to eight FM-X Voices assigned to Parts 9 through 16. You can choose which FM-X parameters are part of the analysis and then touch “Learn”. Learn activates machine learning and puts the new “Smart Morph” sound in Part 1. The process creates 1024 possible variations and can be accessed on a Smart Morph Play screen: a cool, colorful 32×32 grid map. You can then change this sound by touching the grid from the Smart Morph Play screen. Whatever position you touch changes Part 1. You can also touch and move around on the map for real time morphing or move between any two points using the Super Knob. You can automate the Super Knob with a Motion Sequence.
You don’t have to be a serious programmer to create interesting results. Smart Morph is a unique and fun way to create new FM-X sounds. In fact, it is best to not overthink it: Let the Smart Morph machine learning process do the heavy lifting and enjoy the serendipitous results! You can use the Smart Morph results as the basis for deeper editing sessions.
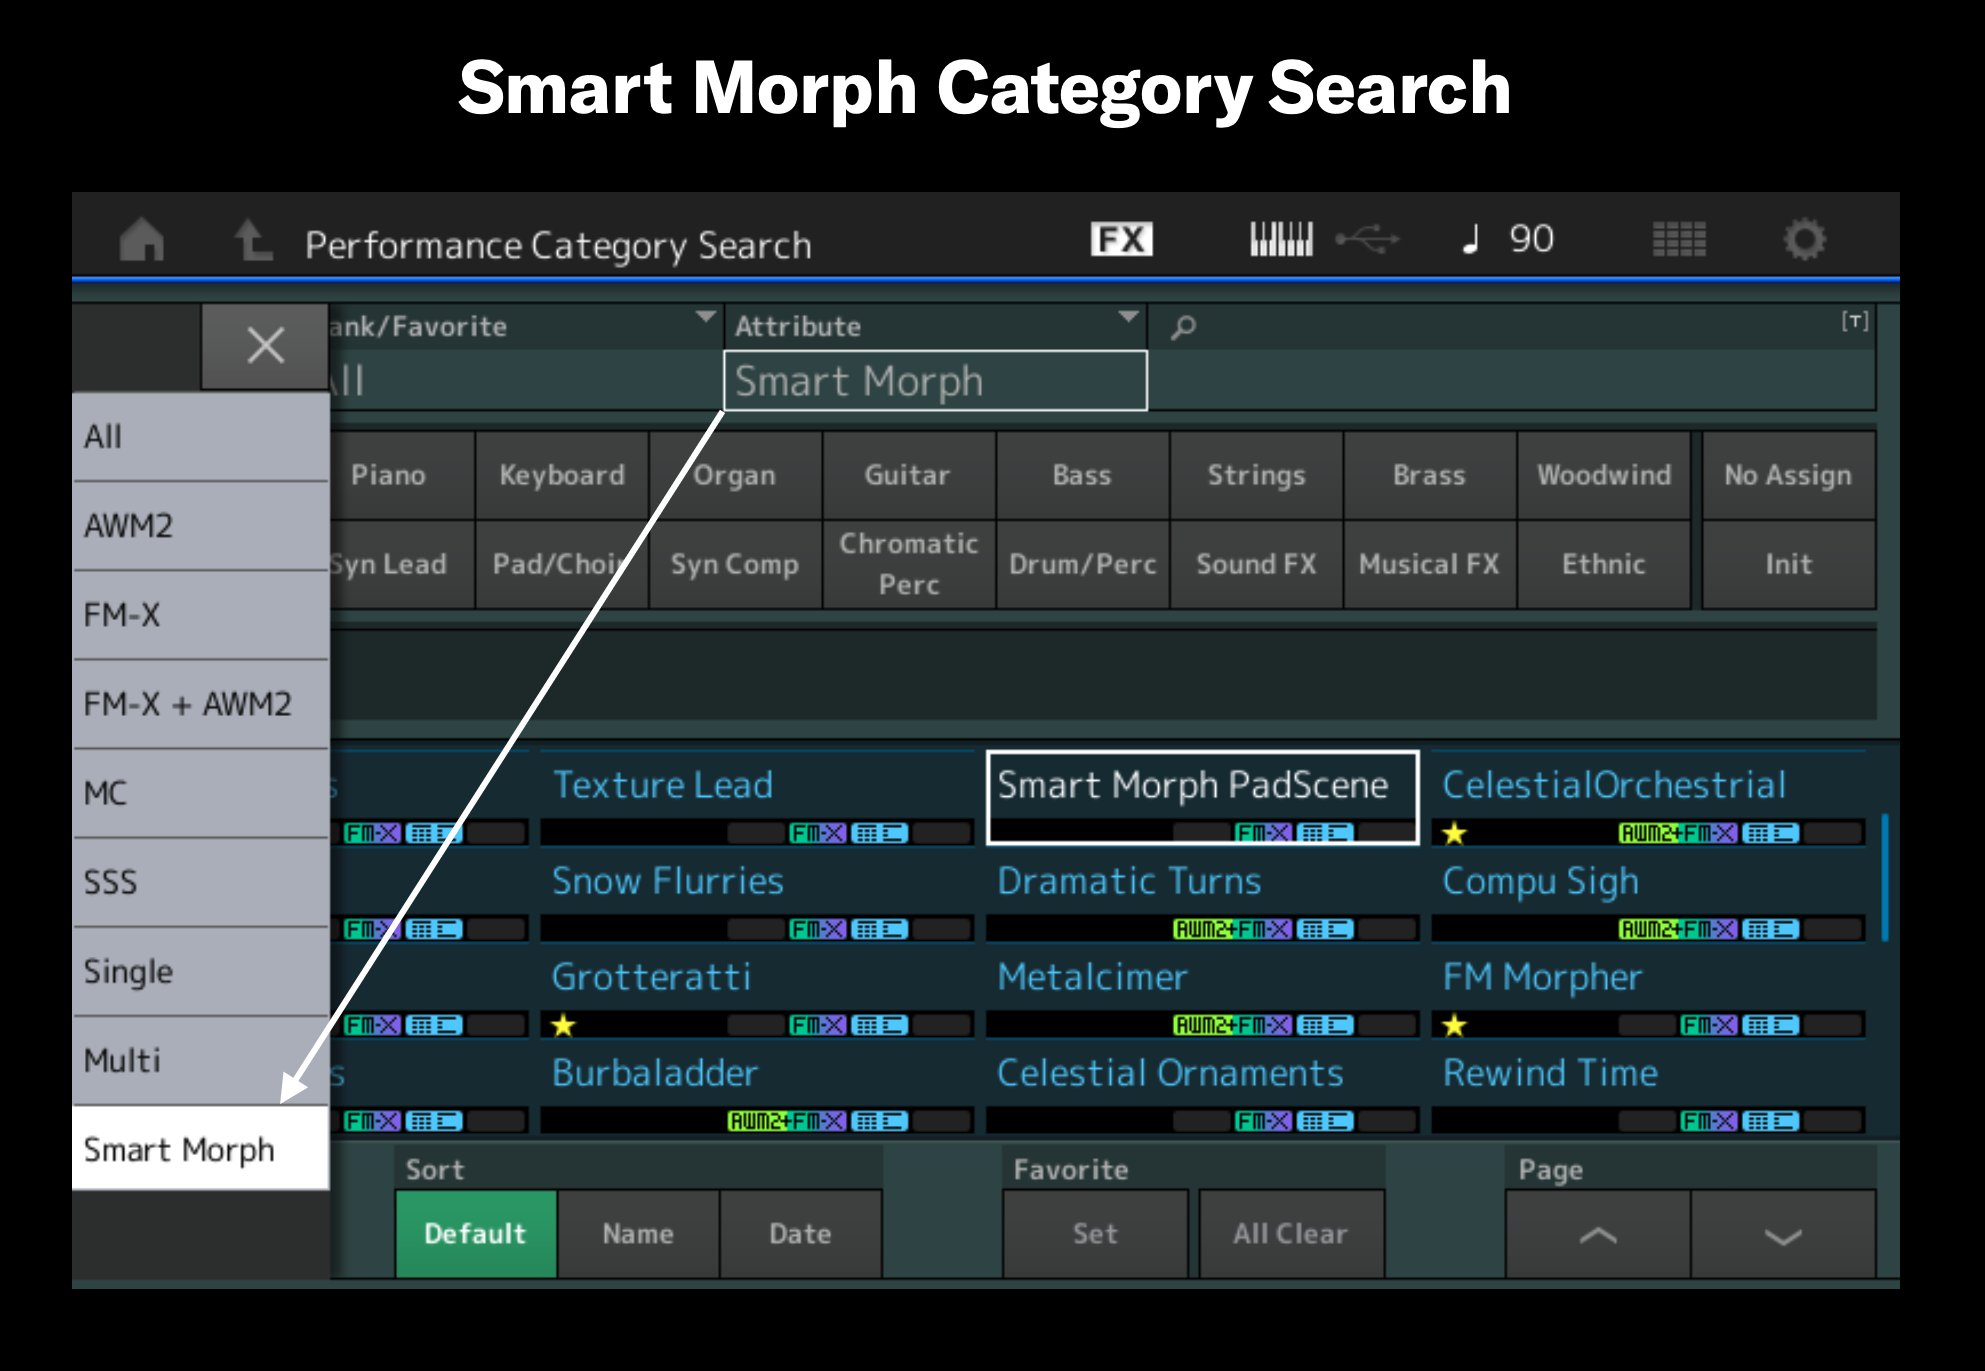
You can quickly check out all of the new 32 Preset Smart Morph Performances in Category Search. Press the [CATEGORY SEARCH] button, then touch “Attribute” in the Touchscreen. A new “Smart Morph” attribute has been added:
Exploring the Preset Performance “Hydra Drone”
Let’s take a look at “Hydra Drone”, one of the new Preset Performances. A new Performance View has been added to MONTAGE OS v3.5 to see the new Smart Morph control graphic. Check it out below:
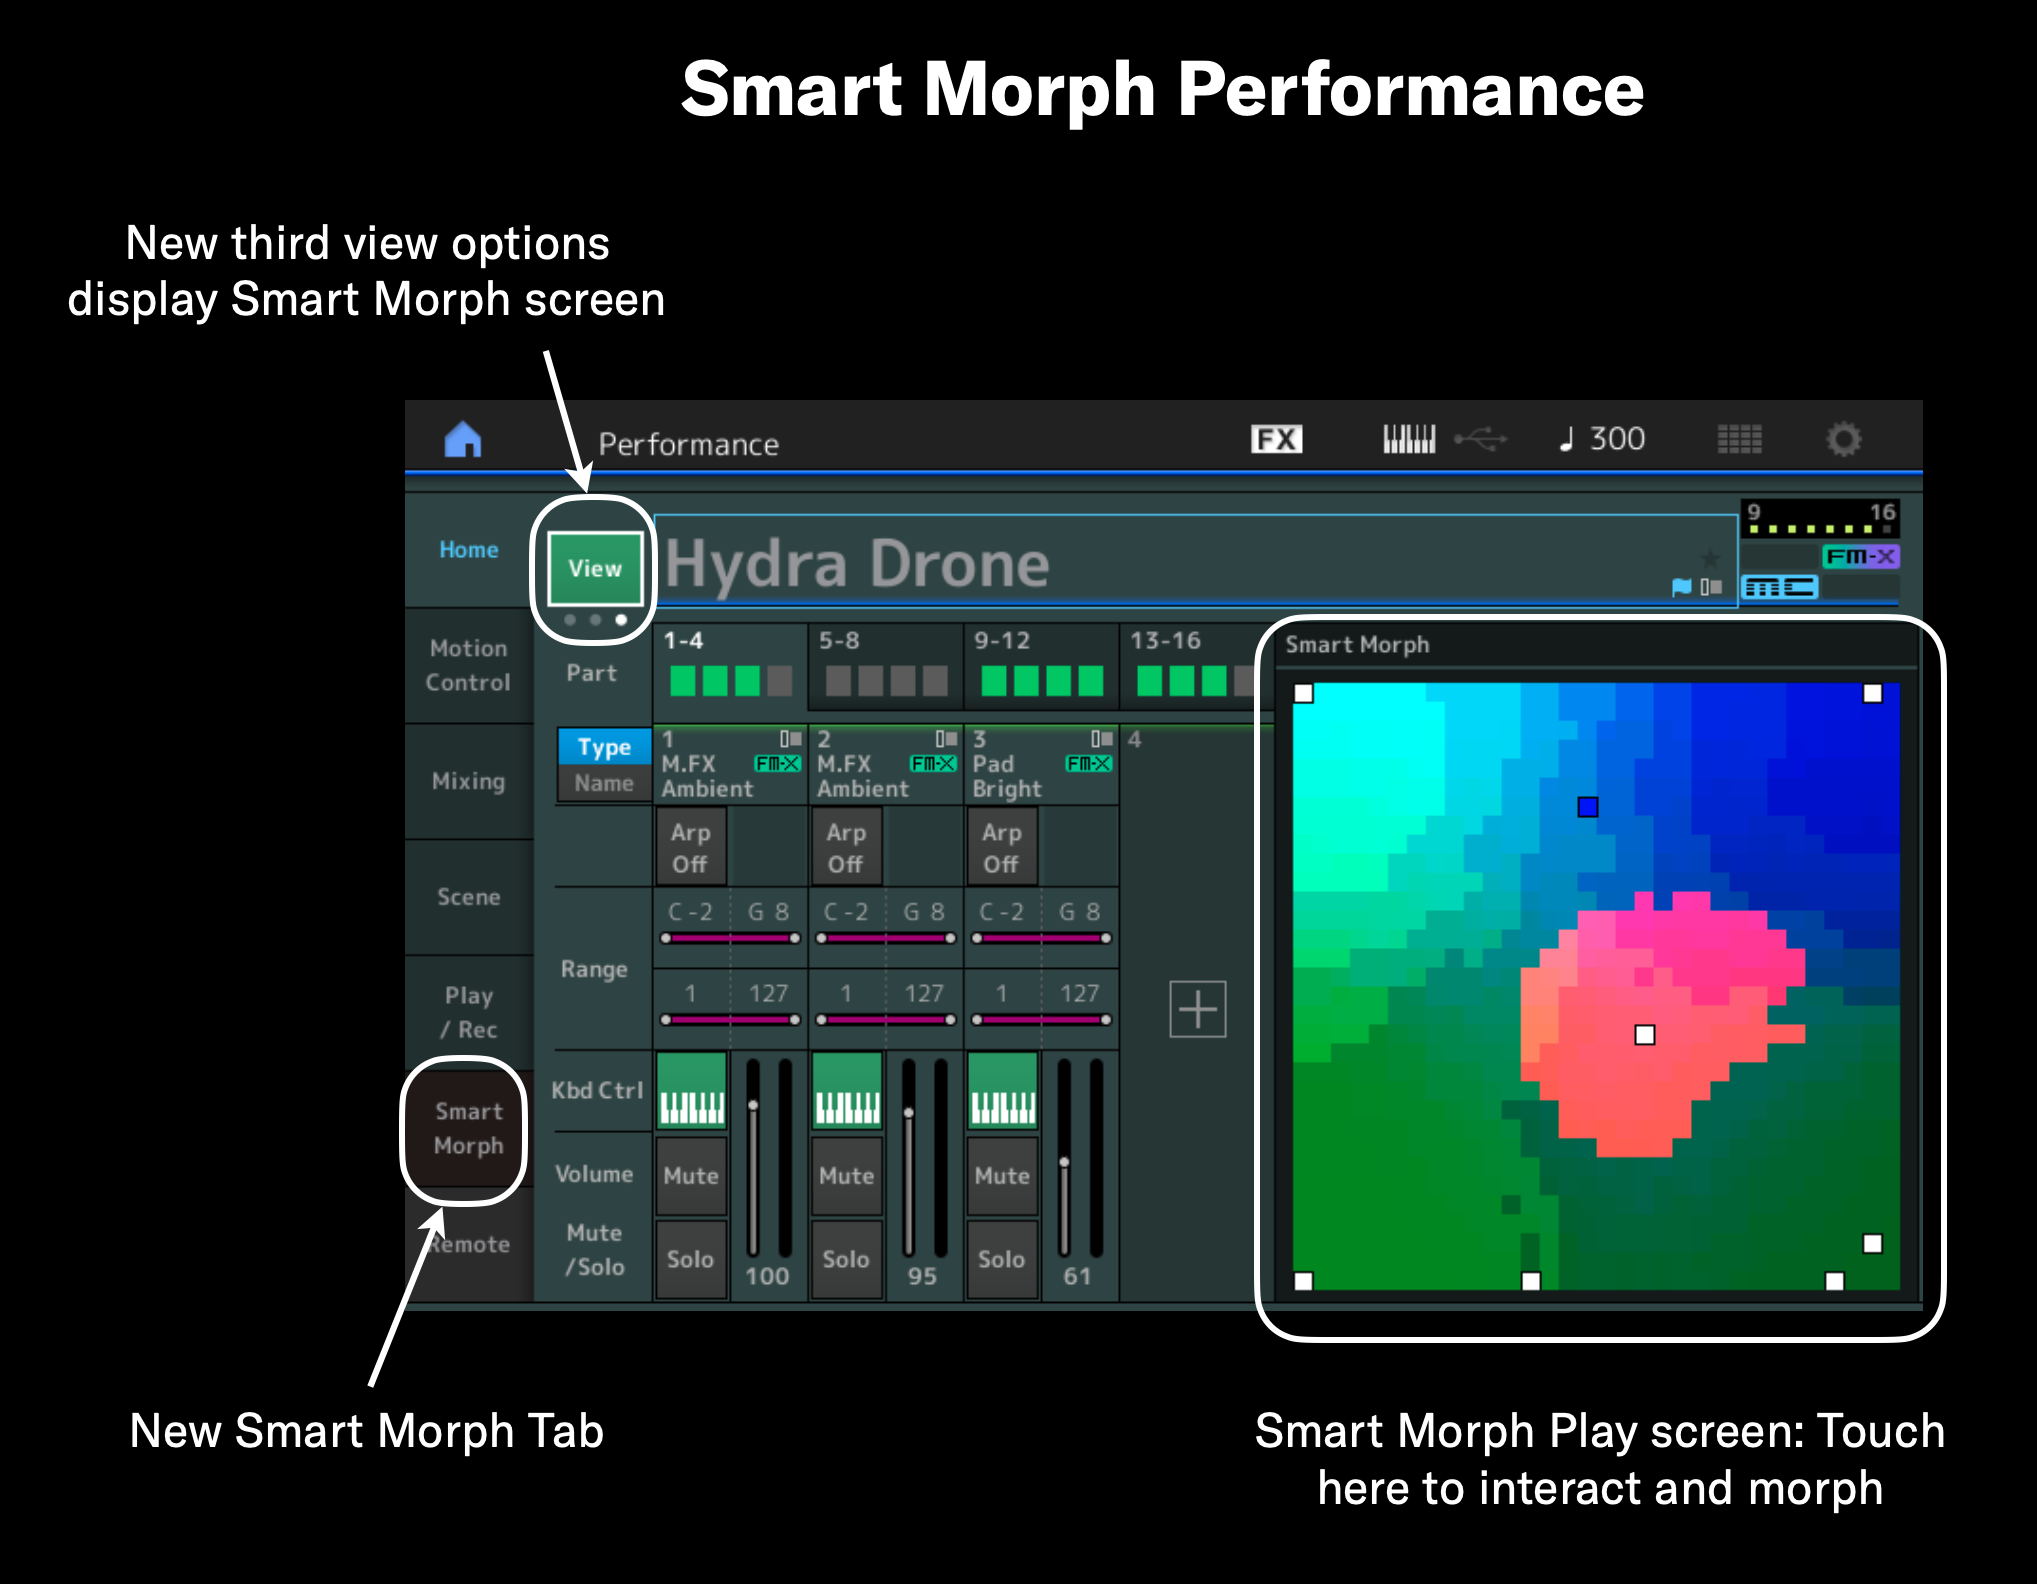
From this screen you can interact with this Performance by touching on the Smart Morph control graphic on the right side of the screen above. I find this Performance is best experienced by playing a few notes while moving your finger across the Smart Morph control area in the view seen above. The changes are really heard in the attack portion. Below is a short musical example of “Hydra Drone”. I created a very basic sequence then recorded the audio. What you hear is the playback of a Pattern Sequence and me drawing my finger across the Smart Morph Play screen. Notice how the sound morphs with the movement:
“Hydra Drone” has three FM-X Parts under Keyboard Control and uses seven Parts (Parts 9-15) as the basis for the Smart Morph. Part 1 is subject to the changes applied from the Smart Morph Play screen; Parts 2 and 3 are not affected but can still be changed with other physical controls like the Super Knob, Modulation Wheel, Knobs, etc. Let’s explore the Smart Morph Edit screens. Touch the Smart Morph Tab on the left side of the touch screen to get there. Check out the Smart Morph edit screens:
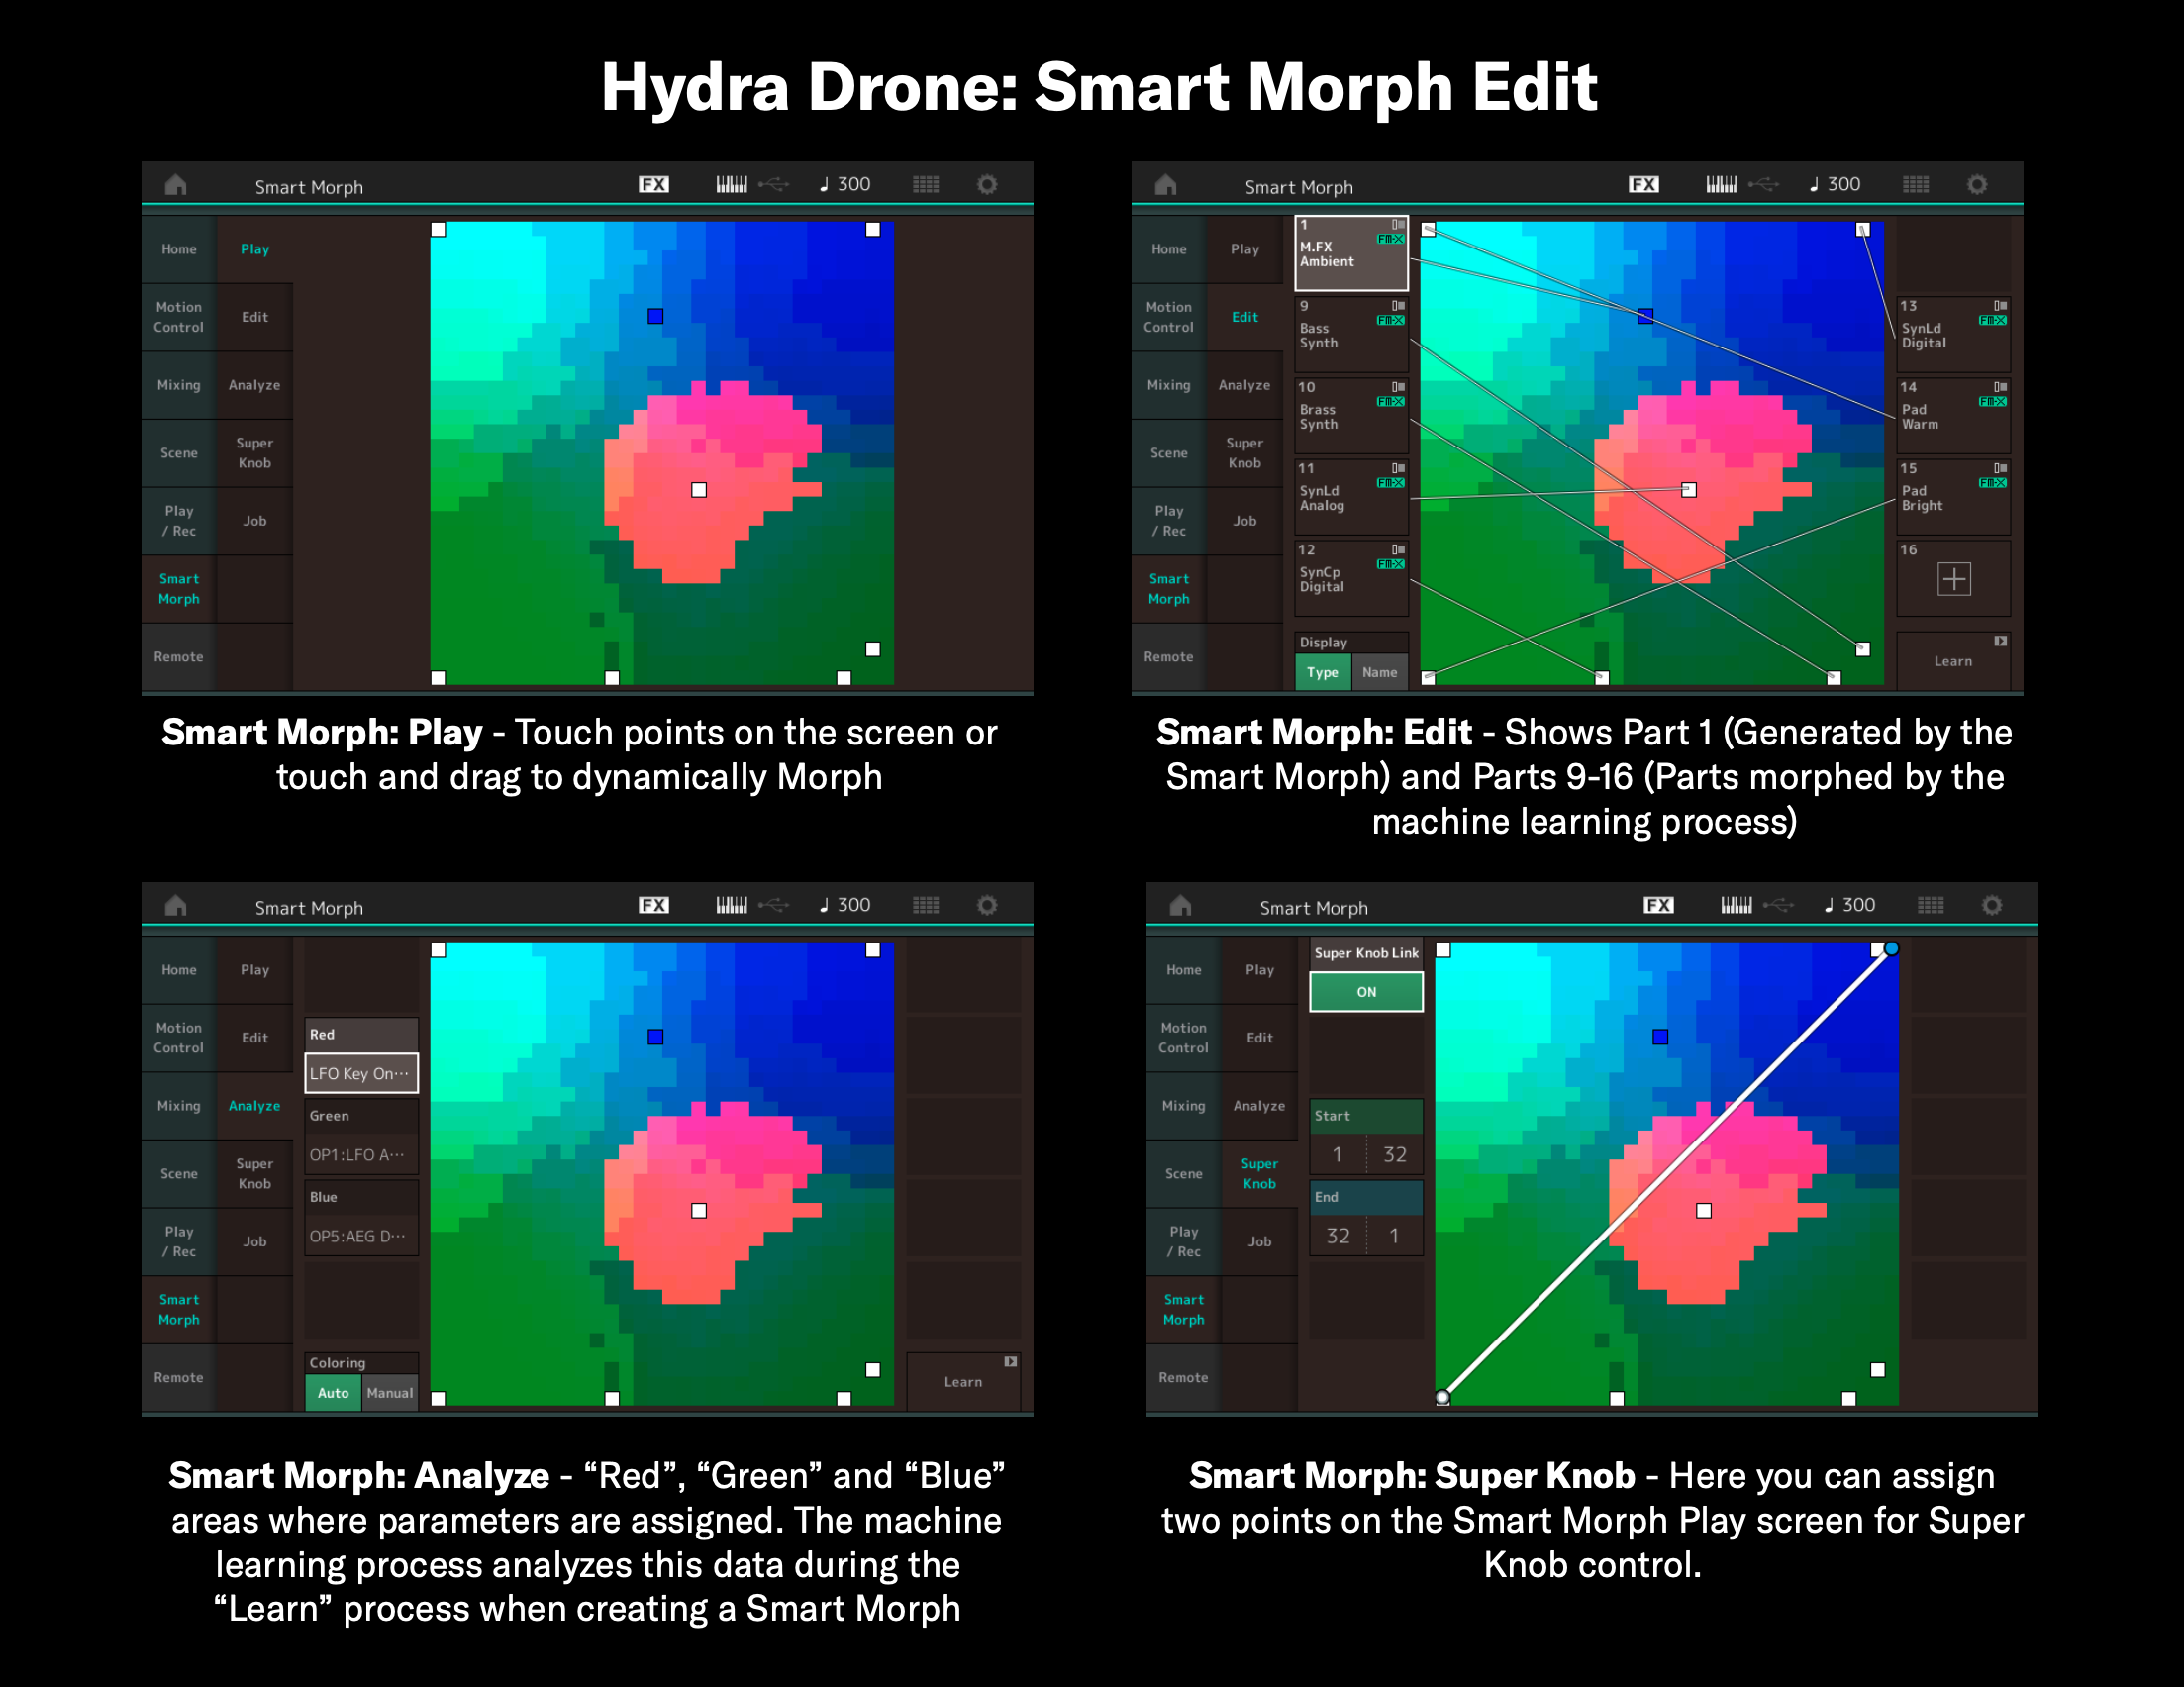
Smart Morph: Play – This screen is a larger version of the main Performance View. Touch on a position and the sound will change. By selecting and saving points you like, you can use this as a powerful tool for creating new FM-X sounds. As you heard in the example above you can touch and drag your finger on the screen for real time Smart Morph control.
Smart Morph: Edit – This is where you select the different sounds you want to morph. In the Top Left you see Part 1 (selected in the image above.) This is the Part generated from the result of the “Learn” process. I’ll explore that more below.
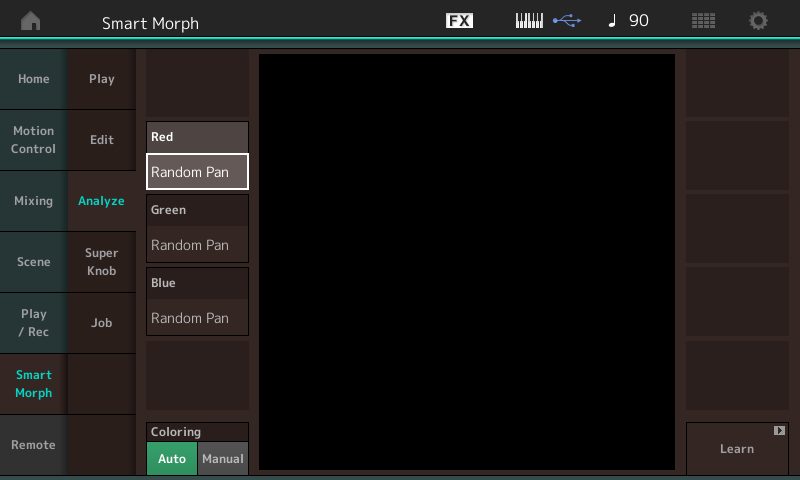
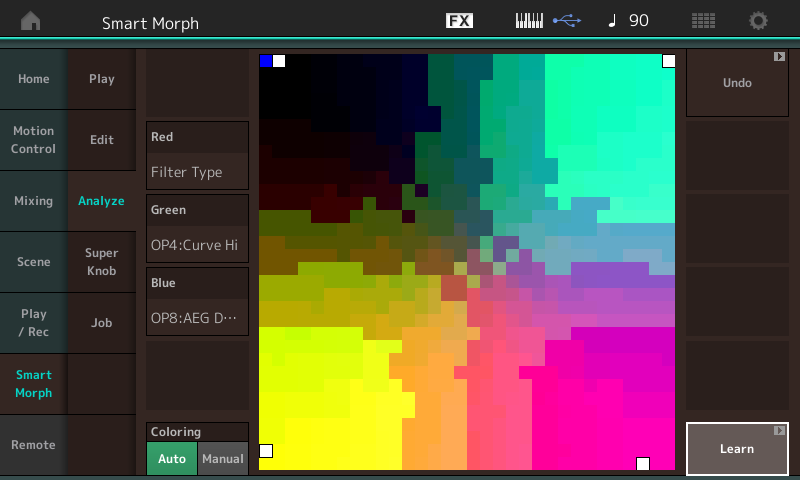
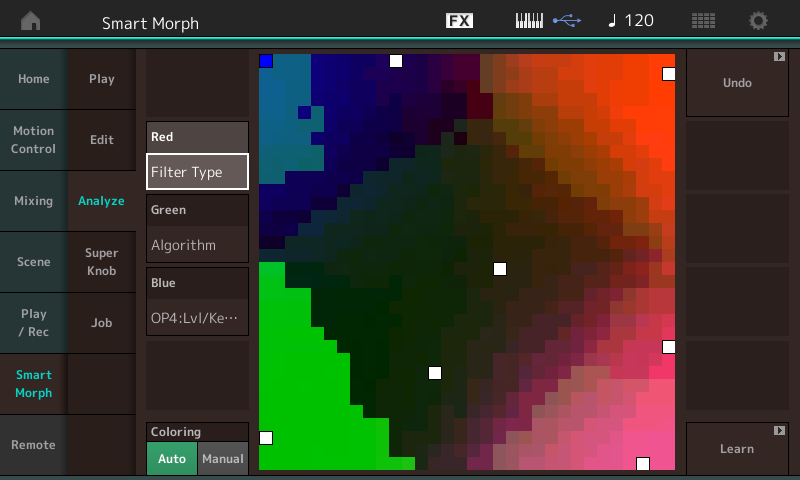
Smart Morph: Analyze – On the left side of the screen are the “Red”, “Green” and “Blue”. These are the FM-X parameters Smart Morph uses when you touch “Learn.”. There is no special significance to the color choices: The color designation for the parameters is a design idea and a part of the UI. Notice the “Coloring” selection in the left corner. When set to “Auto” the machine learning decides FM-X parameter used in the Smart Morph. When it’s set to “Manual” you can decide the FM-X parameter. More on that below.
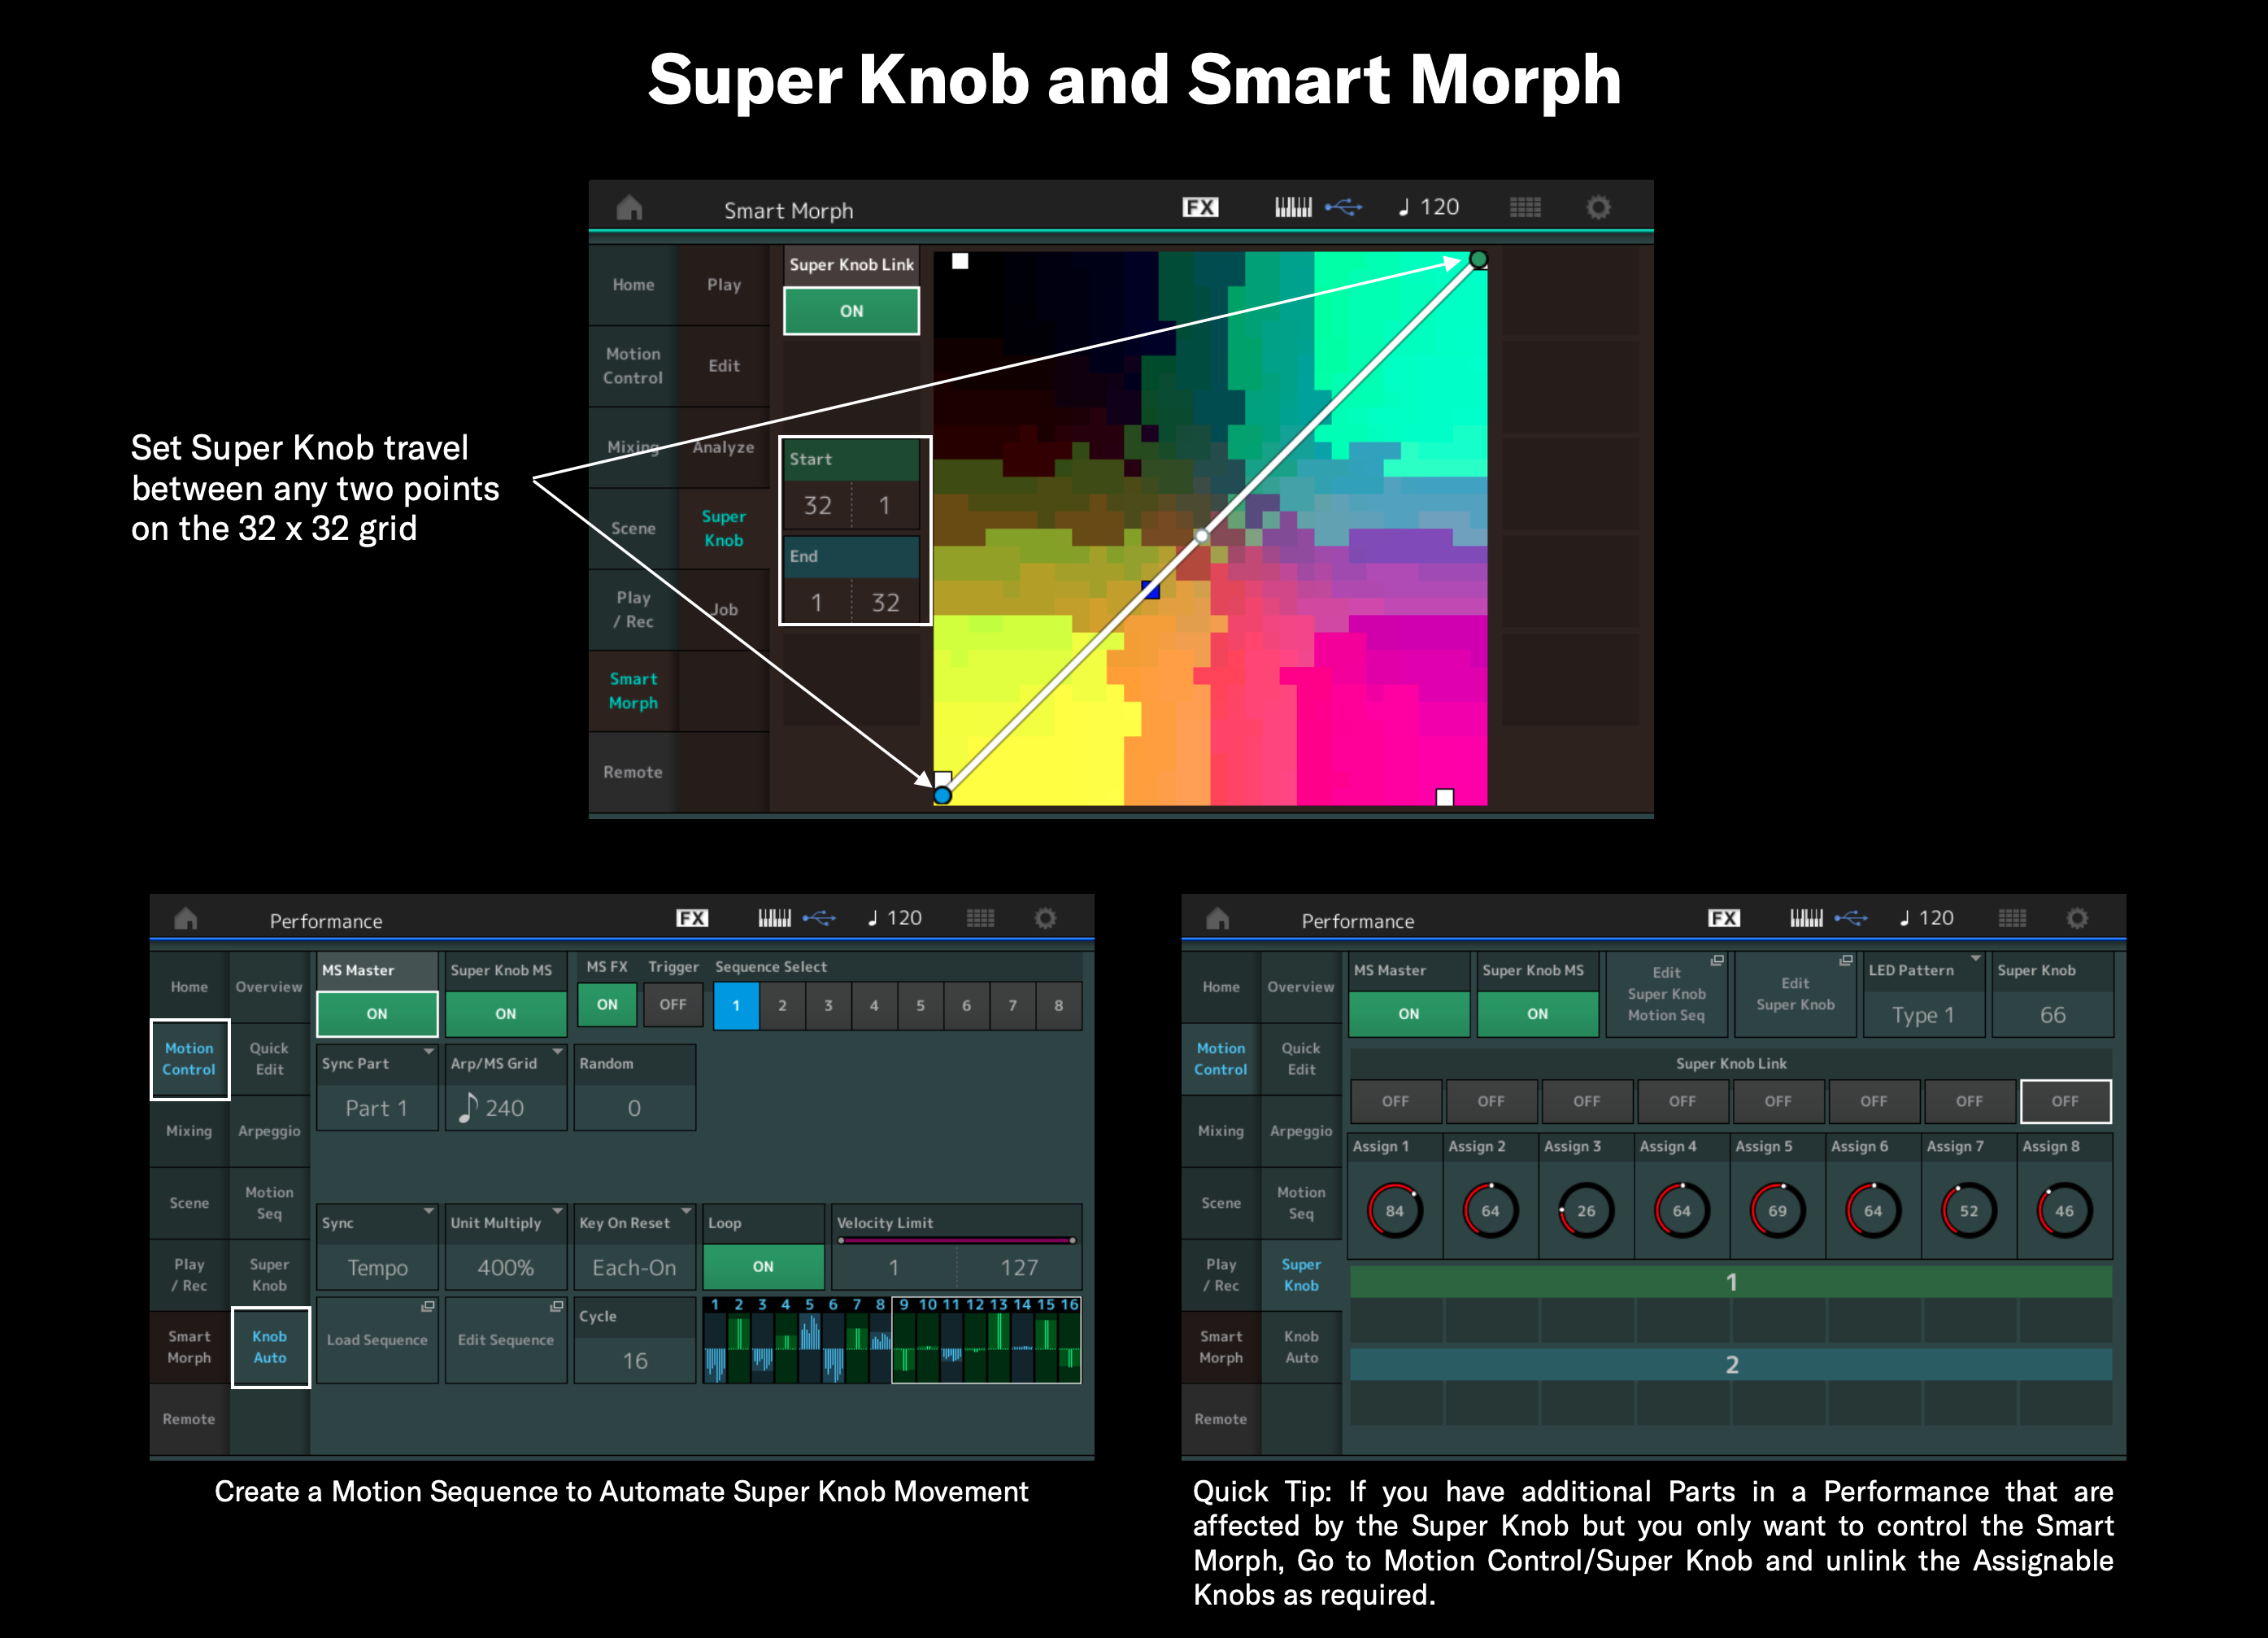
Smart Morph: Super Knob – You can assign the Super Knob to two points on the Smart Morph control screen. In the screenshot above the Super Knob is assigned to start in the lower left corner when it’s set to all the way left. As you turn it to the right the point moves diagonally along the white line to the upper right corner.
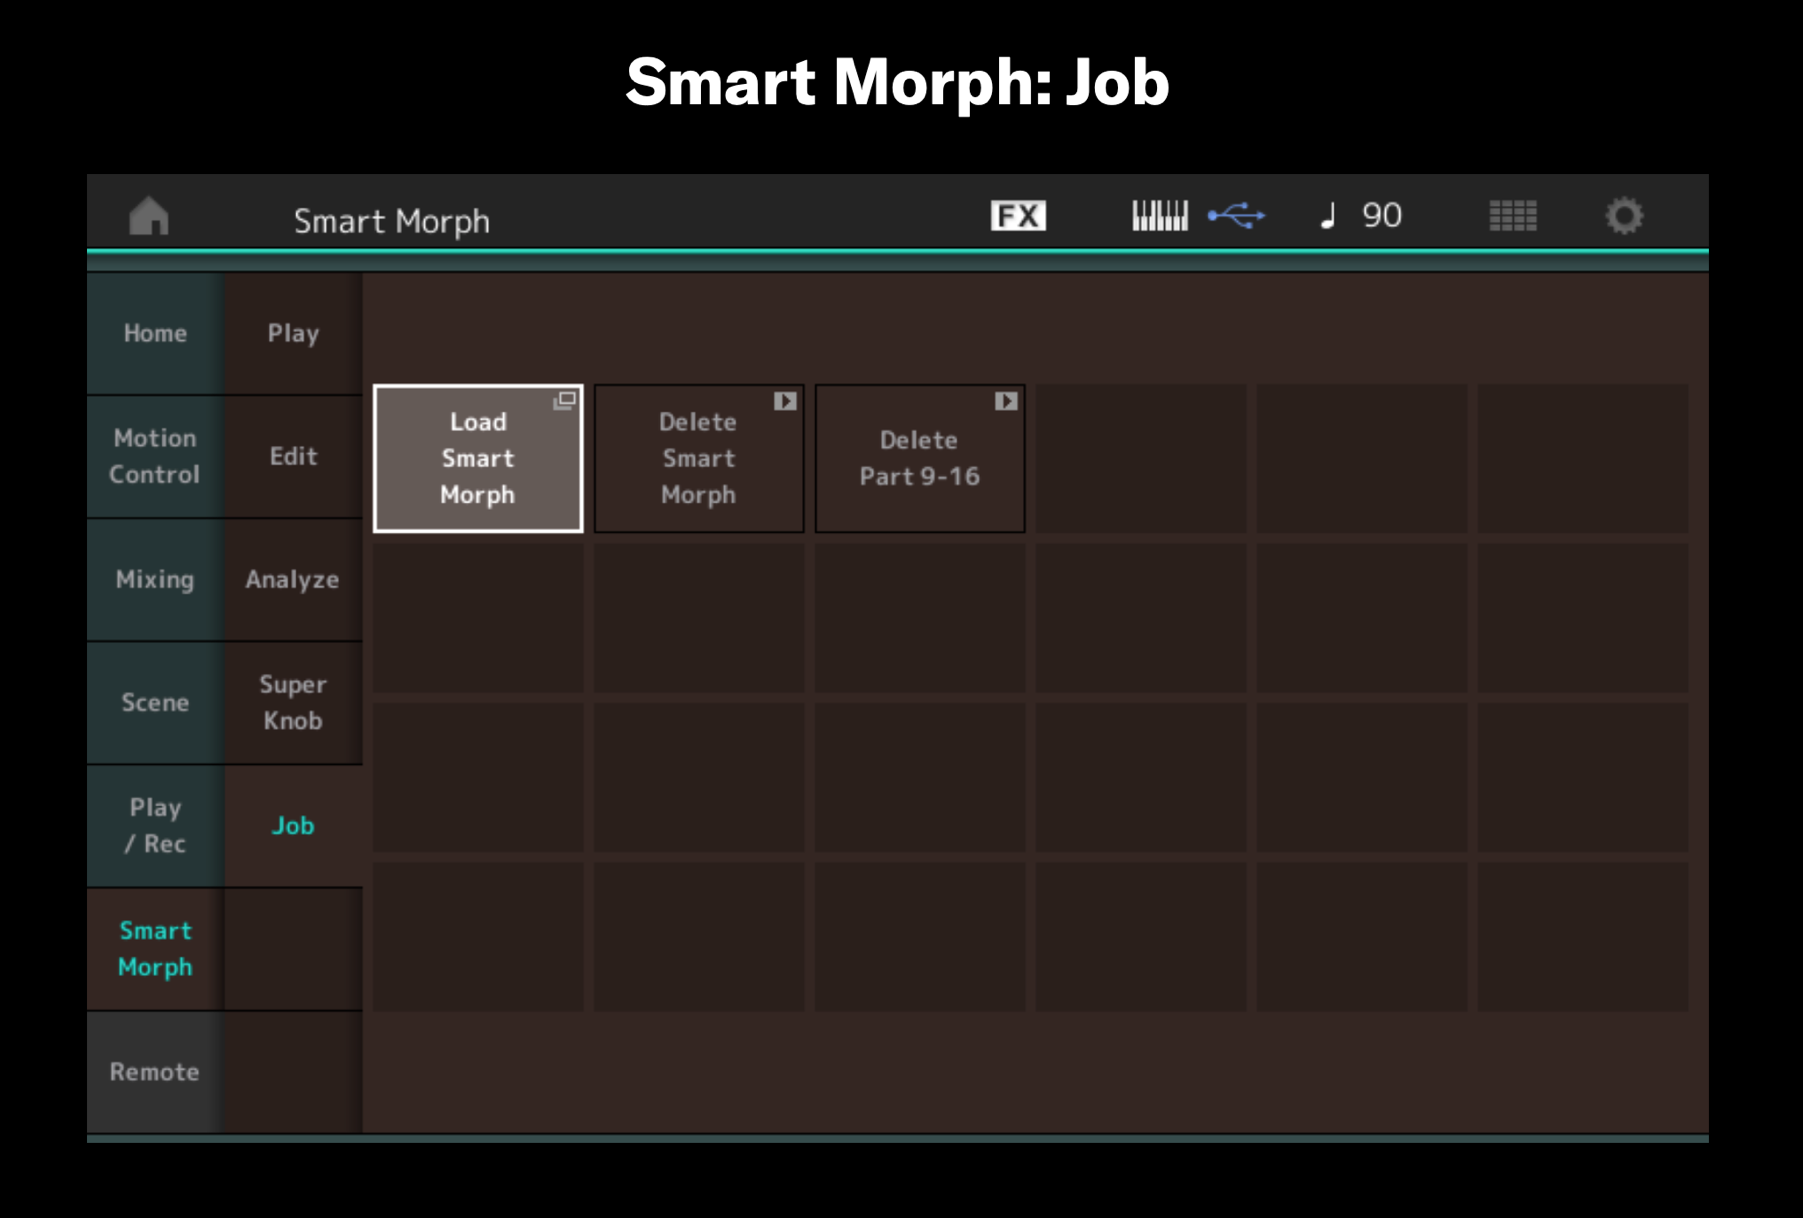
Smart Morph: Job– You can load Smart Morph Preset or User Performances into new Performances. You can also Delete a current Smart Morph from a Performance. The last Job – Delete Part 9-16 – is useful for Seamless Sound Switching. Smart Morph Performances with active Parts in 9-16 will no longer have Seamless Sound Switching. If you have created a Smart Morph result that you like and want to Seamlessly Switch to a new Performance, delete Parts 9-16. (Note: Seamless Sound Switching in MONTAGE works between Performances with active Parts 1-8. If there are active Parts in 9-16 this feature is disabled).
Creating Smart Morph “Hydra Drone” Variations
The process of simply touching on points in the screen and saving the result is a fast and easy way to create new and unique FM-X sounds. Take a look at the Smart Morph Edit screen for “Hydra Drone”:
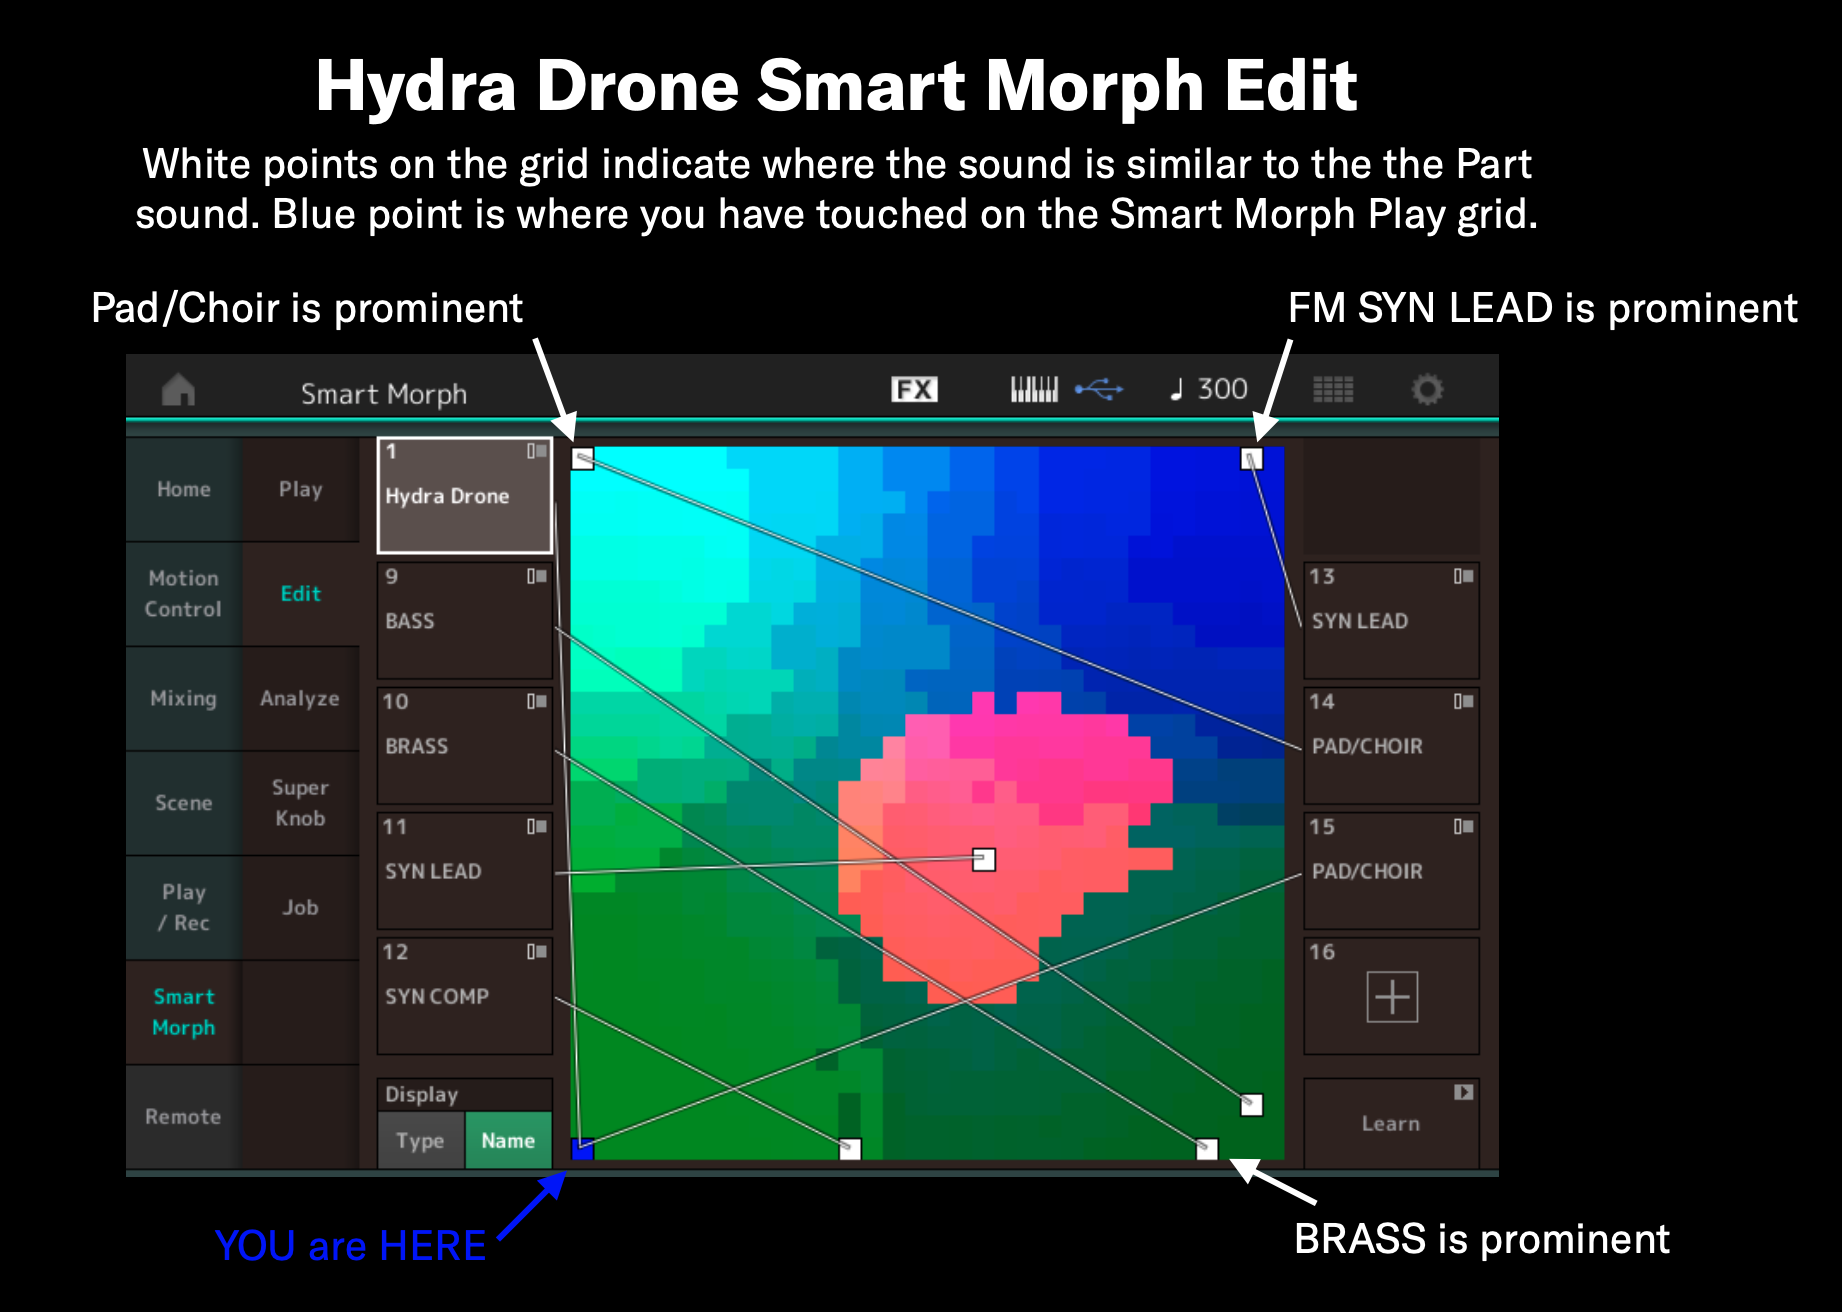
The white points on the grid are connected by a line to the associated Part, so touching on that point will result in something closest to that sound. The blue point is where you are on the grid, so in the above screen shot, the resulting sound is closest to the “PAD/CHOIR” sound in Part 15 if you follow the line (the blue point is covering the white one). Any point in between is where the morph occurs.
Below are four audio examples of this process using “Hydra Drone”. The four musical examples below are recordings of the same sequence created in the Pattern Sequencer, then recorded as audio into Cubase. Each example is accompanied by the Smart Morph Play screen capture, and what you hear is the resulting sound from the blue square point I’ve circled on each of Smart Morph Play screens (in contrast to the audio example above where you hear the result of drawing a finger around the Smart Morph Play screen). The Soundcloud audio examples include a screen shot of the Smart Morph Control grid for each one.
Hydra Drone Variation 1 has a very sharp, huge percussive attack and a with a cool synth sitar-like quality. It’s a lot of the bass in Part 9 morphed with brass and lead.
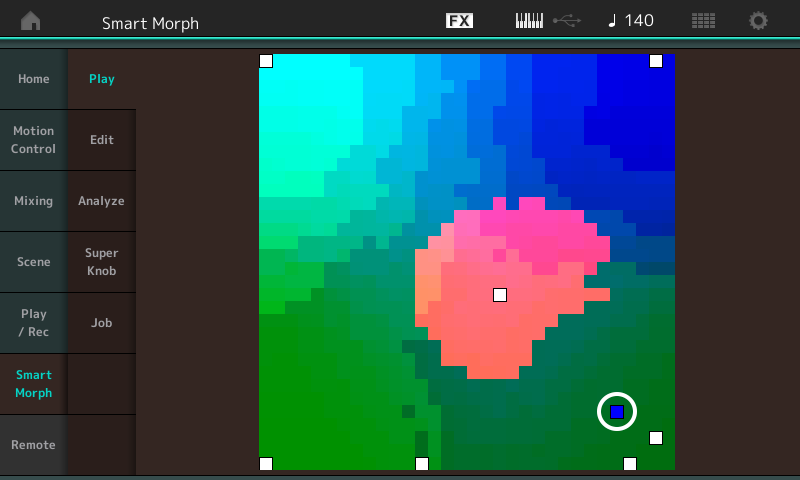
Hydra Drone Variation 2 has a much softer, ethereal quality and lacks the percussive attack. It has a lot of the character of the sound in Part 13:
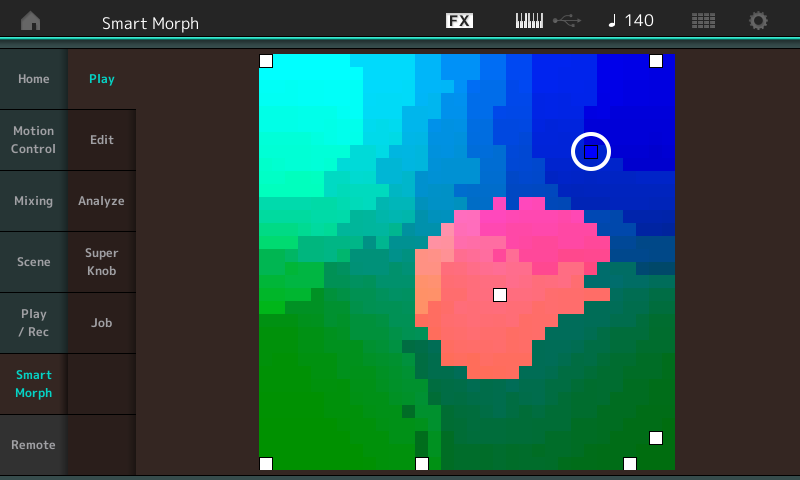
Hydra Drone Variation 3 retains the softer quality but has a bell/choir texture. The pad/choir sound in Part 14 is prominent:
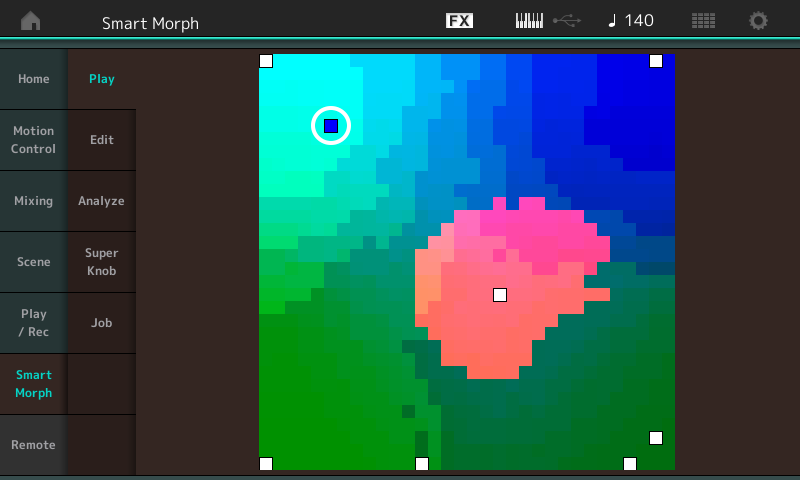
Hydra Drone Variation 4 has a glassy, bowed pad sound and is less percussive. The pad/choir sound Part 15 is prominent in this variation:
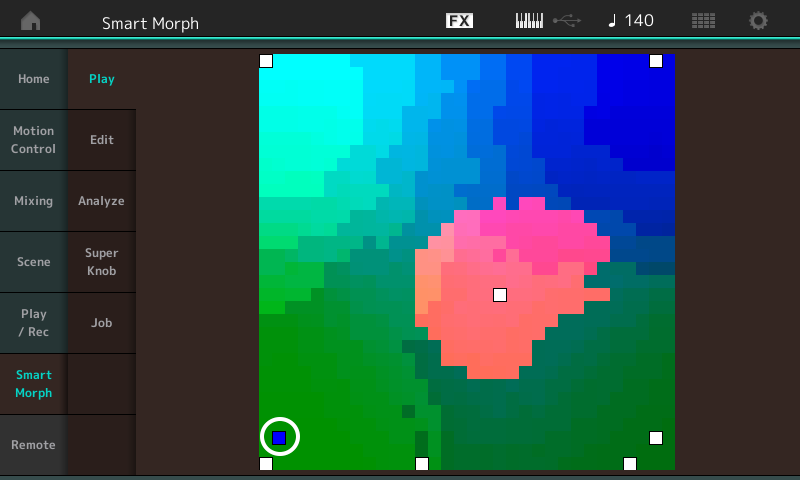
Each one of the Hydra Drone Variations is interesting and different. It doesn’t require years of FM programming experience to create usable FM sounds with Smart Morph.
Creating a Smart Morph from Scratch
Creating a new Smart Morph Performance is easy and it’s best not to overthink the process. My best advice is let the “smart” in “Smart Morph” do the thinking for you! The machine learning process generates interesting results and it’s easy to create new variations by simply touching “Learn.” Don’t like the result? Touch “Learn” again and the process is repeated with different results.
Start with the Performance “Init Normal (FM-X)”. This one works great as Part 1 is going to be replaced by the resulting Part created by Smart Morph. From here touch “Smart Morph” on the right-hand side of the touchscreen, then “Edit”. This is where you choose four FM-X Voices for parts that to morph together and place them in Parts 9-12. For this Smart Morph choose the following voices:
- Part 9: “Hard Roads”: This is an expressive FM EP sound with a bright attack, long decay and lots of timbral changes happening with velocity.
- Part 10: “FM Bell SquarePad”: The name defines the sound. A nice bell-like attack followed by a dark sustained square pad sound that opens up and grows.
- Part 11: “Brass CS80”: An FM synth brass sounds somewhat reminiscent of the CS80
- Part 12: “Dark Journey”: This is a sound from the “Musical FX” category with an interesting evolving attack that changes dependent on velocity.
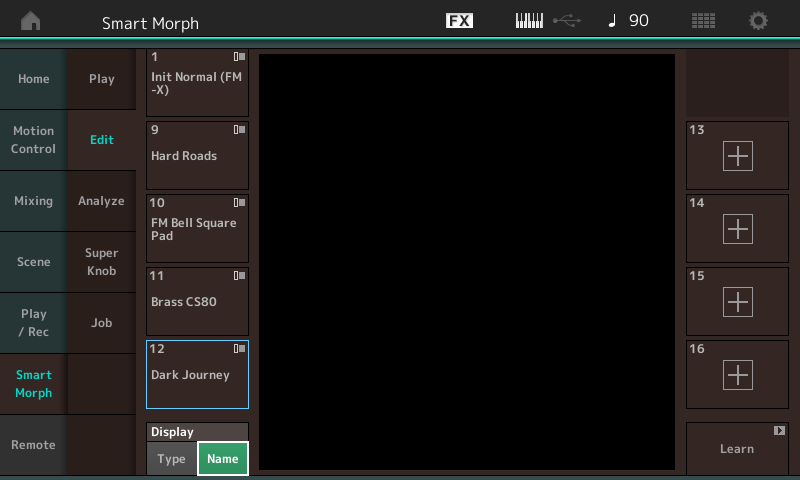
Before touching “Learn” check out “Analyze” on the right side of the touchscreen. Currently it’s just a black page with “Red”, “Green” and “Blue” selections each with the default parameter “Random Pan”:
Now, touch “Learn” on the bottom left side of the touch screen. When you do this will animate and change colors while the machine learning process creates the Smart Morph. After the process is complete there is now a colorful Smart Morph Play screen. In this example “Random Pan” parameter has been replaced with “Common 1: Filter Type” in the Red section, “OP4: Curve Hi” in the Green section and “Op8: AEG Decay 2 Time” in the Blue section. Touch on the image below to play a short musical example of this Smart Morph as I morph using the Smart Morph Play grid:
Want some Super Knob control? Touch on Super Knob and turn “Super Knob Link” On. You can set the Super Knob to move between any two points that you can move manually or automatically using Super Knob Auto:
Let’s take a look at the Parameters available to Smart Morph. There are a total of 35 parameters for the eight Operators, 35 for Common 1 parameters and 34 for Common 2 parameters that can be assigned to each of the colors. When the “Coloring” selection is set to “Auto” the parameter choices are done automatically. When choosing “Manual” you can freely choose the parameters for each color. Check out the selections available below:
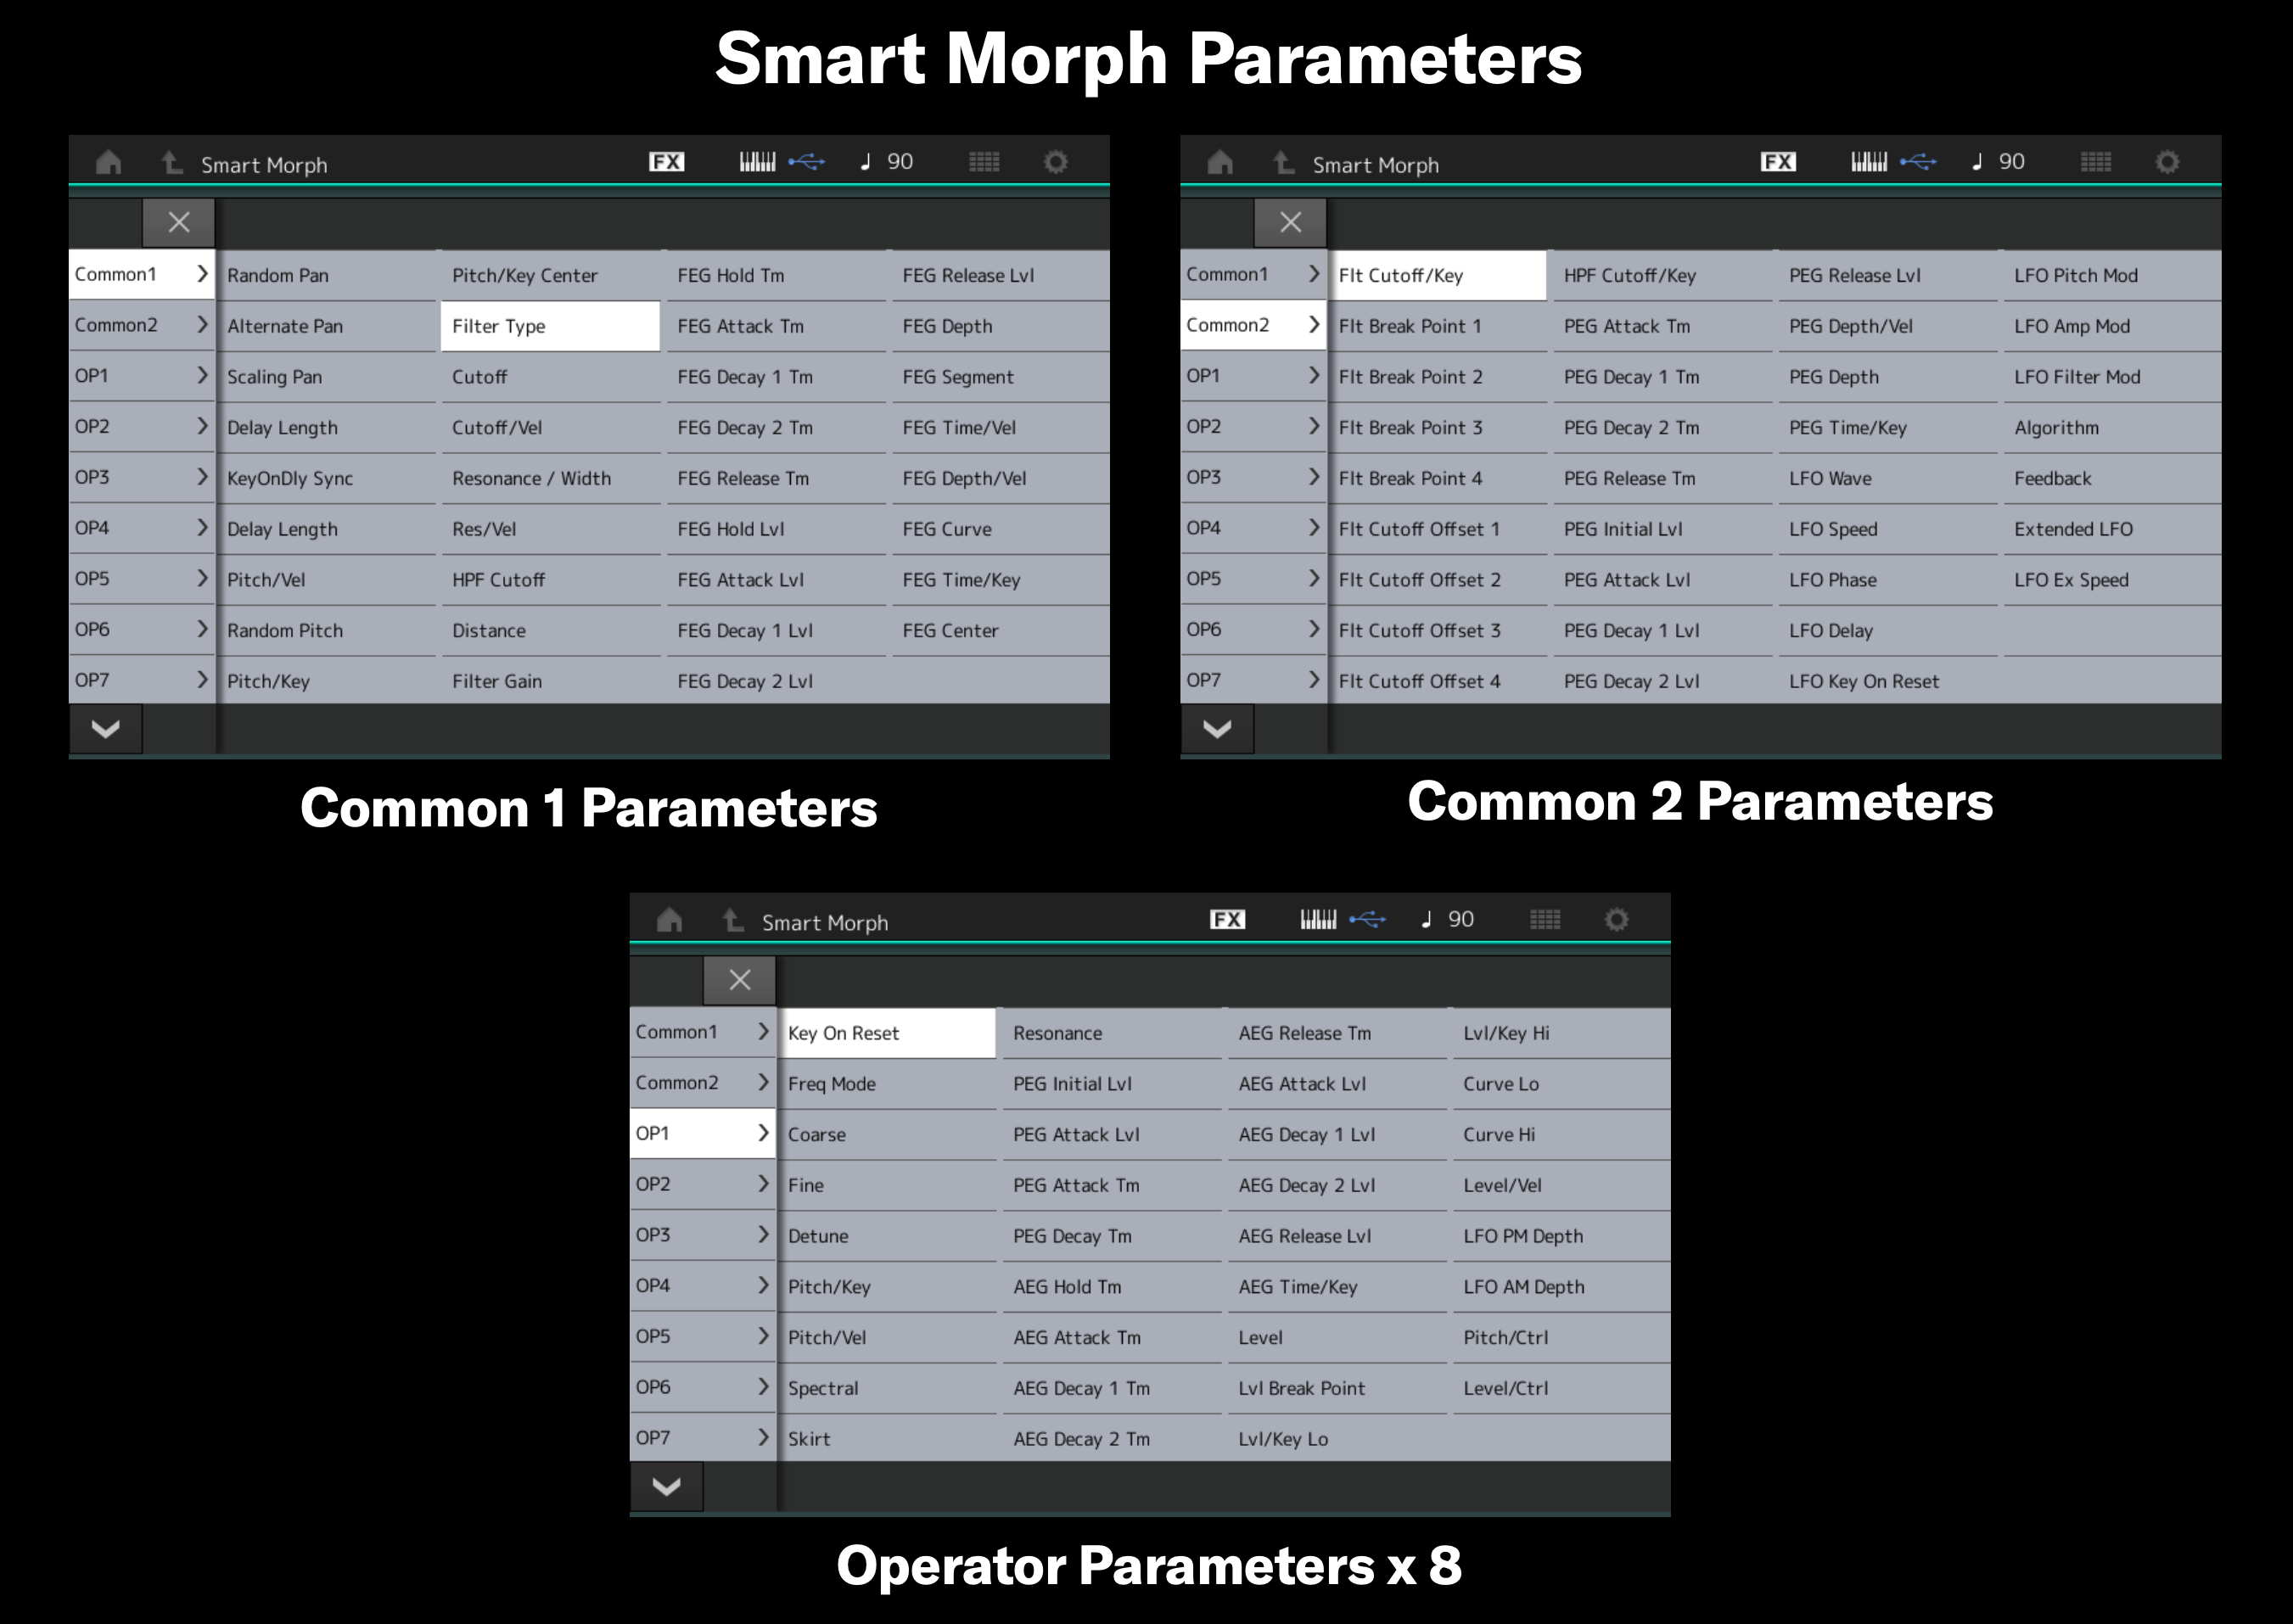
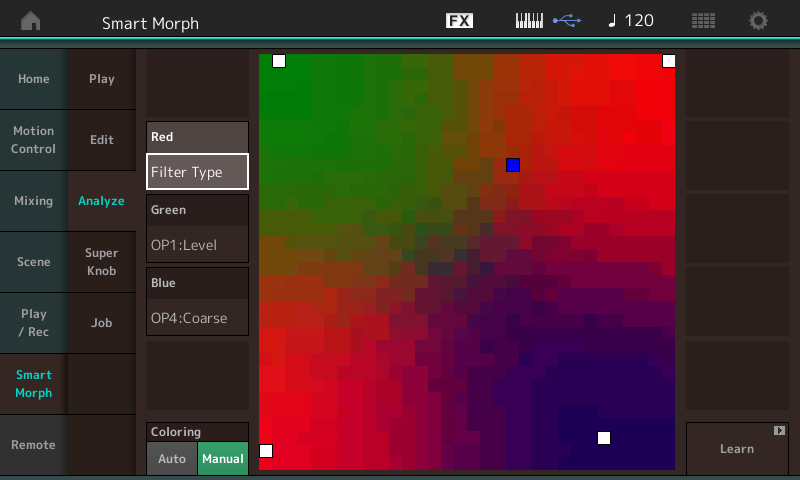
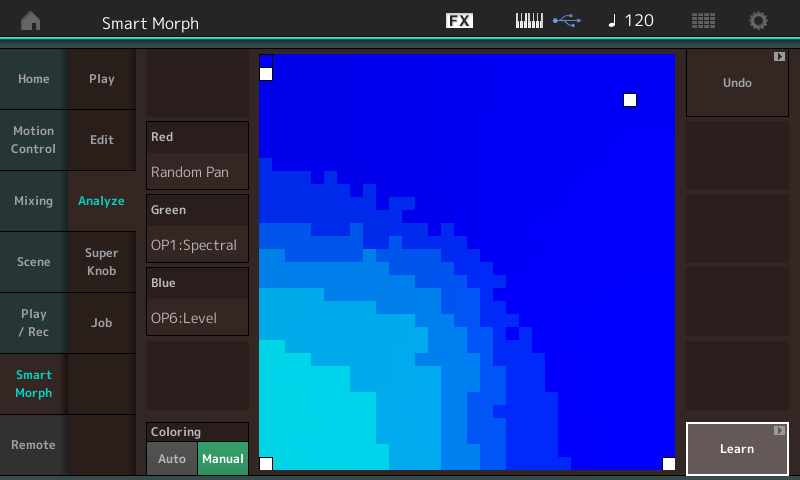
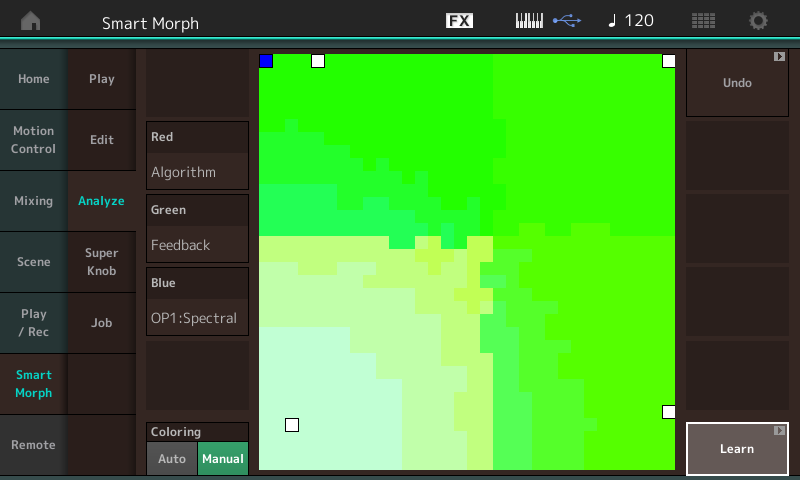
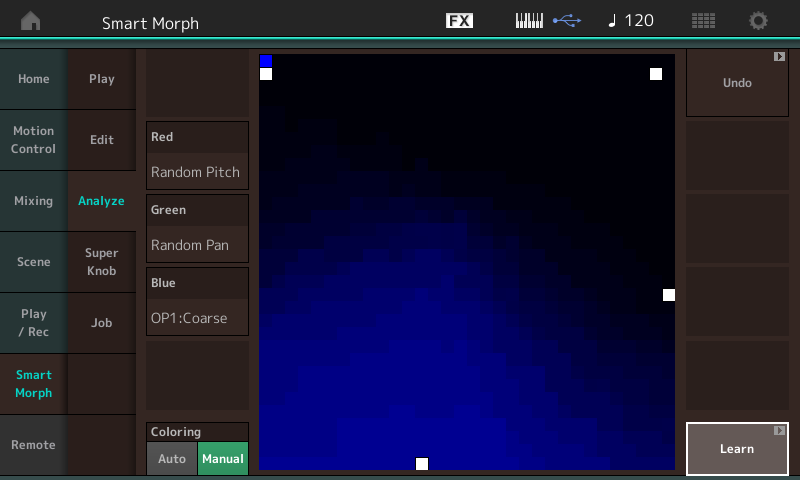
This is where the fun can really begin with Smart Morph! For example, if you select Parts that all have similar Algorithms, choosing Operator parameters that have drastic variations to the sound can yield some interesting results. Or maybe just select “Algorithm” from the Common 2 list as one of the Parameters: This will generate some really cool results! Below are five audio examples. Each screen shot shows the Smart Morph result from different choices I made using the “Manual” Coloring selection. The short musical example is a the same in each example and I recorded the audio and morphed each one in real time using the Smart Morph Play grid. For each of these variations I was going for fairly radical change in the morph without thinking too much. The cool thing about Smart Morph is you don’t have to think too much. It should encourage you to be experimental and try things out. The Soundcloud audio examples below include a screen shot of the Smart Morph Control grid for each one.
The first Smart Morph I chose the Filter Type from Common 1, for Red Op1 Level for Green and OP4 Coarse tuning. I love how it starts as an organ type sound then morphs into bells, plucked textures, back to an organ sound and off into outer space.
In the next example I chose Common 1: Random Pan for Red, OP1: Spectral (which changes the harmonic content of Operator 1) for Green and OP6: Level for Blue. This one starts with a cool bell pad has some cool timbral shifts, detuning, and more.
This example resulted in some huge sound variation. Algorithm switching is most likely responsible for the dramatic changes. Red is Common 1: Algorithm (which switches the operator arrangement), Green is Common 2: Feedback and Blue is OP1: Spectral.
An experiment in randomness. Common 1: Random Pitch for Red and Common1: Random Pan for Green generate some very cool pitch and spatial textures. OP1: Coarse in Blue adds to some very interesting changes, and at several points the sound seems to blink out and morph back in.
For the final example I added new sounds to Parts 13-16:
- 13: FM Vibe 1: A basic DX7 style FM Vibraphone sound
- 14: Piano Drops: As percussive sound similar to the initial attack of a piano.
- 15: Spacy FM-X Drops: The name says it all. This sound has a cool resonant chirp to it and randomly pans around the stereo field.
- 16: FM Vocal Lead: A cool FM lead sound simulating a voice.
For this one Common 1 Filter Type and Common 2 Algorithm In Red and Green change the timbre and the additional Parts add lots of percussive droplets mixed with some cool organ and pad textures:
Smart Morph is one of the most unique and fascinating additions to MONTAGE. It is a new approach to FM sound creation that doesn’t take a lot of programming skill to get interesting results. And when you find a sound you like simply save it and you’ll find the result in Part 1. If you want to you can quickly delete Parts 9-16 and keep the single Part or copy that part to a different location and generate a new Smart Morph. EXPERIMENT!
Want to share your thoughts/comments? Join the conversation on the Forum here.
