
Mastering CP: Exploring the New Sounds in CP OS v1.2
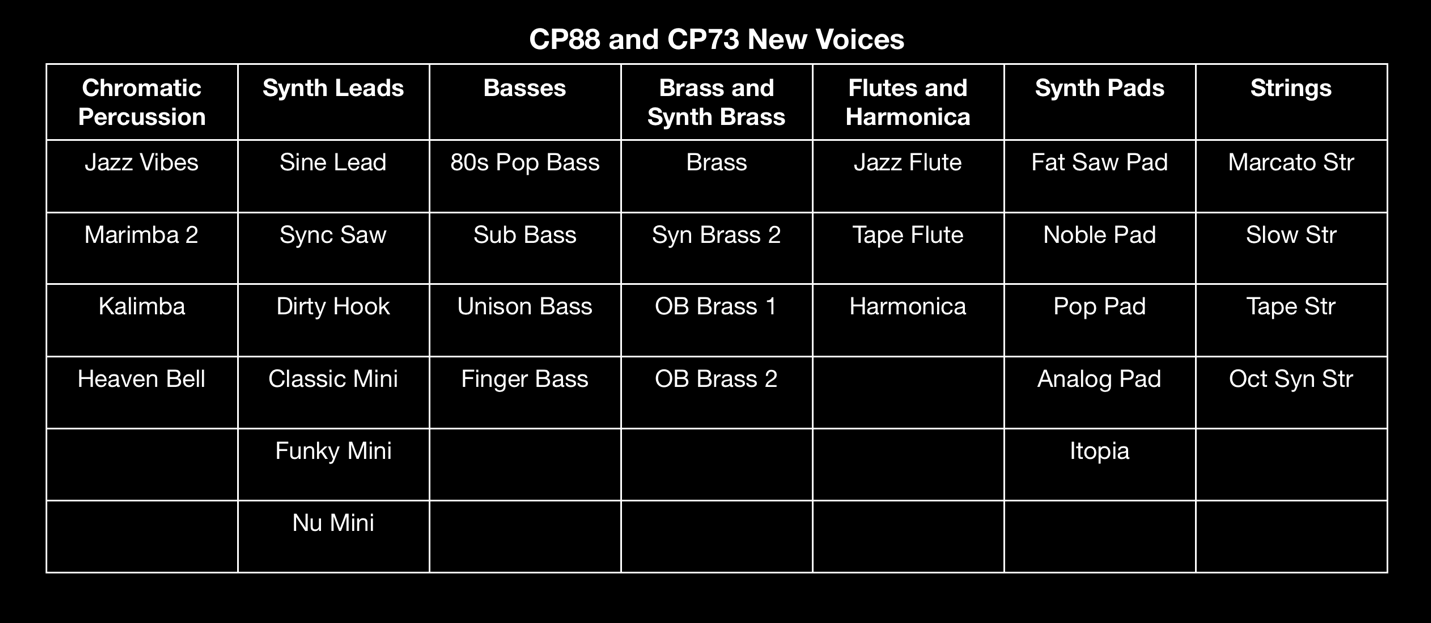
CP OS v1.2 introduces some cool new Sub Section Voices. Check out the breakdown below:
I created a few Live Set Sounds using these new Voices. Download all of them from Soundmondo and check out audio demos on YamahaSynth Soundcloud or just keep reading and play them directly. Below are my descriptions of each Live Set along with musical examples I created using the CP88. Quick music production tip: I recorded these as MIDI and audio into Cubase with the CP88 connected via USB. The built in USB MIDI and audio connectivity makes this process simple using a single cable connecting the CP and your computer.
Since each of these Live Set Sounds use Advanced Mode and customized Modulation Lever assignments, I’ll explain how to access both functions up front. You can find both functions under the “Settings” Menu.
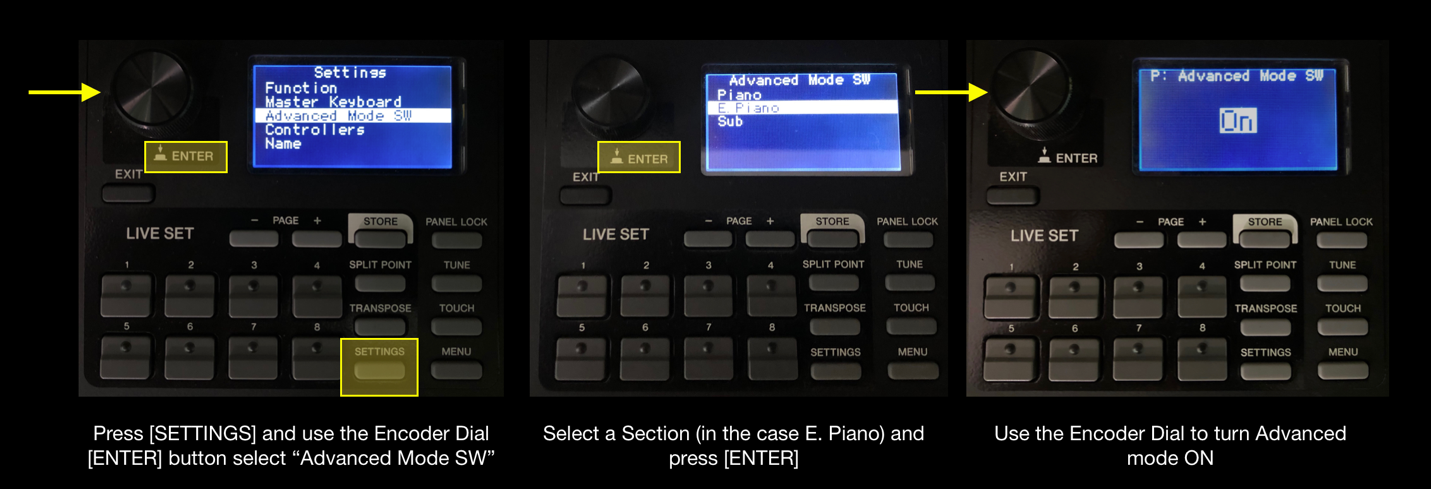
Advanced Mode Setup (Settings/Advanced Mode Sw)
Advanced Mode is a setting that allows you to use any Voice in any Section. For example, say you wanted to play the CFX Concert Grand through the E.Piano Section effects, or use one of the Sub Voices in the Piano Section. Advanced Mode allows you to do that. Below is a graphic that shows how to access and engage Advanced Mode in the E.Piano Section:
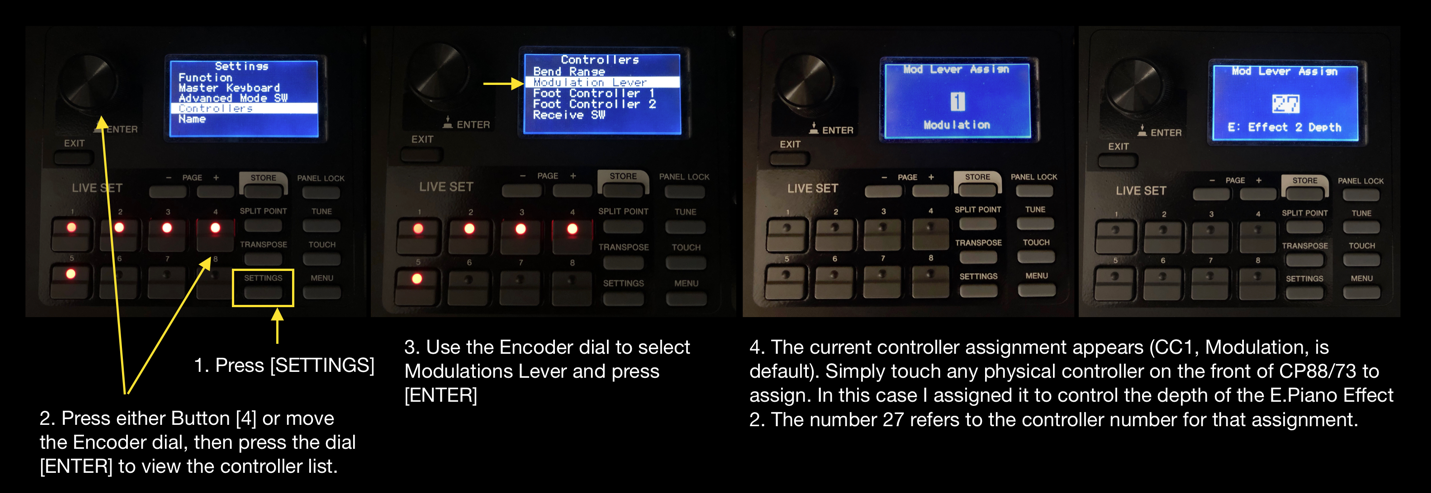
New Controller options (Settings/Controllers)
In each of the Live Sets below I set the Modulation Lever to control something different than the default Modulation assignment. It is easy to customize the Modulation Lever to any front panel parameter by following these simple steps:
Each one of these sounds have either the Piano Section, the E.Piano Section or both in Advanced Mode. Go here to check out a dedicated article on Advanced Mode. Check out this article for more about Settings and Menu, the difference between the two and how they are used to customize Live Set Sounds and global settings.
That is the basic set up for each of the Live Set Sounds below. Check out the Live Set Sounds Below:
PadLeadSplit
This is a Pad/Lead split using the two new Voices added in CP OS v1.2. “OB Brass 1” is in the Sub Section with the octave set at +1. “Classic Mini” resides in the E.Piano Section which is in Advanced Mode (this allows any Voice to appear in any Section). The Modulation Lever assignment controls the Rate of the Ring Mod effect for interesting live modulation changes.
Soundmondo Link: https://soundmondo.yamahasynth.com/voices/50227
Austrian Rain CP
“Imperial” (Bösendorfer Imperial 290 Concert Grand handmade in Vienna, Austria) appears in the Piano Section with lots of reverb added. The E.Piano section adds “Marcato Strings” (Advanced Mode) and the Sub Section adds “Analog Pad” (Both are new Voices added with CP OS v1.2). With all sections engaged you get a very nice moody padded piano that’s great for cinematic music. An interesting aspect is the Sub Section Analog Pad with Distortion effect. The Modulation Lever controls effect Depth and it adds an interesting “rainy night in Vienna” texture to the pad and sounds a bit like rain; the “Rain” of “Austrian Rain”.
Soundmondo Link: https://soundmondo.yamahasynth.com/voices/50229
BassFluteVibe
This Live Set Sound uses three of the new Voices added in CP OS v1.2: Finger Bass, Jazz Flute and Jazz Vibes. The CP is in Advanced Mode, with the Finger Bass in the EP Section and the Jazz Flute in the Piano Section. The Jazz Vibes have the Tremolo Effect applied with a very low speed and the Finger Bass has both the Compressor and Chorus 1 added.
Soundmondo Link: https://soundmondo.yamahasynth.com/voices/50228
Sky, W/Diamonds
The “Tape Flute” and “Tape Strings” Voices come in the CP OS v1.2 update and they are the focus of this Live Set Sound. Tape Flute appears in the E.Piano section thanks to Advanced Mode. This allows the use of the effects in that Section, notably the VCM Phaser 3 applied with very low speed. The Modulation Lever controls the Phaser Speed This is a cool retro Live Set Sound. The Piano Section is off but the CFX is there if you need it! The Soundcloud example starts with only the Tape Flute Voice, then I switched the Phaser on and as playback continues, I add Reverb and Analog Delay. I recorded all this automation into Cubase since all the front panel buttons and switches send MIDI CC. Cool!
Soundmondo Link: https://soundmondo.yamahasynth.com/voices/50230
Have questions/comments? Join the conversation on the Forum here.
