What happens externally, when I switch between Performances on MONTAGE (Does it always Send a Bank Select/Program Change)?
No. The MONTAGE only sends Bank Select and Program Change messages when you’ve configured it to do so. That global function is called the ZONE MASTER. [UTILITY] > “Settings” > “Advanced”.
If the Zone Master function is On: the external device will change according to the “Zone Settings” within the Performance, as you recall it. If there are no specific Bank Select/Program Change messages stored in the Performance, then there will be no Bank Select/Program Change in the external device. The external device will just remain where it was the last time it received a Bank Select/Program message. All 2707 Factory Presets default to ZONE Switches = Off.
Plain language: Changing a MONTAGE program does not change your external connected MIDI device unless you select a Performance or Live Set Performance that has “Zone Settings” that you have programmed and activated within the Performance.
If you work “on the fly” – then recalling a MONTAGE PERFORMANCE will cause no change in your external device unless you specifically recall a PERFORMANCE that has a ZONE function setup. Changing the MONTAGE will cause no change in the connected device.
When would I choose to use the Zone Master function?
You would use the Zone Master function any time you are connecting via MIDI OUT to other synthesizers or MIDI modules, and you wish to control and manage them from your MONTAGE. In short, when using the MONTAGE as your Master Keyboard Controller via MIDI.
Like most any modern keyboard, the MONTAGE transmits Out via MIDI what you play on the keyboard. You usually do not have to do anything, most Keyboards naturally default to transmitting what you are playing OUT via MIDI. What may be new for you is MONTAGE‘s ability to transmit, naturally, on more than one MIDI channel simultaneously. Some of the PARTs might contain Arpeggiators (there are 8 of them available for simultaneous use), some of the PARTs might be following Motion Sequences (there are a possible 8 Lanes of them available for simultaneous use); you can understand why drum, and other arpeggiated note and controller data needs to be kept on separate channels.
In order for that data to captured and returned to the MONTAGE, separate channels makes perfect sense. The MONTAGE can have as many as eight KBD CTRL (Keyboard Control) Parts at once. This is so that you can capture in detail what you perform on MONTAGE… however, sending all of that to your slave MIDI device, not being a MONTAGE, this might be a bit confusing for it…. therefore, in a situation where you are trying to control an external synth or module, you have the ZONE MASTER function. It’s purpose: to intelligently control what goes Out via MIDI when you are connected to an external MIDI device.
Recommendation: Setting up to transmit to an external device via MIDI requires you use the ZONE MASTER function. Letting MONTAGE just transmit to your connected device, without using the Zone Settings, may lead to unexpected responses. Using the ZONE MASTER allows you to determine what, exactly, gets sent from the MONTAGE to your external device.
Can I create setups where some Zones are playing from the internal MONTAGE engine and others Zones are playing external modules/keyboards? How many Zones can I control?
Yes, when you want to create layers, splits or combination layer/splits that are a mix of both internal and external Zones, that is what Zone Master is designed to do. A Zone can be set to transmit to the Internal MONTAGE engine, or to an External device or, in the rare instance, to both. The MONTAGE can transmit via 8 Zones at once.
A “best practice” tip would be to setup the internal MONTAGE Parts starting from Part 1 using as many Parts as you require to build your MONTAGE instrument; use the remaining slots for constructing your external device(s).
What MIDI Channel should I set my external device? Are there any “best practices” recommendations?
You can set your external device to any MIDI Channel you choose. However, just remember MONTAGE can, at times, occupy as many as eight MIDI channels, and when it does it uses channels 1-8. If you select a MONTAGE Performance that is set up with five KBD CTRL Parts, and MIDI I/O = Multi, then the MONTAGE is addressing Channel’s 1, 2, 3, 4 and 5. And it could potentially want as many as eight channels (there are eight Part KBD CTRL Performances). If you pre-plan the Performances you are going to use, you can setup and customize/store the settings for each, as required. But if you like to ‘roam-free’ and program “on-the-fly”, then recognize the MONTAGE is an octopus– it Sends and Receives 8 channels. Best practices: by setting your external device to a channel that is 9, or higher, you can avoid any surprises when just exploring the MONTAGE Factory Performances.
Best practice: It is recommended that you give each external device its own Zone slot so that you can determine what happens with it using an exclusive set of parameters.
Extra Credit: If your external device is additionally connected to the MONTAGE A/D Input, this greatly expands your options to control when and how your external device is sounding.
Can’t I simply set the MONTAGE MIDI I/O Mode = Single/Hybrid and use the Zone Master for external?
Yes – but not at the same time. When Zone Master is enabled in UTILITY and the current Performance has Zone Switches set to On, this setting overrides the MIDI I/O Mode “Single” or “Hybrid” setting. Activating the Zone Switch within a Performance (Zone enabled) automatically changes the status to address multiple devices. Therefore, when you select a Performance, in which you have pre-programmed a MIDI transmit configuration, it will override and apply. Whatever Zone Settings are in the currently selected Performance will determine what gets transmitted OUT via MIDI and on what channels that data will travel on.
Additionally, note that in MIDI I/O mode Multi, the Arps can be set to send their MIDI data Out externally, in I/O mode Single and Hybrid only the keys you physical press are transmitted Out via MIDI. The Arpeggiators do not Output their data via MIDI when either MIDI I/O Mode Single or Hybrid is selected.
On what MIDI Channel is the MONTAGE when MIDI I/O Mode = Multi?
The MONTAGE will Receive MIDI data on the Channel number that corresponds to the Part Number. PART 1 is receiving on CHANNEL 1, PART 2 on CHANNEL 2, and so on, through to PART 16 receives on CHANNEL 16. But when sending it a BANK SELECT and PROGRAM CHANGE to select another PERFORMANCE, you can send that message on any Channel 1 through 8 and the MONTAGE will respond. If you send a BANK SELECT and PROGRAM CHANGE to select an individual PART program within the current Performance you send it on the MIDI Channel on which you want to make the change.
The MONTAGE is made up of Banks, each containing 128 programs. Bank Select is a MIDI protocol that allows products to have more than just one set of programs. You can think of the 640 User Performance locations as five Banks of 128 Performance. Bank Select commands are made up of two Control Change (cc) commands, the MSB and the LSB.
MSB, Most Significant Byte cc000, and LSB, Least Significant Byte cc032… those are the names, both are important – ‘most significant‘ just means it comes first. Each is a number 000-127. So MIDI allows for 128 x 128 or 16,384 possible Banks. Currently, in MONTAGE, Yamaha has filled more than 21 Banks of its possible 32 Preset Banks.
To change a program you need an MSB, an LSB followed by the Program Change event. The PC event should always be sent last.
When you want to recall an entire Performance the MSB/LSB will begin with 064 (when message is sent on a Basic Receive Channel)
When you want to recall an individual Part within the current Performance the MSB/LSB will begin with 063 (channel-by-channel)
When you want to recall a Performance you have linked to the currently active Live Set location the MSB/LSB will begin with 062
You can refer to the MONTAGE Data List booklet for details.
Every Preset, User, and Library Performance has a unique MSB, LSB and Program Change number. You can find this from the HOME screen, by touching the Name box to view the pop-in menu, touch “Property”
The currently activated LIVE SET slots each have a unique MSB, LSB and Program Change number according to the Live Set Bank and Page.
Reading the MIDI Signal Flow diagram
The current status of the MONTAGE can be reviewed at any time by navigating to [UTILITY] > “Settings” > “MIDI I/O”:
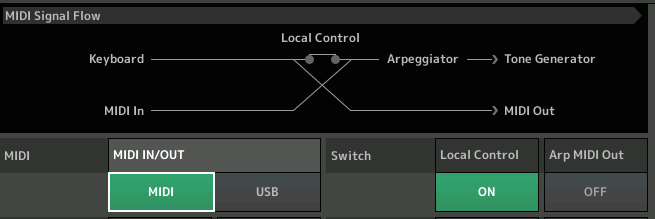
Shown at above is the default condition where MONTAGE is in MIDI I/O Mode = Multi: The ‘Keyboard’ sends its data to the ‘Tone Generator’ and to the ‘MIDI Out’ but, significantly, any arpeggio data is not sent to the ‘MIDI Out’. When “Arp MIDI Out” is Off, you can see that the ‘Arpeggiator’ block is located between the ‘Local Control’ and the ‘Tone Generator’. Any device connected to the MONTAGE via MIDI will respond only to the direct key presses, not the Arpeggio phrases:
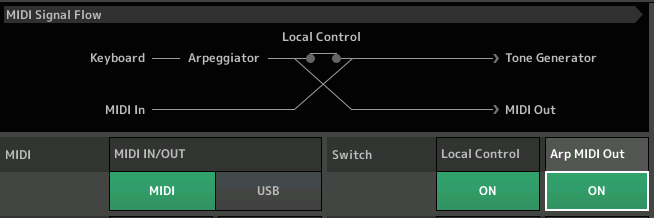
When the “Arp MIDI Out” is On, the ‘Arpeggiator’ block now filters all ‘Keyboard’ data. Those PARTS containing active Arpeggiators will either pass or block the key press information. This will be determined by the individual Arpeggio setup, per the PART:
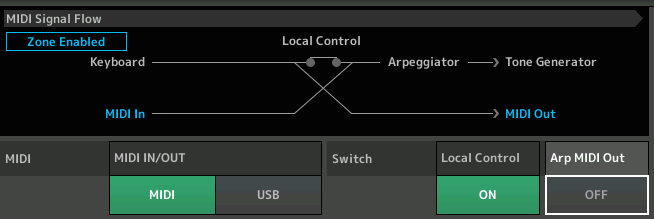
When the ZONE MASTER is activated and a ZONE Switch is set to ON in the current PERFORMANCE, the MONTAGE will behave as if it is in MIDI I/O Mode = Multi (obviously, when ZONE is active you are going to be configuring multiple transmit options). You will notice you can switch the “Arp MIDI Out” On or Off, as you may require in your ZONE Setup:

When MIDI I/O Mode = Single or Hybrid and no ZONE Switches are active, the ‘Arpeggiator’ block is fixed in place so that no Arpeggiator generated data goes OUT via MIDI.
How can I have a MONTAGE Performance recall an external Program but then not have MONTAGE trigger that external device via the keys and controllers?
If your external device is controlled from a MONTAGE Performance Slot that does not have the KBD CTRL icon active, when the Performance is recalled, the Bank Select and Program Change message will be sent but the MONTAGE will not trigger that external device directly.
Only those PARTS with KBD CTRL active sound from the MONTAGE keybed – unless you directly select that individual PART. Each Performance has sixteen slots, any of them can be designated to address your external device. You’d have to actively select it to transmit to it via the keys… so as long as KBD CTRL is not activated (green) and as long as you don’t *select* that PART directly, only the settings you preset in the Zone Settings will be sent. Below, I have placed a Single “INIT AWM2” Part in Part slot 8, naming it “Ext Synth”. By setting the Zone “Int Sw” = Off, I can use this slot exclusively for the external synth setup:
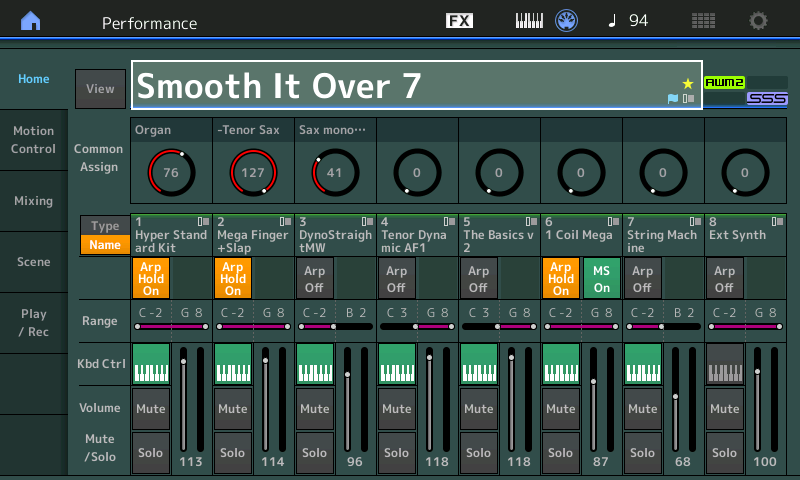
You can actually use any unoccupied Part Slot to setup the External device. Above, the first seven PARTS are under KBD CTRL (Keyboard Control), meaning those 7 PARTS are treated as one by the MONTAGE keyboard. In Part Slot 8, (no KBD CTRL) I have configured a ZONE setup to transmit Out to the “Ext Synth” (highly recommended that you identify the slot by naming it appropriately). When the Performance is recalled, any Zone setup for the external synth is automatically sent, and the keys of the MONTAGE will only address that external synth if you were to select PART 8 directly (by directly pressing [PART SELECT 8]). Below, a look at an example Zone Settings for controlling the “Ext Synth”:
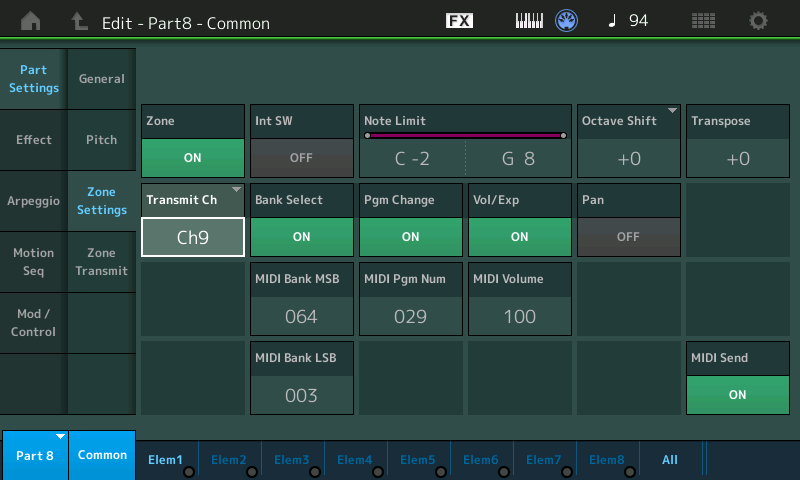
The Zone Switch for Part 8 is set to ON. The “dummy” sound placed in PART 8 is completely bypassed because the INT SW = OFF. The Bank Select, Program Change and Volume/Expression functions are activated – the Bank Select and Program Change commands will be sent when the Performance is recalled. By setting the “MIDI SEND” function ON, I can send new Bank and Program messages from the MONTAGE while on this screen. I can also control the Volume of the External Synth, if I need to… either from this screen or with COMMON FADER 8. If you would rather not have the Volume Control from the MONTAGE you can simply turn OFF the “Vol/Exp” option completely.
While on-stage I often need to rapidly change between internal MONTAGE sounds and my external sound, how can I accomplish this?
By setting up several Parts within a single Performance you can switch sounds seamlessly and as rapidly as necessary within this one environment. The internal MONTAGE Part(s) with KBD CTRL active will sound anytime the [COMMON] button or any one of the linked KBD CTRL Part Select buttons is lit. If a KBD CTRL icon is not active pressing the [PART SELECT] button puts you in communication with the item programmed to be reached by that Part Slot (be it an internal sound or an external Zone Out via MIDI). Because each Performance has sixteen Slots a different Single Part program and Zone setup could occupy each. Remember, each internal Slot is the equivalent of a Motif XF Voice and is fully capable of standing alone. Setup your several MONTAGE Parts as Single slot occupants (KBD CTRL inactive); setup your external slot adjacent to the internal slots – to activate a Part simply press its [PART SELECT] button:
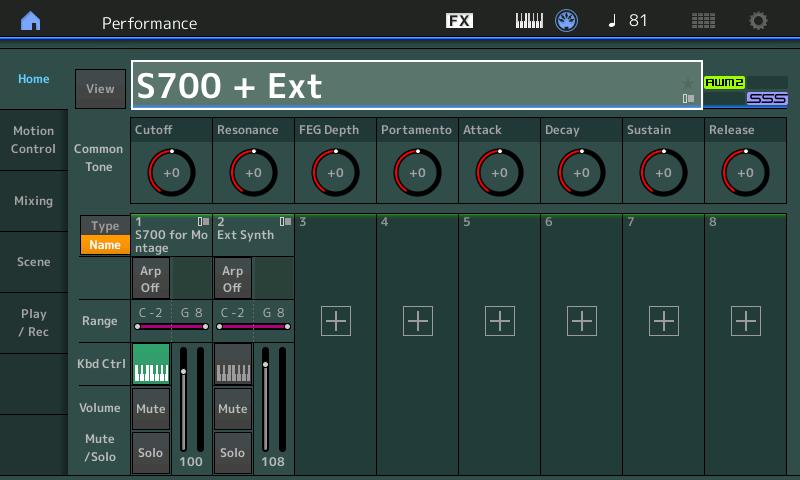
Above, the “S700 For MONTAGE” acoustic piano is playing because KBD CTRL is active on PART 1 and the upper COMMON is selected. You can tell because the highlight is around the Performance NAME. When you want to switch to your EXT SYNTH you simply touch the [PART SELECT 2] button on your right front panel and you will be transmitting to your External Synth via the ZONE Setup created for that PART Slot. Switching is seamless and you can overlap sounds – hold the piano chord with the sustain pedal, switch to the external synth, still holding the piano, or vice versa. Because we are NOT using a MUTE function there is no interruption of the sound when you switch, even between internal and external devices and back. As fast as you can press [PART SELECT 1] and [PART SELECT 2] you can change between internal and external Parts;
There will be no cutoff of the sound when using the [PART SELECT] buttons within your current MONTAGE Performance.
Below you can see that you can also have multiple internal sounds under KBD CTRL and a Part Slot for the External:
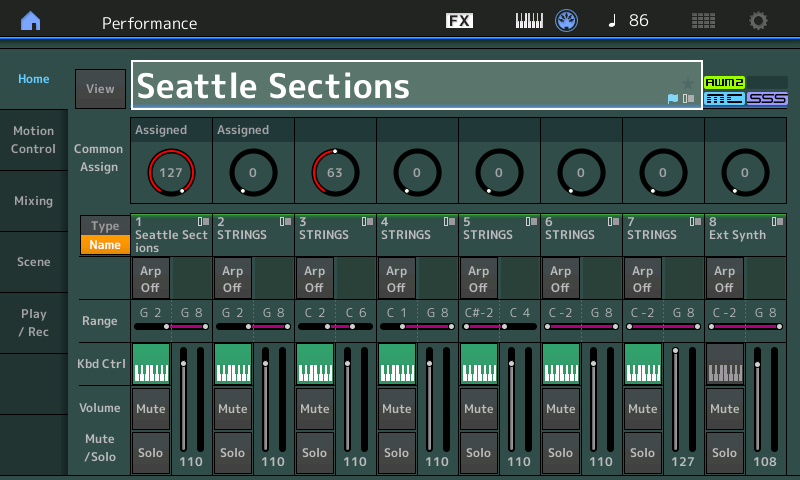
Our example shows this taking place within the first 8 PARTS – you have 16 PARTS – if you wish to have additional devices setup to control from this PERFORMANCE you would setup a Zone setup in any unoccupied Part Slot 9-16. The same rule applies: in order to transmit to that instrument you would need to directly *select* that PART.
There are 16 PARTS – eight of them (the first 8) can be linked by the KBD CTRL to be controlled simultaneously. Any combination adds up to 8 internal/external devices. The other non-KBD CTRL Part Slots can each individually support an Internal or External PART and/or Part with a ZONE setting.
Change between PARTs 1-8 and PARTs 9-16
When you are on the HOME screen, typically, the [PERFORMANCE CONTROL] button is lit, and you are viewing PARTs 1-8; you can flip the screen to view PARTs 9-16 by pressing [SHIFT] + [PERFORMANCE CONTROL]
Alternate Method: Press [PART CONTROL], this turns the top two rows of right front panel buttons into [PART SELECT] buttons 1-16.
Can I Assign and control external Zones the same as I do internal MONTAGE Parts?
PART Slots addressing Internal synth Parts are different from slots used for external Zones. Internal Parts are often controlled directly via assignment within the architecture using AssignKnobs, Motion Sequences, Super Knob, etc. Control over external devices is handled strictly via standard Channel Control Change (cc) MIDI messages which can be assigned various tasks within your external device. The 8 Part Assign Knobs can send cc (Control Change) messages directly to your external device (default: cc17-24, but can be assigned to any cc1-95). What they do to that device will depend on how you assign the destination within your external device. The Assign Knobs must be manually/directly turned to affect the external device (they cannot be placed under Super Knob control or linked to Super Knob control, for example). Such linking of the Super Knob Control is reserved to Destinations within the MONTAGE synth engine, and is reserved for internal MONTAGE Parts including signals arriving via MONTAGE’s A/D Input.
Why when I reassign the MONTAGE AssignKnobs to cc74, for example, does it not control the MONTAGE Filter?
The AssignKnobs do not address the MONTAGE Tone Generator via MIDI Control Change (CC) commands. The CC Numbers generated by the AssignKnobs are sent OUT via MIDI. The AssignKnobs have a *direct* connection to the internal Tone Generator. Your Assign Knobs can be doing something different internally than it is externally. While an AssignKnob might be offsetting the AEG of an FM-X sound, it could be making an entirely different change Out via MIDI to your external device. This will be determined by your programming.
Are there advantages in routing the audio output of my MIDI ‘slave’ hardware device through the MONTAGE A/D Input?
Yes, there are several beyond just saving a couple of channels on the band’s mixer:
- You have an [A/D Input On/Off] switch available on the front panel. If ever you need to cut audio for the external device you can at the touch of a button. Great for those “on-the-fly” type users.
- The A/D Input “Volume” can be pre-set and controlled on a per Performance basis. Balancing volumes of internal and external slots for complex layers and splits, can be stored and accurately recalled; Realtime control over A/D volume can be assigned on the Common/Audio level of editing in MONTAGE and varied via the AssignKnob/Super Knob system… meaning you can morph and crossfade between internal and external sounds same as you do with the internal MONTAGE sounds.
- The A/D Input can be assigned it’s own dual Insertion Effects per each different Performance. It’s signal can be merged with the MONTAGE to the Main L&R Outputs or can remain discreet and travel to the Assignable L&R Outputs. Parameters of the Insertion Effects dedicated to A/D Input can be assigned to realtime Control same as any internal synth Part.
- The A/D Input can be used as a modifier (modulation source) within the Motion Control Synthesis Engine. The A/D Input can be routed via the MONTAGE’s Side Chain Modulation feature to the Compressors, Dynamic Effects, Vocoder etc. adding a new dimension to your musical performance.
- The A/D Input can be used as a tempo source for all clockable functions within MONTAGE. Great if your external device has any kind of automated rhythmic functions. By setting MIDI SYNC = “A/D IN” MONTAGE will sync all clockable functions to tempo it derives from the audio source connected to the analog inputs.
- The A/D signal path takes advantage of Yamaha’s high definition audio path, VCM processing and Pure Analog Circuit output. It will sound great!
My external device only receives on Channel 1, does this present a problem for MONTAGE?
No, but it does mean you’ll need to prepare each MONTAGE Performance you wish use while connected to your external device. The MONTAGE is normally always transmitting something on Channel 1, since all Factory Presets start with Part 1. You will simply need to pre-program your Performance setups with a Zone setup for your external device or if you run the external device’s audio through MONTAGE you can manually defeat the A/D Input signal when necessary.
Do I have to setup the Zone Settings for every Performance or can I COPY my settings from Performance to Performance?
You can use the Part ‘Category Search’ function to recall any Part from any Performance, including its Zone Settings, its Arp/MS, Mixing, and/or Scene settings. When on the Category Search screen you set the “PART WITH PARAMETERS” option to bring along Zone settings whether concerning internal or external Parts.
Can I use a Slot to transmit both internally and externally at the same time?
Yes, but know that it limits your flexibility. But it is possible, in theory. You have eight Zones, spread out for more flexibility. In general, the BEST PRACTICE would be to create an internal PART for each internal sound (AWM2/FM-X) that you wish to play, and create a separate PART for each external device you controlling. You do so by assigning an internal PART but setting the INT SW = OFF. Now the Controller and other PART parameters of the ZONE SETTINGS can be applied to your external device. The maximum simultaneous ZONES you can have is 8. Therefore, if you are starting with the “CFX + FM EP”, which we know is a 5-PART Performance, you can add three external ZONES (to PARTS 6, 7 and 8) for simultaneously control.
The problem with using a ZONE for both internal and external is that you cannot independently setup to control them differently. It becomes just a very simple layer without the full ability to address each independently. That is not to say you will not find uses for stacking an INTERNAL and EXTERNAL in the same ZONE SLOT… for example, in an instance where you have designated a PART SLOT to respond to one of the MONTAGE’s eight Arpeggiators, you could create a situation where both the Internal Montage PART and the Extneral Synth work in response to an Arpeggio Phrase.
How can I set a MONTAGE Arpeggiator to trigger an external synth?
The setup would be the same as for any internal PART. First you must have an occupied PART Slot (one that contains a MONTAGE PART), you can activate the ZONE SWITCH by going to COMMON > “Part Settings” > “Zone Settings”. Additionally, in [UTILITY] > “Settings” > “MIDI I/O” > make sure the “ARP MIDI OUT” switch is ON:
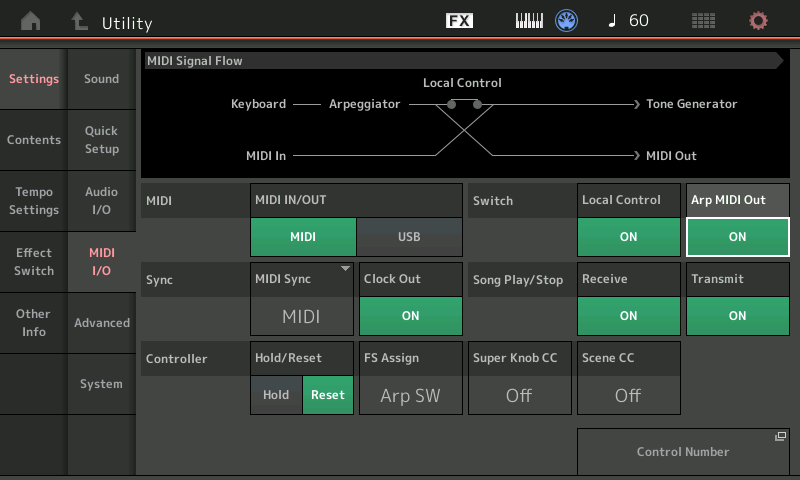
You can see in the MIDI Signal Flow diagram, as your turn this switch to ON, the physical location of the Arpeggiator block moves so that the Arpeggio data is also delivered to the MIDI OUT. (When ARP MIDi OUT is OFF, only the key presses go to the MIDI OUT).
Once I create my Zone Settings are they maintained when I use Live Set and if I install them in a Library?
Absolutely. The Zone Settings you make are stored in your User Performance. Give it a new/unique Name. This Performance can be referenced by Live Sets, and placed in Library files as you may require.
Do the MONTAGE FADERS send cc007 Out via MIDI?
They can, but at times they send Sysex. What they send at any time is determined by the function you have them serving – this is selected on the MONTAGE front panel. When playing a PERFORMANCE where COMMON control is selected, the FADERS do PART VOLUME, which is cc007, for Channels 1-8 or 9-16. This data is also transmitted Out via MIDI. Anytime you wish to communicate OUT via MIDI, it is recommended you activate the Zone Master function and create a setup.
When you have selected an individual Part, the Faders switch roles to become individual Element or Operator Level controls (which outputs System Exclusive Data).
Navigation Tip: To switch the Faders from Part Volume (cc7) to Element/Operator Level (Sysex), use the [PART CONTROL] and [PERFORMANCE CONTROL] front panel buttons. “Performance Control” refers to the overall, combined program… it here that each Fader controls a separate Part… “Part Control” refers to a situation where you have selected an individual Part and wish to control the level of its internal oscillators.
Again, take note of how pressing these two buttons changes the green L.E.D.s adjacent to the Faders.
Alternate view: [SHIFT] + [HOME] to view the “Overview” screen. Again, take note of how pressing these two buttons changes the focus of the Faders, and how both “Common” and “Part” selections impact the controllers.
What Does MONTAGE Transmit that makes it different?
There are certain things that make the MONTAGE a unique synth keyboard, different from most any other keyboard you may have previously owned. One thing is that it can, and often does, transmit on multiple MIDI Channels at one time – depending on how many KBD CTRL Parts are active. We know that the first eight Parts can be linked by this KBD CTRL function. This allows for complex sound design with multiple Arpeggiators and Motion Sequences in action; and allows for the multi-dimensional control you find in its Control matrix.
A PART can be a complete instrument sound or it can be a very detailed articulation of an instrument, or it can be a component used in building a huge multi-dimensional sound. This also allows complex layers that can include multiple internal sounds and/or external devices, as you may desire. When the KBD CTRL icon is active (green) it means that the slot is available for simultaneous internal and/or external Zone use. And when a non-KBD CTRL PART is selected, meaning when the [PART SELECT] buttons are engaged directly, you can address that individual PART or ZONE alone. Naturally, if you are going to transmit an Arp’s Output to an external device you will want to be able to direct it on a specific channel and you will want to isolate just that specific data to that external device.
When you play on MONTAGE’s Keyboard, your Key presses are directed to all KBD CTRL Tone Generator PARTs simultaneously, unless an Arpeggiator is active on that PART. If that is the case, your Key presses are analyzed according the Part’s Arp settings and your velocity and note values are translated into the appropriate Phrase and that MIDI data is sent to the Tone Generator and/or Out via MIDI to an external device.
If, for example, your external keyboard controller only transmits on a single MIDI channel, you would set the MONTAGE to MIDI I/O Mode = Single or Hybrid and then select a Channel 1-16. This would allow you to completely control the MONTAGE functions with a single Channel controller – in the same way you would as if you were playing the MONTAGE’s own keys.
In MIDI I/O Mode = Single, the MONTAGE behaves as a single Channel Keyboard for both Transmit/Receive – all KBD CTRL Parts can be controlled simultaneously. “Hybrid” additionally allows the non KBD CTRL Parts to still be addressed on their correspondingly numbered MIDI Channels. This is ideal when working with a DAW, like Cubase, where you may wish to record a multiple Part single instrument Performance (like CFX Concert or Seattle Sections) to a single MIDI Track… you can use the other Parts as normal.
Have other questions or comments? Join the conversation on the Forum here!


