Divide Drum Track
This is a Pattern JOB that allows you to use the second 8 tracks (9-16) of the Pattern sequencer to construct/deconstruct and reconstruct your drum track. It dissolves the different drum kit instruments, grouped by type, onto their own track where you can offset/quantize and otherwise affect them. This “separate drum/separate track” concept is used by many producers.
Divide Drum Track is found by tapping “Edit/Job” from the main PATTERN screen, touch “Track” > “Divide Drum Tr”.
It will copy the Kit you used to each of the Part slots, 9 through 16, allowing you to isolate each drum type used to its own Track. While isolated, you can individually Quantize them, Offset them, etc.
It will overwrite data in the target Tracks – so be sure about where your data is located. By placing the different Drum types on separate tracks, you can work on them individually. A typical use would be where data is moved from a linear Song to the Pattern mode. Say you recorded a long linear MIDI composition (Song) using a basic drum Arp instead of a metronome, you can now use Pattern sequencer function to construct a more detailed drum track with fill-ins and accents, etc.
Often with the Motion Control Synthesis Engine you just want to jam with a Drum groove – capture it to a linear Song. Then grab the best moments of that extended jam and move them into the Pattern Sequencer for detailing.
What you need to know: When you select a Drum Track to divide and you go to execute, you will receive the following warning:
“Dividing the drum track makes new performance data. You can’t undo this operation”
What this is telling you is make sure PARTs 9-16 contain no data – these Parts will be replaced with the selected Drum Kit mapped to each of the PART 9 through 16:
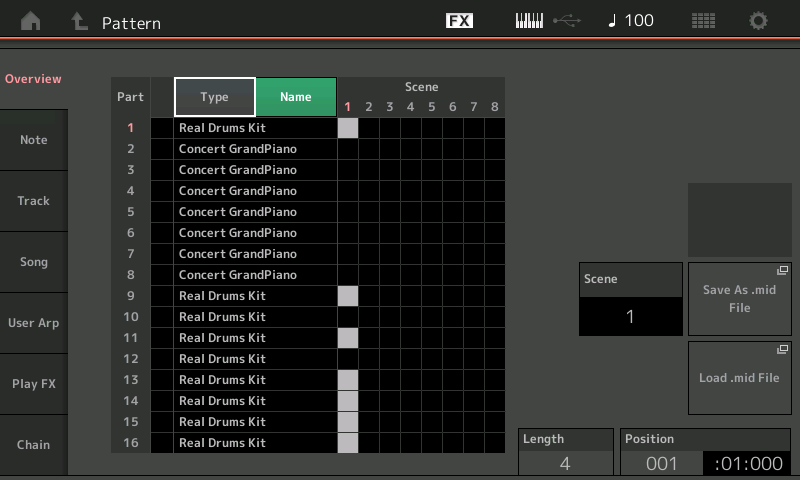
- If your recorded drums are originally on a Track between 1 and 8, when “Divide Drum Track” is executed, the original data will remain intact on the source Track; while the divided drums will be separated to their own Track, 9-16. The original Drums in the screenshot below were recorded to Track 1 – using “Real Drums Kit”. After the Divide, you can see the results in Parts 9-16:

What the JOB did was to analyze the performance and divide the drum instruments, as follows:
- Bass Drum was isolated on Track 9
- Snare Drum was isolated on Track 11
- HiHats were isolated on Track 13
- Ride Cymbal isolated on Track 14
- Toms and Crash on Track 15
- Latin Percussion on Track 16
- If your recorded drums are originally placed on a Track between 9 and 16, when you execute the “Divide Drum Track” Job, only the divided data will appear. The original data is no longer held intact. For example, say you recorded your original Drum Track on Track 10, if you then use the Divide Drum Part, the original data would disappear. The Drums would still be divided in the same manner, it is just the original Track data will be completely dissolved.
Concept: Normally, you record your basic drum groove using a single KIT, on a single Track. “Divide Drum Track” applied to that track will then analyze what you played and automatically EXTRACT the different components and split them (dissolve) to separate tracks, using Tracks 9-16 and Parts 9-16. It assigns the same Drum Kit used to all eight Parts so there will be no difference overall in how it sounds, initially. The idea is so that you now have separate tracks for your different drum components.
It is not strictly isolating just one Drum per Track, necessarily. It puts things together that you would work on together. For example, the HiHat Closed, HiHat Pedal and HiHat Open all arrive on the same dissolved Track – this makes sense as these are worked on as a set. The Tom-toms and the Crash Cymbal arrive on the same dissolved Track – this makes sense when working on a Fill-in phrase. The snare, sidestick, and snare roll will all arrive on the same Track, and so on. Your mileage may vary depending on the Type of Kit you have selected and the layout of its instrument data, but generally, it looks to isolate instruments of the same kind or instruments you would likely work with together.
Extra Credit: The principal Drums in a Kit are typically located between notes C1 and B2 – these are the Drums that give the Kit its name. Latin Percussion begins at middle “C”, C3 and continue up for two octaves. While Drums are divided like this, you can quantize and affect them independently.
Once you have worked out the drums, you can reassemble the data onto one track, if you wish, using the “Track” Job called “Mix” (see below).
What can you do with the isolated data?
“Divide Drum Track” will allow you to do things like quantize the different components with different swing values. In general, quantize (timing correction) can be done in the sequencer either as you record or after the fact. It can be done either permanently or non-destructively. You can now shift just the snare drum behind the beat, or you can swing just the hihat parts. You can remove or even redo PARTS of any of the 3400+ Drum Grooves provided by Yamaha as Drum Arp Phrases. You can recreate them as your own customized ARPEGGIO TYPES. Basically, you can bring the full power of the sequencer editing jobs on each individual drum component.
“Divide Drum Track” will also allow you, if you wish, to keep the drums (permanently) on separate tracks – this allows you to do Muting of certain Kit components. You can choose different sounds and then assemble those sounds into a custom drum kit… we will see how that is done a little later. The possibilities are many. However, once you have edited the timing and velocity on separate tracks you can reassemble the drums to a single track using the MIX TRACK Job.
The “Divide Drum Track” Job will overwrite data in the target location. However, the MIX Job will merge the data without overwriting the existing data.
Depending on your final goal, you can either leave your drums divided out on separate tracks or you can reassemble them to a single track. If you are recording to an external DAW software, like Cubase via USB, for example, you can assign individual drums from within a KIT to individual USB outputs for separate audio processing.
If you are not going to need the additional tracks then you can simply skip the MIX TRACK job and use tracks 1-8 for your music. But if you require the tracks for your other music, you can create a custom kit containing just the sounds you like – assembling drums into a kit is easy enough.
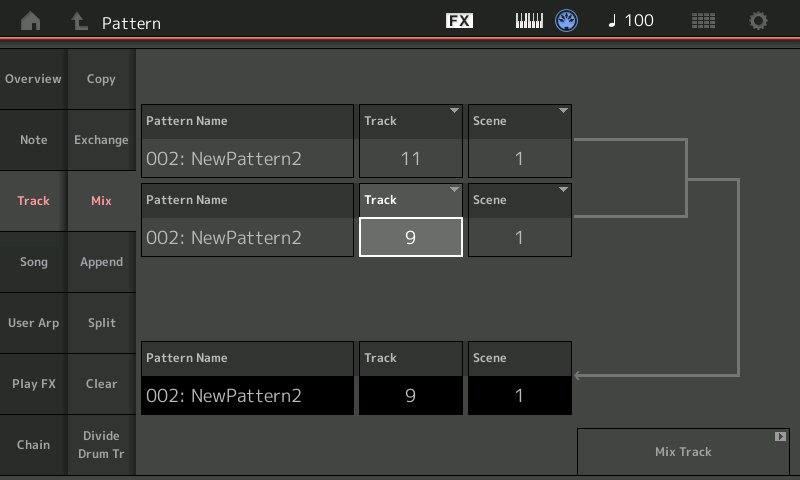
Track > Mix: This Job lets you take data from the source track and combine it with data on the destination track. It does this without overwriting the data on the destination (target) track and without deleting the source data. At first you may wonder why it does not delete the source data, but this is to allow flexibility. The source track data remains, you can delete it separately or keep it to combine it with other tracks.
See the example screenshot below:

This Job lets you take data from a PATTERN phrase and combine it with data of another PATTERN mode phrase. You can use this to combine data even if that data is from a different PATTERN number entirely. It is non-destructive as both the source and destination phrases will remain. The execution can be undone by going to the “Overview” screen where the last function can be reversed.
Above the “divided” snare drum on Track 11 (Source) is set to be “mixed” to Track 9 where the “divided” bass drum lives. When executed, the bass drum and snare will sound from Track 9, and the snare will still sound from Track 11. I can choose to CLEAR Track 11 or I can use that separated snare elsewhere in the Motion Control Synthesis Engine*.
Remember: The possibility of using an isolated sound as a modulation source to interact with another component within the synthesizer is pretty cool. Isolating one drum component or a set of percussion instruments to their own track opens the doors to many potentially interesting experiments. You might use that isolated snare to interact with a Pad or String sound or the hihats to interact with an FM-X Modulation Index – And by setting its OUTPUT SELECT = OFF, you can use the audio pulse it causes as a ‘silent’ modifier within the Motion Control Synthesis Engine. More on this in future articles.
If you have the snare drum divided to its own Track, for example, you can then select a special DRUM kit that contains nothing but snare drums and assign that to your track. These ALL Snare Drum kits (“Acoustic Snares”, “Dance Snares” and “Grouped Stereo Snares” each contain 73 different snare drums, C0~C6) are useful because then by simply Note Shifting the Track data, using the “PLAY FX 2”, you can audition many different snare drums in rapid succession in context of the Pattern. When you find a particular snare drum you like, you can either just leave the note ‘shifted’ to that pitch or you can identify which snare that is and edit it into your own custom KIT.
There are also ALL bass drum Kits, as well, (“All Kicks” and “Dance Kicks”) which in a similar fashion can be used to try out different Kick drums in rapid succession. Depending on your final goal, you can either leave your drums divided out on separate tracks or you can reassemble them to a single track.
We should mention again, that the last edit JOB that you perform can be undone by selecting the “Overview” screen. Before executing a Job, the current data is placed in a special UNDO Edit buffer. This allows you to toggle back and forth between AFTER and BEFORE (A-B). If the JOB creates an unsatisfactory result, simply UNDO it and try a different setting.
Experiment!
Want to share your thoughts/comments? Join the conversation on the Forum here.


