The Extended LFO brings high-speed modulation to the MONTAGE and MODX. You can use it to generate interesting pitch, filter or amplitude modulation that goes well beyond the slower oscillation of a standard LFO. The high-speed nature creates cool granularity that enhances synth leads, pads, comps, special effect and more. It is a great addition to MONTAGE and MODX Music Synthesizers.
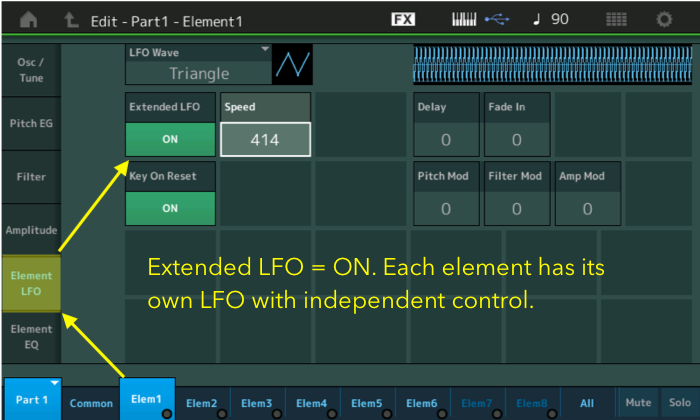
With the standard LFO the Speed parameter range goes from 0-63 (0-42 Hz) for AWM Parts. When the “Extended LFO” is set to ON, the Speed parameter range extends from 0-415 (0-1356.59 Hz). These higher speeds generate interesting sounds when modulating Pitch, Filter or Amplitude.
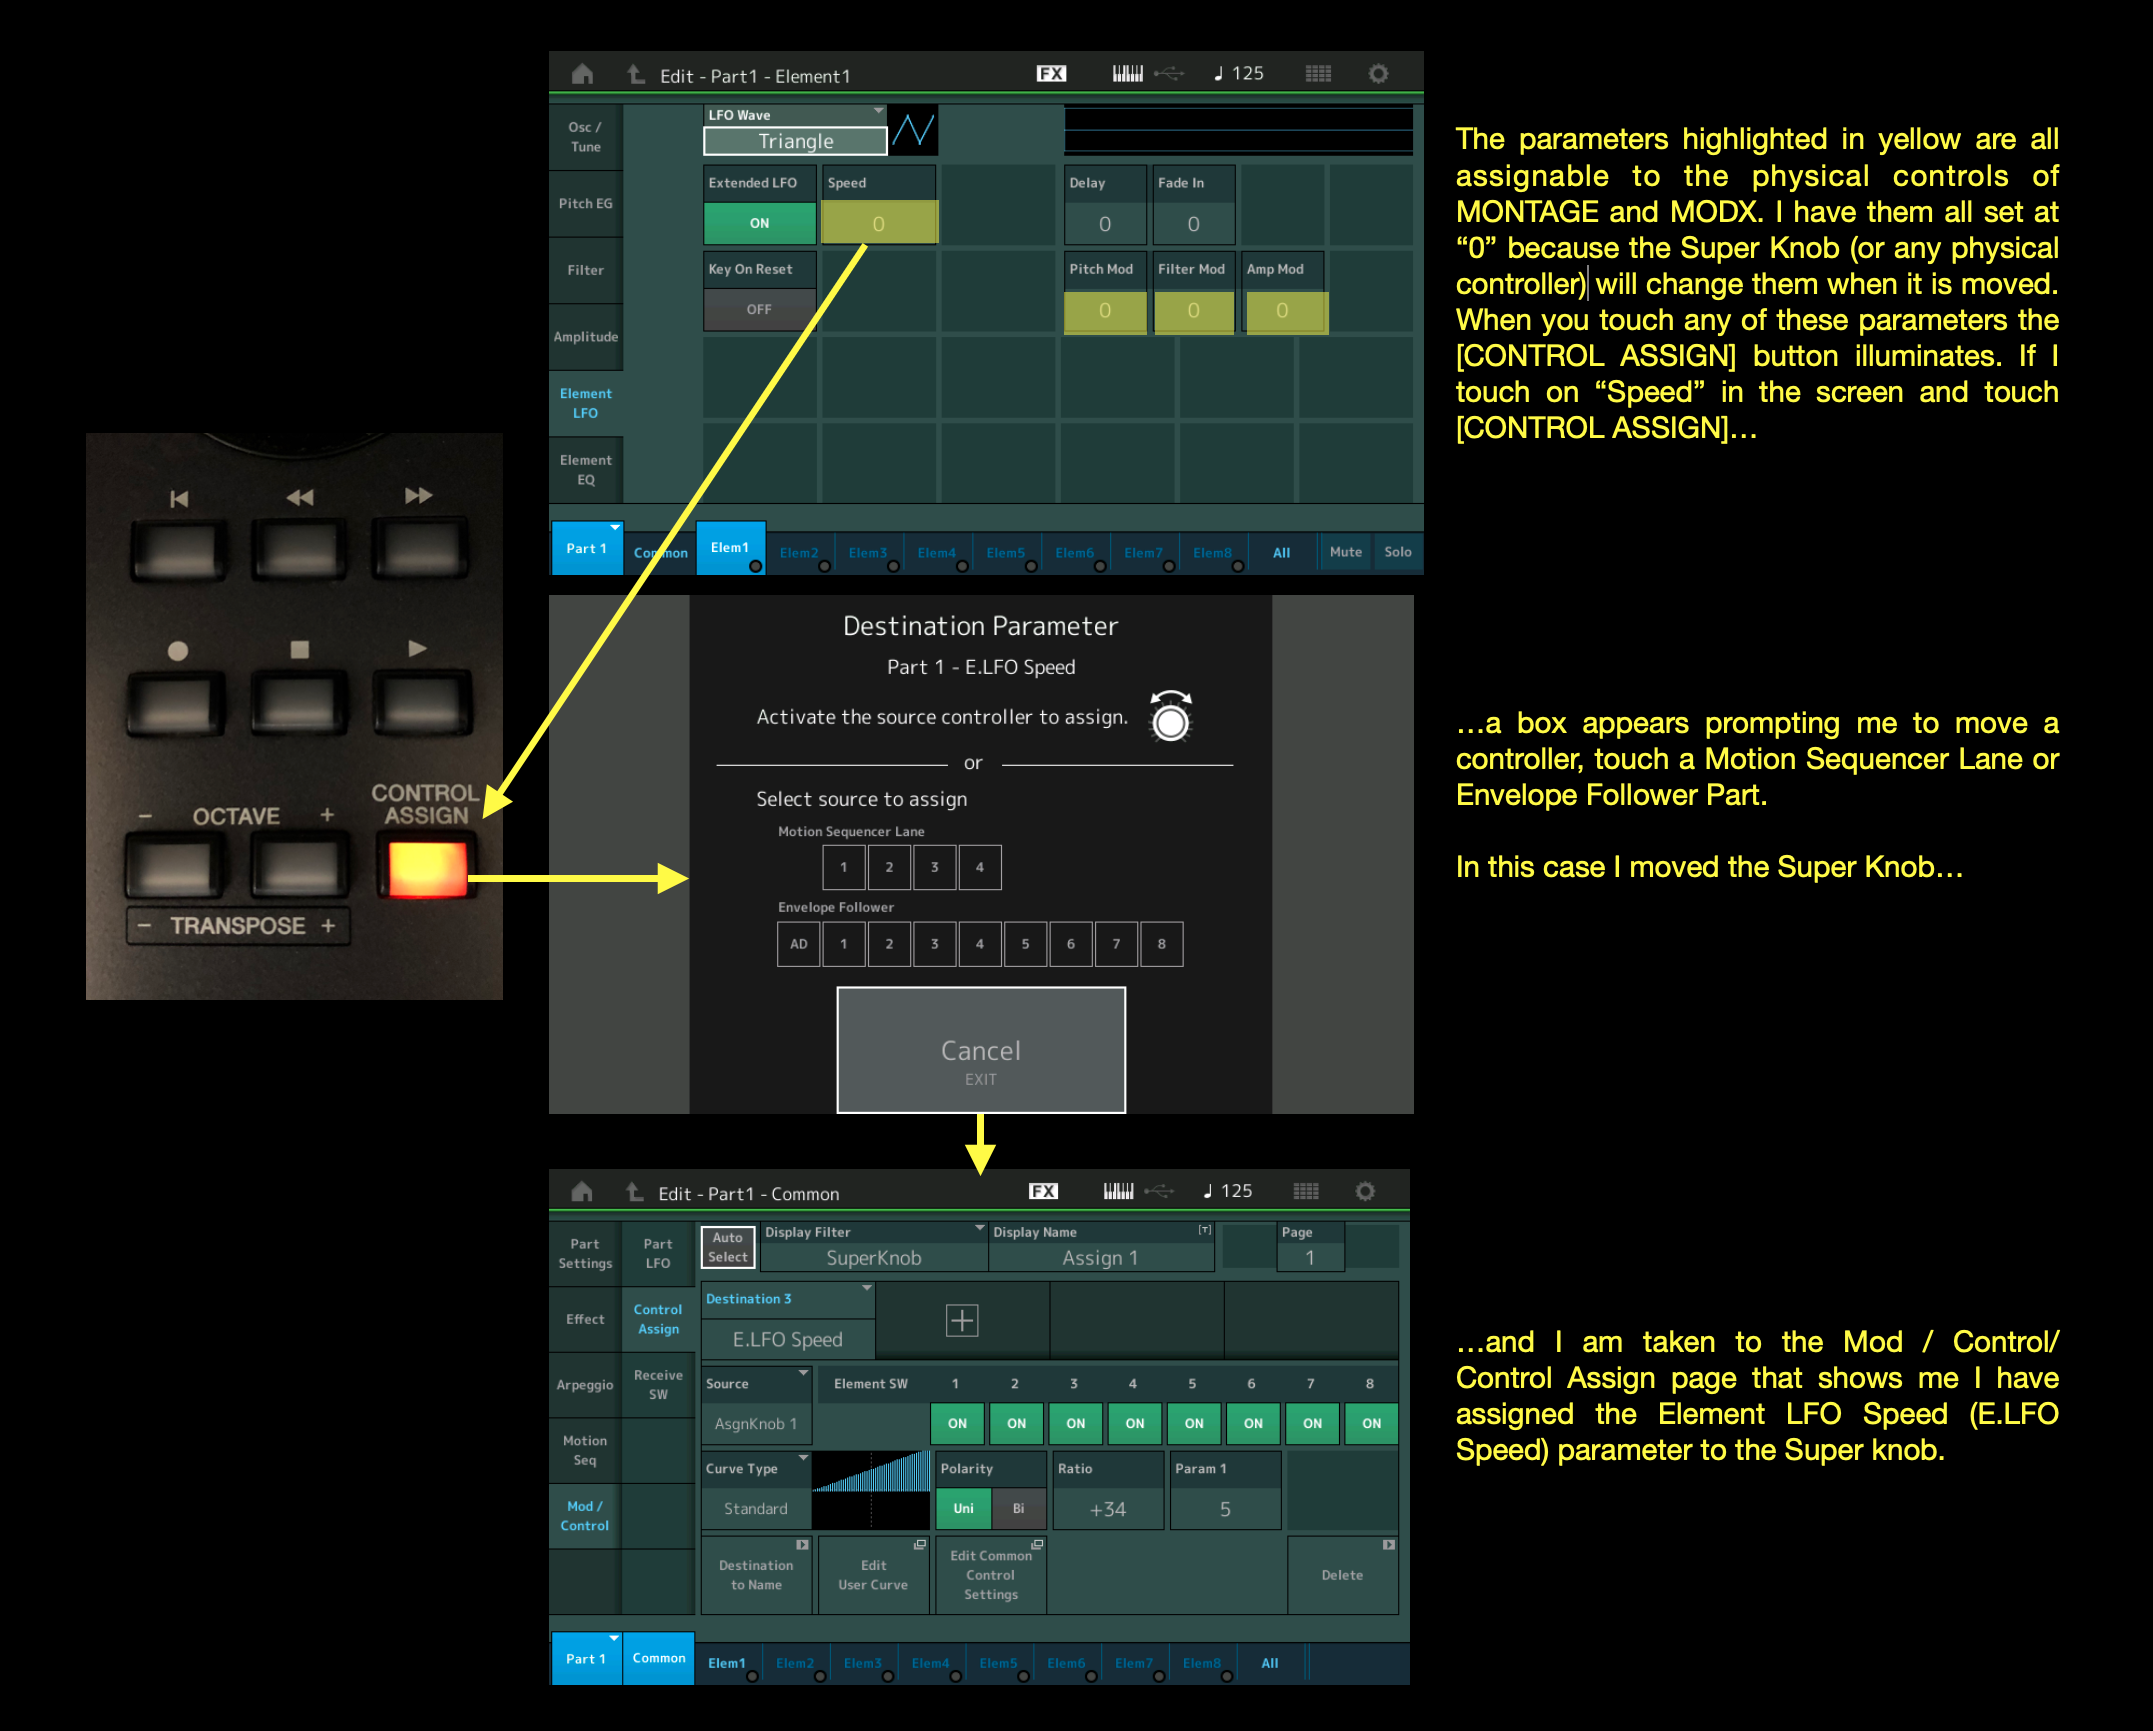
In AWM Parts the Extended LFO is found in the Element LFO and is engaged by touching “Extended LFO” so that it reads “On”:

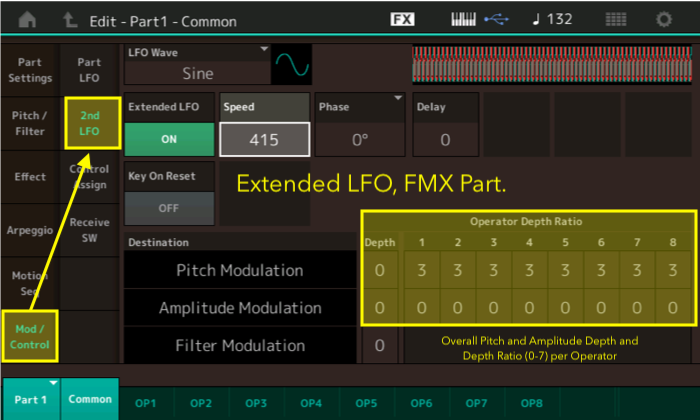
The Extended LFO works a bit differently in FMX parts. It is found at the Part level Common, Mod/Control, 2nd LFO:

When Extended LFO is OFF the Speed parameter range is 0-99 (0-50.89 Hz) in an FMX Part. When Extended LFO is ON the range increases to 0-415 (Same range as AWM Part, 0-1356.59 Hz). Note that for the FMX 2nd LFO there are individual Depth Ratio settings for each Operator for both Pitch and Amplitude Modulation. I’ll explore this in greater detail below.
The depth of the Pitch, Amplitude and Filter Modulation and overall Speed of the Extended LFO can be assigned to any available physical controller, motion sequence or to the envelope follower. The Extended LFO introduces a powerful and dynamic real time modulation tool to MONTAGE and MODX.
Check out the audio examples below. They are all contained in the file and I’ve included links below each description further down:
In the two examples below I’ll use the Extended LFO in an AWM Part and then in an FM-X Part. There are SoundCloud audio examples and Soundmondo links to each Performance as well.
Warm BackingPad XLFO (AWM).
For this example, I started with the Preset Performance “Warm Backing Pad”. I chose this one because it’s a nice pad with a single Element and will work nicely with the Extended LFO.
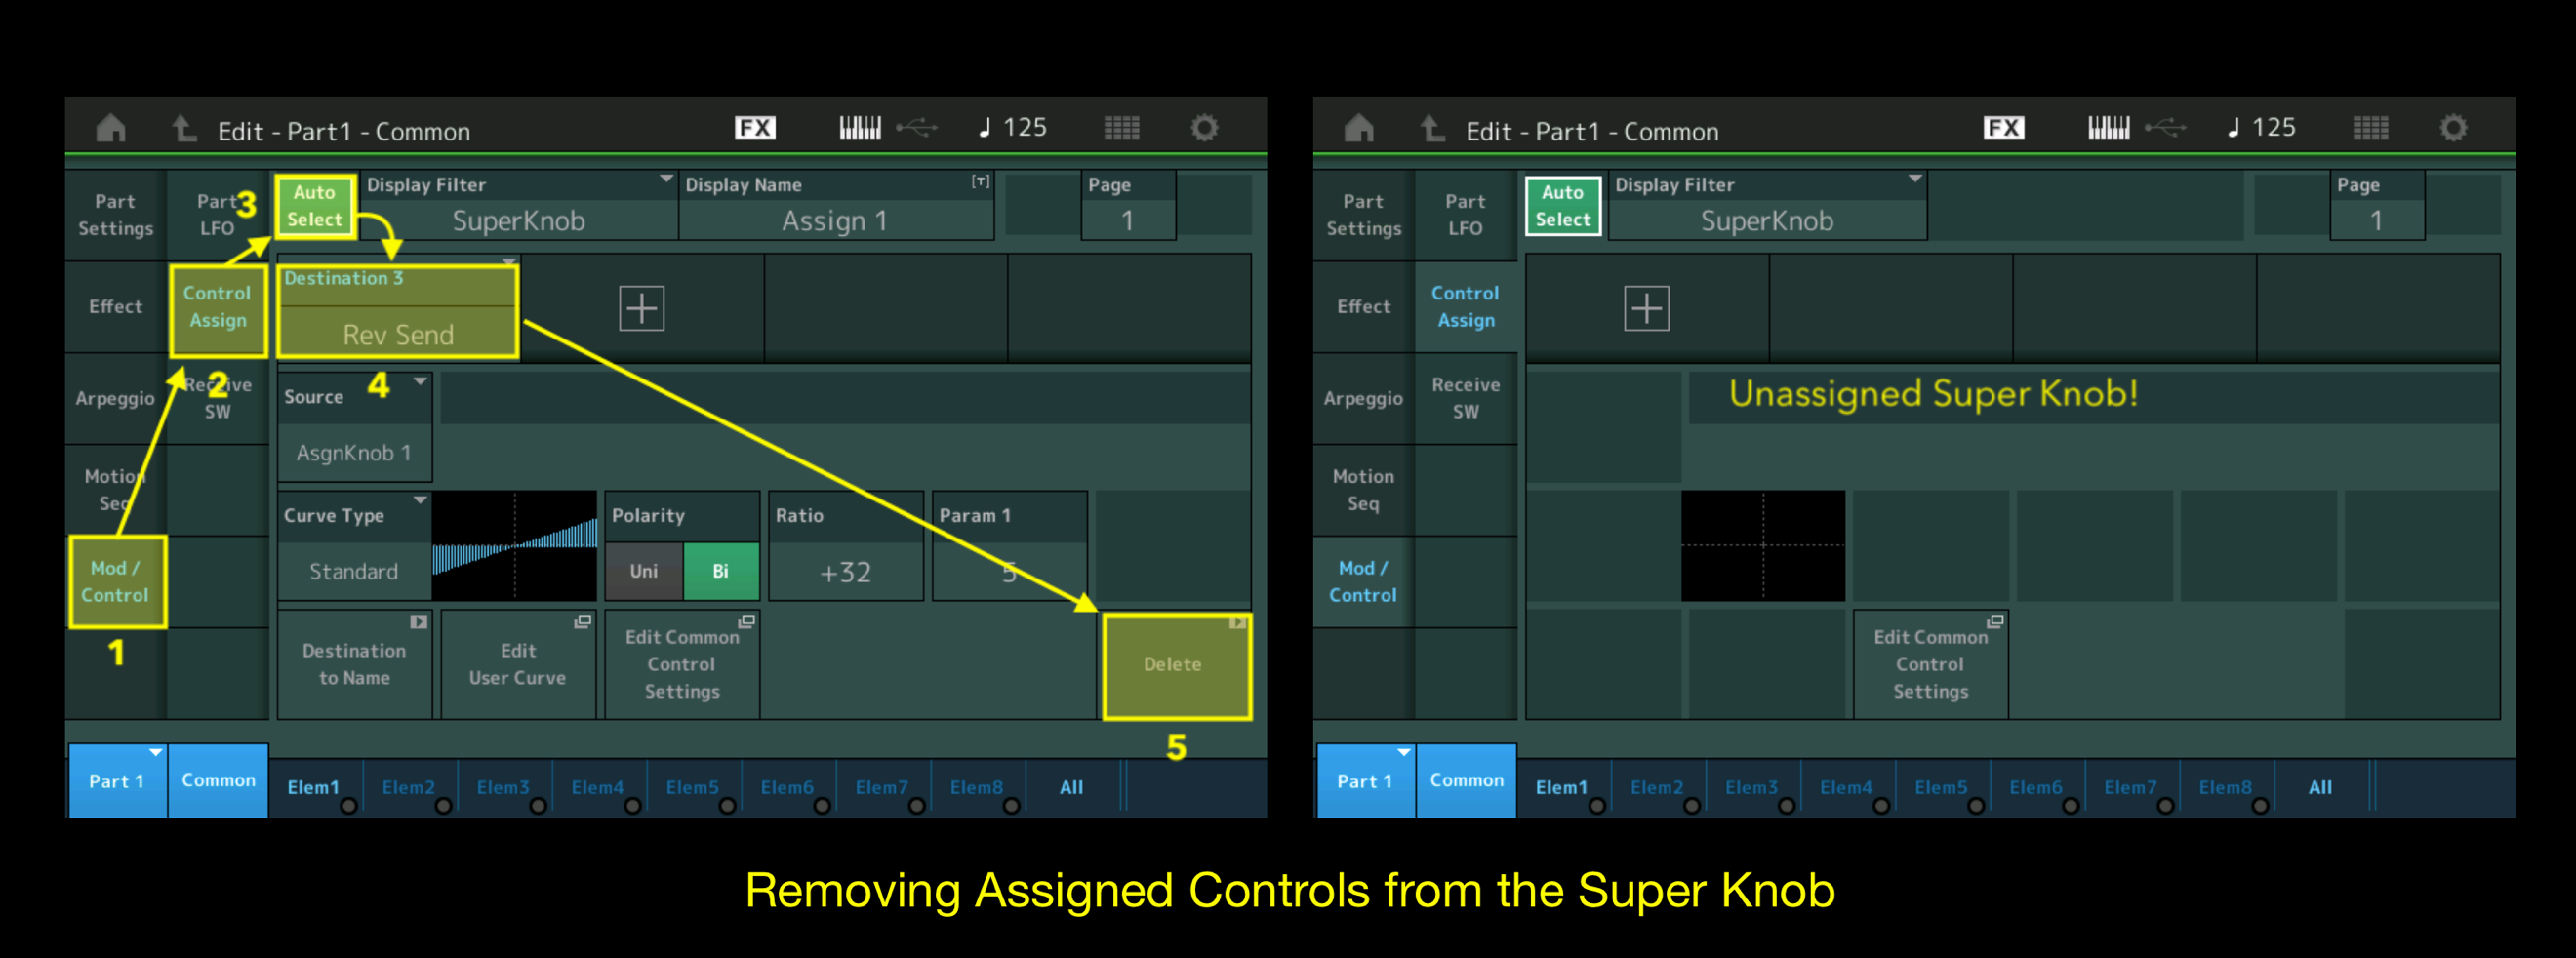
Here’s a quick tip that you might find helpful when editing a Preset Performance: Before assigning control to the Extended LFO, I deleted one assignment to the Super Knob—Part reverb send level—so I could assign Extended LFO controls to the Super Knob and nothing else:
To delete a Super Knob assignment, press [EDIT], select Part 1
1. Touch “Mod/Control” on the left:
2. Touch “Control Assign”
3. Touch “Auto Select” and Move the Super Knob.
4. Touch “Rev Send” to select “Rev Send
5. Touch “Delete” in the lower right-hand corner. Check it out:

This is a good skill to know when editing a Preset Performance. Sometimes there are lots of Super Knob assignments that get in the way of a goal. Now I can set up Super Knob control exactly how I want it.
Now I want to assign each of the Extended LFO parameters to the Super Knob. First, I’ll assign LFO Speed:

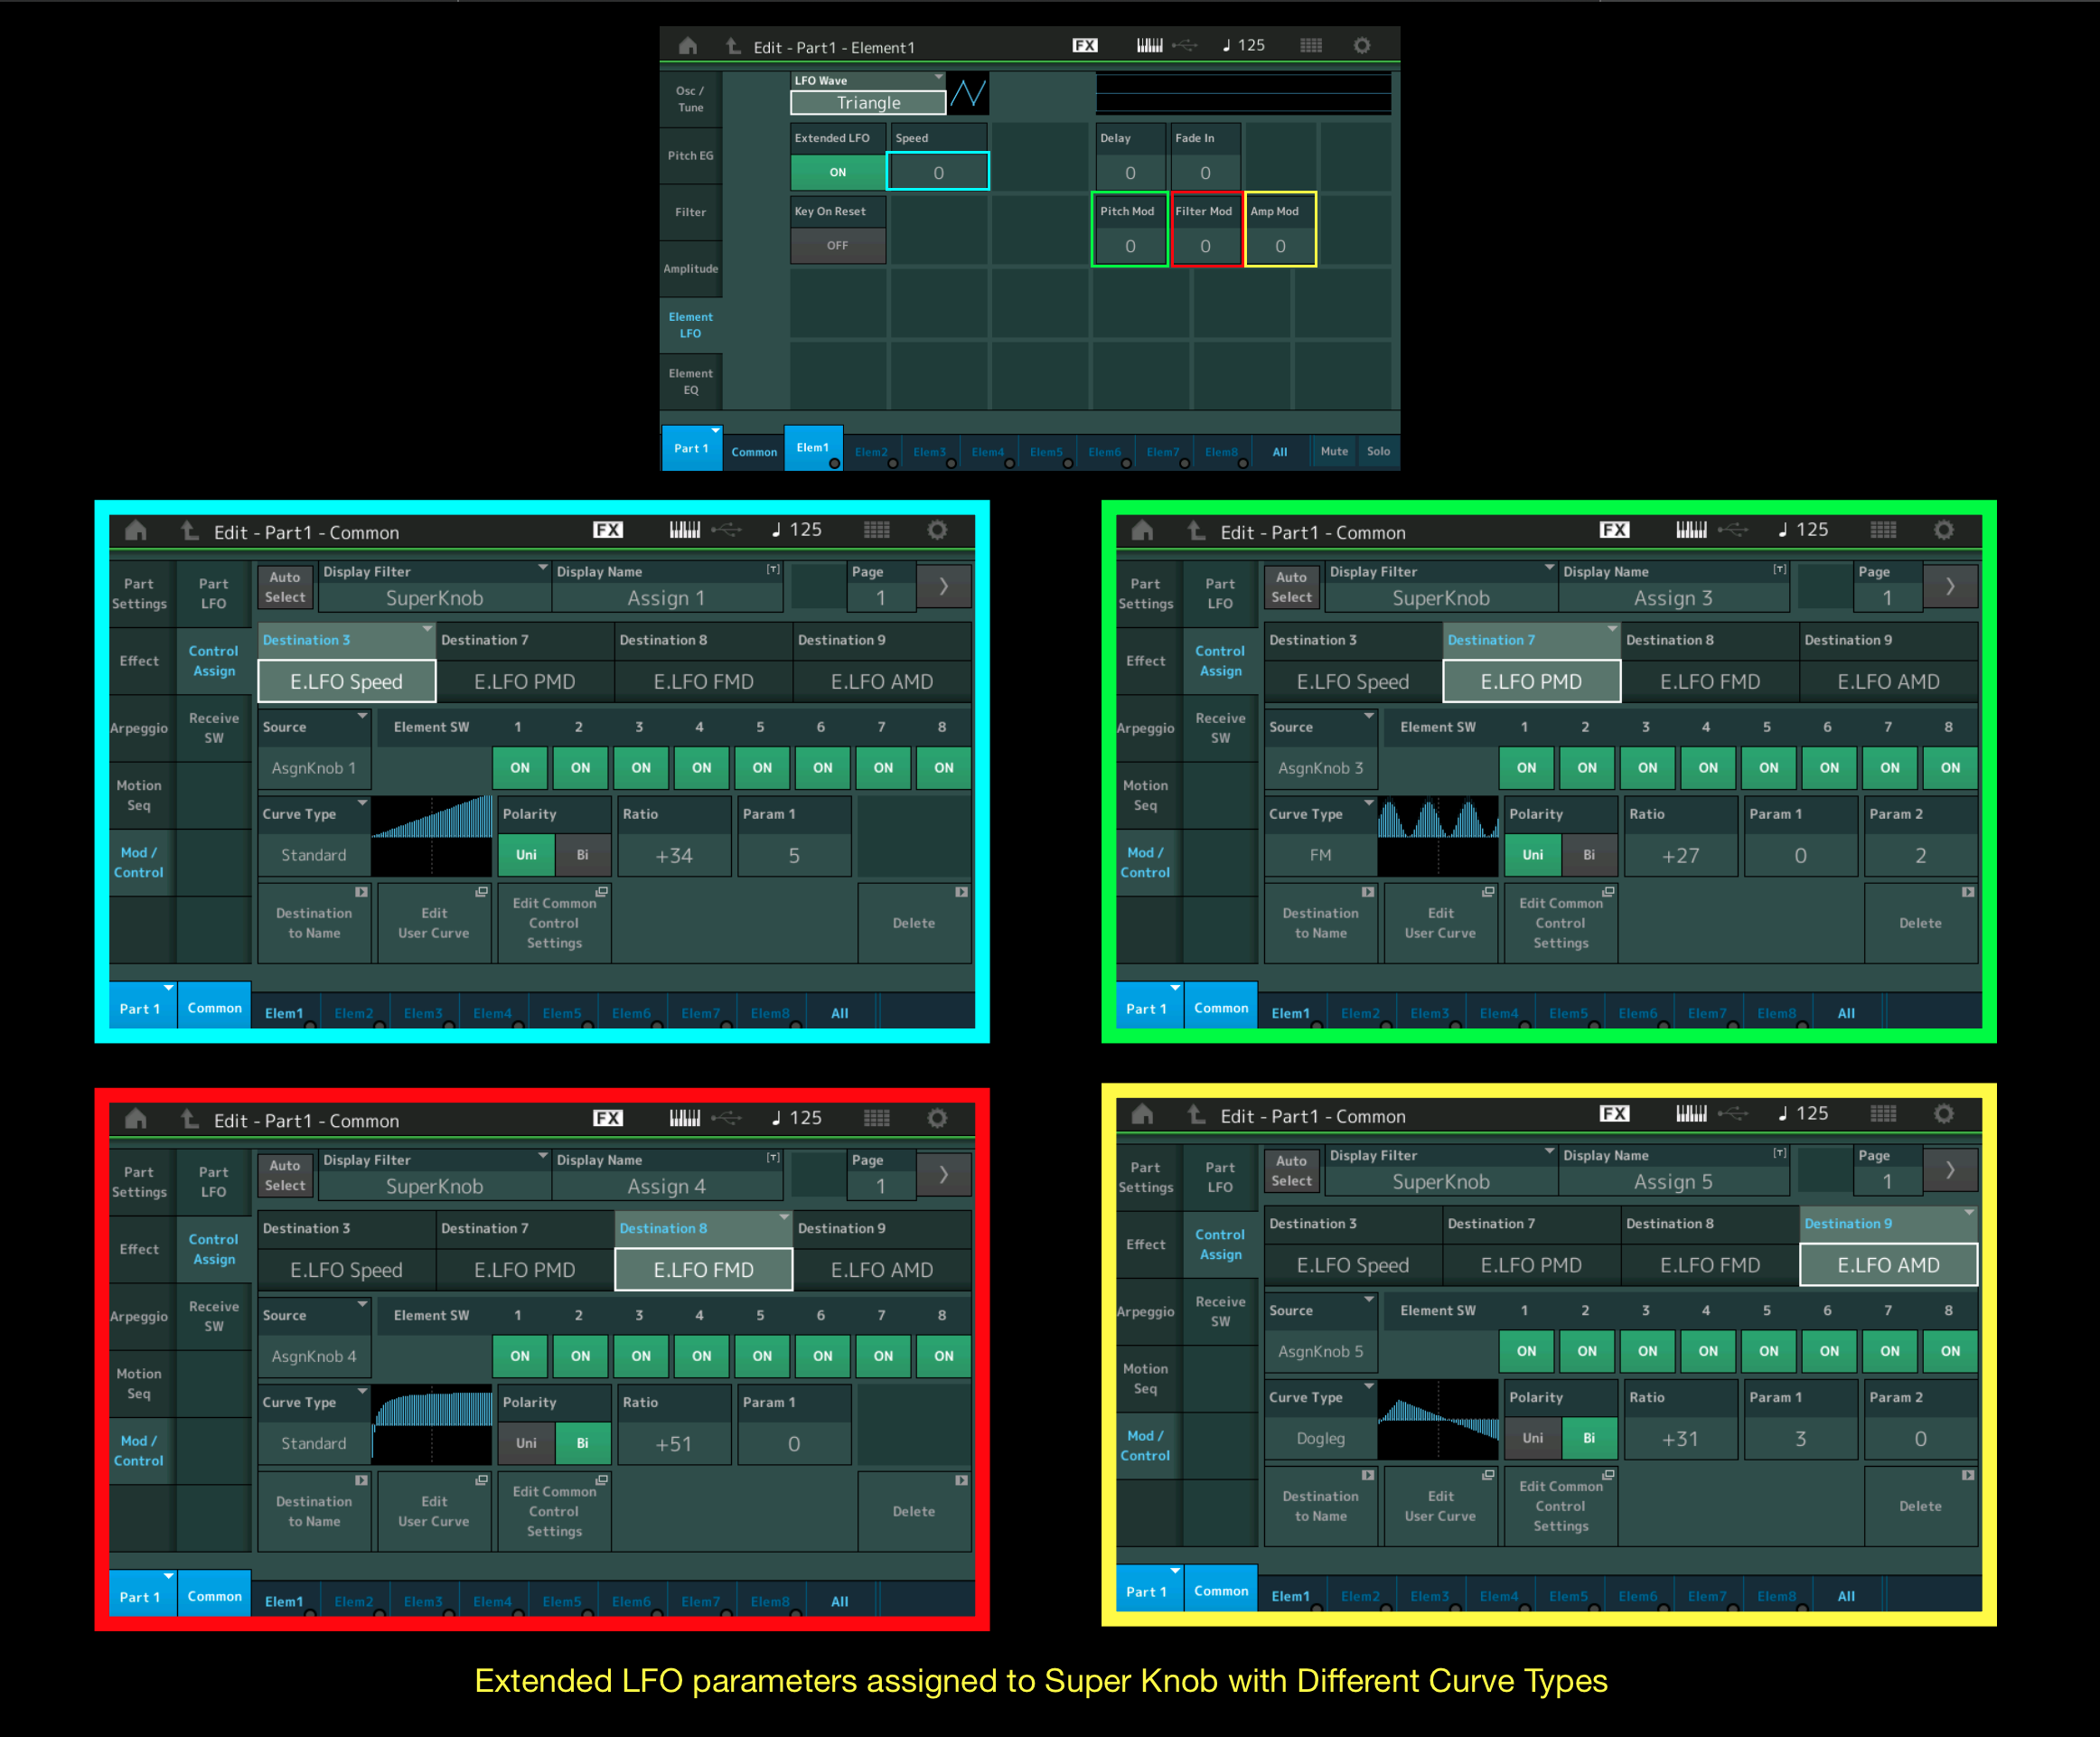
The Speed parameter is set; now I want to assign Pitch, Filter and Amplitude Modulation to the Super Knob too, but with different Curve Types. This means that as the Super Knob is turned clockwise each Parameter will engage at a different point. Check it out below:

Here is what will happen as the Super Knob is turned clockwise:
- E.LFO Speed: I chose the “Standard” linear Curve Type with a Unipolar polarity so as the Super Knob is increased the LFO Speed will increase according.
- E.LFO PMD (Pitch Modulation Depth): For this one I chose the “FM” Curve Type. At the Slower Speed you really hear the fluctuation in pitch but as the Super Knob is increased that fluctuation keeps getting faster resulting in an interesting granular effect.
- E.LFO FMD (Filter Modulation Depth): This is also a “Standard” Curve Type, and I chose the Bipolar Polarity with the “Param 1” setting at 0. This shifts the zero crossing point all the way to the right meaning it the filter modulation will begin as soon as the Super Knob is moved.
- E.LFO AMD (Amplitude Modulation Depth): For this Curve Type is chose the Dogleg curve with a Bipolar Polarity. With this parameter you can end up with no sound depending on the Curve Type and LFO Speed. If this is set to a fast LFO with a positive curve the amplitude will go so low that the sound disappears. At slower speeds you hear it fluctuate. I wanted the modulation to disappear as the Super Knob is turned and the Dogleg Curve Type worked the best.
At this point I’d like to share a comment from the great Dr. John Chowning, the discoverer of FM Synthesis. During our interview at NAMM he said that FM Synthesis was not a math discovery, it was an ear discovery. This applies to my programming as well: The Super Knob Curve Types above and the aural result were not calculated. I tried a few and chose what I liked best. Below is a Soundmondo link and two audio examples of this Performance. I encourage you to download and try your own Curve Types, control assignments, etc., and share your experiments! In the first audio example you’ll hear me play a short repeating chord progression several times with Super Knob motion. In second audio example I added a drum, bass and keyboard part so you can hear the sound in context with other instruments.
Soundmondo Link: Warm BackingPad XLFO
Soundcloud Audio examples: WarmBackPadXLFO (0 – 1:17) and WarmBackPadXLFOBBand (1:18)
FM-Xtended LFO
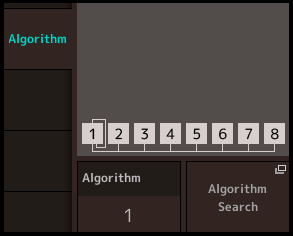
The next Performance “FX-Xtended LFO” is an experimental special effect sound using a single FM-X Part. There are no effects except a bit of reverb. This sound uses Algorithm 1, so all the Operators are Carriers. The goal here is to hear what happens when the Extended LFO modulates a basic FM-X sound.

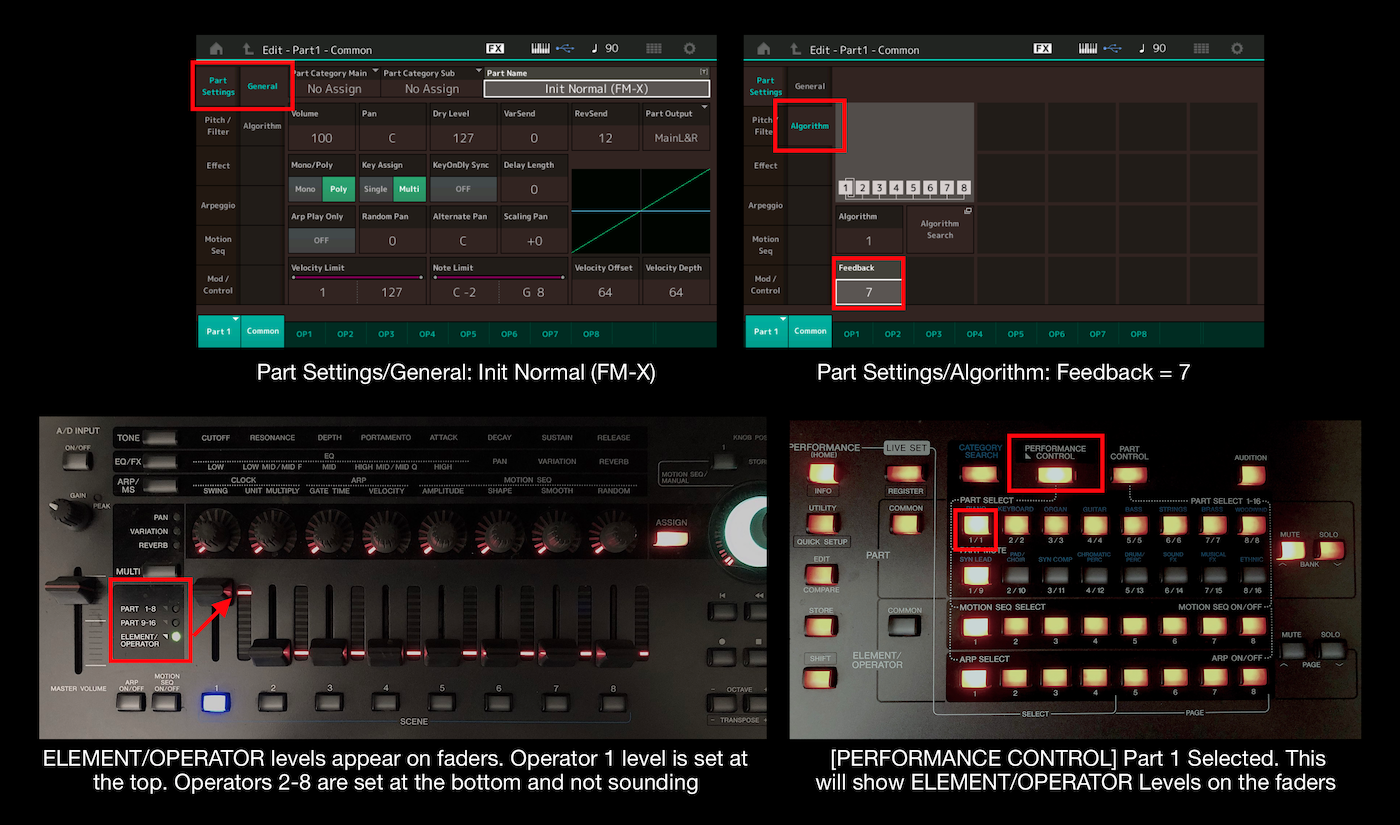
For the example below I started with the basic “Init Normal (FM-X)” Preset Performance. When selected you get a basic Single Part FM-X Performance using Algorithm 1 with only Operator 1 sounding. Operators 2-8 are set to zero and make no sound unless the level is increased. For now, I am only focusing on Operator 1 but later on I’ll add Operators 2-8. I chose this initialized Performance because it’s a “blank slate” with no control assignments, an organ-type amplitude envelope, no insertion effects and only one active Operator.
The first thing I want to do is add harmonics to Operator 1. The initialized Performance is a simple sine wave with Operator Feedback set to 0. Increasing Feedback changes the sine wave closer to a sawtooth wave by adding harmonics. Check it out:

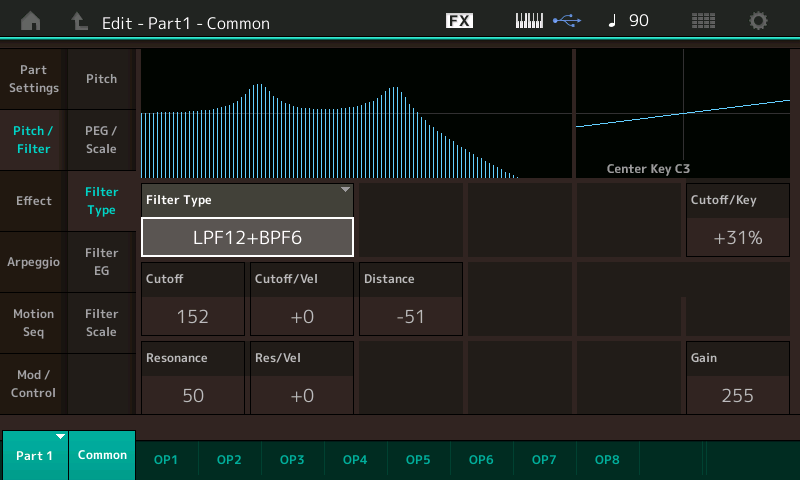
With the Feedback added, the waveform is more harmonically rich giving the filter more to work with. I added Filter Type “LPF12+BPF6” – a low pass filter and band pass filter with resonance and “distance.” You’ll hear the resonant peaks as the cutoff frequency changes with the LFO:

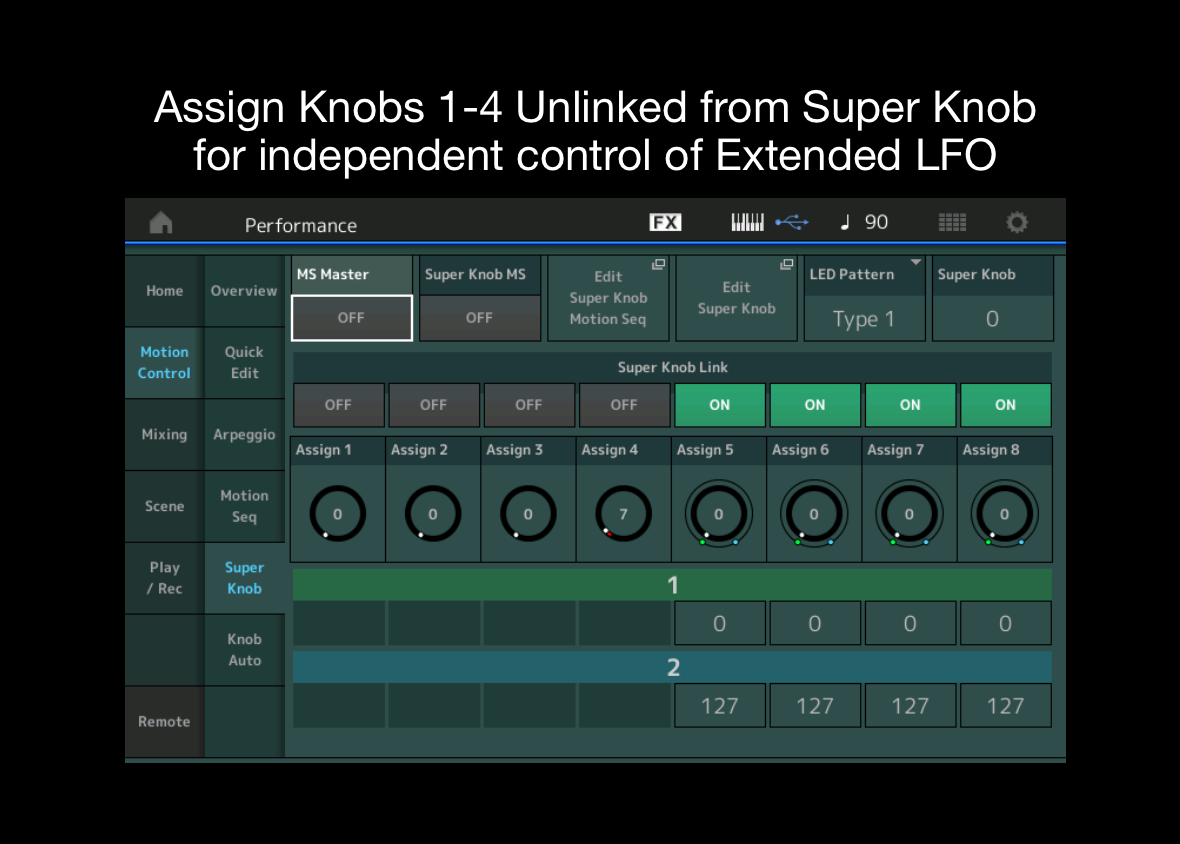
I want to unlink Assign Knobs 1-4 from the Super Knob for independent control of each of the four LFO Parameters. To do this I press the [PERFORMANCE (Home)] button, then touch “Motion Control” and “Super Knob” and set “Assign 1-4” to “Off”:

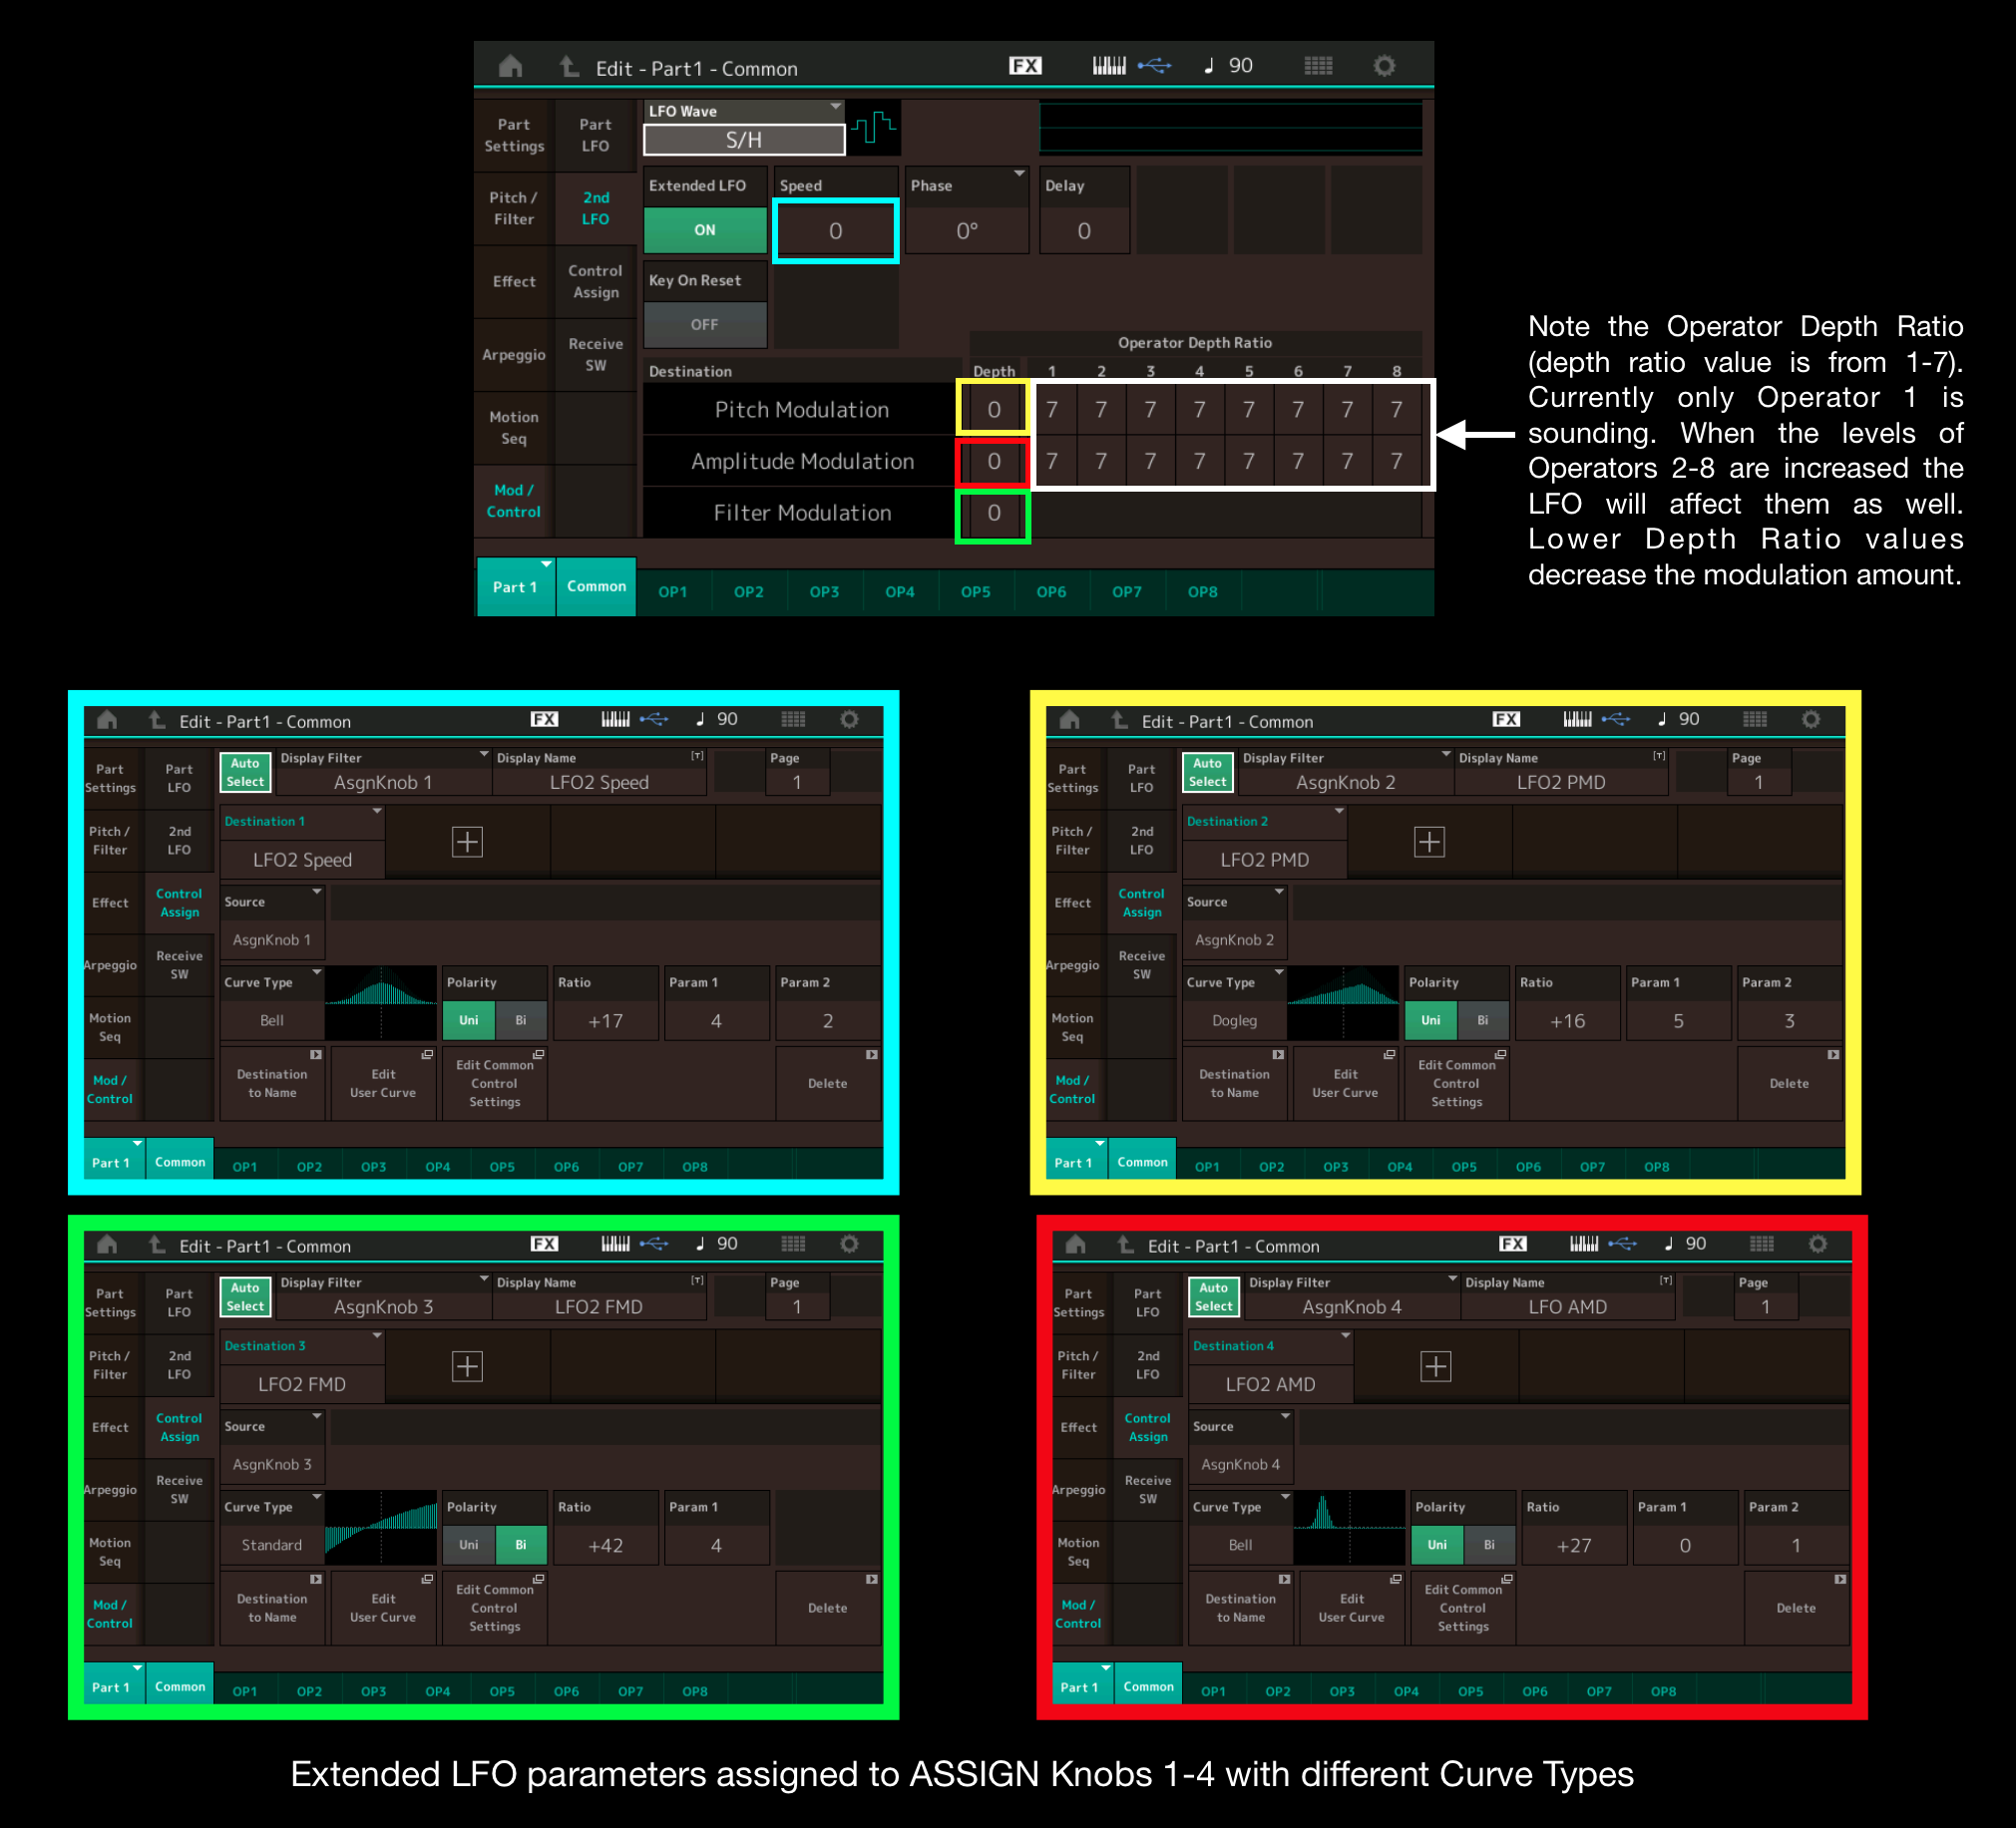
Now each parameter is ready to be assigned. Under “2nd LFO” the Parameters Speed, Pitch Modulation, Amplitude Modulation and Filter Modulation can all be assigned to the Assign Knobs. As in the previous example this is done by selecting the parameter in the Touch Screen, pressing the [CONTROL ASSIGN] button and moving the respective knob:

Each of the Assignable Knobs have different Curve Types that do interesting things especially in context with each other:
- Assign Knob 1 controls LFO2 Speed which speeds up as the knob reaches 12 o’clock and slows down as knob movement increases due to the Bell Curve Type (Top Right, Turquoise Blue).
- Assign Knob 2 controls LFO2 Pitch Modulation Depth increases to its maximum at about 2/3 of the way through and decreases with Dogleg Curve Type (Top Left, Yellow)
- Assign Knob 3 controls LFO2 Filter Modulation Depth with a Bipolar standard curve type that cross midpoint just before the knob reaches 12 o’clock (Bottom Right, Green).
- Assign Knob 4 controls LFO2 Amplitude Modulation Depth. This is assigned a Bell Curve with a very narrow band. Amplitude Modulation only occurs at this point as the knob is turned and disappears before 12 o’clock is reached (Bottom Left, Red).
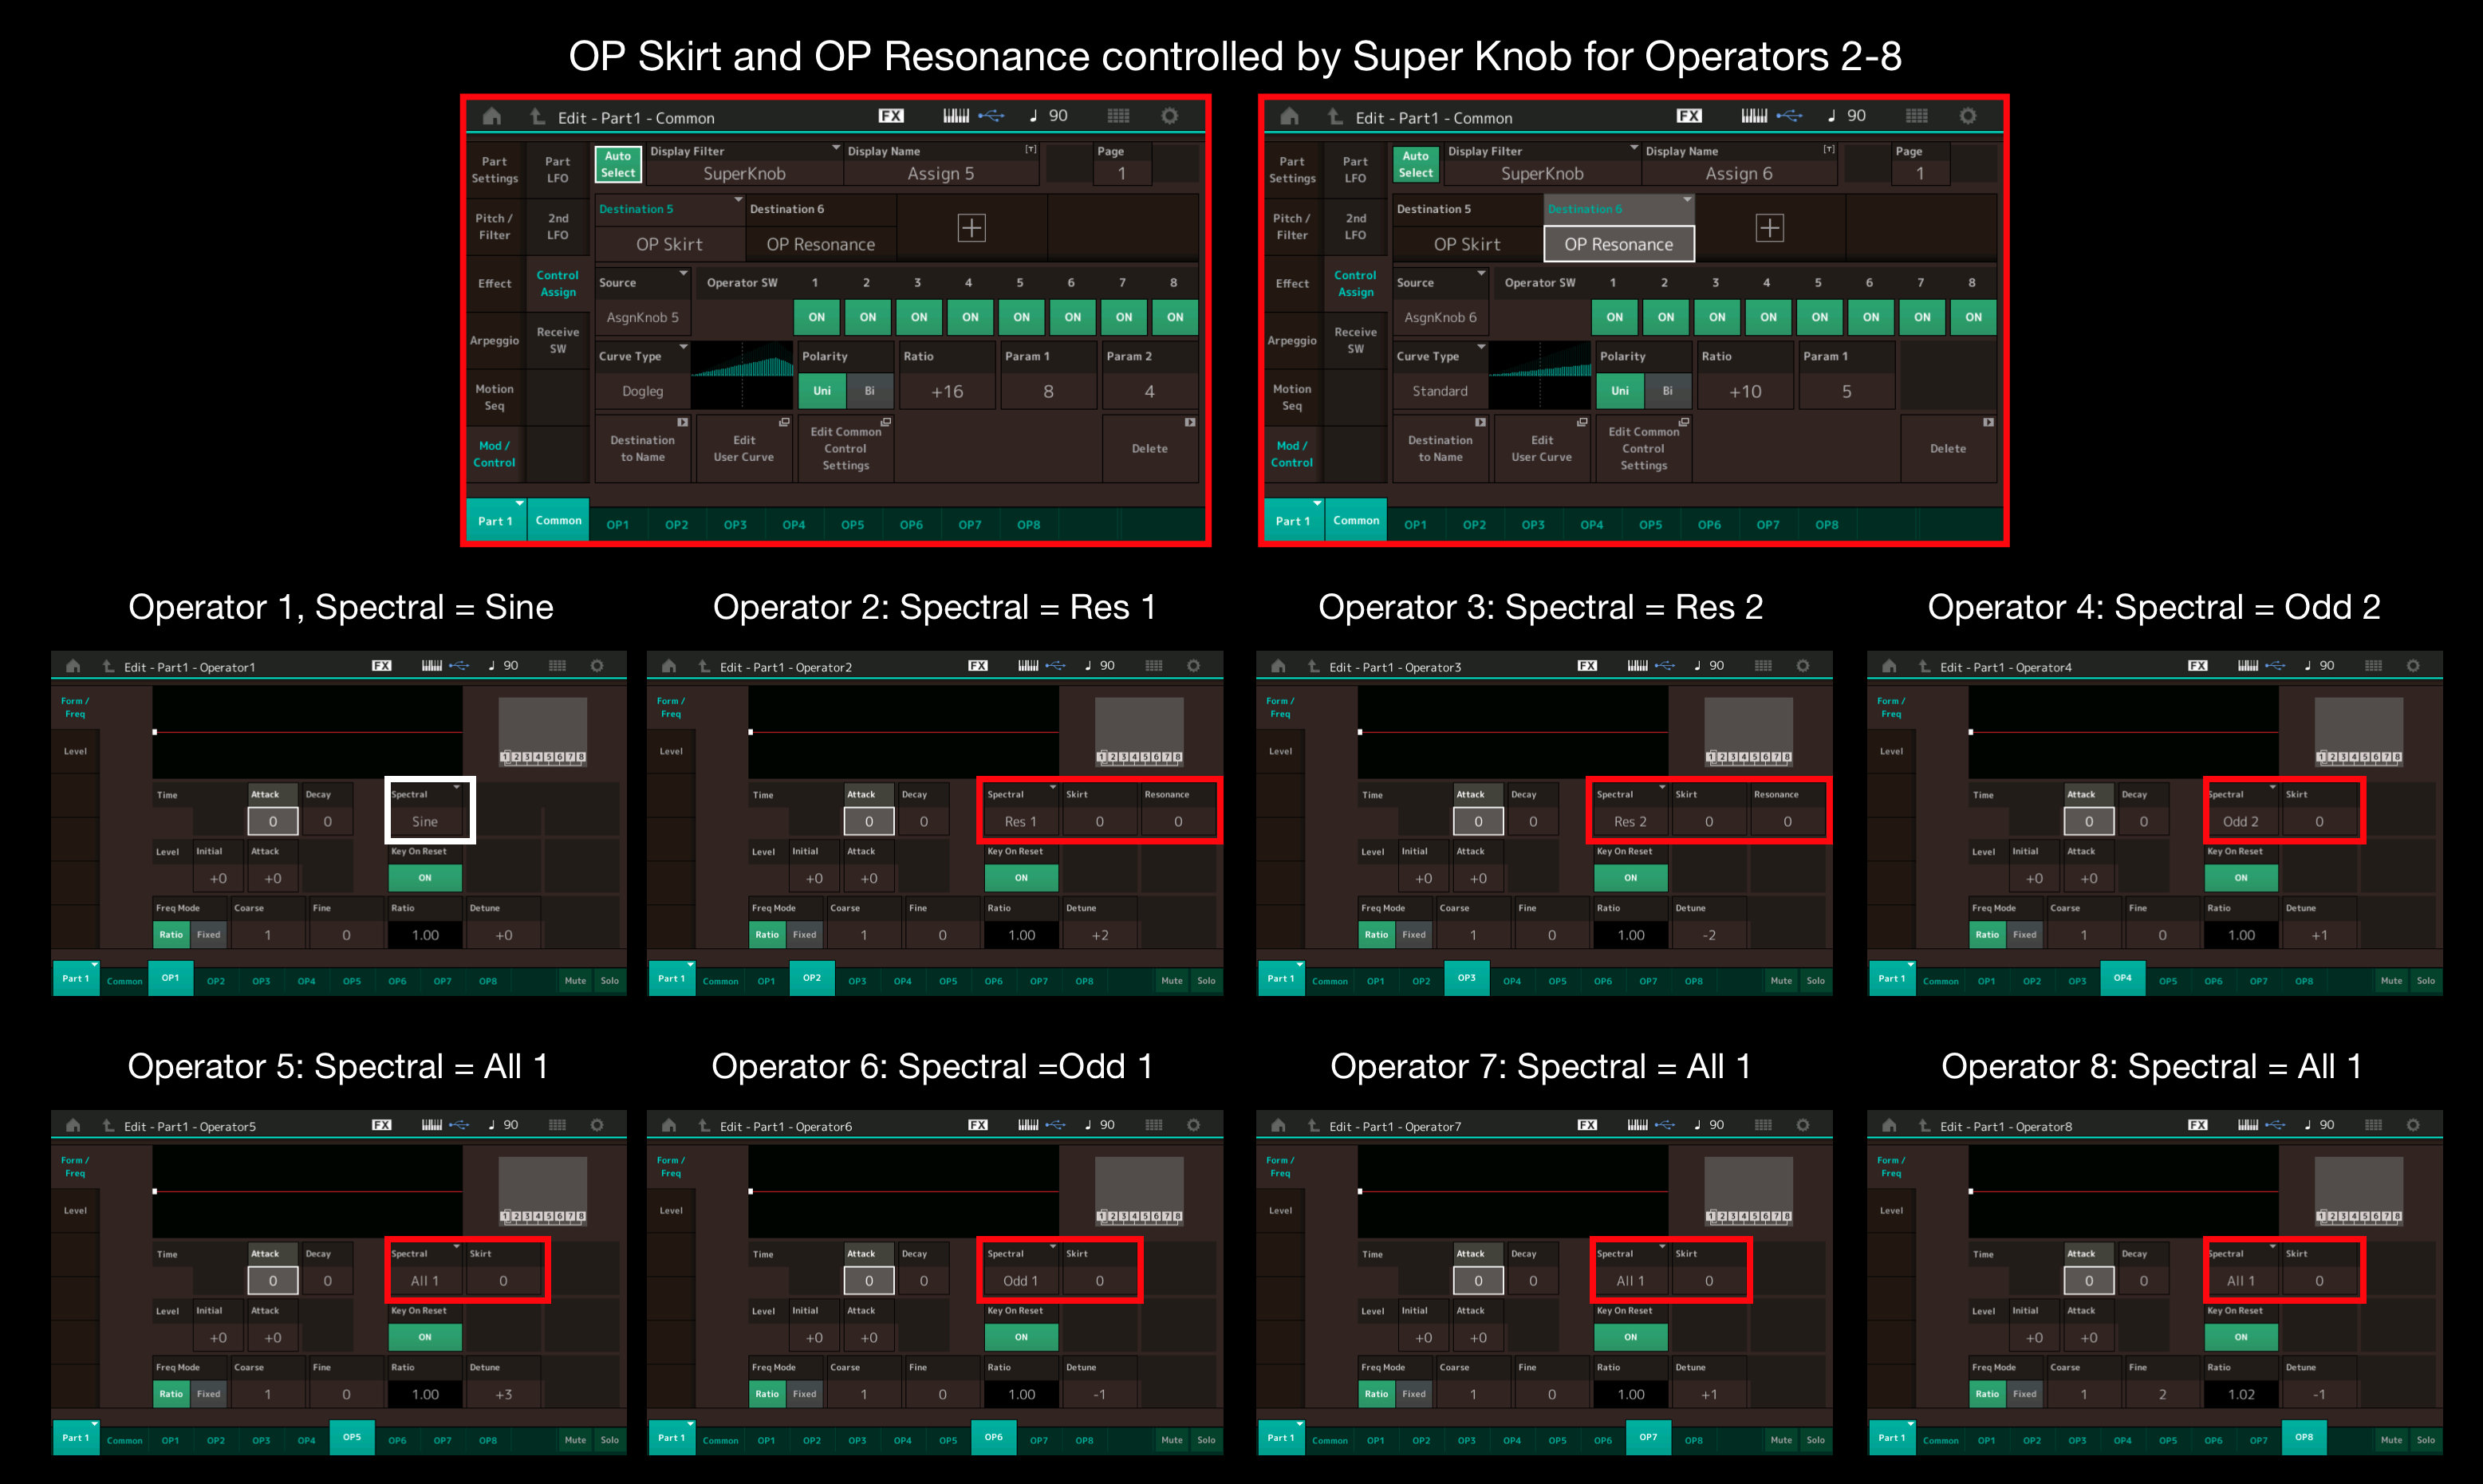
The combination of the knob position creates interesting modulation interactions with just a single operator. But the sound gets even more interesting by increasing the levels of Operators 2-8. In the graphic above I pointed out that the Depth Ratio for each Operator is set at the maximum of 7, so the LFO modulation will affect those operators too. However, I made things even more interesting by changing the Spectral settings for the additional Operators and assigned Super Knob control. Check it out:

The audio examples below are simple drones that change as knobs are turn and Operator levels increased.
The first example you’ll hear only Operator 1. Each turn of the four Assignable Knobs changes the sound: First Filter Modulation Depth, then the LFO speed. then the Pitch Modulation Depth. Amplitude Modulation occurs a few times since it is set to a small Bell Curve Type and I bring it in and out briefly. Remember: This is just a Single Operator!
The second example starts with Operator 1 then the levels of Operators 2-8 are increased. As I move the Super Knob you here both the Skirt and Resonance change, then the four Assignable Knobs change The Filter, Pitch and Modulation Depth. There are some really interesting moments in there!
Soundmondo Link: FM-Xtended LFO
Soundcloud Audio: FM-Xtended1Op (2:38) and FM-XtendedMultiOp (3:45)
Download this Performance, experiment and share your results! We’d love to hear what you come up with!
