Rhythm Pattern
Select a Performance you wish to compose with… You can add a Rhythm Pattern to any Performance with an available KBD CTRL Part. You select a Drum Kit. Once you do, the Rhythm Pattern function does the rest to make it ready to play. This feature is standard with the MODX via a dedicated [RHYTHM PATTTERN] button. In MONTAGE OS v3.0 this cool feature was added using the [SHIFT] + [CONTROL ASSIGN]. First, a little background:
You could always simply add a drum kit to an existing Performance in MONTAGE, but often additional housekeeping was needed when adding a drum Part. For example, say you want to add a drum Part to the Performance “CFX + FM EP 2”, a 2-Part Performance that includes an AWM2 acoustic grand in Part 1 and an FM-X electric piano in Part 2, linked via Super Knob movement. Simply adding the kit “Real Drums Kit” just adds kit with no corresponding Arpeggio. What if what you want is an easy way to add a Drum groove to the piano for inspiration or just practice with a “hip” metronome? That is what the Rhythm Pattern feature offers.
Let’s start with our Performance example “CFX + FM EP 2”.
From the HOME screen: Press [SHIFT] + [CONTROL ASSIGN]. This launches the “Rhythm Pattern” function (new):
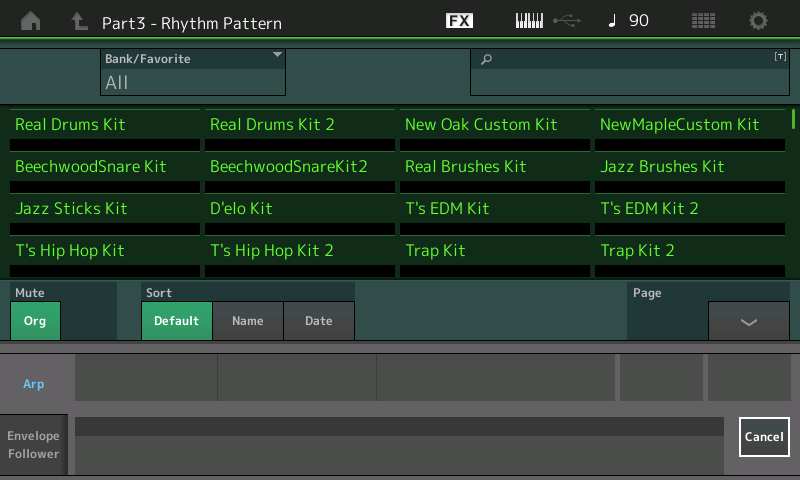
From here you can “merge” a Drum Kit PART by taking you to this special “search” screen for “Rhythm Pattern” selection seen above.
When you select a Drum Kit – use the “Page” down arrow to view additional screens:
- It activates KBD CTRL for the added PART (Part3) making it apart of your controlled Performance
- It assigns 8 related ARP Phrases and gives you direct access via the screen
- It sets ARP HOLD = ON so that you do not have to maintain key down for the Arp phrase to continue.
- It will also set both the PART and MASTER ARP Switches = ON
- While on the Rhythm Pattern screen, the right front panel becomes Drum Kit selection (buttons 1-16); Page UP/DOWN; and the bottom row of eight buttons become ARP SELECT:
Conveniently, Tempo and Volume are also available on the screen to make adjusting things easy. All you need to do now, is play.
HINT: In general, the Name of the Drum Kit will suggest the type of Drum groove you will find initially assigned. For example, selecting a Kit named “Jazz Brushes Kit” will call up a Jazz groove; recalling a Kit named “Hip Hop” will call up a Hip Hop groove, etc. You can try out several…
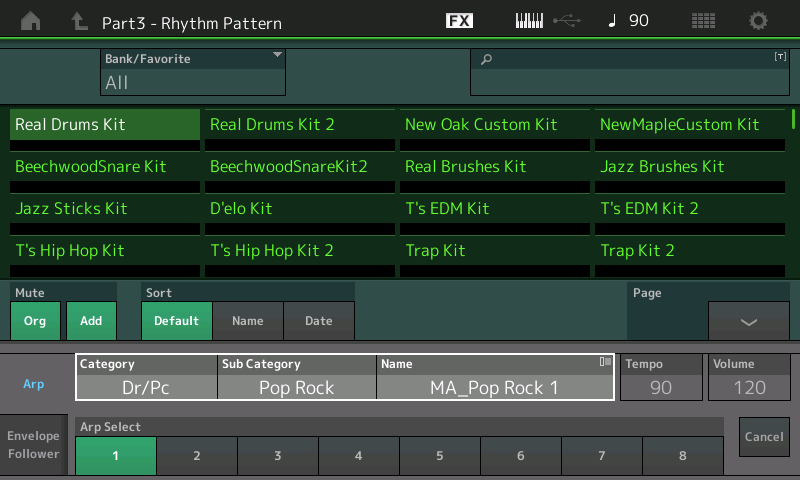
RHYTHM PATTERN feature: The cursor highlight will surround the currently assigned Arpeggio, you can immediately begin a ‘search’ to change the suggested Arp Phrase, if you wish. In our example above, the “Real Drums Kit” has as “ARP SELECT 1” PopRock Drum/Percussion Arp named “MA_Pop Rock 1”
MA = Main ‘A’ Section groove. “M” is main, “A” is the complexity, where “A” is least complex and “D” would be the most complex.
The Arp Category Search is purple. Just tap the Arp Name box (shown highlighted above) for a pop-in menu for “Category Search” or press the dedicated [CATEGORY SEARCH] button while the ARP Name box is highlighted.
The RHYTHM PATTERN function will allow you “merge” a Drum Kit Part to the current Performance – assuming a Part is available. You are placed in a search field showing you your single Part Drum Kits. If you select a Factory Kit, it will bring along 8 Arp Phrases in the context that matches the Kit name. Find a groove that gives you a generally good “feel” for what you’re doing. Use the ARP SELECT soft buttons in the screen, (or if you have a MONTAGE: the right front panel ARP SELECT buttons, 1-8) to select the groove.
You can *detail* your Drums later. During this initial process you just want a groove you can work with – worry about fill-ins and other details later. The wonderful thing about working in MIDI is the ability to ‘change your mind’.
You can completely remove these drums later. We are using it because it is more inspiring than just the click-click-click of the metronome.
MONTAGE only: The [CONTROL ASSIGN] button will flash while you are on the “Rhythm Pattern” screen. To make your Kit selection, press [HOME]
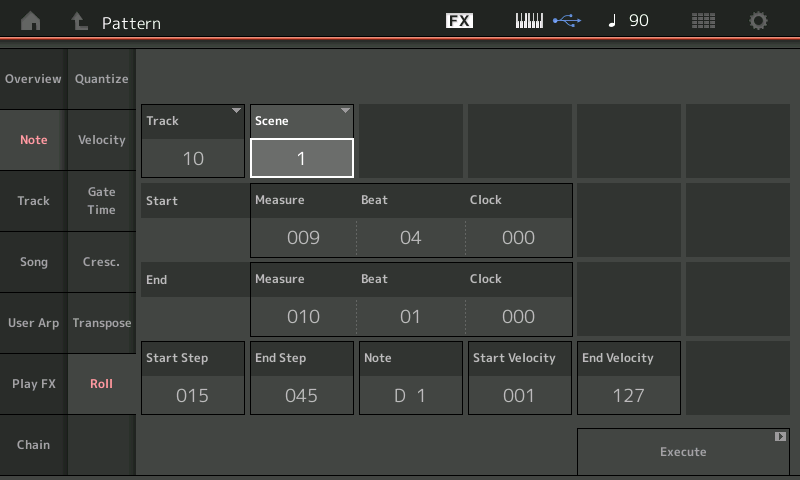
PATTERN RECORD: If you would like to record the currently selected Drum Arp to a Pattern, all you need to do is the following:
Press the [RECORD] button – this will take you to a new Play/Rec item.
On this RECORD SETUP screen with SCENE 1 selected, set the LENGTH of recording as desired.
When working with Arpeggios you can automate the Punch In and Punch Out points by setting the “Key On Start” = ON and setting the “Loop” = OFF. This ensures that the recording begins precisely when you touch the keys and will automatically end recording at the finish of the LENGTH, as set. This takes away all the pressure of starting on the downbeat and will end without you having to press the STOP button precisely before it cycles around.
If you make a mistake, and wish to redo your recording… simply return the transport to the top, and press RECORD again. If your “Record Type” = Replace, the previous data will be overwritten.
Questions/comments? Join the conversation on the Forum here.