MONTAGifying MOTIF: “Altered States”
This week’s MONTAGification of the Motif XF Performance “Altered States” will take us into the area of routing audio to MONTAGE’s array of Audio Output options. We will use it to explore audio output assignments and how this applies when recording multiple Parts simultaneously. We will also look back on some of the previous XF Performance conversions to give you different examples of the opportunities you have with this powerful feature. The idea is to gain mastery of the concept of routing a PART to the MONTAGE Main and Assignable Outputs, and what that will enable you to do with that audio when recording – whether to an external DAW software or to a USB drive connected directly to the MONTAGE’s USB “To Host” port.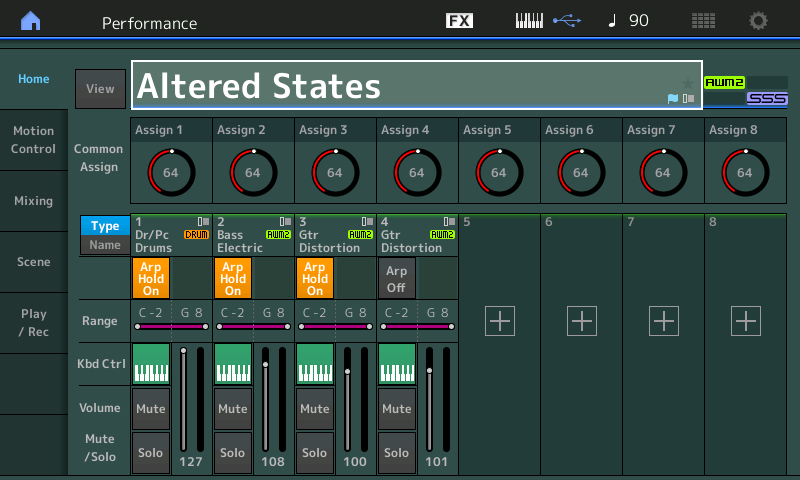
A Motif XF Performance combined as many as four Parts into a playable/controllable Program – we know on MONTAGE this has been expanded to eight KBD CTRL Parts. We have been using these conversions to learn how to customize them into the Motion Control Synthesis Engine. In the Motif XF, each PART represented a different instrument. However, in MONTAGE there are going to be times where you will be dealing with one instrument per PART and there will be times when several PARTs are used to create one instrument. We’ll look at this and the options you have to direct multiple PARTS to Audio tracks in your computer.
Tackling the Subject Matter
We typically divide our task into two areas: 1) the discovery phase, where we use the “Overview” screen; and, 2) “Edit Part Control Settings” shortcut to view the “Control Assign” and “Receive Switch” screen settings. This allows us to see what the original programmer had in mind: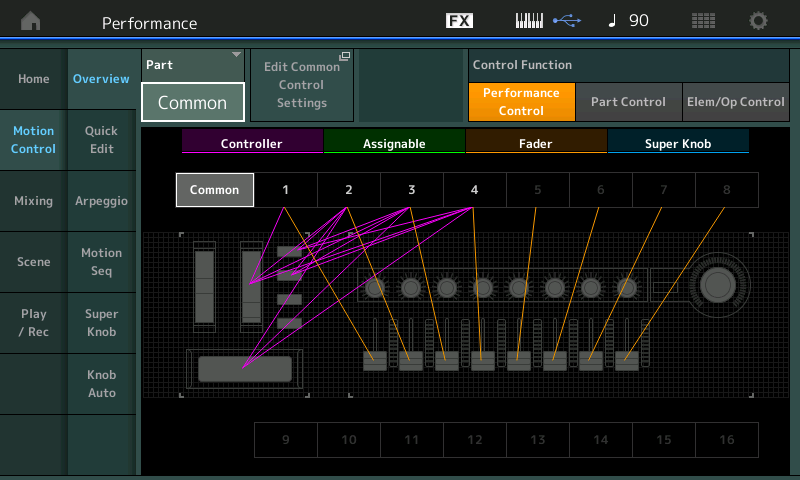
So far we have looked at several different areas of the MONTAGE synth architecture, exploring some of the possibilites – we have:
– Looked into how the FILTER works within an AWM2 Part;
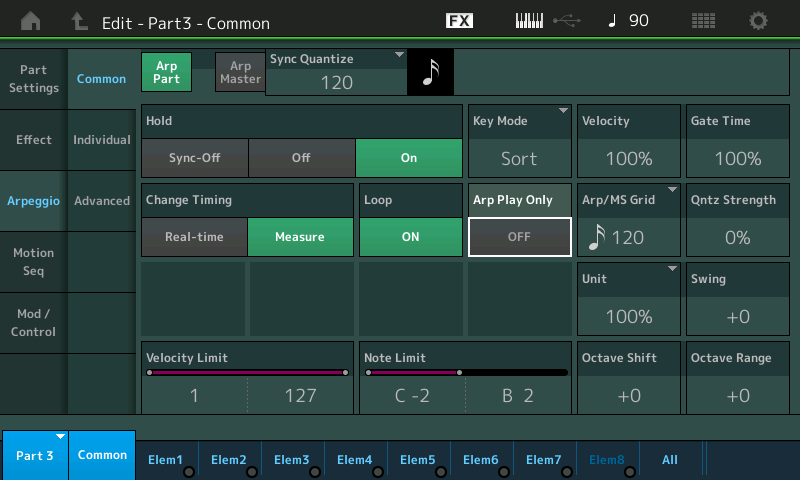
– Looked at ARPEGGIO assignments and how ‘timing and feel’ can be altered to create variations;
– Seen XA CONTROL random/cycle/legato/Element Selection as a musical way to determine which of the multitude of Elements in a PERFORMANCE are doing what/when;
– Looked at a SIDE CHAIN of drum audio used to modulate (shift the phase of) a pad;
– Briefly looked at how Motion Sequences are made and routed to parameter destinations;
– Modulated an AWM2 PART with another AWM2 PART via the Envelope Follower; and,
– Dragged and dropped a SONG from the MONTAGE SONG Folder directly to the computer DAW.
Each of these mini-topics are like doorways – where we are giving you a peak down each hallway. There is much to discover down each one. The purpose here is to introduce the concept involved (gently opening the door) and hopefully you can take it, and run with it in your own experiments. This time we are focusing on one of the most powerful areas of your MONTAGE: Audio routing. And this is key to a major area of the MONTAGE’s musical flexibility. The ability to create new, exciting, interactive musical sounds, and to be able to capture them at their best in your computer-based recording studio. Rather than being the entire studio, (Motif XF ‘workstation’ concept where the keyboard could do it all), the MONTAGE recognizes that the MONTAGE may be just one of the components used in building your music project. You can set it up so that you have a very flexible instrument which can perform multiple musical roles within your composition.
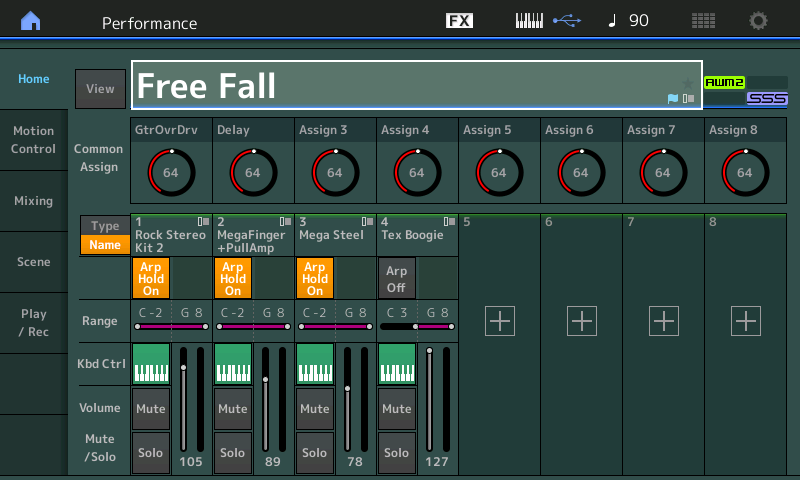
We will leave much of the Control Assign “discovery phase” to you, as this is a familiar task if you’ve been following the previous artilces in this series. “Altered States” is a basic ‘rhythm section with a lead instrument’-type 4-Part Performance. We’ll concentrate on the Audio Routing issues. Drums, Bass, Rhythm Gtr, Lead Gtr.
AUDIO: It’s the Real Thing
There are, in the Motion Control Synthesis, activities that involve the interaction between several Parts. Unlike the Motif XF Performance, in MONTAGE, you can have the output of one Part influence or modulate another Part, or Parts. This makes the function of capturing the audio a very integral part of the workflow. Not all control is due to MIDI interaction. It is precisely because in MONTAGE an instrument sound can use several PARTs that can change everything about *how* you work with recording this synthesizer. You will want to record each of the interacting PARTS while they are interacting with each other.
The “traditional” workflow of overdubbing audio PARTS one-by-one may have worked in previous multi-timbral synths (like in the Motif XF, for example), but once you begin to expand the roll of the PART in a playable Performance (as we have seen in this series) – knowing how one PART can interact and interplay with the other PARTs in the PERFORMANCE – you recognize this may change your thinking on how to go about recording/documenting your musical performance. Or there maybe times when the PART doing the modifying is not directly audible, only through its interaction with the target destination PART – so there are times when you want that PART active but you are not going to record its audio output. There are definitely new opportunities, new decisions, new functions.
These include Side Chaining (using Compressors, Arpeggios, Ring Modulators, Filters, Flangers, Phasers, Vocoded vocal formants, etc.), the Envelope Follower, and some of the other concepts we’ve been looking at in this series.
The MONTAGE offers the composer/musician a stereo bus output for each and every synth Part. This means capturing the eventual audio of a musical performance can be as detailed as you may require. At first, you may think, a stereo output for each Part is overkill – after all, not all sounds are stereo sounds – and while this is very true, the MONTAGE does offer stereo renditions of acoustic pianos, string and brass ensembles, drum kits and some other select instruments. However, most of the single instruments are sampled in mono. But the reason having a “stereo bus” available on which to route an instrument, means you can maintain any use of stereo in the Insertion Effects.
For example, the MONTAGE Tone Wheel (or “Hammond B3” type) Waveforms are mono samples, but the “Rotary Speaker” Insertion Effect which is for all intents, a part of the B3 sound, require a stereo panorama in which to create its ‘magic’. A MONTAGE “Rd” (or Rhodes Electric piano type) Waveforms are mono samples, but the “Auto Pan” Insertion Effect That moves the Rhodes sound left and right requires a stereo field in which to create its magic. Even a Guitar sound might utilize a stereo delay or some other Effect that uses the stereo panorama.
So while an instrument may itself be mono sampled, be aware that the assigned Insertion Effect might be very much utilizing the stereo field. Each Part, 1-16, has its own two Insert Effect, and its own Part EQs prior to being available for the Assignable Output. This means when isolating a MONTAGE instrument on it’s own output bus, it maintains the two Insertion Effects. But does not include the System Effects, or the the Master Effect, and Master EQ, which are “shared” by all Parts. Shared means that audio from those other instruments are mixed in – this defeats our goal of isolation. If you want isolation, removing it from the shared effects is how this is achieved.
By default, all Parts are assigned to PART OUTPUT = “Main L&R” and share the System and Master Effect/EQ. This is ideal for when you wish to capture the entire MONTAGE musical output as a single Stereo entity (.Wav at 44.1kHz/24-bit).
The PART OUTPUT parameter appears in a couple places in the PART parameter set. You can find it on the [EDIT] > [PART SELECT 1] – PART 1 COMMON > “Part Settings” > “General” screen:
It will also be found on the “Effect” > “Routing’ screen. (This is the same parameter, repeated in a location where you will likely need to make this setting at some point). You can move to PART 2, 3 and 4 by using the blue “PART 1” box in the lower left corner of the screen – or by pressing the dedicated [PART SELECT x] front panel button.
We’ll start with the very simplest way to capture your musical ideas.
Direct Record to USB Drive – Create a simple Stereo .WAV for Friends and Family
The MONTAGE is able to record a stereo .wav File (44.1kHz, 24-bit) directly to an attached USB stick. As much as 74 minutes of continuous recording is possible at maximum. You can use this method simply to create an audio document – it is a very important part of being a synth programmer is to record something, and step back and listen to what you have. While programming or actively playing a sound, you listen differently to it than when you are simply listening to the sound back from a recording. It is your first time to make true judgement based on “the sound” alone, (without “the feel + the sound”).
If you plan on transferring the .wav to a DAW, where you can then overdub additional tracks and continue your production, it is highly recommended you use the built-in Metronome Click as a clock reference. By doing so you will be able to accurately position the audio data in your favorite DAW so that tempo and measure/beat references coincide. In either case, although the CLICK is routed to the “MAIN L&R” Output, you will only hear the Click in your speakers, it will not be printed to the .wav file on the USB stick (the path to the USB stick does not go through the MAIN L&R).
Setting the Click “Mode” click to “Always” will give you a reference count-in Tempo. You set this as follows:
– Touch the “Quarter Note/Tempo” icon on the very top line of the screen to go directly to the TEMPO SETTINGS screen: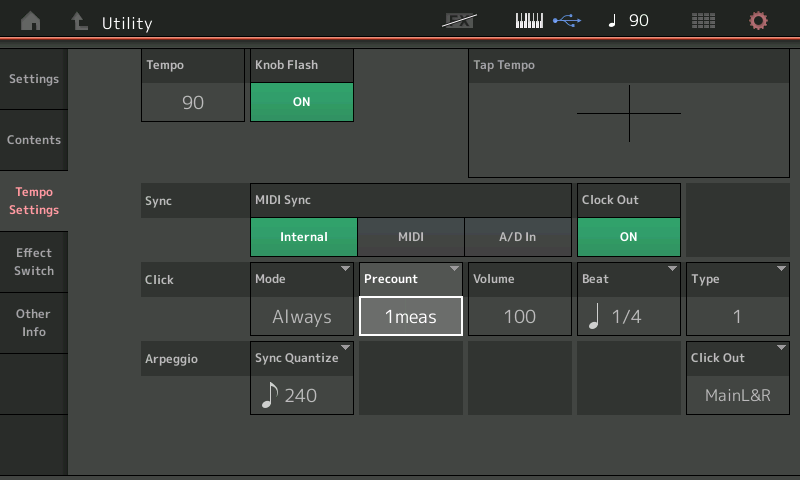
– Press [EXIT] to return to your PERFORMANCE.
By default, all Parts default to PART OUTPUT = Main L&R. This is ideal for capturing the entire audio output as a single stereo .wav
From the HOME screen:
– Touch “Play/Rec” in the first column in the screen.
– Touch “Audio”.
– If you have not done so you will be prompted to “Please connect USB device”.
You will need a USB drive that you have used with the MONTAGE. Just a word here: Most USB sticks come ready to use – meaning no Formatting is initially necessary. There are rare cases where a USB stick comes with free COPY PROTECTION software built-in. In such a case always think COPY PROTECTION = MUSIC PREVENTION. The COPY PROTECTION will prevent your instrument from writing data to it in real time. Contact the manufacturer of the device for the “removal software” – yes, it requires “removal software” – no, you cannot just format the drive to remove the COPY PROTECTION (that wouldn’t be much protection) – so if you have a drive that does not work, contact the manufacturer of the drive, the removal software is usually FREE.
Press the RECORD button to place the instrument in RECORD READY mode (Button flashes red):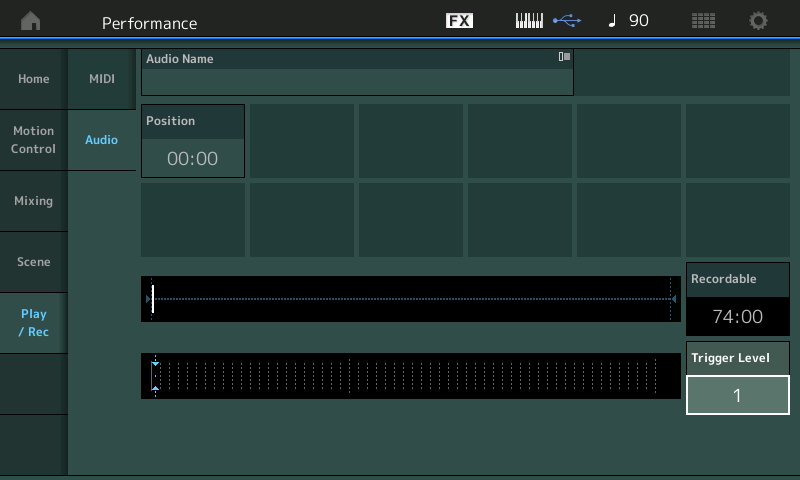
The record time to a USB Drive is 74 minutes continuous. Your mileage will vary depending on the data on the drive and whether or not it is badly fragmented:
– Set the “Trigger Level” = “1” – this will ensure recording will start on the first bit of audio.
– Press the [>] PLAY button – recording will wait for you to start playing.
– The click will count you in. Start when you are ready – recording begins when you begin to play. When the resulting .wav is placed in your DAW Project at the tempo used, the audio will automatically align to the Project’s measures and beats.
When you complete your recording, press STOP.
Touch the “QuarterNote/Tempo”, set the CLICK MODE = REC.
Press [EXIT] to return to your Performance.
This means, without any elaborate setup or configuration, MONTAGE offers you a way to capture your basic Performance programming ideas. If you play respecting the tempo, the result can be easily ported to your favorite DAW for further development. And as we’ll see the routing options makes it quick and easy to start to outline your composition. Even easier to remove and/or replace Arp generated Parts with your own data (using either MIDI or audio) in your favorite DAW software.
As you begin to assemble Performance Parts, creating your own musical montage – be it with Arps, Envelope Follower, Motion Sequences, etc., etc. – you realize that one thing can depend on another and to manipulate them is not a matter of simply adjusting MIDI messages, but more about programming the synth engine. The synth engine often uses parameter control messages that can address multiple Parts in completely unique ways. The separate audio streams allows you to capture each Part, separately.
Alternative Uses:
With the above routine you can record your entire PERFORMANCE as a stereo .wav. The USB Stick will record all PARTS that are assigned to the “MAIN L&R” Output. This means you can, if you desire, play a keyboard sound while jamming along with a Drum Arp – but you can opt to only record your keyboard sound. You would do so by sending just your keyboard PART OUTPUT = Main L&R. By setting the DRUM PART to a USB Assignable pair, it will be removed from the Main Stereo Out and although you hear them as you record, the Drums will not be documented in the recording.
This can be useful when working out PARTS or working on a solo – you can use ARP controlled PARTs to create the repeated backing (not recording them) while you take chorus, after chorus with your main sound. You can then ‘cut and paste’ the best passes into your DAW. They are tempo referenced and isolated!
Multiple Stereo Outputs to DAW
When setting up to record to your favorite DAW, audio routing can be setup manually or you can create a QUICK SETUP template that will make the critical settings for you. If you know a bit about me from my articles, you know, I’m not a big fan of recommending QUICK SETUP templates – this is only because they are often abused. If you never learn what exactly they setup, you never learn to really operate your gear. Yes, they are a shortcut to a solution – but they are the equivalent of handing you a fish, not teaching you to catch one yourself. Once you develop a workflow (a method of working that is comfortable for you) then that is the time to create and store your own custom QUICK SETUP template. MONTAGE will let you do that, too. Often you will discover that a Factory Template ‘sort of’ works for you – if that is not good enough, you need one that works specifically for you! Take your time. For now, we will learn how your audio routing decisions would be made:
– Let’s look at the UTILITY > “Settings” > “Audio I/O” screen and learn what these settings mean: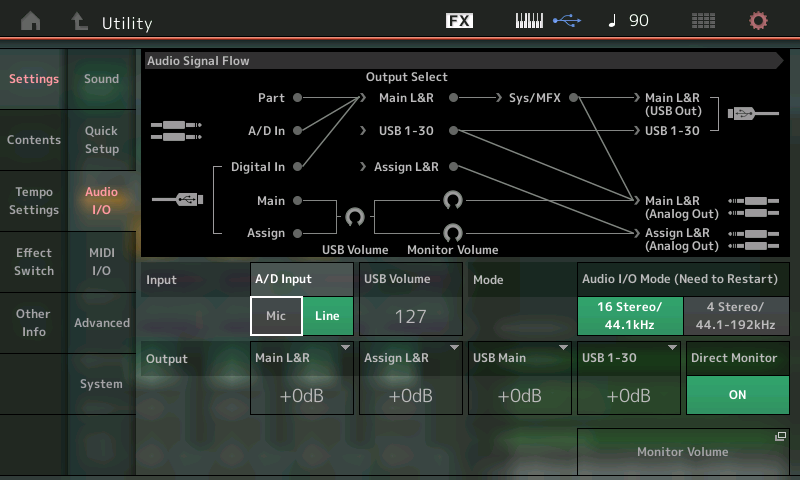
– A/D INPUT – Mic or Line The default is “Line” as this is an amplifier (pre-amp) and the minimum setting would be LINE, the maximum setting would be MIC. This is because a LINE level signal needs very little help from a pre-amp, and the MIC level signal needs the most help from the pre-amp. To create a minimum “noise” added to the system situation, “LINE” level is the default input option. Only set to MIC when you have a microphone connected to the A/D Input on the MONTAGE rear panel.
– USB Volume – 0~127 This is audio returning from the DAW via USB. In the graphic “Audio Signal Flow” you can see the USB cable (lower left) returning audio from the computer. If it is routed to return to the MAIN – it will eventually arrive at the MAIN L&R (Analog Out) after it has passed through the USB VOLUME setting. This will not affect RECORD LEVEL, only Playback Level.
– Mode – 16 Stereo/44.1kHz or 4 Stereo/44.1, 48, 96 or 192kHz – Sets the overall Audio mode. Default is 16 Stereo (32 outs) at 44.1kHz. A change here requires a reboot of the synthesizer.
– OUTPUT (level) – Main L&R, Assign L&R, USB Main, USB 1-30 – Increase or decrease the OUTPUT level of the bus (-6dB, 0dB, +6dB, +12dB). Adjusts the overall Output level of the bus indicated.
– Direct Monitor – ON/OFF Here you determine whether or not the normal connection between the MONTAGE Tone Generator and its analog Audio Outputs is made. If you shut this OFF, the synthesizer engine will no longer send audio to the Main Outputs as a synthesizer. (What that last bit means is: the MONTAGE plays a dual role; it is also your computer’s AUDIO INTERFACE. When DIRECT MONITOR is OFF, the MONTAGE only sends audio to the Main Analog Outputs acting as the computer’s AUDIO INTERFACE). This is a very important thing to understand – the MONTAGE has two pathways to send audio to your Monitor Speakers – Normal routing (DIRECT MONITOR ON), when recording and monitoring audio of the computer, that is, audio that comes into MONTAGE via that USB cable.
– Turn the DIRECT MONITOR function OFF and view the AUDIO SIGNAL FLOW diagram. Try it while viewing the graphic – this signal flow is the key to understanding: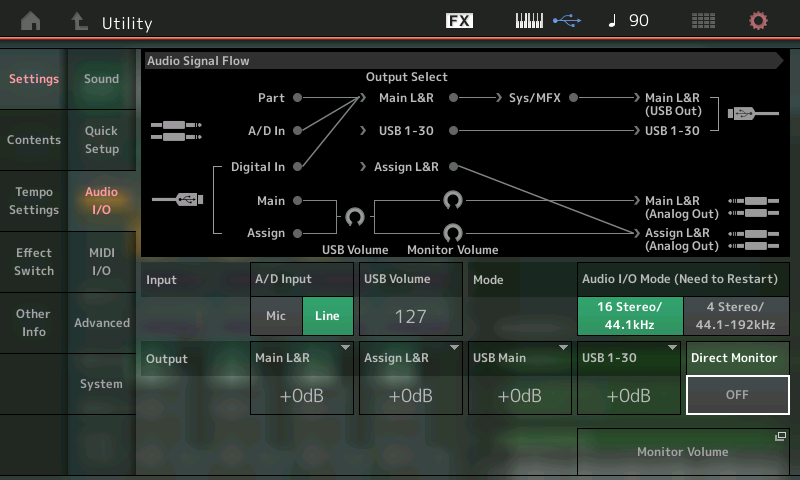
Notice the connection that delivers audio from the MONTAGE “PART” through the SYSTEM and MASTER Effects is defeated from going to the “MAIN L&R (Analog Out)” and so is any PART assigned to USB1-30. It must trave USB OUT to the computer.
How to think about the AUDIO SIGNAL FLOW diagram: The icons in the graphic for 1/4″ cables can be seen arriving in the synth at the A/D Input (upper left), and again at the Main Analog Out and the Assignable Analog Out (lower right).
The icons for the USB cables include the one in the upper right that is sending audio from the MONTAGE to the computer (via USB) – and audio returning from the computer via USB is shown arriving in the lower left corner. (We should mention that there is only one USB cable, in reality, but within that single cable you have both OUT and IN functionality. In the graphic below the yellow is OUT from the MONTAGE > IN to computer, and the blue is OUT of the computer > IN to MONTAGE.)
Signal is flowing from Left-to-Right: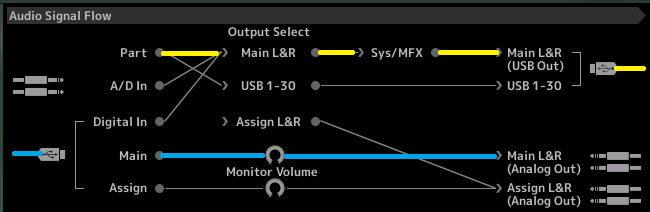
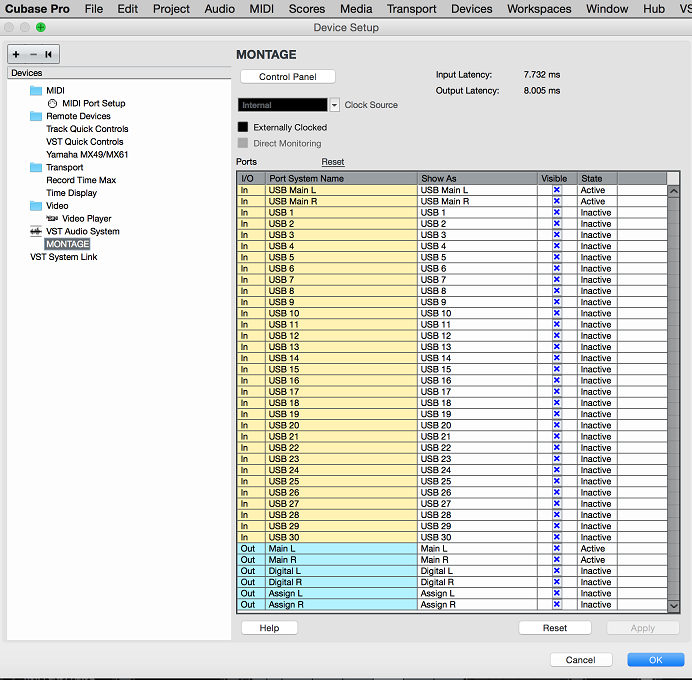
Follow the yellow highlighted signal left to right: If you are playing a PART assigned to the Main L&R, it travels through the System (Reverb/Variation)and Master Effects before going to the “MAIN L&R USB Out”. It is considered an OUTPUT from the MONTAGE view point, but is seen by the computer (Cubase) as an AUDIO INPUT. Again, shown in yellow below are the audio Inputs from MONTAGE arriving in Cubase: DEVICES > DEVICE SETUP >VST AUDIO SYSTEM > MONTAGE
The IN Ports “USB Main L” and “USB Main R” are shown as “Active” – this is because our MONTAGE PART OUTPUT is actively using USB OUT L/R:
Shown in blue (above) is the audio returning to the MONTAGE (acting as audio interface). You can route the signal from Cubase to the Main LR (Analog) Out, the Digital LR (internal mixer) and/or the Assign LR (Analog) Out. Again, the “Active” State shows on just the MAIN L and MAIN R – as we are simply routing the returning audio to our Main L&R Analog Out.
In the MONTAGE “Audio Signal Flow” diagram you can see the USB audio returning to the Montage (blue) and where you can route it. You can return it to the Digital In (internal mixer), the Main (analog) Out or the Assignable (analog) Out:
When DIRECT MONITOR is OFF: Anything played on the MONTAGE will only be routed OUT via the USB OUT only (see the USB cable upper right corner – this goes to the computer) – meaning that to MONITOR (hear) yourself, you will need to return the audio from the Computer via that USB connection (lower left/blue) and then it can be routed to the “Main L&R (Analog Out)”.
If ever you hear “doubling” – it is explained right here in this diagram. This is how it occurs. If you have both DIRECT MONITOR active and you have an AUDIO TRACK in your DAW active (have its Monitor icon active) you will hear doubling. One is the direct signal (no latency) the other traverses the computer and therefore is a few milliseconds late (latency). You can opt to MUTE the audio in the computer, when monitoring yourself Direct or you can opt to listen to the recorded signal, then turn the DIRECT MONITOR route, OFF. It should be EITHER-OR: never both.
Routing Decisions
In our article a few weeks ago using the Motif XF Performance “Worship Center“ we did an experiment where we setup to fade out the orchestral strings and brass PARTS, while we faded in the choir voices and finally we added the pipe organ to the choir – all with a single gesture of simply moving the Super Knob from minimum to maximum, you could setup four stereo Audio Tracks; and through routing and assignment record each simultaneously. With MONTAGE, you will often be performing multiple instrument Parts, so matching Part Output assignments and DAW Inputs will be an important skill. Soloing the stereo audio of each PART would reveal: the “Large Section” (strings) Part and the “Orchestra Brass” Part which are playing initally – they simply fade out as you increase the Super Knob value. Listening to the audio of the stereo “Nativity” (Choir) track reveals it is silent initially until the sound fades in. The “Reedy Organ” actually remains silent for a longer period of time before it finally comes in. On such a PERFORMANCE where four PARTS, 1-4 are making up the Performance each of the four PARTS could be routed to their own stereo pair. For example:
– Large Section = USB 1&2
– Reedy Organ = USB 3&4
– Orchestra Brass = USB 5&6
– Nativity = USB 7&8: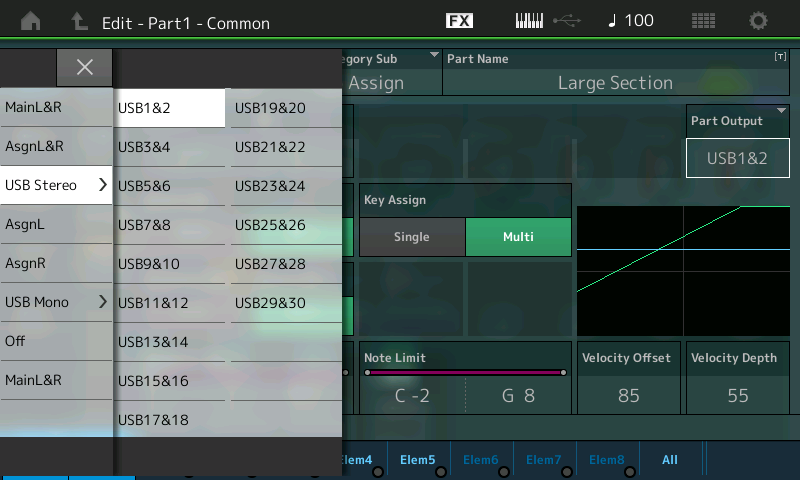
As audio feeds to separate stereo Tracks, you will have totally discreet feeds for each instrument when you opt to send them to separate Assignable USB pairs.
Each PART will be removed from the “shared” SYSTEM – (meaning no System Effects, no Master Effect, no Master EQ) – the purpose of discreet routing is complete isolation. This type of assigning can also be used to isolate specific groups of instruments (more than one passenger can ride the bus).
When you have set the MONTAGE PARTS to USB assignable Outputs you must make the INPUTS available within the DAW. In Cubase this take place by going to DEVICES > VST CONNECTIONS > and selecting the INPUTS tab.
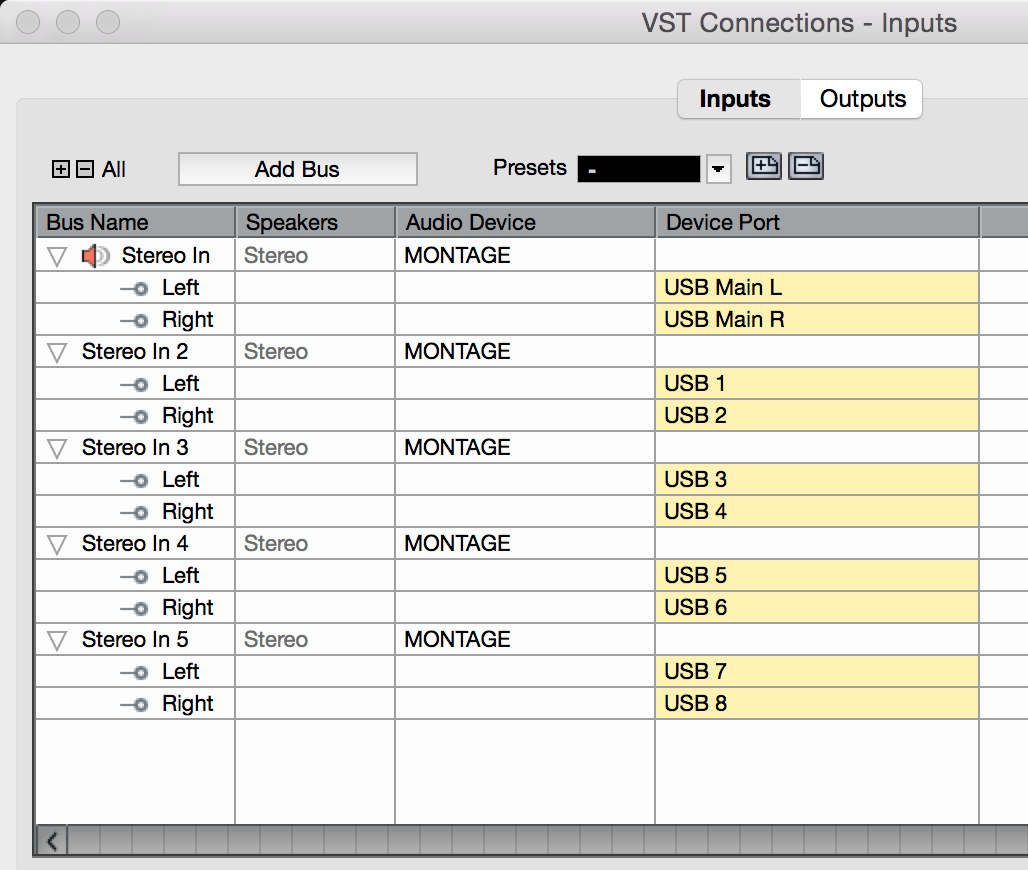 Shown here are the Stereo Inputs:
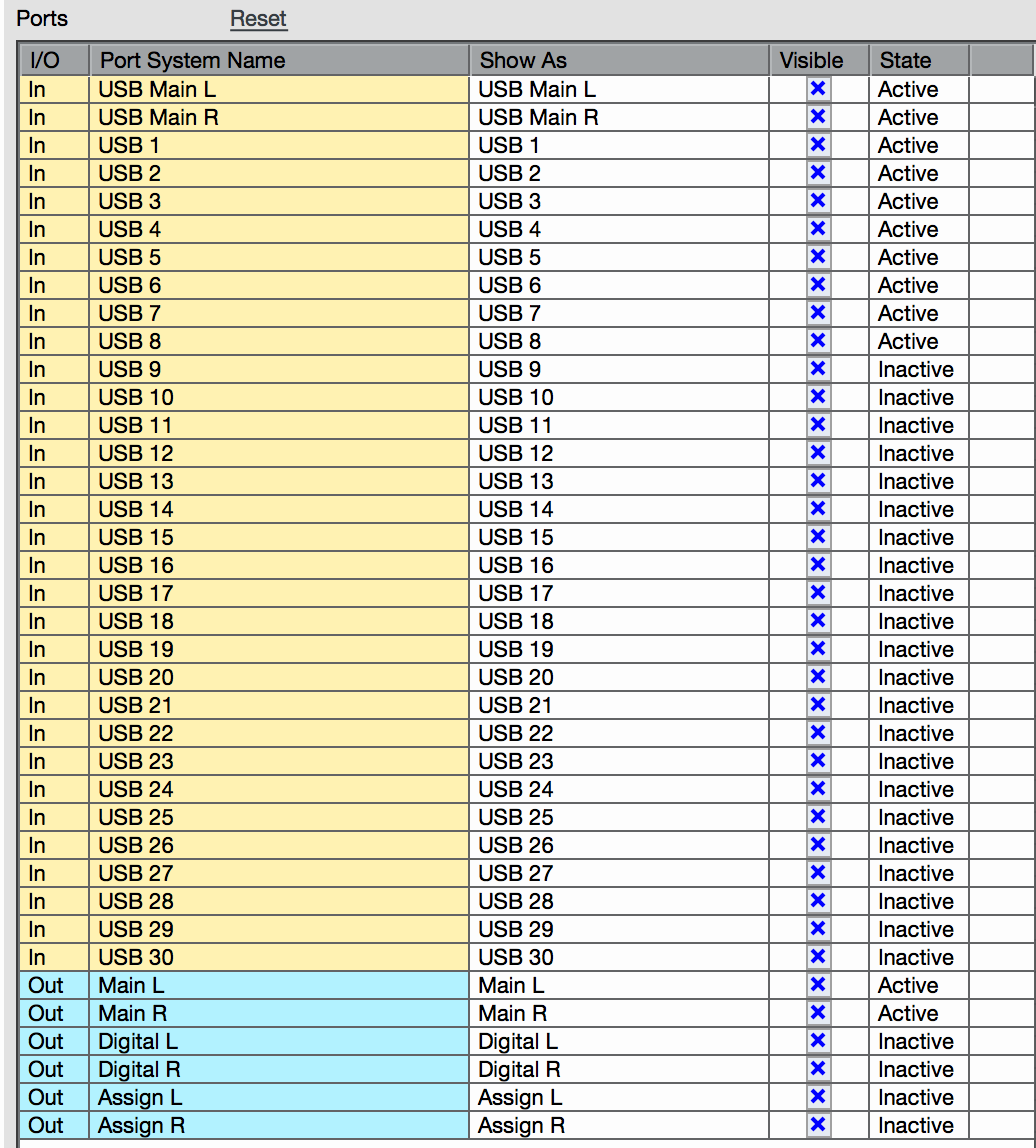
By default the “Stereo In” assigned to MONTAGE USB MAIN L/R is given. We have added four Stereo Buses, (by clicking the “Add Bus” button, they default to the first four Stereo pairings. Once you have created these INPUTS you can see below that the STATE has become “ACTIVE”. The “state” of the PORT is active only when you have actively assigned it under DEVICES > VST CONNECTIONS > INPUTS. Those reporting in active have not yet been setup to receive audio from the MONTAGE:
IMPORTANT NOTE:
When using the MONTAGE with your favorite DAW, if it is not Cubase, you will want to make sure that the audio ports are named properly. There are 32 MONTAGE Outputs (seen as Inputs at the computer side). They are named Main L/R, USB1-30. Please note the first two are the Main Left and Right stereo outputs, and then there are thirty assignable outputs. If your DAW only numbers them from 1 through 32, you may mistake the actual bus you are boarding.
The only difference between the “Main L&R” and any of the other USB Assignable Output pairs, USB1&2 through USB29&30, is that the “Main L&R” includes the System Effects (Rev, Var), the Master Effect and the Master EQ.
To be clear: There are 32 audio bus outputs. They are labeled Main L&R, and USB1-USB30; that’s 2 + 30 = 32. The first two are the main stereo pair of outputs, and then there are thirty assignable. They are called “buses” because like the vehicle, one or more passengers (signals) can be carried by the bus along a prescribed route to a specific destination. In this case we are routing signal on the bus from the particular synth PART to the computer and then onto a specific Track within the computer. The USB1-USB30 (assignable) Outputs can be configured as odd/even stereo pairs (USB1&2, USB3&4, and so on, but never 2&3 or 4&5) or you can setup any of them as individual mono sends to the computer. It is your choice as to how they get configured. You decide based on what you want accomplish with your recording.
For example, it is possible (as we will see) to route individual Drum sounds to individual mono bus Outputs – this is often done when you wish to process the Kick and Snare drums, for example, with computer-based plug-in effects.
To completely isolate an instrument (Part) you must route it discreetly on its own bus to your audio recorder. This means avoiding any “shared” processors or processing. By making the PART OUTPUT = an Assignable USB Pair, you route it there with its own Insertion Effects and its own Part EQ, in tact, but without any ‘shared’ Effects. It is a standard practice in multi-tracking to record without “shared” processors – typically, this means reverberation and time delay effects, which are added during the final mixdown phase of the recording process – not when building the multi-tracks. Reason being, you can make better decisions about HOW MUCH reverb makes sense once all the Parts are assembled. While you print tracks with their personal (Insertion Effects), things like reverbs and delays are traditionally added at mixdown. These effects are usually used to give the listener a sense of a band playing in a room or on a stage, as an ensemble.
The layout of the MONTAGE mixer works with that paradigm. You can BYPASS the SYSTEM and MASTER EFFECTS when required.
Some Contrasting Examples
Several PARTs are often used to create a single instrument, in such an instance each Part can be routed to the same stereo pair – remember multiple passengers can ride any bus to the destination. For example, the “CFX Concert” uses four Parts to recreate this acoustic Piano (18 Elements). Nothing is gained (necessarily) by recording each of these PARTS to its own stereo output pair, so you might opt to route each of the four Parts to just a single pair “USB1&2”. This will automatically remove the System, and Master FX/EQ.
In contrast, the “Seattle Sections” is made from seven Parts, with Part 1 being the first violins seated to the listeners far left, Part 2 is the second violins seated just to the right of the first violins, Part 3 is the viola section center and just right of center, Part 4 is the cello section to the right of the violas, Part 5 is the contrabass section seated to the far right – these orchestra sections are already panned left to right as one would experience them if sitting in the audience in front of a string orchestra. Therefore, it is possible to capture this by routing each of these Parts to the same stereo bus pairing thus maintaining the original panning of these sections.
But what if you want create a more movie score (theatrical) version of the string orchestra – where they balance the violins on the each side of the stereo field? By having the flexibility of routing each section to its own Output buses, you are free to experiment with different arrangements of your instruments.
At the deeper end of the audio routing Pool, you can take a Single Part containing a Drum Kit and by setting the PART OUTPUT = “Drum”, each Drum Key can be routed, as you may require. USB Assignable bus Outputs are available as both stereo pairings and mono bus Outputs. You can use them freely as you design and may require: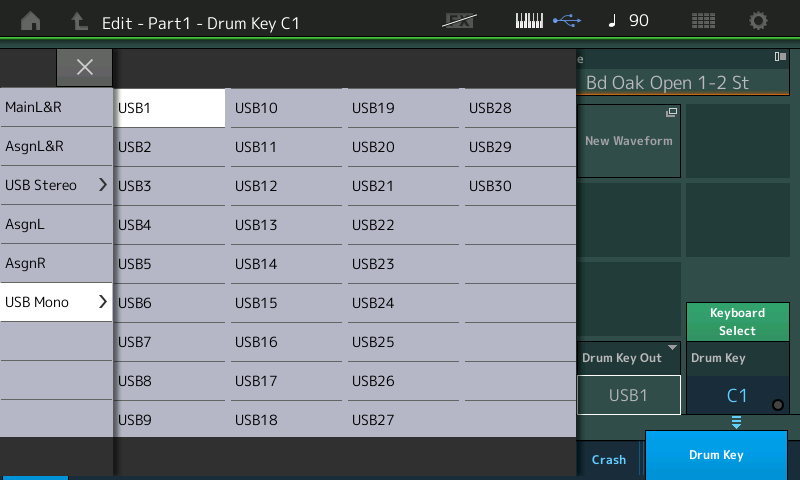
For example, separate outputs for KICK and SNARE (often done especially when you are planning on processing these with plug-in Effects), you might opt to send all three Hihats (Closed, Pedal, and Open) to a single mono bus, while sending the array of tom-toms (if used) to a single stereo pair, so that you can maintain the right-to-left, high-to-low movement, and so on.
In our next installment we will take a closer look at how routing of individual Drums from with a Drum Kit takes place. Enjoy.
Questions or comments about this session? Join the conversation on the Forum here.
Want to catch up on some of the other sessions in this series? Check them out:
* Winds & Strings
* Free Fall
* Second Breakfast
* Smooth Guitar
* Worship Center
* Neon Girlz
* Chilln’ Keys
* Piano Electro
And stay tuned for more to come from Phil “Bad Mister” Clendeninn!
Download here: Altered_States.X7B