We will concern ourselves with the three major situations where you will be addressing things via MIDI:
1) you are using the MONTAGE as a MIDI Keyboard Controller
2) you are recording MIDI to an external DAW or Sequencer
3) you are using the MONTAGE as a MIDI Tone Generator
The messages that are generated by playing and moving controllers of MONTAGE come in two categories: those intended to be returned to the MONTAGE in order to control the internal tone engine; and, those intended to control external devices. What this means is there is a specific function within each Performance that allows you make sense of what gets transmitted Out via MIDI. (We’ll cover this in more detail with the advanced features).
Determines how MIDI communication is going to be established between the MONTAGE and the external MIDI devices.
When you have selected USB, you will be connecting to a computer or an iOS device (iPad/iPod/iPhone) via the USB “TO HOST” jack with a standard USB cable. USB-MIDI is a multi-port connection. A Port is defined as the equivalent of a MIDI IN and a MIDI Out – 16 Channels, coming and going. Each port is used for a different purpose… here Yamaha has opted for the following functions:
Important Note: If you select MIDI I/O = USB, MONTAGE will send and receive via the USB connection; while the 5-pin MIDI IN/OUT jacks will allow you to connect an external device discreetly to the computer (as port 3). So it is NOT that the 5-pin MIDI ports don’t work when you select MIDI I/O = USB, they work to address one external device (both IN/OUT, to and from the computer). You can trigger that device by looping the signal through the computer: Port 1 In to Port 3 Out.
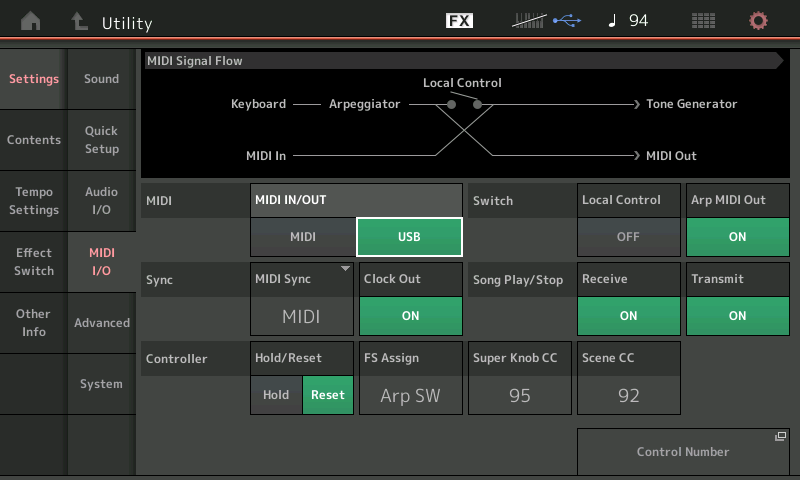
Most Frequently Asked Question (USB): What generates the most questions is how to play the MONTAGE keys and trigger an external MIDI device (that is connected via 5-pin MIDI cable) all while connected MIDI I/O = USB to the computer. The answer is: literally, through the computer. Here is the MIDI Signal Flow:
– MONTAGE key press, Local Control is Off, MIDI messages go Out via USB on Port 1 to a MIDI Track set to receive MONTAGE Port 1 as MIDI IN.
– Set the Track’s MIDI OUT to MONTAGE Port 3.
– Port 3 is the 5-Pin MIDI Out jack that goes to the external synth. So DAW signal routed on Port 3 triggers whatever you connect to the MONTAGE MIDI OUT.
– You can trigger that external keyboard module while connected to your DAW. You simply THRU the data (it passes thru the MONTAGE on PORT 3) – because typically, when working with an external DAW “Local Control” is Off, only if you set the MIDI Track’s Out PORT to 1 will it trigger the MONTAGE tone generator.
USB-MIDI communication also includes bulk data transfers. When the size of the data allows, you can bulk Performance data from your computer, phone or tablet making it convenient to transport your favorites. This communication is handled on Port 1 between the MONTAGE and the “host” device.
MIDI
When you have selected MIDI IN/OUT = “MIDI”, MONTAGE will typically be playing the role of master keyboard controller connected directly to other synths or modules via standard 5-pin MIDI cables: OUT-to-IN for transmitting. You can also setup to control the MONTAGE from an external MIDI device; connect the OUT of your external controller to the MIDI IN of the MONTAGE.
If you wish, you can connect the MONTAGE via standard MIDI cables to a computer, however, you will need to send and receive messages via an external (MIDI interface) device. Computers do not feature 5-pin DIN connectors in this particular reality timeline.
Most Frequently Asked Question (MIDI): What generates the most questions is how to play the MONTAGE from an external controller that can only transmit on a single MIDI channel. A MONTAGE Performance can occupy 16 Parts, one per MIDI Channel. You can link as many as eight of them, via what is called KBD CTRL, for simultaneous play. Unlike its workstation predecessors the MONTAGE multi-timbral Mode is not built around a Sequencer. This means that you do not play multiple Parts by changing the Part‘s MIDI Receive Channel and transmitting to them via the Track’s MIDI Out Channel; in MONTAGE, your Parts maintain their own discreet channel, and you can transmit to them (when necessary) on separate MIDI Channels. The MONTAGE keyboard can transmit data Out simultaneously on as many as eight channels simultaneously.
If each MONTAGE Part is on a different MIDI channel, 1-16, how can you play those big Multi Part (8) Performances from a single channel Controller? The answer is, “MIDI I/O Mode” = Single. Found in [UTILITY] > “Settings” > “Advanced”, you can select a Single Channel on which to communicate to the MONTAGE Tone Generator. This allows you to play the MONTAGE sounds in the same fashion as if you were playing the MONTAGE keys.
When you successfully connect devices, the top line of the screen will indicate either a 5-pin MIDI jack icon or the familiar three forks of the USB jack icon, in blue. The icon will light bright blue when you have a working connection. All Signal Flow screen diagrams update to show what is happening.
2 – Local Control – ON/OFF
Normally, when playing the MONTAGE, Local Control is set to On. This allows the MONTAGE keyboard and physical controllers to address the synthesizer tone generator – this is referred to as “local control”. When set to Off, the “local” connection is broken, and the key presses and controller messages are only sent Out as coded messages via MIDI, to be received by the DAW MIDI Track, which echoes back (also called “Thru”) the data to the MONTAGE tone generator… which then generates audio. When Local Control is set to Off your musical interactions with the keyboard and it’s physical controllers are translated into MIDI messages — you are not directly in touch with the tone engine, instead, all communication is via the external DAW and the routing as setup in the MIDI Track.
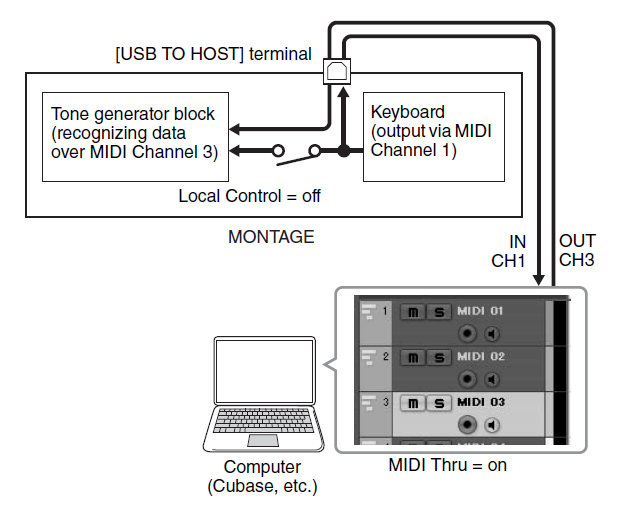
 When working with a computer-based DAW, it is common practice to work with Local Control Off when recording MIDI data – placing the DAW MIDI Track, literally, between the MONTAGE keyboard and the MONTAGE Tone Generator. You will notice that when Local Control is Off, moving a Control or striking a key gives you no response unless you “complete the circuit” through the DAW MIDI Track(s) back to the MONTAGE Tone Generator.
In the illustration you see a diagram of the MONTAGE LOCAL CONTROL OFF scenario: In this example the Keyboard transmits OUT on Channel 1 – this arrives in the DAW MIDI Track. It is the active (currently selected) MIDI Track’s MIDI OUT, Channel (3), which determines what Tone Generator PART is going to recognize the data and generate sound.
It is a fact everything that you do with the MONTAGE keyboard and controllers is sent Out via MIDI as some kind of coded message. You can record and have the MONTAGE faithfully reproduce every musical gesture and nuance. However, we will mention that there are some things that MONTAGE does that can only faithfully be captured as audio.
For example, the A/D INPUT can be used as a modifier/modulation source in the synthesis engine and because that A/D INPUT could be another hardware music synthesizer, its interaction is “live” in the real time sense. It must be captured fresh (particularly if the source is a non-MIDI controllable source)!
The messages that MONTAGE generates via MIDI are both standard Channel-based Control Change, PB, AT, etc., type messages and global System Exclusive (Parameter Change) messages. You will want to activate or ensure your DAW is set to Record and Thru Sysex Data. Do not assume that it automatically records it, many DAW (including Cubase) filter Sysex data by default. You want to be able to both record it and play it back. If your DAW cannot or does not handle System Exclusive, you will want to know — if this is the case, you will opt to use Channel based CC (Control Change) numbers instead.
Specifically, the Super Knob position and movement can generate either System Exclusive messages or standard Control Change messages. The significant difference is if you opt to send a standard Control Change (cc) message, it will be merged with the data on MIDI Channel 1. If you select to send System Exclusive, it does not have a specific Channel but can address the MONTAGE from any Track (convention is to see the messages on Track 1, however, many “pro” DAWs will allow you isolate and record this data to its own Track.
Why this is important: having the functions that use System Exclusive messages on a separate Track will allow you to have this track active along with any other MIDI Track. Since the Super Knob (being “super”) can address any and all of the 16 Parts at any time, if you wish to isolate a track and yet still have it respond to Super Knob movement, you can simply activate (‘solo’) both the Sysex Track and the Track in question. The Syesterday Exclusive messages can ”automate” things within your setup. When Local Control = OFF, you can activate this Sysex Track so that MIDI message “complete the circuit” back to the Tone Generator. This allows you to activate and deactivate the “automation” of the effected parameters, when desired. If your Super Knob is “frozen” while connected to a DAW. this is the likely cause. You must ensure the “round trip” of these messages – be they Sysex or cc.
3 – Arp MIDI Out – ON/OFF
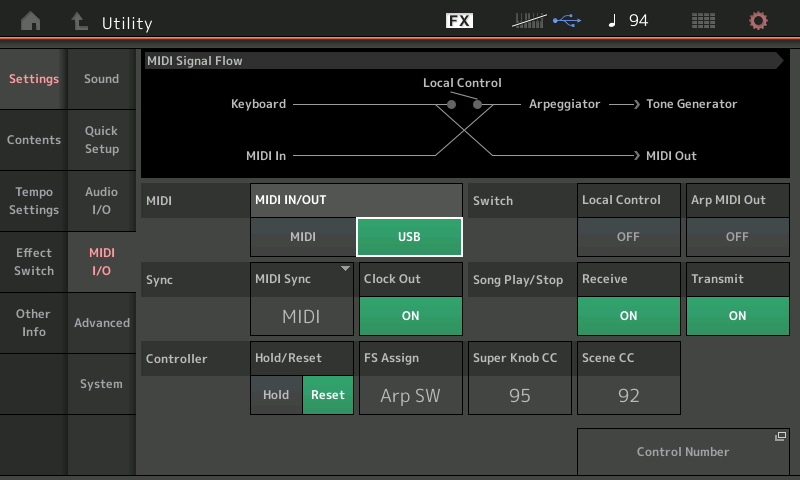
Determines if the Arpeggiators are sending MIDI data or whether the direct key presses/controller movements you make are output via MIDI. A DAW Track cannot differentiate between keys pressed by you and notes output by one of the Arpeggiators. To the receiving DAW they are just MIDI events. Logically, it can record one or the other but not both, simultaneously. This is an important thing to understand – there is a difference between you pressing a key and creating a note-on event, and the Arpeggiator creating a note-on event. But unless we sort that out for the DAW it will not appreciate which ones you want to keep.
When “Arp MIDI Out” parameter is set to On, this literally shifts the location of the ARPEGGIATOR block so that all key messages for a PART with an assigned ARPEGGIO, must pass through it prior to going to the MIDI OUT. This way it can determine if your actual key presses or the notes generated by the Arp phrase should be sent to the MIDI Out. The Arpeggio block can prevent your key presses from ‘confusing’ the receiving device:

In most instances, you want the receiving device to receive one or the other, not both.
4 – MIDI Sync – Internal, MIDI, A/D IN
Determines where MONTAGE is looking for tempo commands… “Internal” would be its own clock. It is typical when working with a computer-based DAW that it, the computer, becomes the clocking source (master) and other all devices (slave) external to the computer run in sync with that clock. Cubase, for example, does not slave to standard MIDI clock, it must be made the master MIDI Clock… set MONTAGE MIDI SYNC = “MIDI”. You would use the “A/D IN” when using an external device to create an audio derived tempo. The source can be any playback device, a microphone or direct signal. The Auto Beat Sync detection can analyze tempo from audio input sources.
5 – Clock Out – ON/OFF
Determines if MONTAGE sends Clock. Defaults to ON. There is one master clock for user functions. It serves as the timing reference for all tempo driven functions. By setting this On you can use the MONTAGE clock as a reference for external devices. Please ensure that your external device can slave to standard MIDI clock.
6 – Receive/Transmit Seq Control – ON/OFF
When you want send and/or receive Start/Stop messages to control the MONTAGE’s internal PLAY/REC function. The messages sent here will start and stop hardware sequencer. (The Remote Control commands for computer based DAW control are not yet available from the MONTAGE transport buttons). You can use you computer software to start/stop the MONTAGE Play/Rec function.
7 – Controller Reset – RESET, HOLD
Determines how your MIDI Controller Reset protocol defaults when a new Program is recalled. This will change the behavior of your controllers when you initially recall a PERFORMANCE – will the values *reset* to the default as specified in the MIDI Specification when a RESET ALL CONTROLLERS message is sent. If HOLD is selected, the Controller values will remain as they were left last – meaning you inherit the current values. Many players prefer that the Foot Controller controlling overall VOLUME remain “live” at all times, rather than having a pre-determined stored VOLUME setting recalled. This is the function that will determine your instrument’s behavior.
8 – Global Controller Settings for FS Assign, Super Knob CC, Scene CC
Determines what messages are generated by the Foot Switch, the Super Knob, and the Scene buttons:
– Foot Switch – this is the one Assignable controller that is globally assigned. The reason is simple, in order to be useful you want it to apply across all programs. For example, say you want a FS to advance through a set list of Performances, you would create your set list as a “Live Set”; you could then set the FS to “Live Set +” (advance). This now applies to all Performances without having to enter each one and set FS to “advance”.
– Super Knob CC – when set to “OFF” the Super Knob generates Sysex. When set to a number 1-95 it generates that Control Change message on MIDI Channel 1.
– Scene CC – when set to “OFF” the Scene buttons generate Sysex. When set to a number 1-95 it generates that Control Change message on MIDI Channel 1.
“Best Practice” concerning MIDI I/O and the computer DAW
If you use standard MIDI In and Out cables, you need an external MIDI interface. Those I/O cables equal Port 1.
If you use a USB connection (multi port connection), the standard 5-pin MIDI jacks work as an external MIDI interface for one external device (and this port will be identified in your DAW as MONTAGE-Port 3), and the MONTAGE engine itself uses MONTAGE-Port 1.
These eight MIDI related settings, described above, are memorized in the three Templates: [SHIFT] + [UTILITY].
QUICK SETUP
Think of the above MIDI settings as your “preferences” – and the three user definable Quick Setups as your places to store your MONTAGE setup configurations for when you connect to your computer. It is recommended to have at least three configurations for immediate recall:
– For regular standard MIDI recording
– For recording Arpeggio generated MIDI data
– For basic audio recording
You should decide what you need to add/change from the factory default “MIDI Rec on DAW” template and the “Arp Rec on DAW” both of which require MIDI routing changes, especially concerning the “Super Knob CC and Scene CC” assignments – and update the Quick Setups. Likewise in your DAW, lock in your “preferences” for basic MIDI recording.
Factory Defaults for QUICK SETUP #1: MIDI Record on DAW
– MIDI I/O = USB
– LOCAL CONTROL = Off
– ARP MIDI OUT = Off
– MIDI SYNC = MIDI
– CLOCK OUT = On
– REC/TRANS SEQ CONTROL = On/On
– CONTROLLER RESET = Reset
– GLOBAL ASSIGN (FS/SK/SCENE) = Arp Sw, 95, 92
Factory Defaults for QUICK SETUP #2: Arp Record On DAW
– MIDI I/O = USB
– LOCAL CONTROL = Off
– ARP MIDI OUT = On
– MIDI SYNC = MIDI
– CLOCK OUT = On
– REC/TRANS SEQ CONTROL = On/On
– CONTROLLER RESET = Reset
– GLOBAL ASSIGN (FS/SK/SCENE) = Arp Sw, 95, 92
Next time we’ll take a look at some of the more advanced MIDI features of the MONTAGE.
May is indeed MIDI Month! Please take the time to visit the official MIDI organization website. You can join for free and take advantage of the information and exchange of ideas offered to members. And, if you’ve ever found MIDI musically useful, support the future development of the specification. Visit the site here: www.midi.org
Want to discuss this article? Join the conversation on the Forum here.


 When working with a computer-based DAW, it is common practice to work with Local Control Off when recording MIDI data – placing the DAW MIDI Track, literally, between the MONTAGE keyboard and the MONTAGE Tone Generator. You will notice that when Local Control is Off, moving a Control or striking a key gives you no response unless you “complete the circuit” through the DAW MIDI Track(s) back to the MONTAGE Tone Generator.