MONTAGifying the MOTIF XF Performance “Second Breakfast”
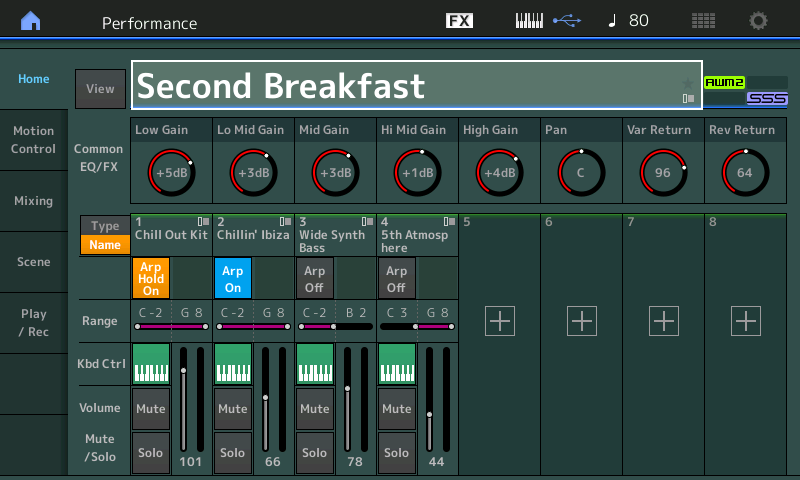
Part 1: Chill Out Kit (Arp Hold)
Part 2: Chillin’ Ibiza (Arp On)
Part 3: Wide Synth Bass
Part 4: 5th Atmosphere
Find at the bottom of this article the zipped MONTAGE CONNECT file of this favorite Motif XF Performance. MONTAGE CONNECT sends this from your computer to the EDIT BUFFER of your MONTAGE. It will not overwrite anything in your User Bank.
Two PARTS under Arpeggiator control: “Chill Out Kit” drums and the random cycling of the six Elements used in the “Chillin’ Ibiza” PART.
Two PARTs under direct keyboard control: A left-hand mono PART “Wide Synth Bass” below B2 and the pad sound “5th Atmosphere” above middle C.
Use the upper PART [MUTE] function to MUTE PARTS. Play just PART 1 and 2, by muting PARTs 3 and 4. Then spend some time playing just PARTs 3 and 4 together without 1 and 2. Then spend time playing all four Parts together.
This is a great Performance for coming up with chord progressions from which you can construct a composition. As we’ve learned, you can quickly capture your ideas directly to the MONTAGE Performance Recorder, which will let you create a .MID File. If you would like to overdub some additional Parts, simply deactivate the green KBD CTRL icon on the Parts you’ve already recorded, activate KBD CTRL on the newly “merged” Part, or Parts, only – and use “Overdub” Record.
* You can also opt to record your ideas as audio (directly to a USB stick connected to the MONTAGE). If recording audio your result will be a .Wav File at 44.1kHz/24-bit, we highly recommend you activate the MONTAGE metronome Click, so that you can easily position this .wav into your DAW. You simply touch the Tempo setting (top line of the screen) to go to the TEMPO Settings screen, set “Click Mode = Always”.
Explore and Discover
If you have been following along with this series, you know how to explore the Performance for the Assignments. Start by going to the OVERVIEW screen ([SHIFT] + [HOME]) and take a look at the COMMON, PART 1, PART 2, PART 3, and PART 4 views to get an idea of what is assigned:
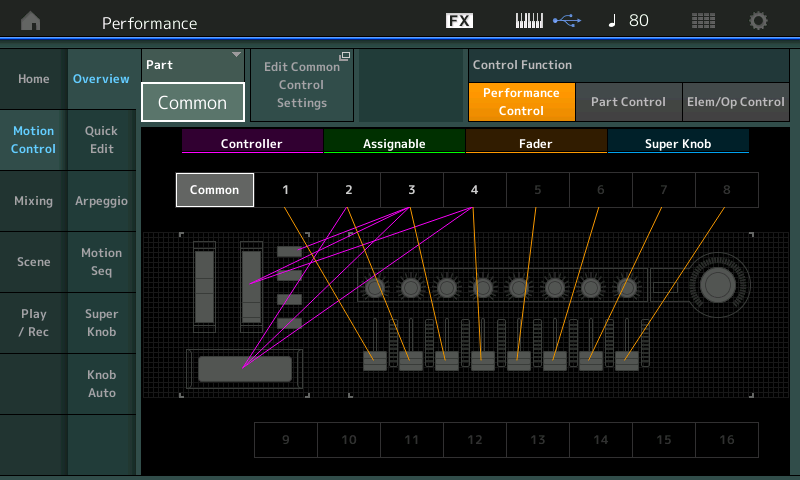
When curiosity strikes or you simply can’t verify what the control is doing, you know you can set the “PART” parameter on the OVERVIEW screen and take the shortcut to the CONTROL ASSIGN screen.
For example, the RIBBON is identified as influencing PARTS 2, 3 and 4, If you are curious about what it is doing to the “Wide Synth Bass” in PART 3, set the OVERVIEW to look in on “PART 3”, and touch the “Edit Part 3 Control Settings” box. You will be delivered to the Control Assign screen for PART 3 (shown below).
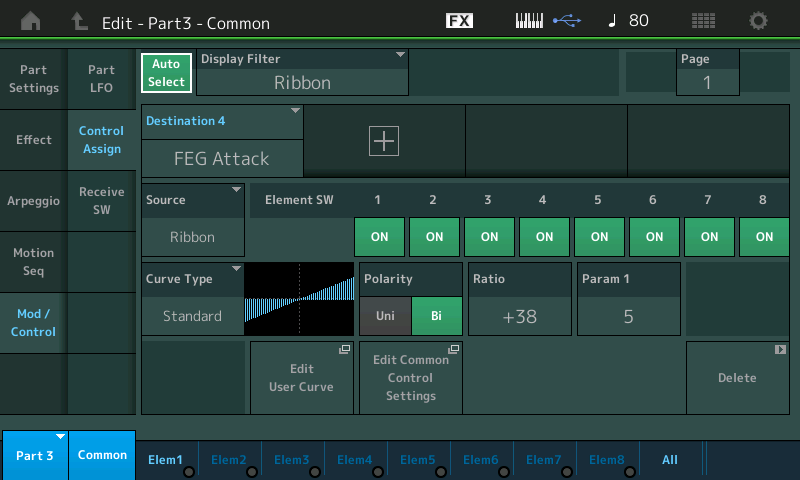
Activate the “Auto Select” option (green) and touch the Ribbon controller.
The FEG ATTACK parameter is shown. This allows you to change the Filter Envelope Generator’s Attack:
The Filter Envelope Generator controls the tone from the moment the sound starts to the moment the sound stops. Filters are designed to remove unwanted stuff: a Low Pass Filter – removes High Frequencies allowing Low Frequencies to Pass and block the highs. As you allow more high frequencies the sound is brighter, less rounded.
Play the PART 3 sound Solo’d (it is mapped from B2 and below). Use the Ribbon in your left hand to change how the bass sound attacks, while you play a bass line with your right hand. When your finger is held on the extreme left side of the Ribbon you will notice the sound is very rounded (as you are lowering the amount of time that this Filter remains open after Key On).
To explore further and find out where this is taking place, lets navigate to the actual Filter of Element 1 – where the Attack parameter is being adjusted. As you can see in the screenshot above this “Wide Synth Bass” PART is a single Element sound – just imagine that each Element would have its own Filter – so in a PART with more Elements, the FEG Attack could affect them all. We are certain it is affecting Element 1 because the “Element SW” is set to ON. This allows the programmer to opt out if you do not want to change the ATTACK of certain Elements and their Filter.
Touch “Element 1” in the screen (or press the first button in the third row on your right front panel to select Element 1 parameters).
Touch “Filter” > “Type”.
You can find out that Element 1 is using a LPF24D (Low Pass Filter 24dB per Octave, Digital) The shaded area is the Frequencies you can hear. They extend from left to right (low to high). Move the CUTOFF Frequency from 103 upward. Move the CUTOFF from 103 downward. Return it to 103.
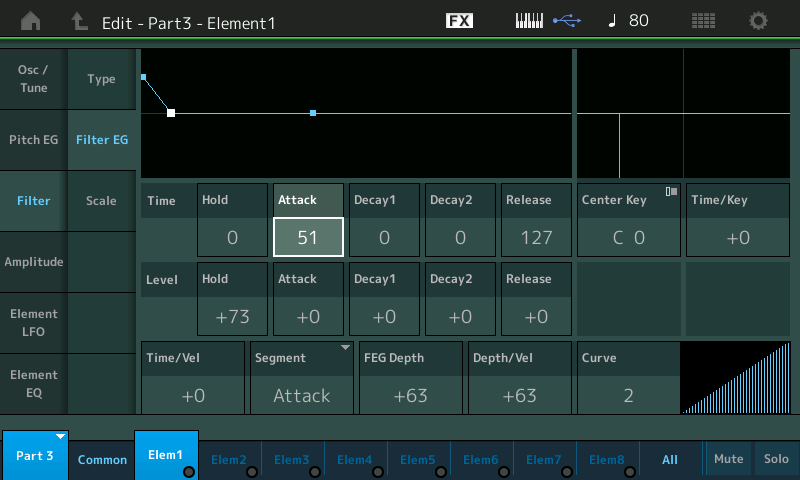
Touch “Filter EG”.
The parameter that is being controlled in this instance is the Attack (Time) of the Envelope: stored at a value of “51”.
Significantly, in this FEG, the HOLD Level = +73 means the initial Cutoff Frequency at the time of Note-On is set here. Filter settings are done by-ear so the value is just something to remember. Filter setting, as most settings to do with sound, can be best done by ear:
You may wonder how the Ribbon is useful here because you have to hold your finger at a certain place for the sound to continue at that setting. When you lift your finger the value returns to “stored” setting.
To show you how you can address this when programming your own. – lets see how the programmer solved this for this combination:
SOLUTION 1: The programmer also assigned FEG ATTACK to the MW.
The MW is naturally a Controller that will HOLD its position, so that when you move it to set it at a value, you can leave it at that value. It does not automatically reset when you let go.
Also assigned to the MW is the Cutoff Frequency. The Cutoff Frequency of a Filter is the point at which it starts to remove frequencies. This is a LOW PASS FILTER so as you raise the Cutoff Frequency the more you hear – it allows more high frequencies to pass. Moving the MW should sound exactly like manually changing the CUTOFF parameter we just moved north and south of the stored 103 setting. But since the MW is Uni-Directional, we know we are moving north of 103 and then back to the stored setting value of 103.
On the CONTROL ASSIGN screen
Move the Cursor highlight to Destination 1 (Cutoff)
Touch the RATIO box, with DESTINATION 1 in blue:
Set the RATIO = +0
This will temporarily neutralize the direct control of the Cutoff Frequency and allow us to hear exactly how the “FEG ATTACK” is being affected. We want you to hear the difference between moving the Cutoff Frequency manually, and what the FEG does for the sound:
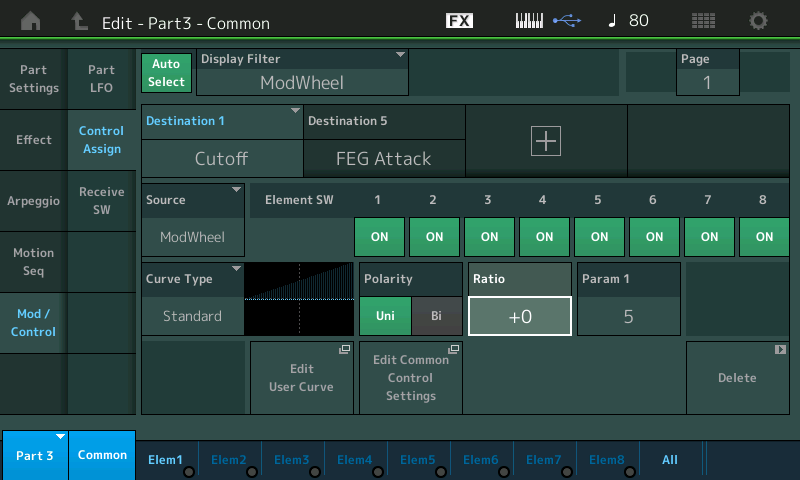
Now that we have set the RATIO to 0, moving the MW will only change the ATTACK Time parameter. Ratio = +0 means that there is zero change applied by this Controller to the selected parameter.
What you are listening for is the length of time the Filter remains open after attacking a note. To do so, play a single Note and hold it for a count of 8 beats. Do so with the MW all the way down. Then raise the MW just a little bit, and play another single Note and hold it for a count of 8 beats. Rinse and repeat, each time raising the MW a bit more. As you do, the envelope will keep the filter open (Cutoff raised) for a longer period of time.
Solution 2: The Ribbon Controller can be set, on a per Performance basis, to either RESET or HOLD. A setting of “HOLD” will literally hold the last value where you touch it. This is done on the PERFORMANCE upper [COMMON] > “General” screen (RB Mode). Obviously, a controller that can HOLD the last value would be more useful, especially if you plan to be using both hands to play the keys. When making your own combinations, you will need to assess for yourself which controller assignment is best for what you need to do. If you need the MW for something else, remember the RIBBON can be set to HOLD position; Foot Controller can also be set to HOLD a position.
PART 2 “Chillin’ Ibiza” XA CONTROL = Random
Now lets take a look at PART 2 “Chillin’ Ibiza”. Truly a “sound in motion” – combine the Arpeggio phrase with the fact that six of eight Elements are set to trigger randomly. Elements 3-8 are under control of the Arpeggio phrase and because they are “grouped” together in the same “Element Group”, the XA CONTROL (Expanded Articulation Control) feature will randomly select one of these six Elements set to XA CONTROL = Random:
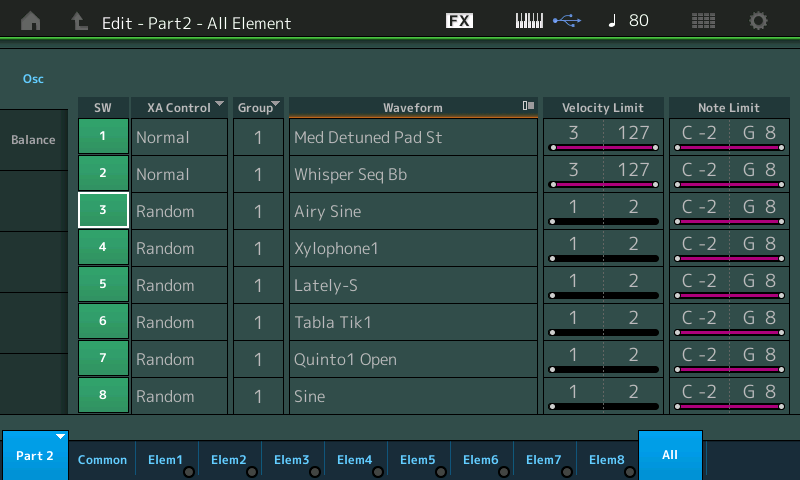
The screenshot above (“All” Elements selected) shows the eight Elements of this PART. The programmer selected to use only Elements 3, 4, 5, 6, 7 and 8 in this particular Performance. Elements 1 and 2 are set to sound ‘normally’ but only when velocity is 3-127. The particular arpeggio phrases selected for this PERFORMANCE PART are set to trigger any Element that has a Velocity Limit of 1-2.*
*This type of Velocity Zoned (Ctrl/Hybrid type) Arpeggio has separate Velocity-specific data for triggering selected Elements within a PART. Remember, an ARP Phrase is “played” by the Arpeggiator, so it is the pre-recorded Velocity that determines how they behave, NOT your trigger Note Velocity. YOU are not “playing” this PART in the same sense of a non-arpeggio sound. You are simply triggering the Arpeggiator which determines the Velocity of notes that are sent to the PART. Because Arpeggio data is absolutely repeatable, precise Velocities of 1 and 2 are used to trigger these Elements. Humanly impossible to play on purpose the ARP Phrase will dutifully trigger Elements 3-8. The Elements 1 and 2 do not sound because the Arpeggio KEY MODE is set to only play Notes “Sorted” by the Arpeggiator. They will sound, however, if you set the Main Arp On/Off switch to Off:
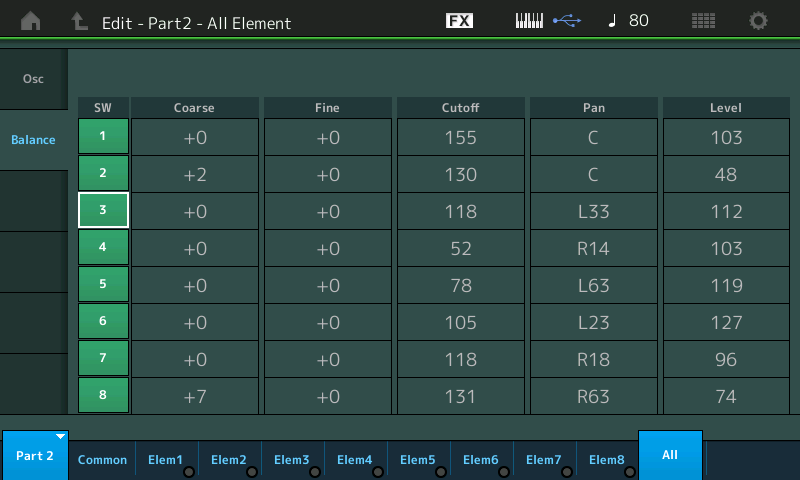
The “Balance” screen (above) shows how the Elements are moving around in the stereo field. Each has been given a PAN position, L or R, in the stereo field.
Use the upper [SOLO] button to isolate PART 2.
Use the lower [SOLO] button to isolate Elements 3, 4, 5, 6, 7, and 8 each in turn.
Notice they all play the same rhythmic pattern, when solo’d. But when you allow all to sound, the Element actually sounding will randomly change. (the lights below Elem3-Elem8 in the screen will indicate which Element is currently sounding). This XA CONTROL mode (Random) allows all Elements in the same Group to be selected at random. Shown below is ELEMENT 3’s “Osc/Tune” screen:
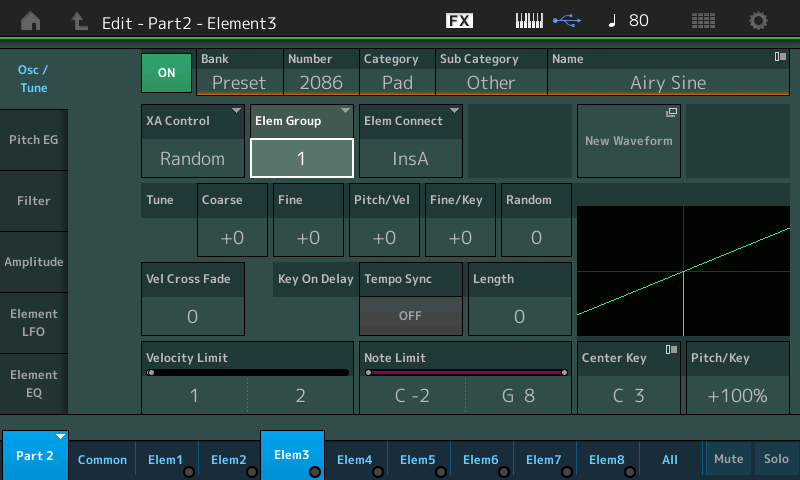
For example, if you place each of the Elements set to “XA CONTROL = Random” to “Elem Group 2” except Element 5 (the ‘Lately-S’ bass Element), you will hear that Element 5 is played with each Arp note – while the others (Group 2) all play randomly. If you place Element 5 and 6 in the same Group, the “random” setting will randomly toggle between these two for one Group and the other four Elements randomly in the other Group.
Experiment with the XA CONTROL modes of “Random” and “Cycle”.
Use Elements 3-8: try placing Elements 3, 4 and 5 Group 1, and Elements 6, 7 and 8 Group 2. Two of the Elements will be sounding at a time – but different combinations will be heard as a random Element is contrbuted from each Group.
Try different combinations to create different patterns.
Try three Groups: Elements 3 and 4 = Group 1; Elements 5 and 6 = Group 2; Elements 7 and 8 = Group 3. Now three of the Elements will be sounding – but different combinations.
Be sure to make use of the [EDIT/COMPARE] button: While in EDIT, you can press the [EDIT] button (flashes) to indicate you are in “compare” mode. Here you cannot make changes but you can hear how the Program originally sounded and you can see the original settings – you are free to navigate while in COMPARE mode, but you can make no further changes. It is strictly about A/B comparisons.
PART 4 “5th Atmosphere”
Let’s take a look at the Pad sound in PART 4, “5th Atmosphere”. A two Element pad tuned a musical 5th apart (+7 semitones). “Ensemble Detune” is Insertion Effect A, and the “VCM Flanger” Insertion Effect B, is applied lightly to give it some movement.
Let’s try out some Side Chain action. Side Chain is a way to have the Output of one or more sources to influence an Insertion Effect. There are several Effect Types that allow you to route audio between Parts – this will get you started.
Navigate to the PART 4 Effects Routing screen:
Press [EDIT]
Select [PART SELECT 4]
Touch “Effect” > “Routing”
Change INSERT B to “Dynamic Phaser”
Set the “Side Chain” = PART 1 (Drums)
Set the Preset = “Reverse”:
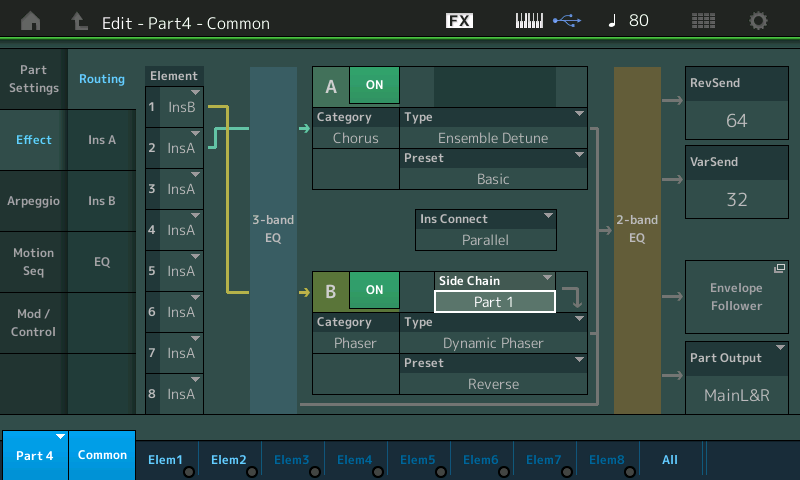
This will allow the Drum hits to dynamically influence the Phaser. The Preset = “Reverse“ will make each drum hit sound like “phaser bubbles” rising to the surface.
If curiosity strikes you, you can dive into Insertion Effect B by simply touching the box “InsB”.
Notice that each of the two Elements are independently going to the Insertion Blocks. Element 1 travels through INSERT B only – while Element 2 travels through INSERT A only. The two blocks are setup in “Parallel”.
Experiment by using different SIDE CHAIN sources: PART 1, 2, 3 even PART 4, or MASTER (you can send the entire output so that it causes the Dynamic Phaser to react).
Experiment. Have fun, if you come up with something really interesting, don’t hesitate to post your variation (Use MONTAGE CONNECT, to capture your Performance, then zip and attach to your post).
Questions/ideas/comments about this lesson? Join the conversation on the Forum here.
And stay tuned – more to come from our Master of the MONTAGE: Bad Mister!
Download here: Second_Breakfast.X7B

