In this series of videos, Dom demonstrates some of the incredible and expressive orchestral sounds in MONTAGE. In the first two videos, Dom plays several orchestral Performances. In the third video, he shows how he created one of the Performances.
Enjoy!
Want to discuss the videos? Join the conversation on the Forum here.
And stay tuned for more ideas on creating fabulous sound with MONTAGE!
FM Essential is an synthesizer app for iPhone® and iPad®. FM Essential uses Frequency Modulation (FM) synthesis to create sound – a technology popularized by the legendary DX7 synthesizer in the 1980s. FM synthesis is capable of producing incredibly dynamic sound. When combined with the effects, controls and control sequences included in the app, it’s possible to create amazingly unique sounds. In addition, FM Essential features legendary Yamaha FM synthesizer sounds from the DX100, TX81Z and V50.
Check out the sounds of FM Essential in the video below:
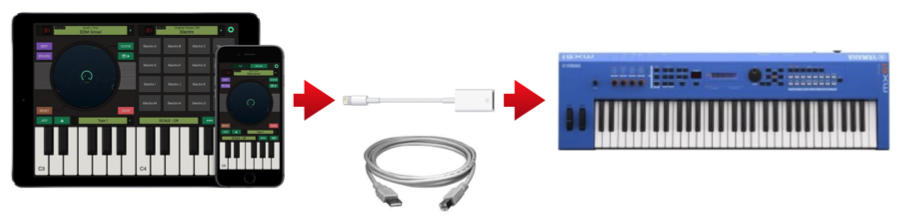
The free version of FM Essential contains 10 preset Voices. Connecting FM Essential to the MX BK/BU/WH Music Synthesizer unlocks a full set of 271 Voices – plus the ability to save your own Voices.
How Do I Unlock FM Essential?
You will need the following to unlock FM Essential:
iPhone or iPad with the FM Essential app installed
To unlock the free version of FM Essential: Connect an iPhone/iPad to the USB-to-host port on the back of the MX with the Apple Lightning USB adaptor and USB printer cable. Now launch FM Essential. There will be a confirmation screen that will say “Thank you for using MX BK/BU/WH series! All functions are available now!” indicating that the app has been unlocked.
There is a demonstration of the unlock procedure available below:
So are you ready to start? Get your app here and get started!
And share your adventures in FM Synthesis and the app on the Forum here.