This is great if you pre-plan and prepare your on-stage setups (highly recommended). We’ll cover how to go about this in detail. But what if you are not so organized? We’ll also give some “best practices” advise for those who have no idea what’s going to happen next while on stage: for the “on-the-fly” folks.
No one article or guide could hope to cover every scenario possible – we can only hope to give you the basics on how to approach using the ZONE MASTER function to setup the MONTAGE as your Master Keyboard Controller.
Activating ZONE MASTER and Setting the MIDI I/O Mode (global)
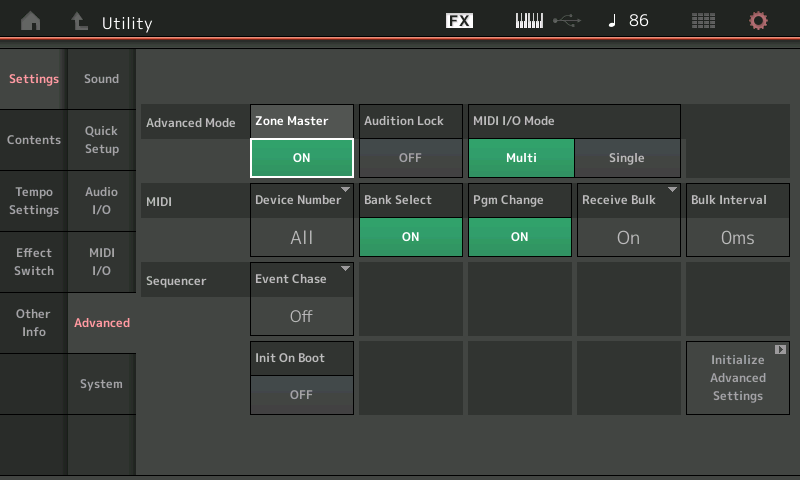
Press [UTILITY]
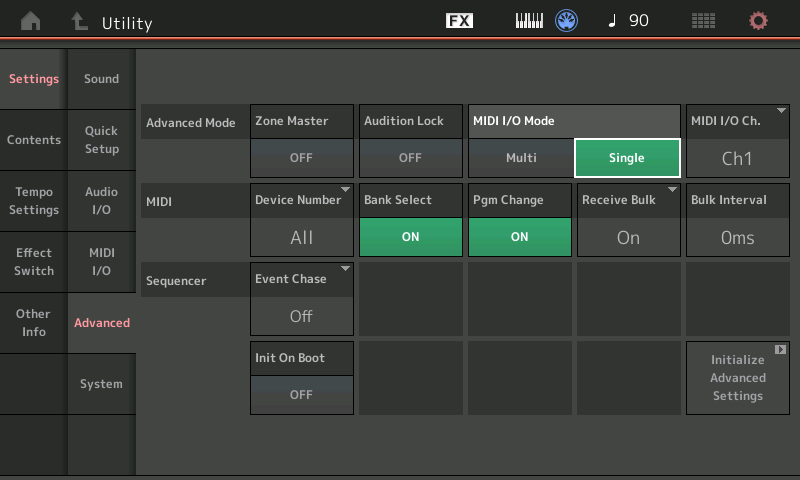
Touch “Settings” > “Advanced”
Set the Zone Master = On.

Here you can both set the Zone Master to On, and select the MIDI I/O Mode that will apply overall when you have not configured a specific Zone setup for a Performance. You will need to understand these two settings and how they work together.
• The “Zone Master” is all about what gets transmitted from the MONTAGE as the master MIDI keyboard from your current Performance. This can be configured on a per Performance basis.
• The “MIDI I/O Mode” is about what is both transmitted from and received by the MONTAGE, globally. If/when there are no Zone Switches active within a Performance your MIDI I/O Mode setting will apply and determine what goes Out via MIDI and how the tone generator is set to receive MIDI coming In.
When the I/O Mode is Multi the MONTAGE is able to transmit (8) and receive (16) on multiple channels simultaneously; when set to Single it transmits and receives on a single, selectable channel. You can use either I/O Mode as best serves your particular system setup requirements.
When the global Zone Master function has been activated, all 2,143 Factory Preset Performances start with a neutral setting – the local Zone Switches in each Part are set to OFF, by default. There is no data setup for the “Zone” functions in any Parts of the Factory Performances. Changes can and must be stored to USER locations.
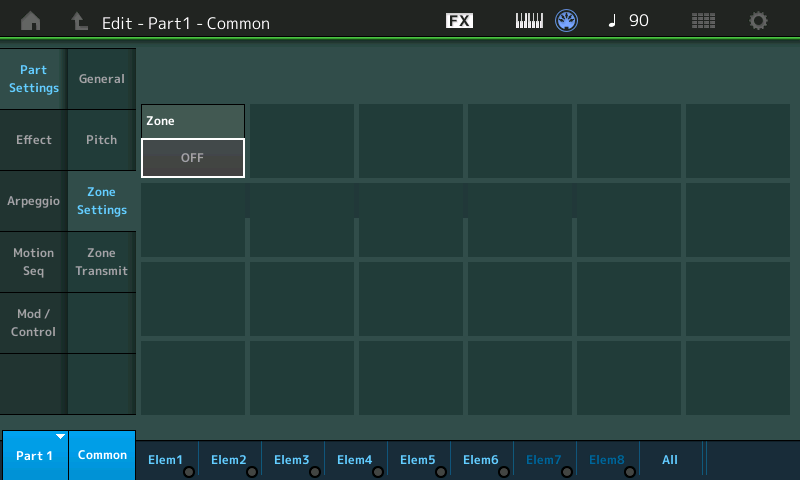
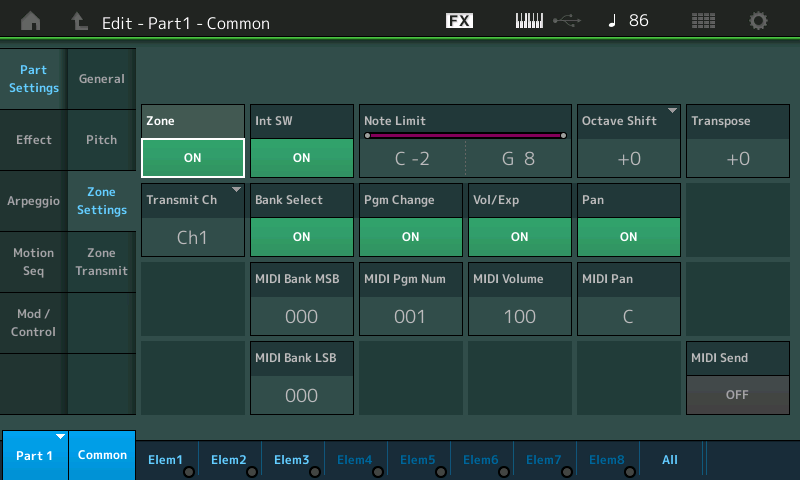
Shown below the ZONE SETTINGS screen for PART 1 from the “CFX + FM EP” Factory Preset. Each Part has a Zone Switch On/Off and can function as a Zone setup.

If you were to edit this Performances, naturally you would STORE the change to a User Performance, which leaves the original Factory location, unchanged.
As you create new Performances, whether built from scratch or by starting from a Factory Preset, you can STORE your Zone Settings with your new Performance to the USER Bank. No changes can be made to the Factory locations, all edits are stored to USER PERFORMANCES. Important to understand is how the MONTAGE transmits Out via MIDI under the different setup circumstances. Before we get into explaining the ZONE MASTER function, it will be important to discuss the “MIDI I/O Mode” parameter.
When recalling a Factory Preset, you will be transmitting Out via MIDI according to the global “MIDI I/O Mode” setting. This parameter is found on the same screen in UTILITY as the ZONE MASTER function. It will be very important to understand these two parameter settings and how they work together, because if you do not, MONTAGE’s behavior going Out via MIDI may be a bit confusing, at first glance. If you have been scratching your head, this article will explain what is going on and allow you to better accomplish your goals when using your MONTAGE Out via MIDI. We will cover the default MIDI I/O Mode setting (Multi) and then how it is impacted when you setup to control internal and external devices together using the ZONE function.
• The Zone Master function is all about how the MONTAGE Keyboard Transmits (only); controlling internal sounds and external devices from the MONTAGE keyboard.
• The MIDI I/O Modes concern both the Transmit and Receive behavior of the MONTAGE keyboard and the MONTAGE tone generator, respectively.
Normally, the MIDI I/O Mode would be set to “Multi”. The MONTAGE is in Performance mode where each program has 16 slots; each slot can contain a Part. This is where each Part is on a different MIDI Channel. The Keyboard is transmitting on more than one channel at a time. The MONTAGE can transmit on as many as eight MIDI Channels at a time, depending on the number of KBD CTRL (Keyboard Control) slots that are active in the Performance. In the Factory Presets this varies between one and the maximum of eight Parts, simultaneously. There is one exception – the PERFORMANCE called, “Multi/GM” that includes Part assignments in all 16 slots – this serves as a template for building a 16 PART Multi-timbral setup for when using the MONTAGE with a DAW software. It defaults to Concert Grand on all Parts but Part 10 which is Drum Kit. Obviously, you are meant to build your own, choosing the instruments you wish to play. You would start with this template and substitute for each Part.
When playing a Factory Preset Performance you may notice several streams of MIDI channel data being transmitted from the MONTAGE simultaneously. There is nothing wrong. That is what this article will hopefully clarify. This normal setting of “Multi” means the MONTAGE defaults to transmitting on multiple channels, and defaults to being able to receive on multiple channels, as well. But remember, it is the active KBD CTRL button (green) that determines if you are transmitting on the correspondingly numbered MIDI channel via the MONTAGE keyboard.
Practical Example
The default mode (Multi) means that if you select a Single PART Performance, like “CFX PopGrandPiano” or “Full Concert Grand” you will only be transmitting on one Channel, Channel 1; the PART is set to receive on the corresponding Channel number and Performances are built starting with PART 1. If you are playing a two PART Performance you will be transmitting data on both Channels 1 and 2. And so on – when you recall a Performance that is eight PARTS, each PART can be outputting data on a separate MIDI channel.
This allows you to output the ARPEGGIO data to different external devices, if you so desire. The MONTAGE features as many as eight simultaneous Arpeggiators – each capable of real time control from the MONTAGE Keyboard. This type of default transmitting is really used when recording OUT via MIDI. If you are going to work with a MIDI Slave device you would activate the ZONE MASTER to intelligently configure what goes OUT and what does not go OUT via MIDI. As we will see you can control any combination of internal and external Zones that total eight, simultaneously.
When you have set the global “MIDI I/O Mode” = Single it creates a situation where the MONTAGE both Receives and Transmits MIDI data on a Single MIDI channel (which you can select, 1-16).
You would use MIDI I/O = SINGLE when you wish to only transmit Out and/or receive a single stream on a specific MIDI channel. The MONTAGE would act like any single mono-timbral synthesizer.
With this I/O Mode set to SINGLE, you can fully control the MONTAGE from an external keyboard controller that can only transmit on a single MIDI channel at a time. (In a situation where you wish to use an external keyboard to control the MONTAGE tone engine, “Single” will allow you to replace the MONTAGE controller with your external controller… the result will be no different from playing from the MONTAGE keys). Without an I/O Mode of Single, you could not play all PARTS of a Multi Part Performance from an external controller that only transmitted on one channel at a time. But with this Mode, you can substitute an external set of keys for the MONTAGE keys.
Into the Performance Local ZONE
Once the global Zone Master is activated you can decide on a per USER PERFORMANCE basis, whether or not you wish to setup a Master MIDI configuration. As soon as a “Zone Switch” within a Performance is locally activated, the global “MIDI I/O Mode” = Single setting will be overridden and the Zone Settings within the current Performance will apply.
If all the local “Zone Switches” within the Performance are set to OFF (there are 16 Switches, one in each PART), then the global setting for MIDI I/O Mode applies. But as soon as you activate a ZONE in any of the PARTS, this action will override the “Single” MIDI I/O Mode setting to allow the Zone parameters to determine how MIDI is handled in the current PERFORMANCE. When you are going to use Zones, you do so because you want to use more than one, so the “Single” channel mode is naturally overridden.
PART/ZONE SLOTS
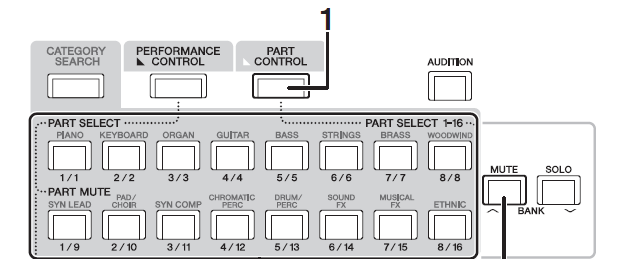
Any of the sixteen slots of a Performance can be used to setup Zone control. In fact, you can setup each slot to control an internal sound or an external device. A maximum of eight can be controlled simultaneously. Please do not mix up those two points: There are 16 PARTS (Slots) they each can contain ZONE Settings, but you can control a maximum of 8 simultaneously. Those 8 are the “KBD CTRL” PARTS… which can be activated on Parts, 1-8. In general, each non-KBD CTRL slot of a MONTAGE Performance can be active by selecting it directly (as an individual) using the [PART CONTROL] (#1 shown below) > [PART SELECT] 1-16 buttons.

You can see how the [PART CONTROL] button is linked by a dotted line to “Part Select 1-16”
Rule: A Performance slot that is not “KBD CTRL”-active is individually selectable for Single Part/Zone control. There will be times when this is exactly what you need. That individual slot could be playing an internal MONTAGE sound or it could be controlling an external device.
Rule: An internal MONTAGE PART must be assigned (“+” added) to the Performance SLOT before any meaningful programming can begin. Adding a Part means that the full complement of MONTAGE controllers will now be available to the Out channel you designate. The internal tone generator can be triggered directly from that slot, or not; you have an INT SW (On/Off). The external Transmit Channel is freely Assignable from any slot.
This means an internal Part must be assigned and then switched Off if you intend to use the slot exclusively for an external device. You are simply substituting the external device for the internal Part. If no Part is set internally, you cannot substitute the external device in that slot. The external Out routing can be on any of the sixteen MIDI channels, meaning you can freely set the MIDI (transmit) Out channel from any slot. When you choose to transmit Out, meaning you’ve made the slot active, all MONTAGE Part controllers are assigned to affect that channel.
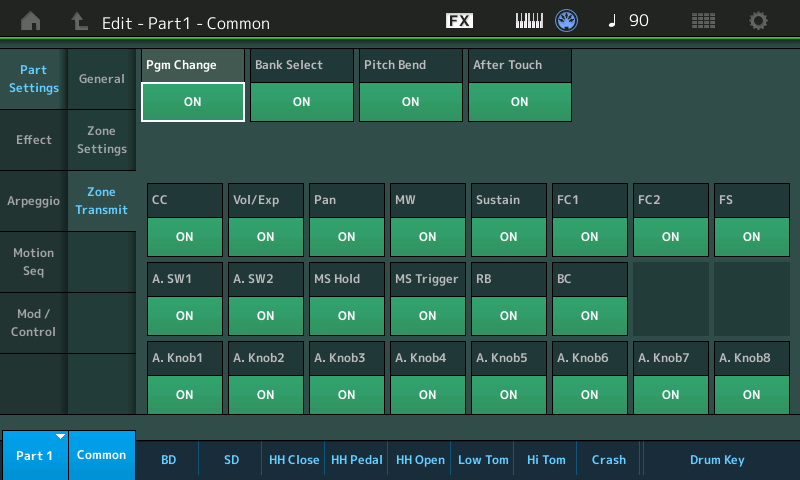
The Zone Transmit Switches

Screenshot above are the ZONE Transmit functions that can be turned On or Off per Zone.
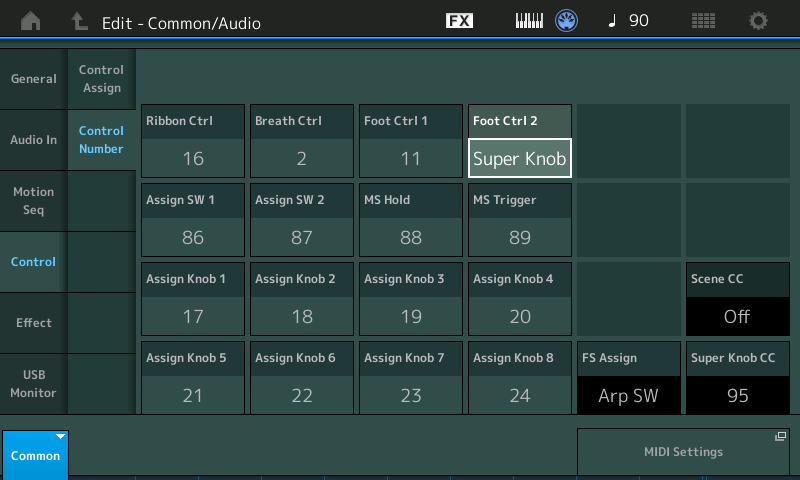
Screenshot below are the Performance COMMON Control Number defaults… All, but three in black (lower right corner), are customizeable on a per Performance basis.
Controller Assign Numbers

“FS Assign”, “Scene CC” (Num/Off) and “Super Knob CC” (Number/Off) assignments are global and apply always – through all Performances.
• When SCENE CC is OFF, the Scene buttons output Sysex.
• When SUPER KNOB CC is OFF, the Super Knob outputs Sysex.
Whether set to a Control Change Number or Sysex (Off), that data is documented typically on Channel 1 of your DAW.
If an assignment conflict occurs, you will see an exclamation point after the Number, indicating the conflict – the SUPER KNOB CC will override the other Control assignment – unless the conflict is with the SCENE CC number. In that case Scene changes will take place and Super Knob movement will be overridden.
It helps to envision signal flow: the Key presses and controllers are first routed to an internal Part, you can then opt to have that internal Part sound or you can turn it Off using the “INT SW” (Internal Switch). An internal Part must occupy the slot for the MONTAGE to transmit Out via MIDI. Separately, you can turn On the transmit Out by selecting a MIDI channel.
RULE: To activate a Part/Zone you must place an internal sound in the slot and then opt to turn it Off (if you do not wish to use the internal sound). You cannot simply program External MIDI functionality without assigning an internal Part to the slot. If you wish to not hear that internal Part, set the “INT SW” to Off.
This can be understood because the parameters that setup your external device must be stored somewhere and that place is among the Part parameters. What gets stored are Part parameters, what is remembered is you want to use the slot, but you do or don’t want the INT sound, and you do or don’t want to transmit Out from this slot, and on what channel you wish to transmit Out on. This is stored with the Performance; it is available whenever and wherever you move the Performance – be it to a Live Set or to a Library.
Basically, the Part Slot allows you to redirect the messages on the selected MIDI channel. The MIDI channel is assigned to the event on the way Out according to your Transmit Channel setting for that slot.
There are several ways to use MONTAGE with external devices, therefore one instruction document cannot possibly apply to all situations. Let’s look at a few common examples, and then with this knowledge you can proceed to create your own configurations:
Example ZONE MASTER ‘use case’ scenarios:
• You want both the internal and external device to sound when you play on MONTAGE keys, in either split or layered combinations.
• You want MONTAGE to send a Program Change to the external device and you are going to play MONTAGE keys but you want only the external device to sound.
• You send a Program Change to the external keyboard, but you want to play each set of keys independently- that is, not have the Keys of the MONTAGE control the external device. Each keyboard will trigger its own tone engine.
• You need to switch between internal sounds and external sounds sounding in the same setup, rapidly.
• You want to integrate your external device in your Motion Control Engine where you can control it via MONTAGE’s Control Matrix, controlling its volume, applying effects, using it as an Envelope Source, automating control, using it as a modulation source, etc.
What you can do:
When building composite programs that include both internal and external tone sources, you can control a maximum of eight channels (Zones) simultaneously. Example: If you are playing five Parts internally, you can assign three more externally. You would build these combination programs using Parts 1-8 because these are the Parts that can be automatically linked for simultaneous Keyboard Control (KBD CTRL).
Best Practice Hint:
Name the Part Slot to identify it as one that is controlling an External device. If you have a single external device you may want to opt to give it consistent slot in all your setups. This way you have a dedicated slider to control the external device’s overall volume.
Global MIDI I/O Mode = MULTI
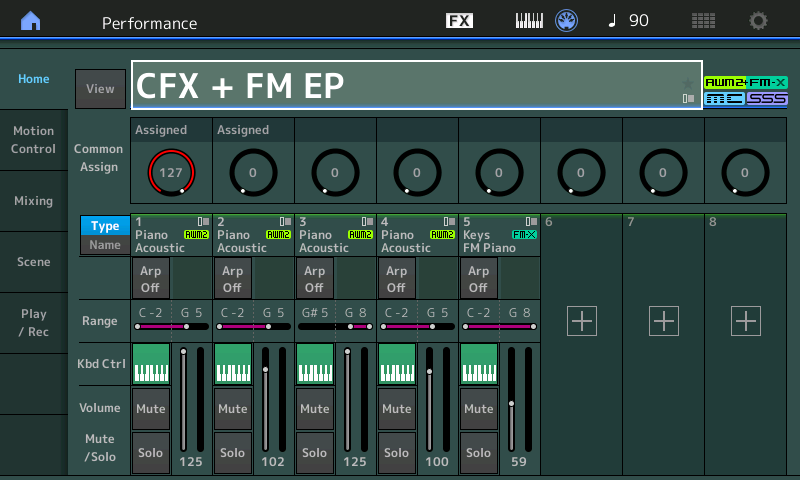
When you recall “CFX + FM EP” or any Factory Preset, the “Zone Settings” and “Zone Transmit” boxes are not programmed. The ZONE Switches are OFF. If you wish to use this Performance with an external device, you will need to edit it and store the result a User Bank Performance. (You can store 640 Performances in the User Bank).
Best Practice Hint: Rename your version of the Performance. If you integrate an external (slave) device with a factory Preset Performance, you are going to have to [STORE] it in the User Performance Bank, giving it a unique name will help you identify it. Remember the original factory Preset will remain in permanent memory, unchanged.
EXAMPLE: If the MONTAGE is set to the MIDI I/O Mode = MULTI… while playing “CFX + FM EP”:
Looking at the [PERFORMANCE (Home)] screen you know for this Performance, MONTAGE is outputting your key presses and controller movements on five MIDI Channels, 1-5, simultaneously (five green KBD CTRL icons appear active). Internally, the sounds in Parts 1, 2, 3 and 4 are Velocity limited and Note limited to respond only when the specified range requirements are met. They are used together to construct the CFX acoustic piano sound. The FM-X electric piano in Part 5 is receiving note-on events at all times but can only Output sound when its requirements are met: the Super Knob is rotated clockwise.

Going Out via MIDI is the full range of MIDI note-ons and all controllers on all five channels. The same data is transmitted on each of the five channels, with the exception of the global Super Knob and Scene Change commands (which if CC is selected, go out on channel 1). The five internal receiving Parts only respond in the Note Ranges and Velocity Ranges that allows them to respond… in fact, within each MONTAGE Part you can define exactly when specific Waveforms are engaged to a dizzying degree. Out via MIDI, the receiving device just ‘sees’ the MIDI event data – as transmitted. At first you may wonder why your external device isn’t responding like MONTAGE – but then you’ll remember, right, it isn’t a MONTAGE! It will Receive and respond to the incoming data according to how you set it to respond. In this case, the Note Limits are a function of the receiving device.
If you have only selected MIDI I/O Mode = Multi, you transmit on each active Part’s channel across all Keys. However, if you additionally, activate the Zone Settings for the current Performance, you can now intelligently define what is transmitted, even Note Limit it to a specific region, and redirect it. It is the Zone Settings and Zone Transmit screens that give you control over what goes Out via MIDI from each ZONE SLOT.
In the absence of Zone Settings, Note and Controller data generated by the Keyboard is identical on all five channels. It is the Tone Generator settings that determine exactly how, or even if, the data is interpreted and sounded by each of the Parts. Although all five PARTS receive a note-on event when you trigger middle “C” at a velocity of 100, only the Part whose settings match the requirements, will sound.
A Performance like “CFX + FM EP” includes more than a dozen Waveforms that each have specific requirements that must be met before they sound – each can be a different behavior or articulation. One of the concepts of MONTAGE is this selective access to AWM2 Elements and FM-X Operators. You dynamically control when, and even if, an oscillator will sound by how each Part is set to interpret the data.
Anything connected externally down the MIDI cable on MIDI Channels 1, 2, 3, 4 or 5 will sound. Basic rule of MIDI… if you’re on that channel, you must respond. Of course, you have the option of programming what your external device does. When making your Zone Settings, you can turn the Transmit Out to Off on a per Zone basis. This condition will be stored to your User version of this Performance. Therefore, if your external device is not supposed to sound, you can set the Zone’s Transmit Channel = Off. This will prevent the MONTAGE from transmitting Out via MIDI and triggering it.
Remember: If, ever, you don’t want an internal Part to sound from a Slot, you can turn the INT SW (Internal Switch) for the Part to OFF.
Special Note to “on-the-fly” operators: Potentially, the MONTAGE may at any time transmit on any of the first 8 channels. To avoid having to “pre-plan” everything you do on stage, if at all possible, set your external device to a basic receive channel 9 or above. Doing so will prevent the external device from sounding by selecting any of the Factory Performances. So unless you’ve programmed it specifically to sound, there will be no surprises. Even if you haven’t pre-planned.
Global MIDI I/O Mode = SINGLE
When SINGLE is your global MIDI I/O Mode, the MONTAGE can be controlled and can be set to transmit on a single channel. By default, MONTAGE is set to transmit and receive on multiple channels. If you attempt to trigger the MONTAGE from an external MIDI controller, you quickly discover that trying to play any of MONTAGE’s multiple Part Performances is impossible if your controller only transmits on a single MIDI Channel at a time. Enter MIDI I/O mode = Single.

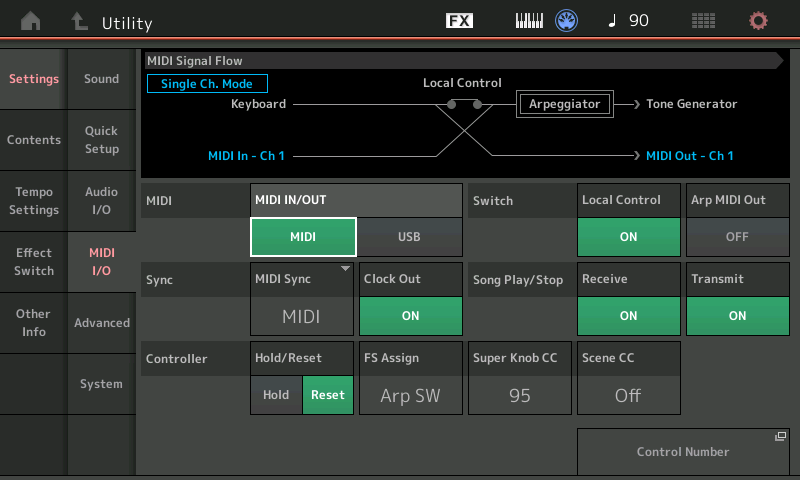
MIDI SIGNAL FLOW: Single Ch. Mode
On the MIDI Input side, this mode allows the multiple Part Performances to be controlled from a single channel MIDI input. Shown above, the MONTAGE is in Single Channel Mode, the MIDI In (in blue) is set to Channel 1. Notice playing the MONTAGE Keyboard will both trigger the Tone Generator and send data OUT on Channel 1.
On the MIDI Output side, this mode will Output just your single interaction with the MONTAGE keyboard and controllers as a single channel stream. Arpeggio data is not output via MIDI.
In SINGLE, obviously, only the trigger (control) notes are sent Out. I say obviously, but perhaps it is not so obvious. In the graphic above, the Keyboard routing to the MIDI OUT does not include the Arpeggiator block. Yet an external controller connected to MONTAGE’s MIDI In will be able to trigger the Arpeggiator and the Tone Generator. Both identically can control the Arpeggiators. The thing to understand from this is, what data goes Out via the MIDI Out port.
Think about a Performance made up of piano, bass with Arp, drums with Arp, and a string pad, Parts 1-4. The piano in Part 1 and the string pad in Part 4, are played directly. The notes you finger on the keyboard are heard via an acoustic piano Part and a string pad Part. But the bass and drums are not playing the notes you trigger- rather the notes that you trigger instruct the Arpeggiator assigned to those Parts to start and control the phrases that are output. You are not “playing” the bass, you are not “playing” the drums… not in the same way you are the piano and the string pad. If you recorded the MIDI data, you would only see the Notes you actually fingered… and in order for the bass and drums to playback properly from a DAW, in this case, you would need to reset, re-arm and re-activate the Arpeggiators, so they will recreate everything during playback.
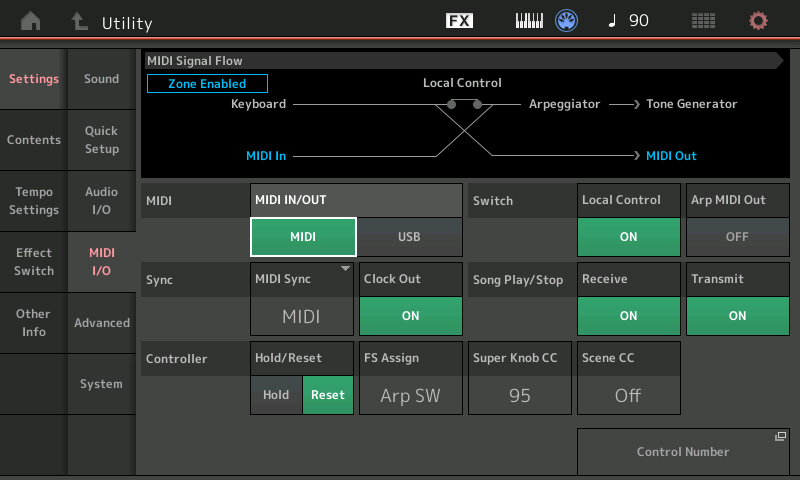
Rule: When the Zone Settings are in use, they will override MIDI I/O = Single. Zones, by nature, must allow for multiple transmit/receive options; Single mode cannot and does not allow for multiple transmit/receive options
To be or not to be, Single or Multi? That is the question
If you additionally want to trigger the MONTAGE from an external device (use it as a tone generator) then this global setting will be very important. Example: If it is a matter of wanting to use a different weighting of keys; you have a MONTAGE 8 and simply want to play your B3 Organ sounds from a non-weighted action; Or you own a MONTAGE 6 and simply want to play your acoustic piano sounds from a weighted action… you could use the Single MIDI I/O Mode to control the MONTAGE. Transmit IN on channel 1.

But if you want to play one MONTAGE sound from the MONTAGE keys, and simultaneously play a different MONTAGE sound from your external device… this would require the Multi Mode I/O setting. Logical.
Setups can get quite complex, but if you know how things work you will be better able to workout how to get it to work for you!
There are, indeed, some impossible scenarios. Yes. Particularly, if your external controller does not transmit on multiple MIDI channels: You cannot, for example, play separate multiple Part sounds from both the internal and external controller simultaneously, if that external controller cannot transmit on multiple MIDI channels.
Remember this: once the Zone Master is turned ON in a Performance it will take precedence over the MIDI I/O Mode Single setting.

Therefore, if you recall a Performance in which there are no Zone Master Settings, (OFF), the global MIDI I/O Mode setting will apply.
Important Concept
Here is a major concept: You can control as many as eight MIDI Channels at a time; as an eight Zone Master Keyboard those zones can be internal and/or external. But there can only be eight fully unique Zones at once. If you are playing a five Part Performance (like CFX + FM EP) internally, you have three unique Zones available externally for simultaneous play. If you are playing seven Parts internally, you have but one unique Zone available externally, and so on.
We are saying “unique”, because, technically speaking, you can have a Zone transmit simultaneously internally and externally (but this is the least flexible arrangement). Typically, each device would have its own Zone settings. Each slot designated as an external slot can be set to transmit Out on any channel you desire. Any or all of the sixteen slots can be setup, however, only Part slots 1-8 can be linked for simultaneous control.
Any Part not linked by the KBD CTRL icon can be selected individually by pressing its [PART SELECT] button, directly.
The ZONE Parameters defined
Turn the Zone Switch On within a Performance. It is going to be a Part parameter. There are 16 Parts.
• Press [EDIT]
• Press the [PART SELECT 1] button to view its settings
• Touch “Part Setting” > “Zone Settings”
If you do not see the Zone Settings option in the second column, you must activate the ZONE
MASTER in Utility: go to [UTILITY] > “Settings” > “Zone Master” > set to ON.
• Press [EXIT] to return to Part Edit

Int SW – this is where you designate whether or not the internal MONTAGE Part assigned to this slot is going to sound. If you set this to Off, the slot becomes available exclusively for an external device. An internal Part must occupy a Part slot for it to be used as a Zone – you can then disconnect the internal Part with this switch.
Note Limit – this sets the range of notes transmitted by this Zone. Setting the High Limit lower than the Low Limit sets up a “no-fly” zone where notes in between are silent. This parameter affects both Internal and/or External transmitting. This parameter defines what gets transmitted – not to be confused with the Part’s own Note Limit which define what gets received.
Octave – +3/-3 octaves
Transpose – +11/-11 semitones
Transmit Ch – this is where you activate this slot to control an external device by selecting the MIDI channel. If Transmit Ch = OFF, the Slot will not transmit OUT via MIDI at all.
Bank Select – if you wish to send MSB/LSB set to ON, and enter values. If you do not wish to send Bank Select set to OFF
Program Change – if you wish to send PC set to ON, and enter the value. If you do not wish to send a Program Change set to OFF
Volume/Expression – if you wish to send/control the zone cc7/11. If you do not wish to send Volume or Expression set to OFF
Pan – if you wish to send a pan position message. If you do not wish to send a Pan command, set to OFF
MIDI Send – when active (green) the Program Change, Volume/Expression, and Pan Settings are sent in realtime from this screen. When inactive, the values are only sent when the Performance program is initially recalled. (Note: Bank Select changes are not sent until the Program Change is selected… This means: changing just the MSB and or LSB does nothing until a Program Change value is selected).
PART 2: ZONE MASTER FAQ
What happens externally, when I switch between Performances on MONTAGE (Does it always Send a Bank Select/Program Change)?
No. The MONTAGE only sends messages when you’ve configured it to do so. If the Zone Master function is On: the external device will change according to the Zone Settings within the Performance as you recall it; if there are no specific messages stored in the Performance, then there will be no Bank Select/Program Change in the external device. The external device will just remain where it was the last time it received a Bank Select/Program message. All 2044 Factory Presets default to ZONE Switches = Off.
Plain language: Changing the MONTAGE program does not change your external connected MIDI device unless you select a Performance or Live Set Performance that has Zone Settings that you have programmed/activated..
When would I choose to use the Zone Master function?
You would use the Zone Master function any time you are connecting via standard 5-pin MIDI OUT to other synthesizers or MIDI modules, and you wish to control and manage them from your MONTAGE. In short, when using the MONTAGE as your Master Keyboard Controller via MIDI.
Can I create setups where some Zones are playing from the internal MONTAGE engine and others Zones are playing external modules/keyboards? How many Zones can I control?
Yes, when you want to create layers, splits or combination layer/splits that are a mix of both internal and external Zones, that is what Zone Master is designed to do. A Zone can be set to transmit to the Internal MONTAGE engine, or an External device or in the rare instance, both. The MONTAGE can transmit via 8 Zones at once.
A “best practice” tip would be to setup the internal MONTAGE Parts starting from Part 1 using as many Parts as you require to build your MONTAGE instrument; use the remaining slots for constructing your external device(s).
What MIDI Channel should I set my external device? Are there any “best practices” recommendations?
You can set your external device to any MIDI Channel you choose. However, just remember MONTAGE can, at times, transmit on as many as eight MIDI channels, and when it does it uses channels 1-8. If you select a MONTAGE Performance that is set with five Parts, and MIDI I/O = Multi, then the MONTAGE is addressing Chanel’s 1, 2, 3, 4 and 5. And it could potentially want as many as eight channels (there are eight Part Performances). If you pre-plan the Performances you are going to use, you can setup and customize/store the settings for each as required. But if you like to ‘roam-free’ and program “on-the-fly”, then recognize the MONTAGE is an octopus- it Sends and Receives 8 channels. Best practices: by setting your external device to a channel 9 or higher you can avoid any surprises when just exploring the MONTAGE Factory Performances.
If your external device is additionally connected to the MONTAGE A/D Input, you have yet another option to control when and how your external device is sounding.
Can’t I simply set the MONTAGE MIDI I/O Mode = Single and use the Zone Master for external?
Yes, but… Not at the same time, when Zone Master is enabled in UTILITY and the Performance has Zone Switches set to On, its settings override the MIDI I/O Mode “Single” setting. Activating the Zone Switch within a Performance automatically changes the status to address multiple devices. Whatever is setup in the currently selected Performance will determine what gets transmitted OUT via MIDI and on what channels that data uses.
Additionally, note that in I/O mode Multi, the Arps can send their MIDI data Out externally, in I/O mode Single only the keys you physical press are transmitted Out via MIDI. The Arpeggiators do not Output their data via MIDI.
How can I have a MONTAGE Performance recall an external Program but then not have MONTAGE trigger that external device via the keys and controllers?
If your external device is controlled from a Performance Slot that does not have the KBD CTRL icon active, when the Performance is recalled, the Bank Select and Program Change message will be sent but the MONTAGE will not trigger that external device directly. Each Performance has sixteen slots, any of them can be designated to address your external device. You’d have to actively select it to transmit to via the keys… so as long as KBD CTRL is not lit and as long as you don’t select it directly, only the settings you Preset in the Zone Settings will be sent.
While on-stage I often need to rapidly change between internal MONTAGE sounds and my external sound, how can I accomplish this?
By setting up several Parts within a single Performance you can switch sounds seamlessly and as rapidly as necessary within this one environment. The internal MONTAGE Part with KBD CTRL active will sound anytime the [COMMON] button or any one of the KBD CTRL Part Select buttons is lit. If the KBD CTRL icon is not active pressing the [PART SELECT] button puts you in communication with the item programmed to be reached by that Slot (be it internal or external). Because each Performance has sixteen Slots a different Single Part program could occupy each. Remember, each internal Slot is the equivalent of a Motif XF Voice. Setup your several MONTAGE Parts as Single slot occupants (KBD CTRL inactive); setup your external slot adjacent to the internal slots – to activate a Part simply press its [PART SELECT] button.
Can I Assign and control external Zones the same as I do internal MONTAGE Parts?
Slots addressing Internal synth Parts are different from slots used for external Zones. Internal Parts are often controlled directly via assignment within the architecture using AssignKnobs, Motion Sequences, Super Knob, etc. Control over external devices is handled strictly via standard Channel Control Change MIDI messages which can be assigned various tasks within your external device. The 8 Assign Knobs can send cc (Control Change) messages directly to your external device (default: cc17-24, but can be assigned to any cc1-95). What they do to that device will depend on how you assign the destination within your external device. The Assign Knobs must be manually/directly turned to affect the external device (they cannot be placed under Super Knob control or linked to Super Knob control, for example). Such linking of the Super Knob Control is reserved to Destinations within the MONTAGE engine or signals arriving via MONTAGE’s A/D Input.
Why when I reassign the MONTAGE AssignKnobs to cc74, for example, does it not control the MONTAGE Filter?
The AssignKnobs do not address the MONTAGE Tone Generator via MIDI Control Change (CC) commands. The CC Numbers generated by the AssignKnobs are sent OUT via MIDI. The AssignKnobs have a *direct* connection to the internal Tone Generator. Your Assign Knobs can be doing something different internally and externally. While an AssignKnob might be offsetting the AEG of an FM-X sound, it could be making an entirely different change Out via MIDI to your external device.
Are there advantages in routing the audio output of my ‘slave’ hardware device through the MONTAGE A/D Input?
Yes, there are several beyond just saving a couple of channels on the band’s mixer…
_You have an [A/D Input On/Off] switch available on the front panel. If ever you need to cut audio for the external device you can at the touch of a button. Great for those “on-the-fly” type users.
_The A/D Input Volume can be pre-set and controlled on a per Performance basis. Balancing volumes of internal and external slots for complex layers and splits, can be stored and accurately recalled; Realtime control over A/D volume can be assigned on the Common/Audio level of editing in MONTAGE and varied via the Super Knob… meaning you can morph and crossfade between internal and external sounds same as you do with the internal MONTAGE sounds.
_The A/D Input can be assigned it’s own dual Insertion Effects per each different Performance. It’s signal can be merged with the MONTAGE to the Main L&R Outputs or can remain discreet and travel to the Assignable L&R Outputs. Parameters of the Insertion Effects dedicated to A/D Input can be assigned to realtime Control same as any internal synth Part.
_The A/D Input can be used as a modifier (modulation source) within the Motion Control Synthesis Engine. The A/D Input can be routed via the Side Chain Modulation feature to the Compressors, Dynamic Effects, Vocoder etc.
_The A/D Input can be used as a tempo source for all clockable functions within MONTAGE. Great if your external device has any kind of automated rhythmic functions.
_The A/D signal path takes advantage of Yamaha’s high definition audio path, VCM processing and Pure Analog Circuit output. It will sound great!
My external device only receives on Channel 1, does this present a problem for MONTAGE?
No, but it does mean you’ll need to prepare each MONTAGE Performance you wish use while connected to your external device. The MONTAGE is normally always transmitting something on Channel 1, since all Factory Presets start with Part 1. You will simply need to pre-program your Performance setups with a Zone setup for your external device or if you run the external device’s audio through MONTAGE you can manually defeat the A/D Input signal when necessary.
Do I have to setup the Zone Settings for every Performance or can I COPY my settings from Performance to Performance?
You can use the Part ‘Category Search’ function to recall any Part from any Performance, including its Zone Settings, its Arp/MS, Mixing, and/or Scene settings. When on the Category Search screen you set the “PART WITH PARAMETERS” option to bring along Zone settings whether concerning internal or external Parts.
Can I use a Slot to transmit both internally and externally at the same time?
Yes, but know that it limits your flexibility. But it is possible, in theory. You have eight Zones, spread out for more flexibility. In general, the BEST PRACTICE would be to create an internal PART for each internal sound (AWM2/FM-X) that you wish to play, and create an separate PART for each external device you controlling. You do so by assigning an internal PART but setting the INT SW = OFF. Now the Controller and other PART parameters of the ZONE SETTINGS can be applied to your external device. The maximum simultaneous ZONES you can have is 8. Therefore, if you are starting with the “CFX + FM EP”, which we know is a 5-PART Performance, you can add three external ZONES (to PARTS 6, 7 and 8) for simultaneously control.
The problem with using a ZONE for both internal and external is that you cannot independently set things like the NOTE LIMITs, Controller Receive Switches, etc. It becomes just a very simple layer without the ability to address each independently.
Once I create my Zone Settings are they maintained when I use Live Set and if I install them in a Library?
Absolutely. The Zone Settings you make are stored in your User Performance. Give it a new/unique Name. This Performance can be referenced by Live Sets, and placed in Library files as you may require.
Do the MONTAGE FADERS send cc007 Out via MIDI?
They can. They normally do not, until you activate the ZONE MASTER in Utility (global), then activate a Zone Switch (On) in the current Performance and finally, activate the TRANSMIT CH to send Out via MIDI. Anytime you wish to communicate OUT via MIDI, it is recommended you activate the Zone Master function and create a setup.
What Does MONTAGE Transmit?
There are certain things that make the MONTAGE a unique synth keyboard, different from most any other keyboard you may have previously owned. One thing is that it can, and often does, transmit on multiple MIDI Channels at one time, depending on how many KBD CTRL Parts are active. We know that the first eight Parts can be linked by this KBD CTRL function. This allows for complex sound design with multiple Arpeggiators and Motion Sequences in action; a PART can be a complete instrument sound or it can be a very detailed articulation or component used in building a huge multi-dimensional complex instrument sound. This also allows complex layers that can include multiple internal sounds and/or external devices, as you may desire. When the KBD CTRL icon is active (green) it means that the slot is available for simultaneous internal and/or external Zone use. And when a non-KBD CTRL PART is selected, meaning the [PART SELECT] 2-16 button is engaged directly, you can address that individual PART or ZONE alone. Naturally, if you are going to transmit an Arp’s Output to an external device you will want to be able to direct it on a specific channel and you will want to isolate just that specific data to that external device.
When you play on MONTAGE’s Keyboard, your Key presses are directed to all KBD CTRL Tone Generator PARTs simultaneously, unless an Arpeggiator is active on that PART. If that is the case, your Key presses are analyzed according the Arp settings and your velocity and note values are translated into the appropriate Phrase and that MIDI data is sent to the Tone Generator and/or Out via MIDI to an external device.
Other uses: Transmitting on multiple channels makes sense when you are playing separate instrument sounds and wish to document the different channel’s data for editing purposes, or for notation, etc.
There are times, however, you expressly do not need separate channel transmitting per Part. Instead, you want to transmit just a single stream of MIDI data on just a single channel; simply because it makes things easier to edit and you simply don’t need to trigger an external device with an arpeggio. Or it may be because this is the way you have always worked in the past. If your receiving device accepts and merges all incoming MIDI data sending in multiple streams of data can be disastrous. You may not have a need to receive separate channel streams of data as MIDI events. That is the reason for these two MIDI I/O Mode settings, MULTI and SINGLE.
When configuring your system, you must take into account that the MONTAGE, from its own keyboard, transmits on as many as eight MIDI channels and can occupy as many as eight MIDI Receive channels, simultaneously, with its tone generator. But can also be setup to transmit and receive as just a single channel entity. What may be surprising is that this does not change the performance of MONTAGE, not one little bit. It only changes what is available OUT via MIDI and how MONTAGE behaves in response to messages coming IN via MIDI.
If, for example, your external keyboard controller only transmits on a single MIDI channel, you would set the MONTAGE to MIDI I/O Mode = Single. This would allow you to completely control the MONTAGE functions with a single Channel controller – in the same way you would as if you were playing the MONTAGE’s own keys.
Important Note: Onstage MIDI setups can get quite complex. We will concentrate here, first, on gaining an understanding of the MONTAGE as your Master Keyboard (Transmitting) Controller. If you additionally intend to use MONTAGE as a slave to an external controller…(Receiving) we ask you take in how MONTAGE is designed to work as a controller before experimenting with doing both transmit-and-receive type setups. The reason we mention this is because the global Multi/Single, transmit/receive requirements of MONTAGE may not fit all potential scenarios. A clear understanding of the MIDI I/O Mode setting will be required before attempting to create such setups. If you know how MONTAGE works (or is intended to work) you are better able tackle configuring your own custom system setup. MONTAGE cannot be in both Multi and Single mode simultaneously (obviously).
