MONTAGifying Motif: FREE FALL
FreeFall
PART 1 – (ARP) Drums
PART 2 = (ARP) Mega Bass
PART 3 = (ARP) Mega Guitar
PART 4 = Lead Guitar (Super Knob increases Guitar Overdrive and Delay repeats). The Lead Guitar will have short plucked attack at low velocity, and singing soaring tone with increased velocity. Crank the Super Knob (FC2) to get more Drive and Delay…
The Drums, Bass and Steel Guitar are controlled by Arpeggios with the left hand (Below B2)… the Lead Guitar is in the right hand (C3 and above). (Super Knob added for Lead Guitar Effects)
Here, this is done with an artful assembly of components: Sampled articulations and the ability to construct a ‘control phrase’ that can mimic a musical performance. The note data must accurately access a specific articulation at the precise moment required. The arpeggio phrases are used to access (trigger) a specific Element (sound component) at a specific time because each note-on has a KEY and a VELOCITY – this MIDI data determines when an Element will contribute its portion of the whole.
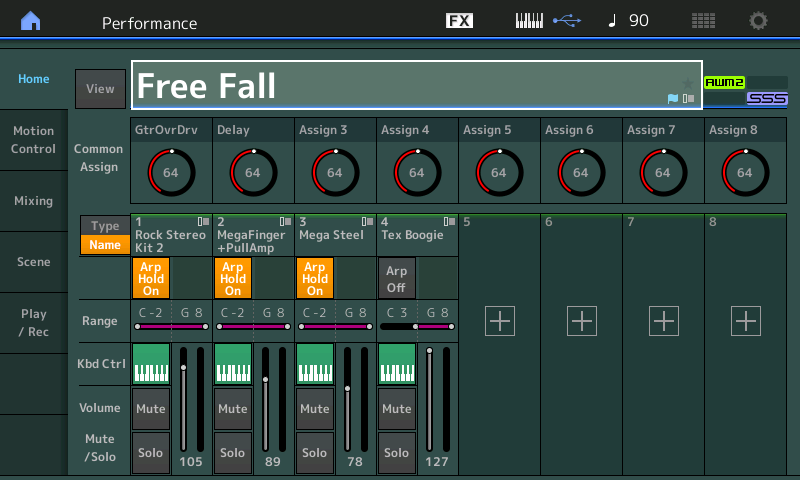
SCENE 1 and 2 are Main sections; SCENE 3 is a Fill-in; SCENE 4 is a Vamp; SCENE 5 is an Ending.*
* It does not stop… there are just empty measures placed at the end – giving you time to press the [STOP] button.
Brain Game: Deconstruction of PART 3 – the “Mega Steel” Guitar
Once you pull apart a synth sound, isolating each component, as we are getting ready to do, you can never “un-hear” them. But it will give you a new appreciation of how MIDI is used to convincingly mimic a musical performance by a real player. And this will undoubtedly affect how you begin to think about using alternate “articulations” in your own music creations.
In general, the arpeggio phrases are MIDI data meaning you can customize and/or adjust what the phrase sounds and/or feels like, in your music. The idea is not just to be repeatable, but have the phrase be bendable and flexible, in a musical sense, to work as a creative function. Arpeggios are simply another (rather unique) way to manipulate the Montage Part in a completely different/creative way.
As humans we tend to listen to the whole instrument and we accept (or not) how it sounds, however, once we take this sound apart and analyze the components individually, you will never quite hear it the same again. Any organ emulation, be it a Tone Wheel organ sound of the B3 or a traditional Pipe organ, is made up of multiple harmonics in specific volume balance to each other. As you isolate the different elements that make up the instrument’s overall tonality, you become super-aware of the separateness of each drawbar/pipe actively contributing its particular harmonic component. But you can, in the end, step back, and then just listen and the enjoy the organ tone as whole single playable ‘patch’.
Well, with arpeggios like the one we’ll take a look at here, there are more than just pitched components making up the Guitar Voice – there are specific noise components and other articulations that are carefully placed in the performance of the phrase that add to the usefulness of this arpeggio phrase.
Isolate the Guitar Part: From the [PERFORMANCE (HOME)] screen – the [PERFORMANCE CONTROL] (#1 in diagram below) function is lit by default
This makes the first two rows (sixteen numbered buttons) on the right front panel
Top Row: Part Select 1-8
Second Row: Part Mute 1-8 (or Part Solo)
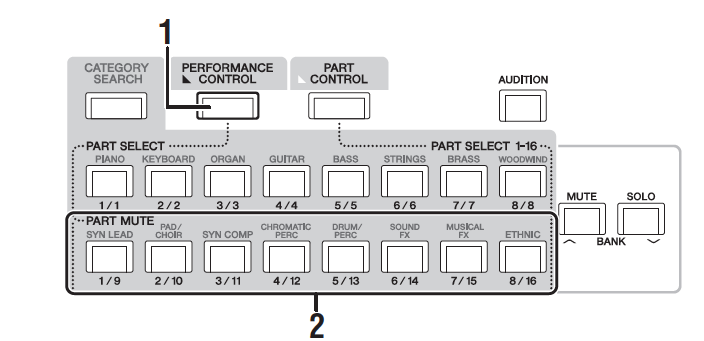
Third Row: Motion Sequence Select 1-8
Fourth Row: Part Arp Select 1-8

Touch the “E” below middle “C” to start the Drum, Bass and Guitar
Use the PART MUTE row (#2 in screenshot above) buttons [1/9], [2/10] and [4/12] to Mute the Drums, Bass and Lead Guitar Parts of the “Free Fall” Performance.
You should now hear just the strummed Guitar PART in PART 3
Alternate Method: Press the [SOLO] button to the far right
Then press [PART SELECT 3]
Can you hear the discreet components that make up this ARP TYPE Phrase?
We know it is difficult – because we tend to listen to the Guitar sound here as a whole instrument.
How can we isolate each of the different components?
For this we will need to drop into EDIT on this PART and then isolate the Elements.
PART Edit is where you can assign and customize controllers so you can manipulate each of the Oscillators (Elements) as you may require. We are going to have a PART where the different Elements are each responsible for a specific articulation (component) that will bring this detailed strumming arpeggio phrase to life. If you are not already in Edit…
• Press EDIT
• Press [PART SELECT 3]
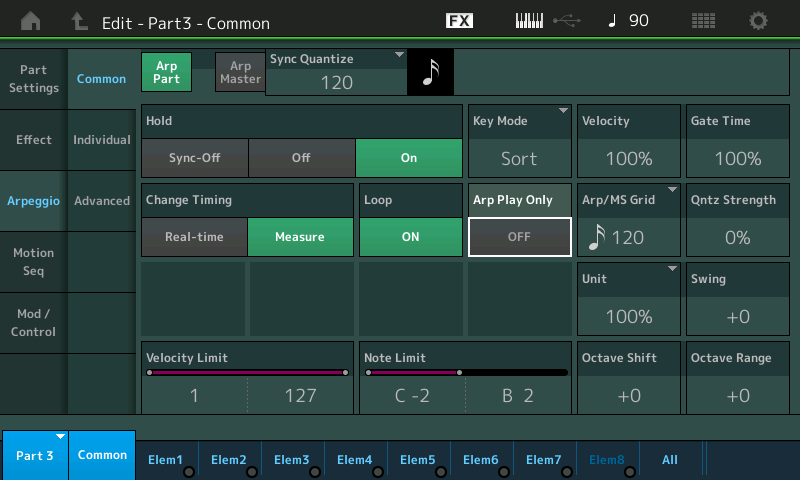
This particular “Mega Steel” PART is made up of 7 different guitar articulations; it’s made from 7 Elements – each responsible for recalling specific guitar articulations that make up the details of this strumming guitar. It is not designed for play by a human… it is designed specifically for play by precise velocity messages to recall particular articulations. In the screen, along the bottom, you can see green activity lights that flash On whenever an Element is sounding.
The Elements are carefully mapped to specific VELOCITY RANGES and/or NOTE RANGES. The Arpeggiator can repeat not only the specific notes (we as humans have no problem playing the correct notes, mostly), but it can play at specific velocities (that’s where we as humans are not so very precise). When you hear the arpeggio Phrase “play” this same Part, you quickly realize the purpose of these MEGA Guitar sounds. They are designed to be used with the “technology” of the arpeggiator, which can, like a sequencer, playback a musical phrase with precisely accurate velocities, on demand. You will find Mega Parts and Mega Gt/Bs ARPs for both Guitars and Bass.
Unlike a normal sequence phrase, an arpeggio phrase can be CHORD INTELLIGENT… Yamaha has been refining this Chord Intelligence engine since the 1980’s. Here it is applied to voicing the chords – using music theory. It will not only recognize Major, Minor, Dominant, Diminished, Augmented chords and more… And depending on the Arpeggio CONVERT TYPE you use, the note data can follow, or not, the instructions input by the keyboard – in real time!
Even if you know the Velocity Limit Ranges and Note Limit Ranges of each Element, it would be impossible, as a human, to play with the same accuracy as the Arpeggio phrase – well, we should never say ‘impossible’. Let’s say you should do something else with your time! It might be easier to learn on a real Steel String guitar.
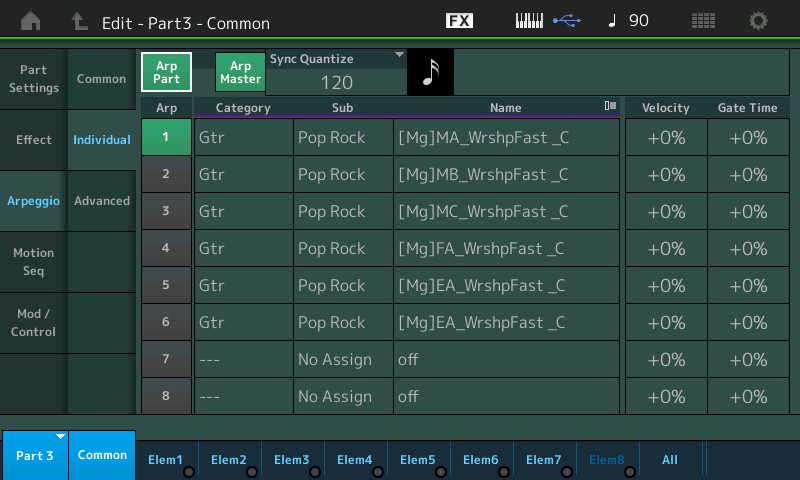
From the PART EDIT area we can pull apart this guitar and listen to exactly what is going on.
Press [EDIT]
Select or SOLO PART 3 [PART SELECT 3]
Press the lower [COMMON] button
• While in [EDIT] the third row of buttons help us isolate the various Elements. Buttons [1]-[8] Select an Element for Editing
• The bottom row of buttons will illuminate to indicate that this is a 7-Element Voice. turning OFF their lights will MUTE the corresponding Element
• Press [SOLO]
This will allow us to listen and isolate each of the Elements in turn. It is an 8-measure phrase so take your time – it takes a full eight measures for each item to play through and some Elements are very sparsely used, as you will hear.
Arpeggios will use precisely placed (and repeatable) commands, via Velocity and specific Notes, to trigger specific articulations. Isolate each Element in turn and listen closely for its contribution to the Phrase (remember to let the phrase count through 8 full measures – some articulations are subtle and sparse).
To start the arpeggio phrase touch a single “E” on the keyboard below B2 – and let it play. Arp HOLD is activated.
Use the bottom row of buttons to [SOLO] and isolate each Element. You will discover that Elements 1, 3, 4, 5 and 7 contribute different articulations to the Arpeggio Phrase.
Below the 7 Elements and their Velocity ranges are shown and detailed: (Screenshot below showing “All” Elements and their Velocity and Note Limits)
Element 1 – Open; the main body of the guitar and the principal strummed notes of the chord.
Element 2 – Dead-note sound. (This is not used in this phrase).
Element 3 – Mute; a muted tone and adds an articulation to the phrase
Element 4 – Hammer-On; articulations in the Phrase; isolated you hear them quite easily
Element 5 – Pitch slides that occur in the Phrase; again isolated you can hear them easily
Element 6 – Harmonic; articulation (it is not used in this phrase, at all)
Element 7 – FX; the raking noise of the strings being strummed. Surprisingly, when isolated you recognize it, as being separate, but not really before. Once reassembled you now can mentally isolate it, but not before… it’s like …how didn’t you notice this as a separate component previously?
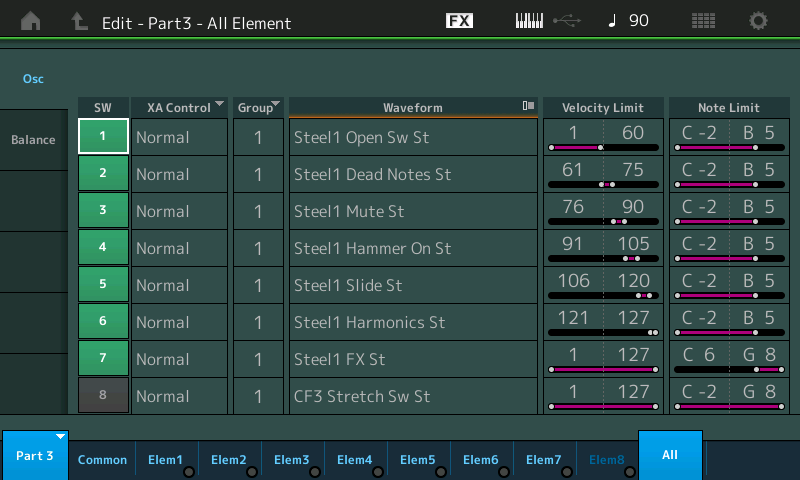
Of the seven active Elements, all but Element 2 and 6, has its own rhythm and makes its own contribution to the arpeggio Phrase.
The main body of the sound, Element 1, is compressed into the Velocity region 1-60. A Velocity of 60 is maximum for the Open Guitar string sound. Trying to play normally with 60 as maximum velocity is quite impossible. You can guess the data was created normally then ‘compressed’ before Converted.
When heard by most listeners, this arpeggiator phrase might as well be an actual acoustic steel string guitar, playing a very intricate guitar riff. When in fact all that is necessary is to voice a E chord or any other chord.
Press the [MUTE] button and try different combinations of just these Elements. The arpeggio Type (phrase) is an 8-measure phrase. So you will discover that Elements 3, 4, and 5 only occur occasionally to support the realistic recreation of the guitar riff, as you will hear.
Start with just Element 7 – the raking noise; add the pitch slides of Element 5; then add the Hammer-on articulation of Element 4. Finally add the main body of the guitar in Element 1.
As you do this, your ear/brain is now able to keep ‘separated’ each of the components and you are more aware of the individual contributions of each Element. You don’t necessarily think consciously about all of this detail when you are listening to the Mega Steel Voice as PART 3 of a four PART PERFORMANCE, like “Free Fall”, and not even when you isolated the guitar from the rest of the ensemble, but these components add to your overall acceptance of this as an actual strummed guitar. And if you just use Element 1, something is definitely missing from the overall impact of the guitar part. This is MIDI data artfully triggering the Elements in a precise manner.
The Super Knob has been programmed to increase the lead guitars Overdrive (AsgnKnob1), DelayMix (AsgnKnob2), RevSend (AsgnKnob2)
EXTRA CREDIT:
In creating an arpeggio phrase like this, you would need to take advantage of the multiple Arpeggio Tracks simply because of how you need the resulting phrase to behave. A portion of the phrase requires specific notes because the sampled audio of the particular articulation is “fixed” to a specific Key, while other portions of the phrase will need to adjust to the chord quality requested by the trigger notes. The raking noises require several “fixed pitch” Waveforms assigned several adjacent Keys (well above the range of a guitar, C6-G8).. Therefore it needs to be converted via a “Fixed Note” arp track. Element 1 which carries the main string sound and pitch will require that its data is converted to the arp with the “Org Note” function (which is chord intelligent).
So you can imagine to create this multifaceted phrase, it is assembled from several tracks of MIDI data. Articulations, this is a big part what having eight Elements is all about. The more Elements you have, the more details you can express. Each of these noise articulations are directed to the single Guitar Voice in a single arpeggio phrase. This is really what the four tracks of the arpeggio creation function are all about: you can have a totally different response, per Element, to the trigger notes, but all together they create a musical result.
Someone sat down, analyzed what the guitar player was doing and then recreated it (meticulously) by programming the tracks that contribute to this ARP TYPE Phrase.
While listening to just the Hammer-ons or just the Pitch Scoops, or just the raking noise, you can see that by themselves they are not much, but what they add to the overall vibe of the Arp Phrase is magical. It brings the phrase to “life”.
The multiple tracks of the “Put Track to Arpeggio” Job were used to separate the CONVERT TYPES needed. Those that require chord intelligence are converted using the “Original Note” Type, and those that are strictly percussive would be converted using the “Fixed Note” Type.
This Study of a Preset Arpeggio was provided in addition to just the Motif XF Performance, so you can gain a deeper understanding of how arpeggio data works – there can be pitched/chord intelligent data, and non-pitched/fixed note data. In future studies we will help you construct your own arpeggios from data you generate and/or from existing MIDI data. Enjoy!
with respect… RIP Tom Petty.
Download here: Free_Fall.X7B


