Manny’s Modulation Manifesto: Wrapping up – Advanced Tips, Tricks & FM Quirks
I hope these articles and the Soundmondo Voice examples – plus your own tweaking and exploration – have given you the ear experience for how FM works. By providing you with this library of examples that can be used as building blocks for creating your own original sound, the goal was to inspire your enthusiasm to just dive in – looking for cool & unique haxidents – even if your still not entirely sure what I’ve been talking about! These four approaches can add to your repertoire:
Velocity Tricks: Emulating Velocity “Switching”
The Yamaha FM implementations have a very wide range of velocity dynamics, and can be used in clever ways to create unusual or unique behaviors. One trick is to use extreme Level velocity settings for the Carrier Operators to emulate velocity controlled attack times and behaviors – also sometimes known as velocity “switching” or “layering”. Reference the Voice “Dyna Strings” on Soundmondo and listen to the linked Soundcloud demo. This Voice is an analog style synth string sound using velocity to articulate between a soft and slow attack behavior as a pad – and a brighter, hard bowed attack sound at high velocities. This Voice uses Algorithm 10: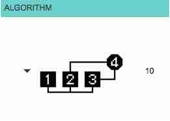
There are three Carriers. Carrier Op 1 has no Modulator, so the only harmonic content we can create is by using Feedback. For a string type timbre, I’ve set the Feedback Type to Saw and the Feedback Level to 90. This Operator is going to create the basis for the sound. I’ve set slow Envelope Rate 1 & 2 values and no Velocity sensitivity so when you play very lightly you hear the “pad” behavior. The second and third Carriers – Ops 2 & 3 – both have very fast Envelope 1 & 2 Rates to create the hard bowed attack. Ops 2 & 3 share the Modulator Op 4, which is set to Fixed mode for its Frequency tuning to create the “bow noise” stuff in the attack. To further accentuate the bowing noise, the Pitch EG is set to only modulate Ops 3 & 4. You will see that the Velocity setting for Ops 2 & 3 is maximum, so the “bowed” behavior and timbre is only heard when you play very high velocities. Thus, when you play very softly you get a nice slow and gentle string pad behavior from Op 1. If you play very hard, then you hear Ops 2, 3 & 4 come in with their fast, hard bowed attack behavior. This allows for a nice dynamic range of soft sustained pad behavior all the way to aggressive agitato or accentuated marcato playing for a nice, versatile synth string sound.
Another way to use this velocity trick is for layering in another Carrier with its pitch tuned to a fifth, octave, sub octave, or other interval, etc. – only when playing at very high velocities. To hear this effect, edit Op 3’s Frequency, first setting it to 2.00, then setting it to 0.500, and then to 1.50 – remember to play both very lightly and very hard. It’s pretty cool to have a normal string pad for the soft sections that morphs into interval layers with fast arpeggio playing. For another example of using Velocity to control layering of different pitches, check out “Strange Files” on Soundmondo.
Now let’s review and summarize the concepts from the entire article series used in our “Dyna Strings” example:
- Multiple detuned Carriers for a thicker sound
- Using Feedback to create harmonics
- Fixed Frequency Modulator to create the attack stuff
- Pitch Envelope assigned to specific Operators to accentuate the attack stuff
- the Effects to enhance the richness, and
- extreme Velocity Sensitivity on Operators that have significantly different Envelope behaviors
Envelope Level Tricks: Using the Envelope Levels as a Limiter
As you’ve seen in many of the Soundmondo Voices I’ve posted, using Operator Level Scaling is both very useful in evening out the volume and timbre of the sound over the keyboard range – as well as enabling us to create split sounds or drastic timbre changes from the low to high notes. However, there can be a problem that arises for our Modulators if we use either the +LIN or +EXP curve settings. The total Level for that Modulator Operator can start to get too extreme as we play higher (if +LIN or +EXP is set for the Right Curve) or lower (if +LIN or +EXP is set for the Left Curve). This can change the sound in a way we don’t want. It can push the total Modulator Level into a range that creates the drastic “FM math weirdness” of overmodulation in the sound as covered in the last article on Lead Sounds. Or, it could create unwanted aliasing (digital noise and distortion) in the sound. This happens because at some point, the net total Level of an Operator – meaning its Level value plus the Key Scaling Value. This will eventually add up to the maximum possible level of 127. Which note or key range where this occurs depends on how high the original Level is set, which +LIN or +EXP Key Scaling Curve was chosen, and the Key Scaling Level setting. So, here’s the trick – use your Envelope Levels to limit the maximum total output of your Operator. Reference the example voice “Key Scale Limiting” on Soundmondo along with the linked video. This example uses Algorithm 8:
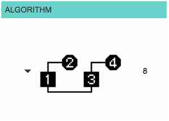 I’ve set this up so that each of the operator stacks – Ops 1 & 2 and Ops 3 & 4 – play the identical sawtooth sound at C3 (middle C). The C3 is the ‘fixed point’ of Key Level Scaling – meaning that no matter what Key Scaling Curve or Level you set, they have no effect at C3 – only the notes above or below. The Op 1 & 2 stack is set up to show what happens normally with Modulator Op 2, without using the Envelope Level limiting trick. I’ve set Op 2 Level to 81 and Feedback to 85 – creating a basic sawtooth sound at C3. I’ve set both the Right and Left Key Scaling Curves to +LIN and the Key Scaling Level to 64. Play C3 to hear the ‘reference’ timbre, and play up and down the keyboard to hear the timbre get brighter as you play both higher and lower. As you play keys above G4, you will start to hear the aliasing (digital noise) in the sound. As you play keys below G1, you will hear the timbre change significantly – it gets very thin, nasal and reedy – losing the sawtooth character due to overmodulation. This happens because of the effect of the Key Scaling Level and Curve settings. They combine with the initial Operator Level setting to increase the modulation Level as you play up and down the keyboard. In this example, the Key Scaling increases Op 2’s modulation amount from the initial Level value of 81 all the way to maximum of 127 – a change (or dynamic range) of 46 for the Op 2 modulation Level. Next set the Velocity Sensitivity for Op 2 to 65 and play dynamically soft and hard to hear how Velocity now changes the timbre as you play up and down the keyboard. As you play harder, you again get the overmodulation and aliasing issues in the sound.
Now turn off Op 1, and turn on Op 3 to only hear the second stack of Ops 3 & 4. This stack is set up with using the Envelope Level limiting trick with Modulator Op 4. You’ll see that the Feedback for Op 4 is also set to 85 as Op 2, but notice that I’ve set the Level for Op 4 to 111 and all its Envelope Levels 1, 2 & 3 to 70. What’s happening here is that the Op 4 Envelope Levels are attenuating the effective level of the Op 4 modulation Level. The interaction of those Envelope Levels at 70, with the Op 4 Level setting of 111, gives a “net” modulation Level of 85. Play C3 where you’ll hear the identical timbre as the Op 1 & 2 stack. Play up and down the keyboard. What you will now hear is the timbre get brighter as you play up and down, but you no longer get any change in the timbre or brightness when playing above C4 or below C2. This is because the Key Scaling Curve and Level setting can only increase the modulation Level of Op 4 from 111 to the maximum 127 – a change (or dynamic range) of only 16. The interaction of the Envelope Levels settings of 70 mean that when the Key Scaling Level and Curve settings increase the Op 4 Level to the maximum 127 as you play up and down the keyboard range, the “net” Level tops out to actually only be about 95-96. We made a limiter! I find this very useful for many keyboard sounds, especially electric pianos and clavinets, as well for guitar sounds. It is almost a necessity in creating split sounds, with completely different timbres and behaviors in the high and low notes. Check out the Voice “OverMod Keys” on Soundmondo to hear an example of this keeping the sound from aliasing, yet still overmodulated. Also, if you go back and look at the prior “Dyna Strings” example, you will see I used Modulator limiting on the Fixed Frequency Op 4 that provides the attack portion “bow” noise.
Detuning Tricks: Carrier/Modulator Detuning
An area I haven’t yet discussed is what happens when you detune Carriers and Modulators in the same stack differently from each other. While the numerous examples noted in this series demonstrate detuning independent stacks of Operators in Algorithm 8, those have always applied the same detuning to both Operators in each stack to recreate an ‘analog’ two oscillator detuning sound. Detuning FM Operators within the same stack sounds and behaves completely different than analog type detuning as recreated in the Algorithm 8 examples. To hear what different detuning of Operators within the same stack sounds like, let’s take a look at the voice “Detune Example” on Soundmondo and the accompanying video. This example uses Algorithm 11:
The basic timbre is just the sound of the Op 3 & 4 stack, with Op 4 detuned +20 (I have Ops 1 & 2 turned off). Play some single notes and chords up and down the keyboard range and listen to the sound. Next change the Op 4 detune value to Zero – and again play single notes to hear the static waveform with no overtone pair detuning. Then change the Op 4 detuning back to +20 and listen again. Now, contrast that sound with the familiar analog style detuning. Turn off Op 3 and turn on both Ops 1 & 2. They are set with a Saw-type Feedback level of 78 to create the same saw wave timbre as the Op 3 & 4 stack. Op 2 has a detune setting of +20 as well. Again play notes and chords up and down the keyboard range and listen to the sound. Go back and forth a few times tuning off Ops 1& 2 and turning on Op 3, etc. There’s quite a difference between the two types of detuning.
The reason the detuning sounds so different is due to another quirk of FM math. Quick technical detour time! This quirk is that FM also creates ‘negative’ overtones (harmonics) in the waveform – often referred to as ‘reflected’ or ‘mirrored’ overtones. This creates an overtone ‘pair’ for each of the overtones in the harmonic series. The important characteristic of these reflected or mirrored overtone pairs is that they are detuned from each other by a fixed frequency (Hertz) for all the overtones up the harmonic series. This is in large contrast to conventional two oscillator detuning where the Hertz difference of an overtone pair (one from ‘oscillator A, the other from ‘oscillator B’) is not fixed, but increases as the overtones go up the harmonic series. This fixed amount of overtone detuning going up the waveform’s harmonic series is the main reason why FM detuning sounds different and ‘thinner’ than conventional detuning, where instead those upper overtones get more detuned going up the harmonic series. Both types do share the same behavior of the overall detuning increasing as you play higher pitches and decreasing as you play lower pitches.
So let’s hear an example applying this behavior of FM Carrier/Modulator detuning in a sound. Reference the Voice “Massive Sweep Pad” on Soundmondo. This Voice also uses Algorithm 11: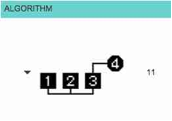
There are three Carriers, Ops 1, 2 & 3 and just one Modulator Op 4 which only modulates Op 3. Yet when you play the sound, you’ll hear a lot of harmonic motion.
Let’s look at the components.
First, set both Effects to “Thru” so you can hear the harmonic motion is not coming from the Effects. Also turn off Op 3. Note Op 1 has the Square Feedback Type with a Feedback Level of 112, and Op 2 has the Saw Feedback Type with a Feedback Level of 101. They have no Modulators, so the timbre is just a static square wave for Op 1 and sawtooth wave for Op 2. I have them widely detuned from each other for the sound of two poorly tuned oscillators. But when you play the sound, there’s no harmonic motion at all. Now turn off Ops 1 & 2 and turn back on Op 3 and play and hold some notes. You’ll hear the harmonic motion is coming from the Op 3 & 4 stack. Great – you know from all we’ve discussed that as the Modulator Level changes from how its Envelope Levels change over time, we change the level or intensity of the harmonics we hear. But wait, look again – the Envelope Level values for our Modulator Op 4 are all 127! There’s no change in the Modulation amount over time at all, so how are the harmonics moving all around? As explained above, we’ve created a ‘pair’ of two overtones at each harmonic series interval. Because the detune is the minimum value of -1, the frequency difference is so small between the overtone ‘pairs’ it sounds very similar to phasing or filter sweep.
So now change the Op 4 detune from -1 to Zero and listen to the sound. It’s a static, buzzy pulse/saw hybrid timbre. Reset the Op 4 detune back to -1. The harmonic motion comes back. To speed up this effect, change the Op 4 detune to -2 or -3. One thing to note that regardless of what you set for the base detune value, the rate of the effect will speed up with higher note pitches and slow down with lower note pitches. Next, for variations that combine both this Modulator detune trick with Modulator Envelope control for enhanced harmonic motion, along with detuned Operator Stacks using Algorithm 8 for enhanced thick/lush sound as discussed in prior articles — check out the three “Massive Slow Sweep Pad” series Voices “Sawtooth“, “Pulse” and “Square“. This detune trick can also create more intense results using greater detune values that will increase the speed of the harmonic motion, especially if used with stacked modulators. For an example of how that can sound, check out the Voice “Nena 99” that emulates extreme pulse width modulation in the attack of the sound.
Fixed Frequency Sub-Audio Carriers: Another Cool FM Math Quirk
This trick is similar to the prior Carrier/Modulator detuning trick but with some significant differences. When a Carrier Operator has its frequency set to a sub-audio Frequency value, the negative overtone pair phenomenon mentioned above creates something sonically different than when the Carrier and Modulator are both in the usual audio range. In short, this trick allows us to create detuning within our sound that stays constant – no matter what pitch you play up or down the keyboard – unlike the other detuning types described above that increase with higher pitches and decrease with lower pitches. In addition, it also results in a pulsating effect in volume (amplitude) similar to an LFO tremolo or amplitude modulation. To hear what this effect sounds like, reference the Voice “Fixed Carrier Example” on Soundmondo and its accompanying video. This Voices uses Algorithm 1:
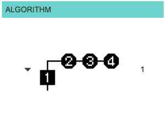
The three stacked Modulators 2, 3 & 4 are creating our waveform with the Fixed Mode Carrier Op 1 set at 1.000 Hz creating the pulsating chorus/tremolo effect. Play some notes and you’ll hear this effect is constant as you play up and down the keyboard. What’s happening is that all you are hearing is just the reflected (mirrored) overtone pairs of the waveform created by Ops 2, 3 & 4 and nothing from our Carrier Op 1 because the setting of 1.000 Hz is inaudible. And instead of the frequency of these pairs being offset by the Operator Detune parameter described in the Carrier/Modulator detuning section, with a Fixed Frequency Carrier each overtone pair is instead offset from each other – a fixed amount equal to twice the Frequency setting of the Carrier. When this value is in the low sub-audio range it will create a detuned ‘beating’ or pulsating effect similar to a cross between a chorus and tremolo. This example has Op 1 Frequency set to the minimum value of 1.000 Hz, so you will hear this ‘beating’ or pulsating effect at the same 2.000 rate (twice the 1.000 Hz setting) for every note up and down the keyboard. So you can hear hear the ‘raw’ waveform from the Op 2, 3 & 4 stack- before it is ‘reflected’ into overtone pairs by Op 1’s Fixed frequency. Let’s temporarily change to Algorithm 6:
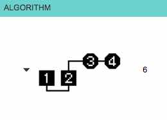
This Algorithm separates out Ops 2, 3 and 4 into their own stack, so you can now hear their ‘raw’ waveform. Play some notes and you will hear it is the same timbre – but without the pulsating chorus/tremolo Fixed Frequency Carrier effect. It is also lower volume because the Level of Op 2 is 82, not 120 like Op 1.
Now, change from Algorithm 6 back to Algorithm 1 and let’s turn this Voice from a plain example into something interesting and useful.
First, turn on the Pitch EG for Op 1 only and play – and hold – a note. You now will hear the speed of the pulsating chorus/tremolo effect begin at a faster speed – and gradually slow down as the note is held. Then when you release the note, it will speed up again as the Pitch EG rate and level settings are changing the Frequency of Op 1. Next turn of Effect 1 to Flanger and Effect 2 to Chorus to thicken up the sound and create a wide stereo spread. Play staccato arpeggio patterns in the right hand over held octaves or chords in the left hand. To experiment in some ring modulator type of inharmonic sounds, try setting the Op 1 Frequency to various values from 30 Hz up to 600 Hz while also turning the Pitch EG off and on for Op 1. To hear a version of this Voice with a square wave timbre, check out “Fixed Carrier Square“. To hear some very unique examples combining both Fixed Frequency sub-audio Operators and Fixed Frequency audio range Operators, check out “Double Fixed Freq Pad C” and “Double Fixed Freq Pad A” where I’ve ‘tuned’ the harmonicity of the timbre to specific notes in the scale.
Well, there you have it. We hope you all enjoyed the show, but we’re sorry now it’s time to go…!
I hope you have found this article series informative and helpful in taking away some of the mystery of FM synthesis; foster a better understanding of its versatility and capabilities; and, encourage you to dive on in to create your own sounds. I’ll leave you with some additional content on Soundmodo to hear more examples of the wide range of sounds possible with Reface DX. Check out:
- “Time Vortex” and “Frontiers !” to see some complex split sounds
- “Malechite” and “ExorChime 3” to see percussive bell like timbres
- “Jibbishy” for a very unique timbre using a Fixed Frequency Modulator for a sitar-like effect
- “Dyna Smack” using wide velocity dynamics and overmodulation
- A simple yet expressive Mellotron flute “Berry Flute“
- For a Lead that’s an interesting hybrid of a distorted vocal guitar, check out “Klinkk Lead“
- Take a listen to “Rezznatron” for a example using ultra-low settings for Fixed mode Modulator Frequency
- For when you’re in a classical mood or have to feed your inner John Williams, try “Brass Section Fanfare 1” and “Brass Section Fanfare 2“
- And just for fun, take a look at “Tron Recognizer“
To wrap it all up and give a final example of what’s possible with the versatility of FM synthesis, I’ll end with this demo link, “Viva Zapata Remix,” which is 100% Reface DX and shows what you can create from just those 4 Operators.
Happy Tweaking!
Want to discuss what you learned? Join us in the discussion about this final lesson in the series on the Forum here.
Not had a chance to experience the other lessons in Manny’s Modulation Manifesto? Catch up now:
Lesson 1 – Basics of FM Synthesis
Lesson 2 – Solo Brass Voices
Lesson 3 – Ensemble Brass Voices
Lesson 4 – Synth Pads
Lesson 5 – Bass Sounds
Lesson 6 – Lead Sounds
A little bit about the Author:
Manny Fernandez has been involved with sound programming and synthesizer development for over 30 years. Initially self taught on an ARP Odyssey and Sequential Pro-One, he also studied academically on Buchla modular systems in the early 80’s. With a solid background in analog synthesis, he then dove into digital systems with release of the original DX7. Along with his aftermarket programming for Sound Source Unlimited, Manny is well known for his factory FM programming work on Yamaha’s DX7II, SY77, SY99, FS1R and DX200 as well as the VL1 and VL70 physical modeling synthesizers.
