Manny’s Modulation Manifesto: Solo Brass Voices
In the first article we discussed the basics of how Operator Frequency Ratios and Levels create the timbre, meaning the harmonic structure and intensity of the overtones in a sound. Additionally, we discussed how the Envelopes control the Modulator Levels to change the intensity of the overtones over time. In this article we will embark on our first example in programming specific Voices from scratch.
I like to start with brass Voices, as brass and brass-style Voices are nearly ubiquitous in all musical styles – from brass section stabs in pop and R&B, solo lead sounds in jazz and prog rock, orchestral horns in classical and movie soundtracks to ‘super saw’ synths in dance music and electronica styles. Not to mention that brass sounds were a large part of John Chowning’s development of modern FM synthesis, and FM synths are well known for these types of sounds.
I’ll cover both solo ‘orchestral’ and ensemble ‘synth brass’ (or “brassy synth’) type sounds. To start, let’s look at a solo trumpet sound. Reference the Voice “Brass Tutorial Voice” on Soundmondo. This is a recreation of a generic solo trumpet sound with velocity dynamics and a built-in delayed vibrato.
The components of this type of sound break down as follows: The basic timbre is a fairly bright waveform with all the integer harmonics/overtones present, which is softer in volume and with less brightness at low dynamics/velocity. During the initial attack it has a peak in volume and brightness as well as a short flutter, aka ‘spit’, of inharmonic overtones. After the initial attack, the volume gradually gets softer and the tone less bright. How gradually the volume softens and the overtones diminish depends on a player’s phrasing and breath capacity. Finally, the player will typically add vibrato with sustained notes.
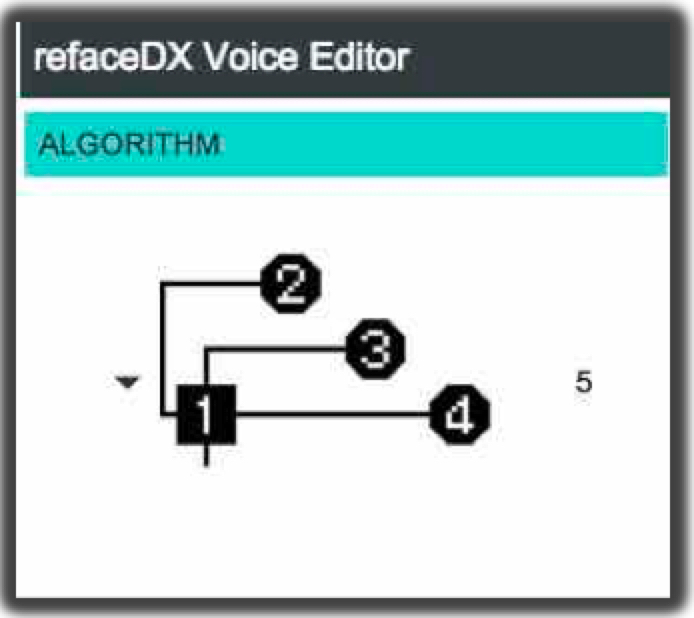
Again, I’m using Algorithm 5 for this example because as a solo instrument sound, we only need one Carrier (Operator 1) and we want to be able to isolate the Modulator Operators 2, 3, 4 to clearly hear how they contribute to the final sound:
So from our breakdown, the basic brass timbral structure has all the integer harmonics/overtones present, like a sawtooth wave. Thus Ops 1 & 2 are set to Frequency Ratios of 1.00 which as we demonstrated in Article 1 will give us all the integer overtones.
In choosing the Level and Feedback for the Modulator (Operator 2), remember what was covered in the first article on how setting the relative values of Level and Feedback act as a ‘waveshaper’ to shift the intensity of the overtones in the mid, upper-mid or higher harmonic ranges of the waveform. Since brass instruments have more pronounced upper-mid overtones compared to a standard sawtooth wave, you’ll see I’ve chosen to go with a higher Level and a lower Feedback setting for Op 2. This is what sounds good to my ear, so play around with these and tweak for what sounds good to you. Now also notice I’m using Feedback on the Carrier operator Op 1. This is something I haven’t touched on yet, so I’ll now explain why.
This requires a quick technical detour — if you remember from the Wave Example video accompanying the first article in this series, once you get above certain values for Modulator Level, the brightness and intensity of the overtones change in quirky ways with FM synthesis. This has to do with the mathematics of Bessel equations and is the main reason why FM can sound more ‘acoustic’ and respond more ‘naturally’ to playing dynamics than analog or subtractive synthesis. Acoustic instruments do not have a linear timbre response to input dynamics.
Put another way, the manner in which specific harmonics or overtones get louder or softer as you play louder or softer is not uniform. They often change at different rates relative to each other in response to playing dynamics. This is why filtered, fixed waveforms are only marginally successful in emulating the timbre and dynamic playability of acoustic instrument sounds. Since I said in my introduction of this article series that it’s “not about the math its about your ears”, let’s return to our regularly scheduled program…
So — why the use of Feedback on Op 1, our Carrier? It is a way to get more brightness in the high overtones of the sound in a more even or linear way than by continuing to increase the Level of Modulator Op 2. The companion video for this Voice will show the difference in how these settings change the sound, so make sure to check out this ‘reface DX solo brass example‘ (also linked on the Soundomondo page for the tutorial Voice).
Take time to play with these settings on your own and let your ears get familiar with the differences. Find what you like the sound of the most or what best fits your needs. The interactions of these settings within a range of just 5-15 increments can make or break the usability of a sound — or give you something really cool that you weren’t expecting, those ‘happy accidents’ that I like to call ‘haxidents’. That’s what I want you to get out of these articles — play with the settings and learn what it sounds like and if you get a nice haxident, save it for further exploration. So, in summary, Ops 1 & 2 are creating our basic brass timbre.
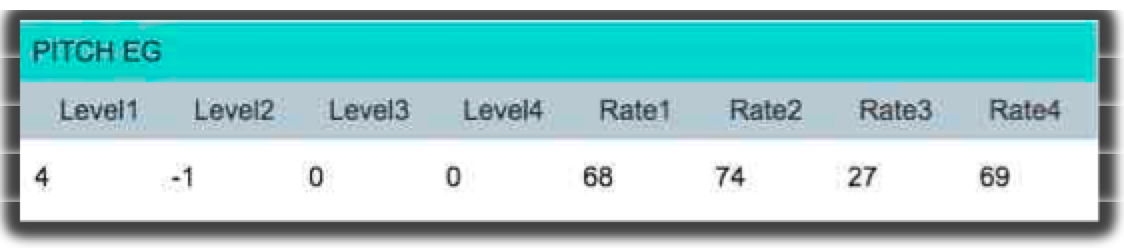
Moving on to the attack details of our trumpet sound. For brass instruments, it takes a few milliseconds for the lips to get up to speed, as it were, before the sound actually starts resonating. During these initial moments, the overtones are unstable and inharmonic as the pressure wave within the tubing of the instrument comes into stable resonance. So we’re going to recreate these transient, noisy type components of the sound — known as the “stuff” as coined by David Bristow — by using Operators 3 & 4. For the inharmonic portion of the attack, I’ve set the Frequency Ratio of Op 3 to the non-integer value of 3.67, with a very short Envelope and a high Velocity sensitivity. I also added just a taste of Pitch EG to Op 3 as well to emphasize the instability in the attack. Turn off Ops 2 & 4 and listen to just Ops 1 & 3. Play up and down the keyboard range at both low and high velocities.
Now, turn off Op 3 and turn on Op 4. Op 4 is creating the lip ‘flutter’ part of the sound. Again, there is something new here – you’ll see the Mode for Op 4 is set to Fixed, with a value of 63.09 which means that regardless of what pitch or note you play, Op 4 will have a fixed, or static frequency of 63.09 Hz. I did this because it best emulates the lips slapping together as they come up to speed. While technically this does change with the pitch played because of a brass player’s embouchure loosening or tightening as they play low or high notes, it doesn’t change in quite the same way the pitch scale does. Thus, using Fixed mode gives a better “lip flapping” emulation than using Ratio mode. Again, play up and down the keyboard range and at different velocities.
Next, turn on both Ops 3 & 4. Notice that Op 4 has the Velocity sensitivity set to 0. This is to emulate what happens in real brass instruments – there’s a lot of lip flutter relative to the volume of the sound with soft notes. Thus even when you play very softly you still get the lip flutter while the inharmonic overtones from Op 3 have a high Velocity sensitivity so they get stronger with louder playing.
An additional tweaking detail involves the use of Keyboard Rate Scaling – the “KSC-R” parameter on the individual Operator Page 2 with the Level/Velocity/Feedback settings:
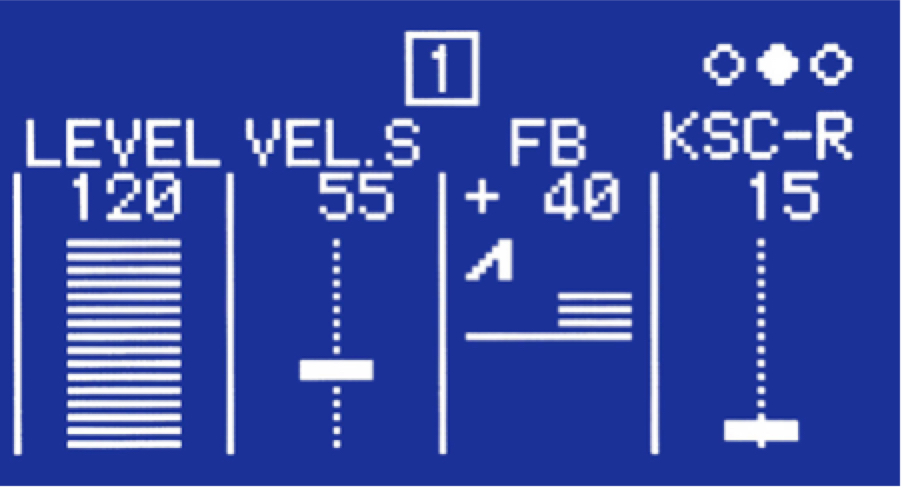
and listed as “KB.R” in the Operator Page 2 section of the Soundmondo editor: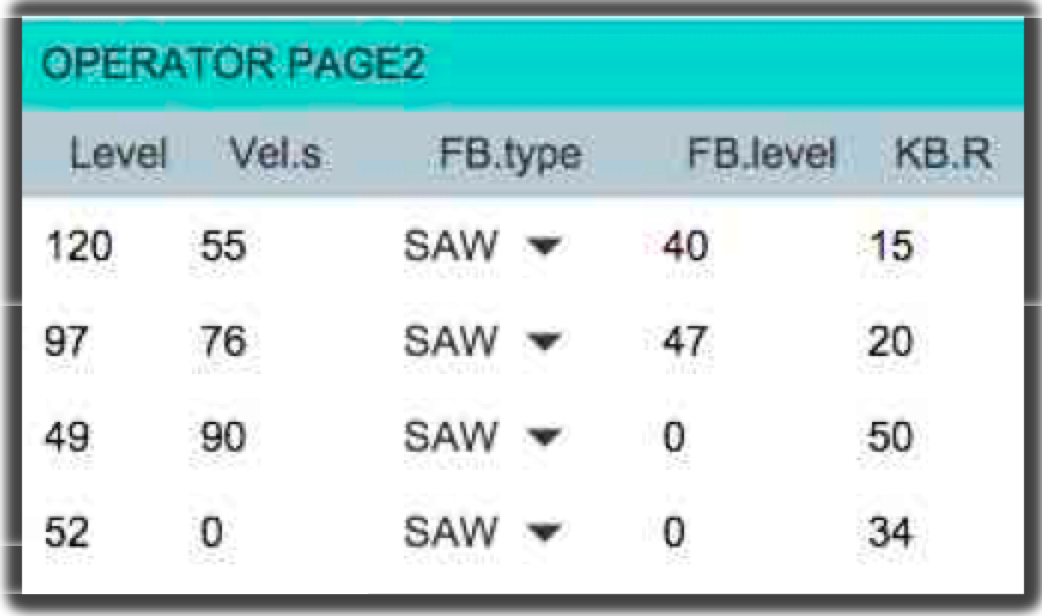
This parameter controls how much each Operator’s Envelope rates slow down as you play lower notes on the keyboard and speed up as you play higher notes on the keyboard. You may ask, why are we using Envelope Rate Scaling? This is to mimic the behavior in real instruments where lower notes tend to “behave” slower than higher notes in regards to the attack and decay of both overall sound volume and the overtones’ intensity. In the reface DX implementation, the reference note is middle C, thus as you increase this setting the rates slow down for notes below middle C and speed up for those above. Small values will give a small change in speed across the whole keyboard range, and high values will create large differences.
Another way to look at it — assuming the master transpose is set to zero — is that when you play middle C you always get the default rates you set for that Envelope, no matter what the Key Scaling value. Then as you increase the Key Scaling setting, the rates will get slower below middle C and faster above. So you can see that the value I’ve set for our Carrier Operator 1 that controls the overall volume is fairly small – 15; while the amounts set for Modulator Operators 3 & 4 is much higher – 50 and 34 respectively. This is because in broad terms it best mimics real instrument behaviors, but more importantly it is what sounds good to my ears.
Play around with the setting for all the operators, turn them all to zero or set at extreme high values. Listen to how the ‘stuff’ in the attack changes up and down the keyboard, and set them where it sounds good to you. You also may have noticed the settings for Level Key Scaling as well. I’ll cover Level Key Scaling in detail in future articles, but in summary it allows for increasing or decreasing an Operator’s Level as you play up and down the keyboard range. In this Voice I’ve set them to balance the volume and brightness of the low and high notes. For the final polish you can see I set up a delayed LFO to create vibrato on sustained notes. Take some time again to play the sound up and down the note range, at different dynamic levels, and for different durations to see where the vibrato kicks in.
Now let’s incorporate the Effects and playing modes. Try setting Effect 2 to Reverb. Also try changing the Voice Mode from Poly to Mono-Legato to eliminate the attack portion for proper emulating of legato notes. Again, test out the sound, make some tweaks to your taste to the parameters we discussed … so there we have our solo trumpet sound!
But wait, there’s more! We still have a hidden ‘trick’ up our sleeve. In a mix or when playing with other instruments, you’ll often have to tweak a sound so it stands out, or dial it in so it sits just right. Usually this is done with EQ. For example, you may need to thin out a brass sound so that it won’t muddy the mix or mask other sounds. Or you may need to emphasize the top end to help it cut through the mix with some in-your-face ‘brassiness’. You could go back in and play with the Level and Feedback settings for Ops 1 & 2 to thin it out and ‘brassy’ it up, but to do this it typically requires the higher Modulator Levels where you’ll encounter those quirks of FM math.
For a more direct approach that doesn’t disturb our core Level & Feedback settings, instead set Effect 1 to Distortion. Notice how it thins the sound and makes it more ‘brassy’ – the Distortion effect has a basic parametric EQ, controlled by the Tone setting. This allows for some useful EQ and shaping of the tone without messing with our Levels and Feedback. Play around with various Tone settings; even play with the Drive setting. Don’t overlook the reface DX Effects section as a way to alter the character of your sound.
In the meantime, if you’d like to discuss this lesson, join the conversation on the Forum here.
In our next lesson, we’ll take a look at how to turn a solo brass Voice into an ensemble – now available here.
A little bit about the author:
Manny Fernandez has been involved with sound programming and synthesizer development for over 30 years. Initially self taught on an ARP Odyssey and Sequential Pro-One, he also studied academically on Buchla modular systems in the early 80’s. With a solid background in analog synthesis, he then dove into digital systems with release of the original DX7. Along with his aftermarket programming for Sound Source Unlimited, Manny is well known for his factory FM programming work on Yamaha’s DX7II, SY77, SY99, FS1R and DX200 as well as the VL1 and VL70 physical modeling synthesizers.