Mastering MONTAGE: Motion Sequence Study
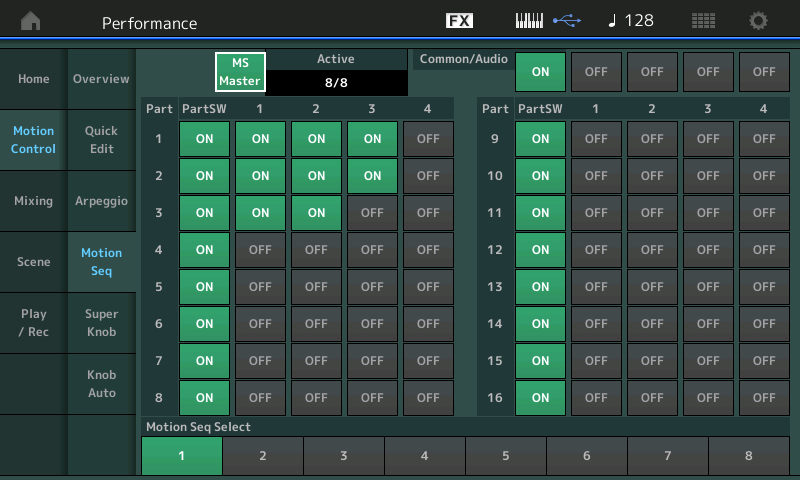
This study will look into the scope of the Motion Sequencer. Here there are 8 Motion Sequences and three PARTS are involved. And we will look at the significance of the MS LANE assignments. In this particular PERFORMANCE the maximum of eight Lanes are in use. In the screenshot below, you can see that PART 1 has three Lanes active (ON), PART 2 has three Lanes active (ON) and PART 3 has two Lanes active (ON). The “Active” box indicates 8/8 – all possible Lanes are in use. It is typical that all 16 Parts have their PART SWITCH set to ON, nothing happens until a Lane is activated, and a maximum of eight Lanes at once is the rule.
From the HOME screen > touch “Motion Control” > touch “Motion Seq”
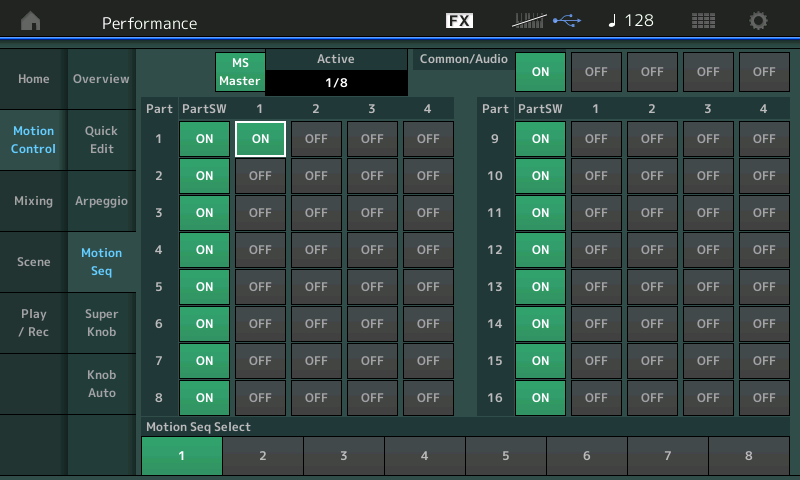
Along the bottom of the screen you can see the Motion Sequence Select boxes… you can have different Motion patterns for each. The end result is a combination of the eight active Lanes. It can be very interesting to isolate and hear the contribution of each of the eight Lanes individually. After playing the sound come back to this screen and turn OFF all but the very first MS LANE assigned to PART 1, as shown below. This will allow us to see and hear and understand just how and what is going on…and how it got to where it is…
Press [EDIT]
Press [PART SELECT 1/1] to view PART 1 parameters
Touch “Common” (blue) low left corner or press the lower [COMMON] button on the right front panel which gives you access to the workings within the selected Part
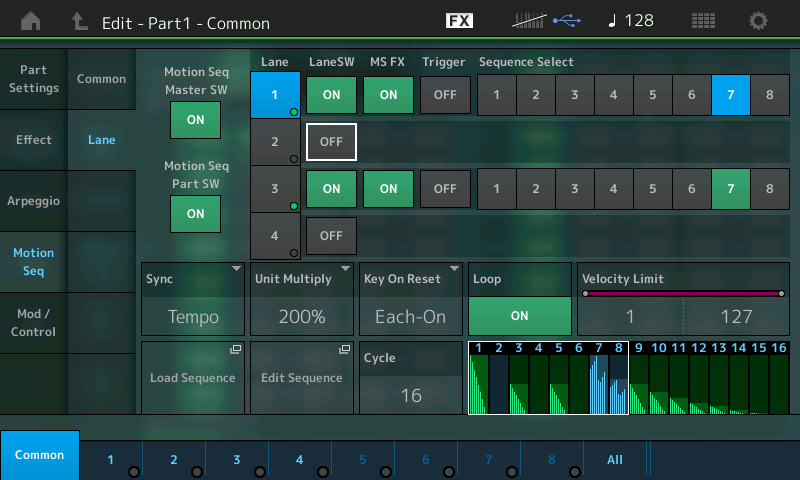
Touch “MotionSeq” > “Lane” (shown below)
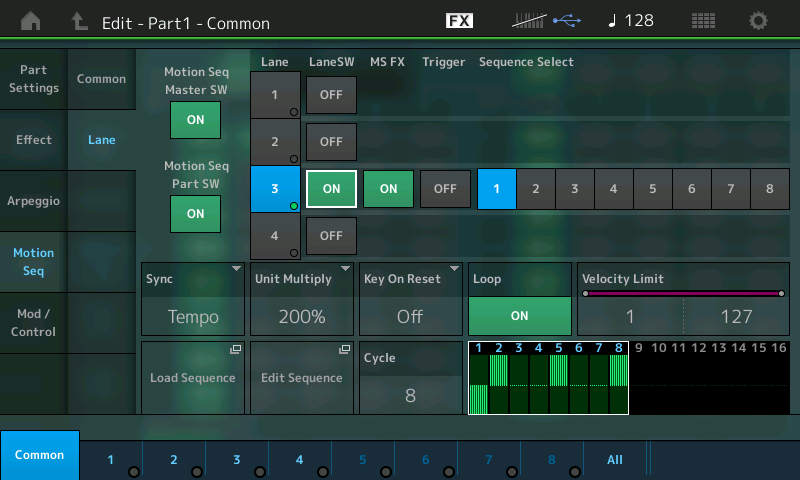
Below: Lane 1 is selected, the LaneSW is On, Sequence 1 is selected.
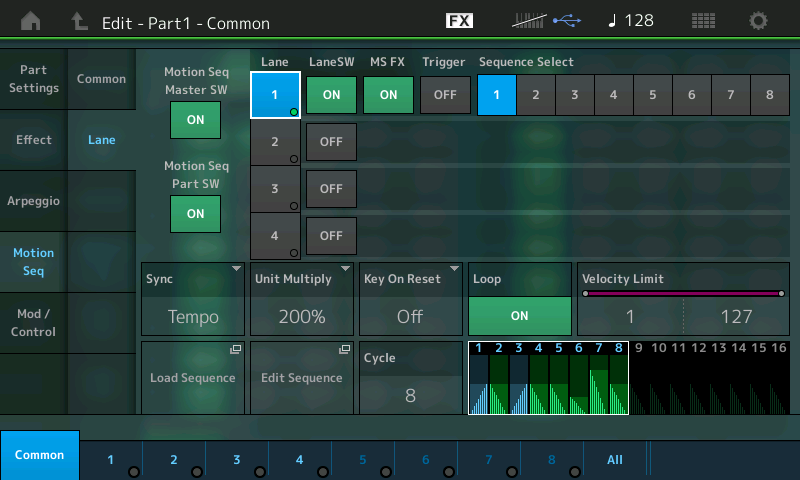
Notice the SYNC = TEMPO _each Performance has a tempo value, 128 in the example
The UNITY MULTIPLY = 200% _(half time to the set tempo) takes twice as long to complete the sequence
KEY ON RESET = OFF _free running at current tempo
LOOP = ON
VELOCITY LIMIT = 1-127 _all velocities; Motion Sequences can be initiated via velocity.
CYCLE = 8 steps _(half the complete tour) steps divide the time
Basically this equates to each cycle is one measure because at 200% we are half the tempo but 8 steps being half the length… each cycle is one measure at 128bpm.
EXTRA CREDIT: things to try, see and hear:
_ Touch the box “Edit Sequence”
_ Play and listen to this… hold a chord while the Motion Sequence applies the controller movement. You can tell this is assigned to Filter Cutoff (we will take a look at “Mod/Control”, where this is assigned to MS LANE 1 later in the article). You should quickly be able to see and hear the accented movements on count 7 and 8.
_ Use the FADERs 1-8 to interact with the AMPLITUDES of each of the 8 Steps. When you highlight the Motion Sequence grid, the 8 Faders correspond to Steps 1-8 or Steps 9-16. The red LED indicators outline the current Amplitude of the corresponding Step. Increase and then decrease Faders 7 and 8 while holding a chord to hear the amplitude change. The physical Fader must pass through the red indicator to “hook” it, once it grabs hold the physical Fader will match the current value.
_ Use the blue SCENE 1-8 buttons (retasked) to change the PULSE Type of the Steps 1-8. A Blue light gives you Pulse B, no light gives you Pulse A.
You may notice that the Motion Sequence is freely running – in other words, it does not restart when you initially trigger a chord or note. This is because KEY ON RESET = OFF. (Super Knob can flash tempo). Try changing the KEY ON RESET to “1st ON” and “Each ON” to learn/experience the differences.
Also set the LOOP to OFF so that you hear that a Motion Sequence can, indeed, be triggered to play through just once. This opens the doors to all kinds of automation possibilities. Motion Sequences can be Sync’d to the behavior of the assigned Arpeggio (more on this in future articles).
Please note: That when the KEY ON RESET is freewheeling (OFF) and the UNIT MULTIPLY is set to a high value, the changes you make may not be heard immediately. For example, if the UNIT MULTIPLY is set to 2400%, 3200% or out to 6400% you may have to wait quite a while for the current cycle to complete – meaning you may not hear a change you expect until the currently playing cycle completes. However, if KEY ON RESET is engaged (“1st On” or “Each On”) then retriggering a note/chord will immediately restart the cycle. Just FYI.
Let’s see and hear the contribution of the next LANE. First turn LANE 1’s “LaneSW” OFF – this can be done right on this screen, as well.
Move the Cursor to LANE 2
Set the Lane2 LaneSW = ON (shown below) notice it’s MS grid for Sequence Select 1 is completely different from Lane 1
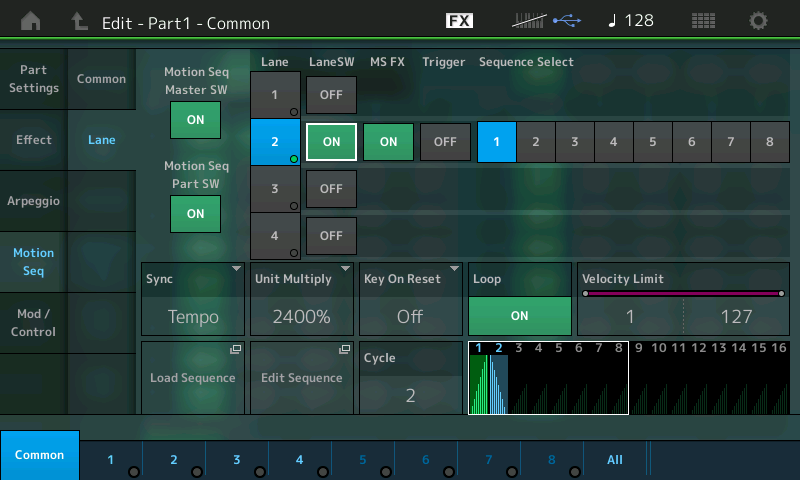
Notice the UNIT MULTIPLY (2400%) and the CYCLE length (2). So this creates a rise and fall in the opening and closing of the Filter Cutoff but this swell is occuring at the set interval of time referencing the current tempo.
Again experiment with FADERs 1 and 2 to adjust the AMPLITUDE… Use the SCENE buttons to change Pulse A/B Type. And experiment with the UNIT MULTIPLY.
You will notice that at the current settings when you re-activate LANE 1 (LaneSW =ON) you can hear how they interact. This swell in the filter from completely closed to completely open to closed again, you can increase the number of cycles by reducing the UNIT MULTIPLY. Turn back on LaneSW1 to hear these two Lanes together. Separate is completely different from when activated together. Experiment…
Next isolate Lane 3 (ON) and turn LaneSW OFF for LANEs 1 and 2. (Shown below)
You may not hear this immediately… change the position of the SUPER KNOB to about 2 o’clock or 3 o’clock (Yes, the position of the Super Knob can also influence what you hear and how things respond). By turning the Super Knob, you now can hear that this Lane is certainly assigned to Pan Position. Pan can be to select Elements within a Part (so this is not a broad channel-wide control like cc010) it is a direct parameter assignment. A Control Change message, like cc010, would, by definition, Pan everything on the current channel together. Imagine sending in cc010 from an external MIDI controller or from a DAW, all Parts would pan together. Here we can select specific Elements within each Part to pan as we desire… It’s simply a much deeper level of control.
Notice the UNIT MULTIPLY is 200% and the CYCLE is 8… You have the following movement: hard left, hard right, center, center, hard right, center center, hard right.
Again combine this with the previous two Lane; switch LaneSW ON for both LANEs 1 and 2 to hear them all together. We now have heard the three Lane assignments to PART 1, of Motion Sequence 1. Only the tip of iceberg…
Experiment now that you have all three Lanes active, by selecting the SEQUENCE SELECT items in the screen – switch them to SEQUENCE SELECT 2, then 3 and so on. They all advance together and, yes, each SEQUENCE SELECT’s settings can be completely unique.
Lane1 we know is Cutoff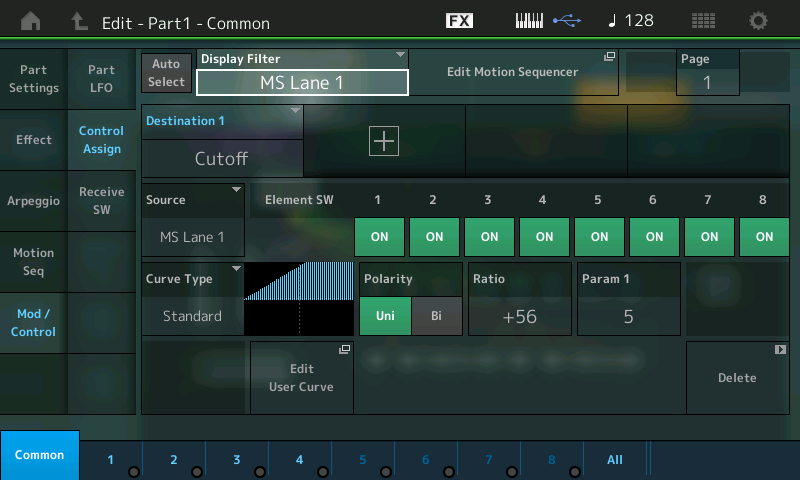
In the PART 1 “Mod/Control” > “Control Assign” box, (shown above) Motion Sequence Lane 1 is the Source, and the Destination is the Filter Cutoff of each of the active Elements. This particular PART has four Elements – you can see the blue numbers along the bottom of the screen and the four lighted buttons on the bottom row of the right front panel which represent the active Elements. (All Element Switches default to “opting in”).
Lane2 is also Cutoff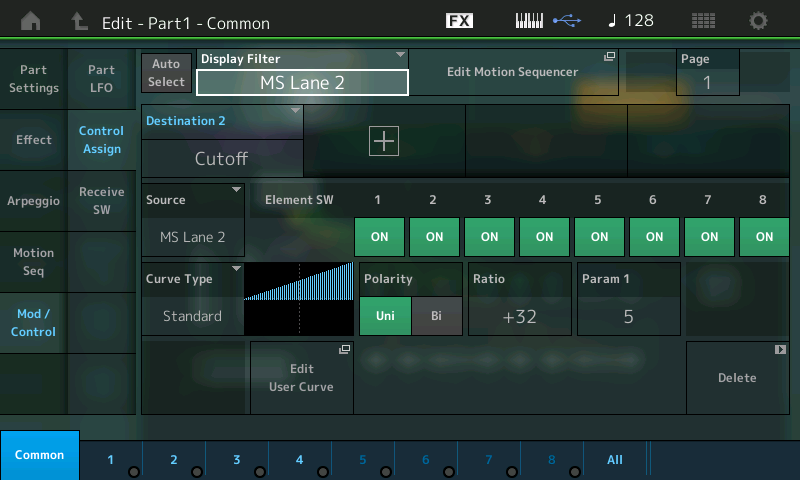
Motion Sequence Lane 2 is also assigned to control the Cutoff frequencey of the active Elements, but as we know it has a different shape, amplitude and pulse rate.
Lane3 is Element Pan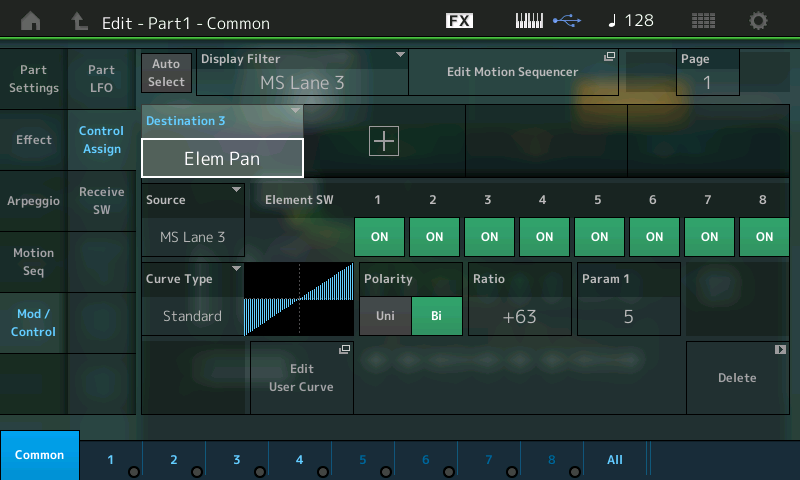
Motion Sequence Lane 3 is assigned to the Destination Element Pan… again all Element Switches are set to opt in, but you can select to opt out by turning OFF a particular Element.
Notice in each of the CONTROL ASSIGN screens when the SOURCE is a Motion Sequence Lane, you can jump directly to edit that sequence using the “Edit Motion Sequencer” shortcut box (next to the Display Filter).
Experiment
Below I’ve set LANE 1 and LANE 3 active on SEQUENCE SELECT #7 (turning Lane 2 OFF) The fading repeated pattern (16 steps of LANE 1) pans left and right according the Amplitude settings of LANE 3.
We have just activated the three Motion Sequence Lanes for PART 1. Rinse and repeat exploring PART 2 and its three Motion Sequence Lanes, and finally PART 3 and its two Motion Sequence Lanes. Take your time, there is tons to explore just within this Performance. Remember there are 8 Motion Sequences… They very much parallel for Controllers what Notes are for Arpeggios.
Motion Sequences can be LOADED from the PRESET Motion Sequence Folder, you can create your own from scratch and save and load them as you desire.
 The upside is focus and detail on the recorded sound, the downside is loss of sounding natural. You are not used to hearing an instrument from the distances these microphones were placed. In fact, you are used to hearing instruments in ensemble with far less detail. But the upside outweighs the downside, because we have a way to return that ‘listener’s distance’ to our very detailed and focused recordings! The reverb chambers became a necessary evil early on in the Recording Studio. It’s job is to return some of the sense of distance from the performers – distance that sounds natural to our sense of listening to music in a room. In a band, we expect to hear all the instruments sound as if they are in the same room. It would be (and is) very disconcerting to a listener when one of the instruments is perceived to be “somewhere else”… we enjoy the illusion that all the musicians are in a single room playing as an ensemble… Even though in the majority of recording today this is not the case. The amount (SEND) of Reverb applied to each PART helps the listener position the instrument in their own mind. Reverb and pan position are extremely important tools to use in your final mixdown process. So individual AUDIO TRACKS are often assemble in the DAW, and during the final mixdown the engineer applied the amount of reverberation to each Part and then pans them (were applicable) so that there is an overall natural feel to the ensemble. Reverb is like a glue that if applied to early (in isolation) might wind up being placed wrongly. If record with REVERBERATION on the audio track it is very difficult (if not impossible) to reduce or change that later. So it is standard operating procedure to wait until mixdown to commit to the amount of REVERB.