
Mastering MONTAGE: Assignable Knob Study
A deeper look at these two Performances reveals that even though the Assignable Knobs and the Super Knob are controlling a very similar set of parameters, the number of Elements and their mapping is different. You can see this by simply moving the Super Knob from the PERFORMANCE (HOME) screen… notice the Assign Knobs move in different directions with different ranges for each and sonically there is quite a difference in the result. This is determined by Super Knob “Value” assignments and the parameters as set within the Common and Part edit areas.
By changing the Cutoff Frequency along with the Time and Send amount to Reverberation, you can change the virtual position of the listener in the “room” – as you move farther away you feel the appropriate change in frequency balance… Making it truly feel like you’re moving the listener’s position toward the back of the hall. You are given direct access to the boutique level VCM EQ 501, allowing direct changes to the overall frequency balance. The Part Assign Knobs referencing the EQ are not linked to the Super Knob, they can be accessed directly by selecting the Part and directly adjusting the Knob. There is one exception: In the CFX the High (band) Gain is reduced significantly to give the illusion of distance (a more rounded less defined sound, not as sharp a focus), the cutoff frequency adjustment of the filters rounds the overall sound as we get more and more distant.
The “Imperial Grand Piano” Performance does a very similar thing. The mapping of the Super Knob to the Parts here is going to be unique and specific to match the destinations within this Performance. Again the destinations include a System Reverb, Cutoff Frequency, and this time AEG Release (which help make the virtual “room” the “Imperial Grand Piano” is in much larger than the one the “CFX Concert” piano seems to be placed in). By lengthening the piano’s “AEG Release” you create a truly far away sound effect.
As you turn the Super Knob for each of these two pianos, you are changing tonal balance and reverberation… And very much creating the illusion of moving the position of the listener. You can select anywhere along this movement curve a listening position that you like, STORE this as your start condition. You may never actually ‘move’ this parameter in realtime during a performance, and then again you might. It depends on the illusion you want to create musically.
These assignments are working together to move the listener’s position to the back of the virtual room/hall. As the knob reaches about 3 o’clock you reach the edge of the ticketed seating; then beyond that point you crossover into that Twilight Zone of science fiction (and why not? It’s a synth)! Dial the Super Knob to minimum, and suddenly you’re seated at the piano, in player’s position.
You’ll want to explore each of the Super Knob assigned functions, one-by-one (excellent way to teach yourself programming) – hear what they are doing individually. Learn the concept so that you can recreate what YOU want to control.
EXTRA CREDIT:
Here’s how to explore the AssignKnobs: start with the “CFX Concert”; Repeat with “Imperial Grand Piano”
“Common/Audio” AssignKnobs (on the upper Common editing level) are automatically linked to Super Knob: they can be assigned to control System/Master Effects, and/or can be linked to control the AssignKnobs of the individual Parts.
Press [EDIT]
Press the upper [COMMON] button
MUTE all Parts except Part 1 – Part 1 in both pianos is made up of the soft, medium soft, medium, and medium loud strike velocity Elements only.
Touch “Control” > “Control Assign”
Set the “Display Filter” AUTO SELECT = ON (green)
Now when you touch an AssignKnob, 1-8, the Display Filter will reveal its Destination parameter for the upper level. Explore by turning each Knob while on this level of Edit.
On the upper Common/Audio level you can see the System Effect “Reverb Time” parameter is targeted by AssignKnob1. (In the MONTAGE Programming Basics series “Super Knob Common” we learned that the upper Common level you can directly assign control to parameters within the “shared” assets like the Master Effects, Master EQ and System Effects). Reverb Time will affect all Parts in common (all Parts with active Send levels).
Move Assign Knob 1 to view its assignement:
_Turn this knob directly (AsgnKnob1) as you play to get an idea of what it does individually (as you turn it minimum toward maximum, you are adjusting the “Reverb Time” (System Effect) parameter from its stored value. Move Knob 1 directly and listen for its influence as you play a few notes/chords. The higher you set it, the longer the reverb lasts.
_Next move the Super Knob to hear the how this “Reverb Time” setting has been scaled to respond when the link is exercised. In other words, changing AssignKnob1 directly from min-to-max will reveal it can be set to move through a completely different range of settings from when changing it with the Super Knob. This is because we can define and refine the range and direction of its response by using the Super Knob range (Value) settings and from within the Part’s own Control Assign box… as we learned in the article on “Super Knob Value Ranges”.

It is important to understand, that the Super Knob does not have to move all parameters the same amount, nor in the same direction. You can define the range of response to its movement according to what you wish to happen in each target destination. This way you can tailor exactly the range of the movement so it never exceeds your requirement/musical preference.
This parameter interaction means you can be increasing the “Reverb Time” by a specific amount, and simultaneously changing the “Reverb Send” amount from a particular PART, simultaneously, (as we’ll see next) through a specifically set range. So instead of just having both increase through the entire range of the parameter, you control ‘how much’ and on what type of curve the change is applied, and in which direction! It is this multi-dimensional control that you want to learn to take advantage of… It is very similar to how the new era “one knob” features work on today’s modern digital mixers – except you have the complete programming control over the creative movement of each parameter as you link it in.
As the Common “Reverb Time” increases we begin to feel that we are farther away, in distance, from the source piano. As we’ll see, increasing the Part “Reverb Send” amount alone gives a different aural experience to our ears/brain. We don’t necessarily feel that increasing the send amount as moving farther away as much as we feel that the space we are in is getting bigger; we seem to remain a fixed distance from the source. However, when manipulated together (Reverb Time and Reverb Send) the aural illusion is profound. We can make the space change size, shape, at the same time we can move the listener’s position with reference to the source instrument.
In the “CFX Concert” the REV TIME is AssignKnob 1. Set the AssignKnob1 to a value by turning it directly. Set it so you get used to the space this is creating. Next we’ll navigate to the Part 1’s AssignKnobs and check out what they are controlling and play with the Reverb Send setting.
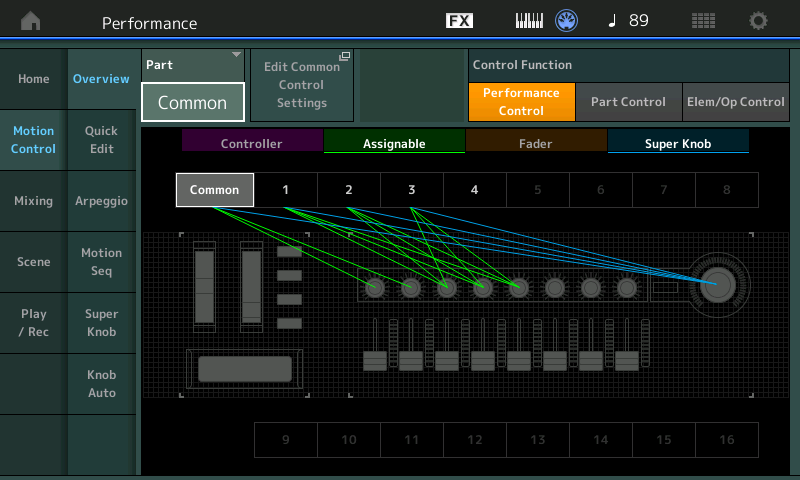
Press [SHIFT] + [PERFORMANCE (HOME)] together to see the “Overview” of controller routing
We can set it first to “COMMON” and take a look at the “Edit Common Control settings”
Press this box to take the shortcut to view the assignments to the Knobs
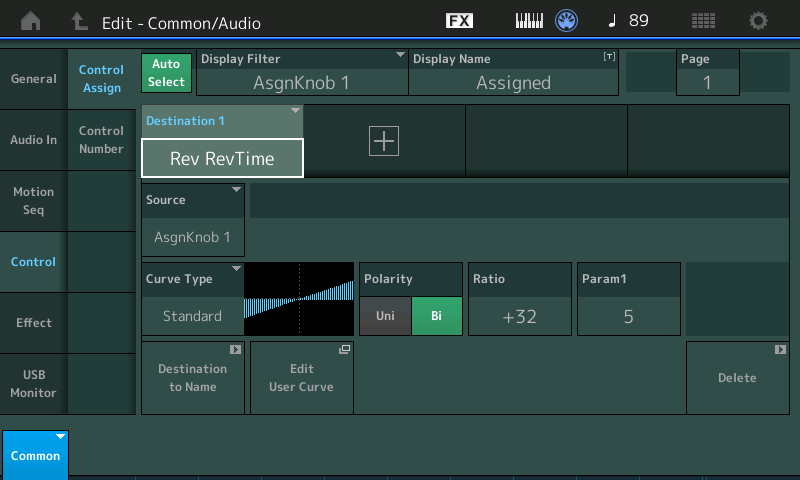
When you arrive at the Common “Control Assign” settings you can set the DISPLAY FILTER = ALL. Here you will see three PAGES of assignments – you can explore them later – but we call your attention to the “REV RevTime” Destination 1, assigned to AssignKnob1.

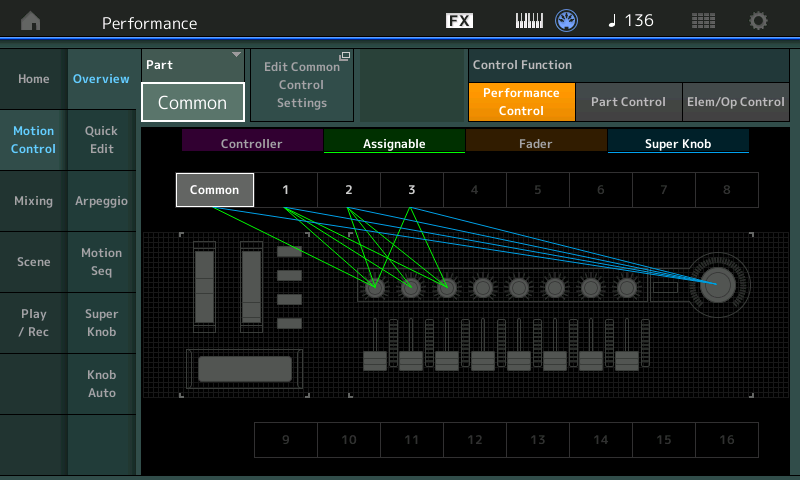
From the Overview screen ([SHIFT]+[PERFORMANCE (HOME)]) you can also select to view “Part 1” routing to the AssignKnobs and the Super Knob. 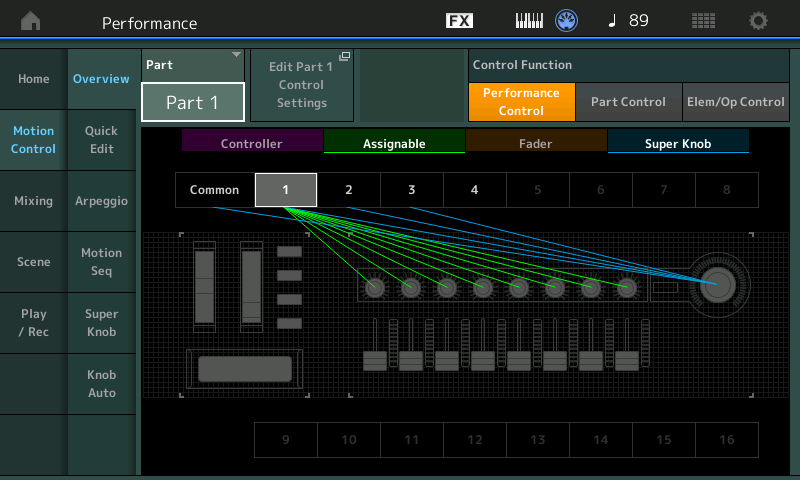
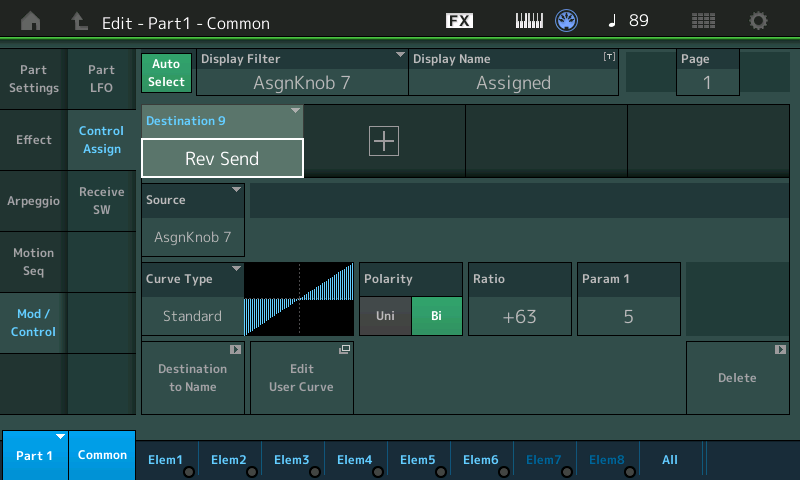
Take the shortcut to Part 1, touch “Edit Part 1 Control Settings”. This take you immediately to the PART 1 “Mod/Control” > “Control Assign” screen.
Again, touch each Knob in turn to discover what each is assigned to do. Focus in on AssignKnob 7, which is “Reverb Send” amount. Move it directly, hear the Send amounts influence. Now, move the Super Knob to hear the amount of change that has been allowed by the Super Knob. Turning the Knob directly allows you to change through the full range of Reverb Send, however, the Super Knob movement has been refined to just a specific range of movement.
This specific(defined) movement is because PART 1’s Assign Knob 7 has been linked to movement of one of the upper COMMON (SuperKnob) Assign Knobs. When you study the upper COMMON assigments – you will discover that ‘PART 1 ASSIGN 7’ has been linked to the movement of upper COMMON “Assign Knob 3”
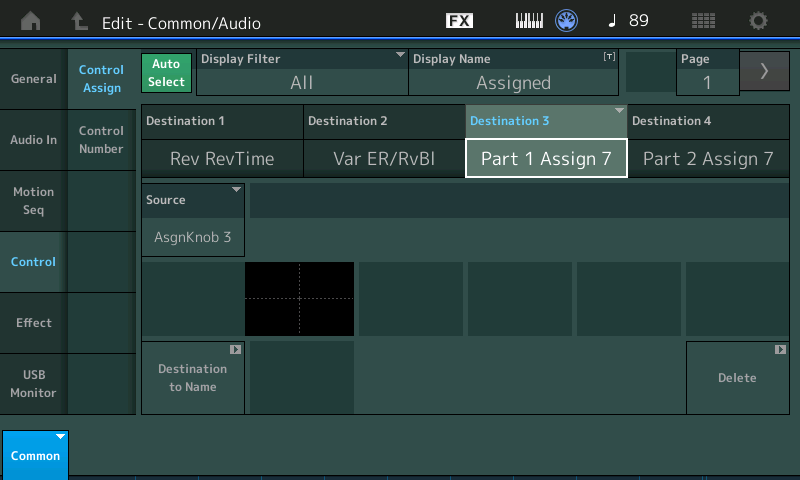
This is why moving the Super Knob only causes a small change to the parameter (REV SEND amount) – the exact amount of change that programmer wanted to affect – once you can rap your head around how the Destination Parameter is assigned to a PART ASSIGN KNOB, and then the PART ASSIGN KNOB can be linked to the movement of the upper COMMON Assign Knob, – you can begin to take advantage of the multi-dimensional changes that are possible.
I find tweaking someone else’s programming is always (for me at least) preceded by a study of what has already been done… So as not to make an additional assignment that is ‘fighting with’ or working against an already made assignment.
By utilizing the AUTO SELECT feature for the DISPLAY FILTER, you can quickly move through the parameters assigned to each of the eight Assign Knobs on the level of editing you are viewing. On both of these particular acoustic pianos, the concept of “motion” is really about the listener’s position in relationship to the piano. From “far away” (Super Knob open) you can make both of these pianos seem to be in a larger space, to “up close” (Super Knob closed) you can shrink the environment down to a very tight practice room, where you are seated at the piano.
Press the upper [COMMON] button to jump back to the Common/Audio level of Assignable Knobs. Move Assign Knob 1 to set “Reverb Time”.
Press the [PART SELECT 1] button to jump back to the Part 1 Assignable Knob 7 “Reverb Send”.
Toggle back and forth trying different Reverb Time settings with different amounts of Reverb Send amounts.
To complete your analysis you must visit the parameters that are being manipulated. You do so from the HOME screen by:
Press [EDIT]
Press upper [COMMON]
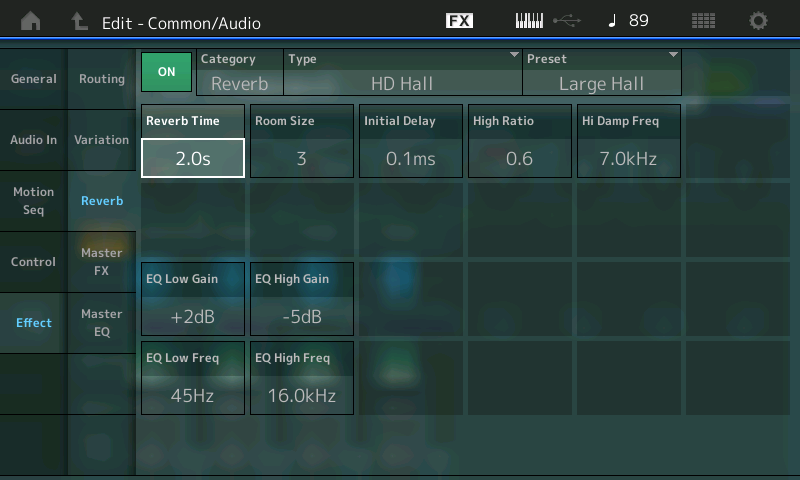
Touch “Effect” > touch “Reverb”
Here you can see the parameters within the System Reverb Effect. Reverb Time can be set from 0.3sec through to 30sec
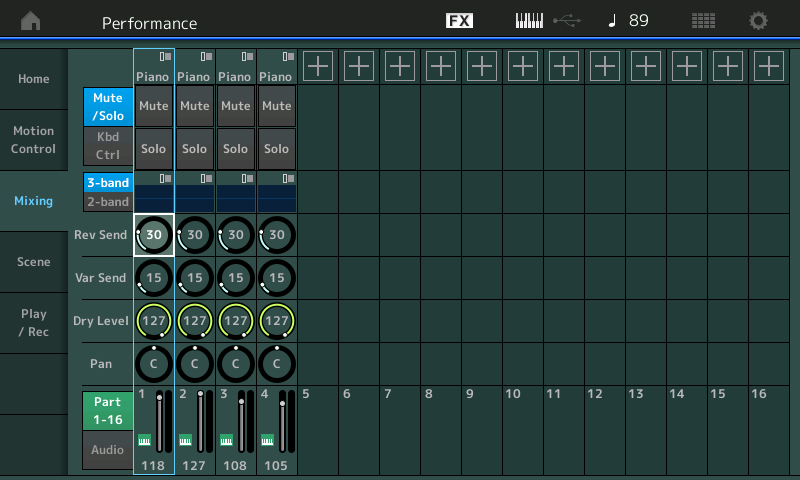
You can always see the Reverb Send amount for each PART by going to the view of the MIXING screen. From HOME touch “Mixing”:
Since these two programs are based on a similar design template – multi-Element, multi-Part, single instrument (acoustic grand) Performance using the Super Knob to control listener’s position – start by getting an idea of what is changing. You have a similar thing going on in both in terms of control concepts, finish by approaching making the changes to the get the sound you want.
The Bosendorfer is in a huge space when you open the knob up full.
The CFX Concert is in a concert hall.
Check the MW as it is assigned to adjust AEG Attack, Release and Depth simultaneously, each scaled to the movement of the Wheel.
Both take advantage of changing detailed EQ settings via direct AssignKnobs (not linked to SK movement) for quick tweaks.
Have questions/comments? Join the conversation on the Forum here.
Want to dive deeper and learn more about Mastering your MONTAGE? Kick-off your exploration of the full learning series here.
