
reface YC MIDI Primer: Setting the MIDI Receive Channel
Page 41 of the Owner’s Manual contains instructions on setting the basic conditions for your reface YC. You power on the unit while holding a specific key and this programs your instrument’s Flash ROM with the conditions you prefer to work. These settings (preferences) will remain between power cycles – until you either Factory Reset the instrument or change them manually. When working with an external MIDI sequencer (be it hardware sequencer, like the MOXF or Motif XF, or be it software, like Cubase or any other DAW), you will want to setup your reface for MIDI CONTROL = ON and in most cases you will want to turn LOCAL CONTROL = OFF. Because there are so many different setup possibilities please consult the recommendations of your sequencer product.
In general, when connecting to an external host device (computer, iOS) you will be using the USB connection (USB connections feature multiple MIDI ports). For iOS device connection you will require an Apple Camera Connection Kit adapter to connect to USB. And most likely you will use the standard 5-pin MIDI connection to control the reface YC from an external controller. In fact, both can happen simultaneously – for example, you can be simultaneously connected to the reface Capture App and your MIDI controller. But there maybe configurations where you might need to setup the MIDI RECEIVE CHANNEL specifically…
What you need to know about using the reface YC and MIDI
The reface YC is initially set to OMNI MODE ON *(Receive Channel = ALL) … This allows the instrument to respond to MIDI data on all MIDI channels (any incoming MIDI channel). There are two methods of connecting the reface via MIDI, either USB-MIDI and/or standard 5-pin MIDI.
Using the reface YC as a single PART with the MOXF or Motif XF Sequencer via 5-pin MIDI cables:
In a situation where you need the reface YC to be respond to just a single MIDI channel, you must turn OMNI MODE to OFF (this action will default the YC to MIDI Receive Channel 1) and then select a different MIDI channel, if you desire. You can turn OMNI MODE OFF by sending a CHANNEL MODE MESSAGE via the MOXF or Motif XF Sequencer:
cc124 = OMNI MODE OFF
This will simultaneously turn the OMNI MODE to OFF and set the Receive Channel to 1. If you desire to place the reface YC on a different MIDI Receive channel, you can change it with the following MIDI Parameter Change (System Exclusive) message:
F0 43 10 7F 1C 06 00 00 01 dd F7
F0 is start of Exclusive message
43 is Yamaha manufacturer ID
10 is Parameter Change, first Device
7F 1C 06 is reface YC product ID
00 00 01 is High-Mid_Low Address of System parameter Receive Channel
“dd” is the DATA BYTE 00-0F (is a channel 01-16), and 10 (sets it to ALL channels)
F7 is end of Exclusive message
To figure value of “dd”:
“dd” is the DATA BYTE 00-0F (is a channel 01-16), and 10 (sets it to ALL channels)
00 = channel 1
01 = channel 2
02 = channel 3
03 = channel 4
04 = channel 5
05 = channel 6
06 = channel 7
07 = channel 8
08 = channel 9
09 = channel 10
0A = channel 11
0B = channel 12
0C = channel 13
0D = channel 14
0E = channel 15
0F = channel 16
10 = channel All
If you connect the reface YC to your computer or iOS device via USB, you will naturally isolate the reface YC on its own PORT using the Yamaha USB-MIDI driver. So the OMNI MODE ON default should not be an issue. However, if you wish the reface YC to playback a single PART of a sequence you prepared in the MOXF or Motif XF sequencer, you will want to turn OMNI OFF and you will want to select a single MIDI Receive channel for the reface YC
Motif XF
For example, you can input a CHANNEL MODE message by selecting a Track – this message must go on the Track set to transmit to the reface YC.
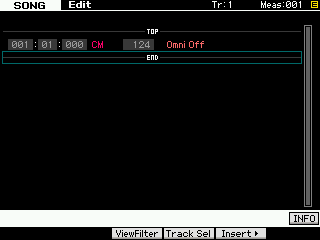
Press [EDIT]
Press [F5] INSERT>
Set the EVENT TYPE = CHANNEL MODE
Move the cursor and set the CTRL NO = 124 [Omni Off]
Press [ENTER]
MOXF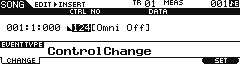
Press [EDIT]
Press [F5] INSERT>
Set the EVENT TYPE = CONTROL CHANGE
Move the cursor and set the CTRL NO = 124 [Omni Off]
Press [F6] SET
When this message is “played” to the connected reface YC it will simultaneously turn OFF Omni Mode and set the reface YC to Receive Channel 1.
Setting the MIDI Receive Channel:
Only if you require a different MIDI channel (other than 1), would you need to INSERT the following SYSTEM EXCLUSIVE message into the track data. For example say you wanted to place the reface YC to receive on MIDI channel 2 (01)
Press [EDIT]
Press Track [1]
Press [F5] INSERT>
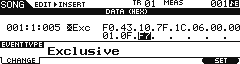
Set the EVENT TYPE = SYSTEM EXCLUSIVE
Insert the following message _ the data field automatically inserts the “F0” (Start of message) characters:
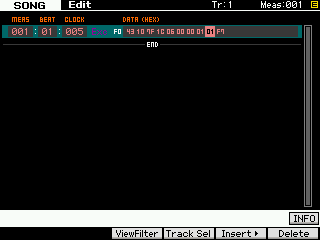
F0 43 10 7F 1C 06 00 00 01 01 F7 = shown above the Motif XF screen setting reface YC to Receive channel 2 (01)
F0 43 10 7F 1C 06 00 00 01 0F F7 = shown below the MOXF screen setting reface YC to Receive channel 16 (0F)
Entering the Data:
You do so by using the DATA DIAL to dial up the two character hexadecimal value. Move the cursor to the right to advance through the message. Once you have coded the message, press [ENTER] (Motif XF) or press [F6] SET (MOXF) to enter this message into track 1. System Exclusive messages can be placed on any track, however, typically, Track 1 is used so that they are easily found when you desire to edit them.
Don’t like typing System Exclusive messages?
Below is a link to sixteen one measure MIDI Files that allow you to set a MIDI channel and request a BULK DUMP of the current settings… allowing your sequencer to then receive the current reface YC Voice data as SYSEX data in the first measure of your sequence.
The files are named according to the MIDI RECEIVE CHANNEL to which it will set your reface YC.
