The videos below are great accompaniments to this article. Check them out: PERFORMANCE 4: Super Knob Bipolar-+
This example introduces the polarity “Bipolar” – for moving parameters above and below the starting point. Often Destination parameters need to revolve around a central starting point – where you need to increase and/or decrease from the starting value. Bipolar is the curve that answers this requirement. (Please note: The Live Set that is used in the Mastering MONTAGE series is located here.)
Example PERFORMANCE = Super Knob Bipolar-/+ This allows for movement in either direction from the 12 o’clock position of the Super Knob. In this example, the LFO SPEED is set to a value somewhere between the Minimum and Maximum value. The Classic Flanger’s LFO Speed is set to a medium level in the Part Effect window. The full range is from 0.00Hz through 39.7Hz – Using the Bipolar Curve will allow the Super Knob to start at 12 o’clock (64) and increase when turned clockwise and decrease when turned counterclockwise. When you recall this Performance the Super Knob is stored at the 12 o’clock position – observe how when at 64 two sets of LEDs light at the very apex.
You will also notice when using a Yamaha FC7 sweep pedal, (Foot Controller 2) to control the Super Knob, you will need to move the pedal past the mid point to grab the Super Knob. So if the pedal is at rest in toe down position, you will need to move it back to “hook” the stored value. Once you pass the stored value the pedal will control the Knob as usual. This prevents any jumping of values.
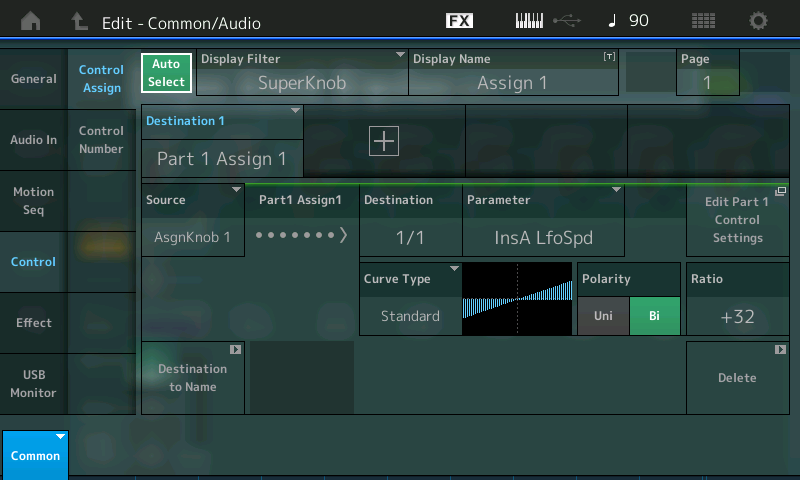
The Controller Polarity setting for PART 1 Assign Knob 1 is Bipolar with a linear Ratio +32. Positive values for Ratio will increase when turned clockwise. To verify this let’s use the navigation shortcuts to verify the assignments.
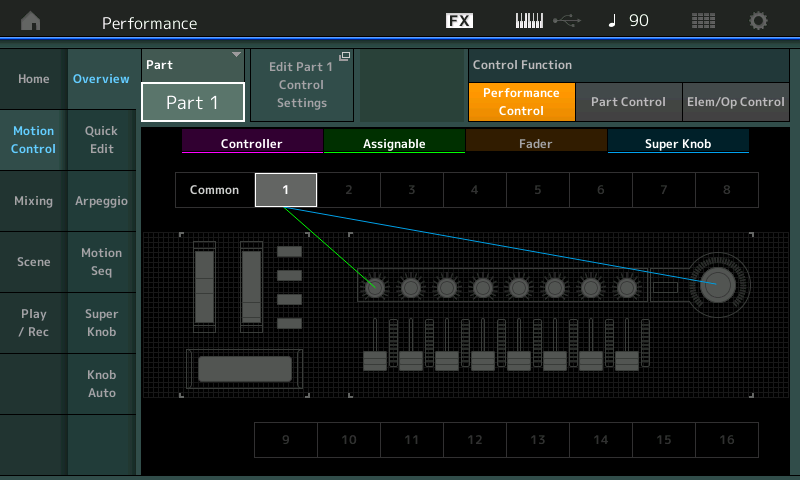
Hold [SHIFT] + [HOME (INFO)] to view the OVERVIEW screen. Set the PART to “COMMON” Press the “EDIT COMMON CONTROL SETTINGS” – to see how Part 1’s Assign 1 Knob is linked to the Super Knob.
Press [EXIT] to return to the OVERVIEW screen
Set the PART to “PART 1”
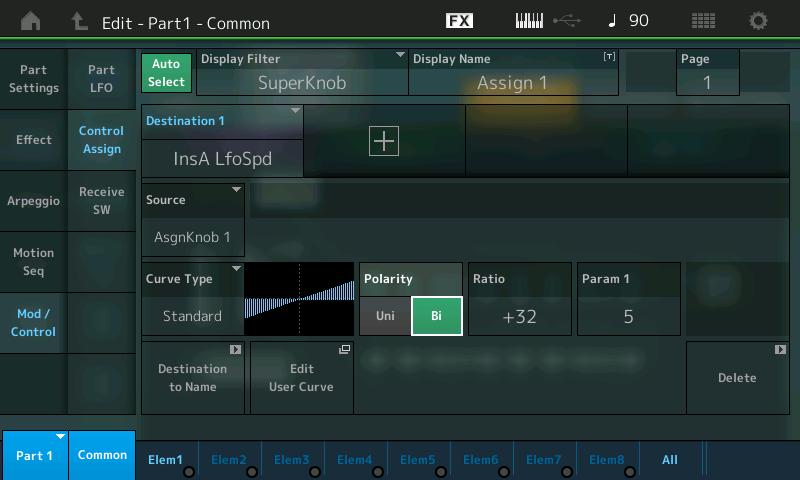
Press “EDIT PART 1 CONTROL SETTINGS” to ride the shortcut to Part 1’s assignment to control INSERT “A” LFO Speed.
The Super Knob position 64 (Center) is the start position. On close inspection you can find CENTER when four of the ladder LEDs light simultaneous as you reach the 12 o’clock position. When the Performance is stored the current position of the Super Knob is documented.
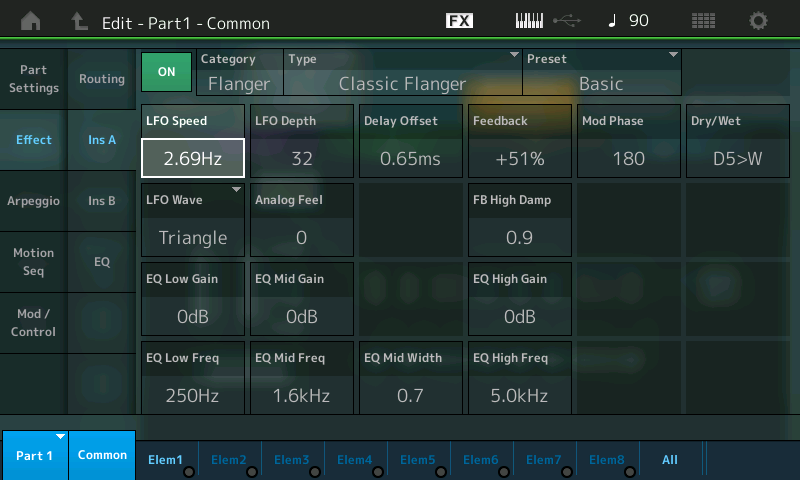
It will correspond to the STORED parameter setting of LFO Speed = 2.69Hz. In the left column of the screen press “Effect” > “INS A” to drop into viewing the parameters inside the Classic Flanger.
The Super Knob moved from center to left reduces the LFO Speed from 2.69Hz to the minimum of 0.00Hz. The Super Knob moved from center to right increases the LFO Speed from 2.69Hz to the maximum of 39.70Hz.
As a result the Super Knob controls the complete parameter range, as well, just as in the previous Unipolar examples. But the starting point is different. In case of Bipolar the Super Knob works bi-directionally. In the Unipolar examples, the initial setting was the minimum and we could increase the speed, only; here we can move in either direction from the initial setting.
If a specific LFO speed is intended for the basic starting point, using Bipolar might be more useful, because the intended speed will correspond exactly to the center position (Super Knob = 64). Modulations in both directions are possible using Bipolar.
But basically the decision for Unipolar or Bipolar will depend on the start position of the Super Knob and the kind of control you require musically. If it starts at left, Unipolar is more useful. If it starts at center position, Bipolar is recommended.
If you have any questions or comments about this article, please join us to discuss them on the Forum here.
The video below is a great accompaniment to this article. Check it out:
The first thing to explain would be the reason it exists in the first place. A basic playable program in MONTAGE can be up to 8 Parts – each Part is equivalent to what a Voice was in the Motif-series. We’ll begin our exploration with the AWM2 engine since it maybe most familiar. (Later we’ll dig into the FM-X Engine.) This means an AWM2 MONTAGE “Part” can be made up of 8 Elements (8 Oscillators) each with its own complex controller routings. Instead of just the six Control Set Destinations as found in the Motif-series, each MONTAGE PART can have 16 Control Set Destinations. Each PART can be a very complex instrument(s) sound by itself (Single) or each PART can be an individual component used in building a very detailed instrument sound (Multi) or several individual instruments can be used to construct a musical MONTAGE experience. When this “PART” is combined with 7 other PARTS under what is referred to as “Keyboard Control”… well, you begin to understand that the matrix for controller routing in the MONTAGE is massive. Here is the one knob, the Super Knob, that can be put in control of multiple tasks (or not) as you deem fit.
Music In Motion/Music Is Motion
Sounds, in general, fall into two categories: Noise and Music. In music there is order and a consistency in vibration. It is the relationships between these vibrations that make music enjoyable. In the Motion Control Synthesis Engine you will discover that it is the interaction of these vibrations and control over them that is a key to making music with MONTAGE. Musical tones (notes) are vibrations of a specific number of cycles per second (also called “Hertz”, abbrev: Hz). We consider something a musical tone that repeats at a consistent number of cycles per second. Our hearing range is between approximately 20Hz and 20,000Hz. Vibrations below 20 cycles per second are perceived as “rates” or pulses, rhythms. Music is all about vibrations, from rhythmic beats to consistent (rhythmic) tones. It is all about motion.
The Super Knob can be moving/changing multiple things simultaneously. We’ll start nice and easy, then get deeper and deeper. You will begin to understand just how super this knob is in bringing together a wide variety of changing parameters. The Knob can be controlled directly or it can be controlled easily by assigning an FC7 pedal. Simply connect it to the Foot Controller 2 jack on the MONTAGE back panel – allowing both hands to remain on the keyboards while you put the Super Knob in motion with your foot. This can be assigned on a per PERFORMANCE basis. The movement can also be fully automated and tempo controlled. And while a full Performance can be made up of 16 Parts, 8 Parts can be placed under real time “KBD CONTROL”. This means you can be interacting with 8 Parts, simultaneously.To get started let’s take a look at how the Super Knob works from the top down, if you will. (Please note: The Live Set that is used in the Mastering MONTAGE series is located here.)
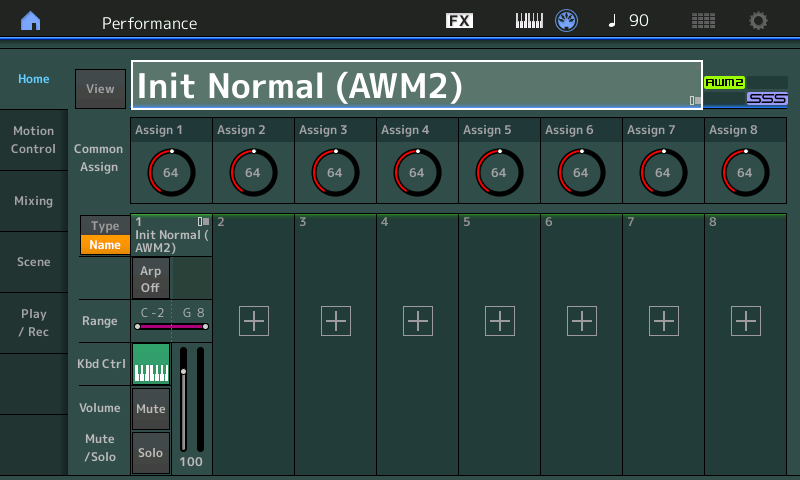
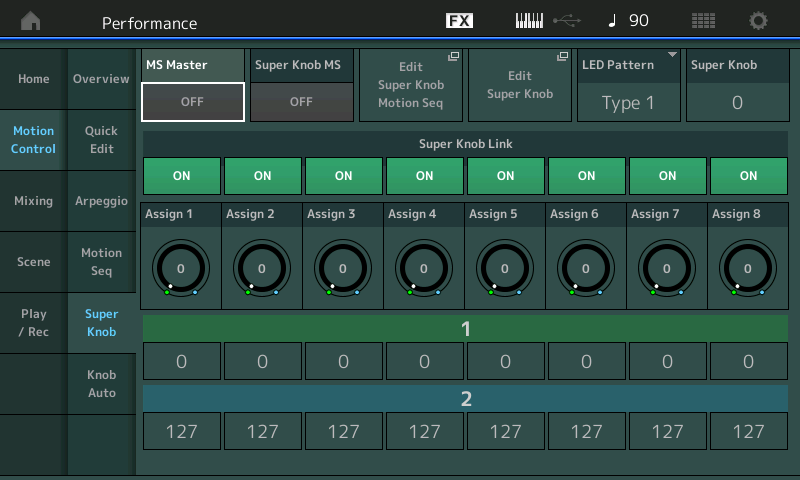
We’ll start with an “Init Normal AWM2” Performance. Press [CATEGORY SEARCH] and select “Init” Choose “Init Normal (AWM2)” From the main screen of a Performance (HOME), touch the Home icon in the upper left corner of the screen – this will automatically take you to the main screen of the current Performance, and it will highlight the Performance Name. From here we can begin our tour of the MOTION CONTROL SYNTHESIS ENGINE Touch “MOTION CONTROL” – the second item in the first column of the screen Touch “SUPER KNOB” – the fifth item in the second column of the screen
Turning the Super Knob you will notice that all 8 Assignable Knobs move in concert under the control of the Super Knob. No special assignment needs to be made to have this control at this programming level – they are all linked to the Super Knob by default. You can, when desired, unlink a Knob by setting the Super Knob Link = Off. We are at the upper Common level of the architecture, each of the 8 Assignable Knobs are automatically linked to the Super Knob. Currently, they are not assigned to do anything – this is for you to decide on a per program basis. These Assignments can be made to a specific set of parameters that are common to all the PARTS associated with this PERFORMANCE (including the A/D Input Part). These COMMON parameters are referred to in the architecutre as the “Common/Audio” parameters.
The Super Knob can be assigned at the overall top level – to parameters that could affect all controlled PARTS (in common) or are available to all PARTS (in common) including parameters for the Analog-to-Digital Audio Input Part. (The A/D Input is included along with the overall Common parameters because it can be a control Source assigned to influence any of the synth Parts). The Super Knob can also be simultaneously assigned to control specific parameters within a PART by linking the PART’s ASSIGNABLE KNOBS to one of the Super Knob’s Assignable Knobs (more on that as we go along). At first glance, the MONTAGE appears to have just 8 Assignable Knobs and the Super Knob – in the actual programming, every Performance has a set of 8 Assignable Knobs linked to the Super Knob on this upper “Common/Audio” level of the architecture, and each of the 8 possible synthesizer Parts under “Keyboard Control” has a set of 8 Assignable Knobs of its own, at the PART level of programming! Any, or all, of the individual synth Part’s eight Assignable Knobs can be linked, so that they, too, follow movement of the Super Knob (or not). This is entirely programmable. All can be influenced by the Super Knob, if you wish. These multi-dimensional changes and interactions are at the heart of the Motion Control Synthesis Engine.
The LED PATTERN Type setting (upper right in the screenshot above) allows you to choose different behaviors and color schemes for the Super Knob (including OFF, for those with no sense of adventure/style and are certain they don’t want a colorful flashing knob). Turning Off the color and flashing do not affect its function. You will find that it is not only colorful but a highly useful multi-dimentional control. The SUPER KNOB value setting indicates the currently stored value for the Super Knob (its current location). In the screenshot notice all eight Assignable Knobs and the Super Knob are set to the middle value, 64.
As we’ll see later, the range and direction of movement for each Assign Knob is extremely programmable.
Knobs, Knobs, Knobs
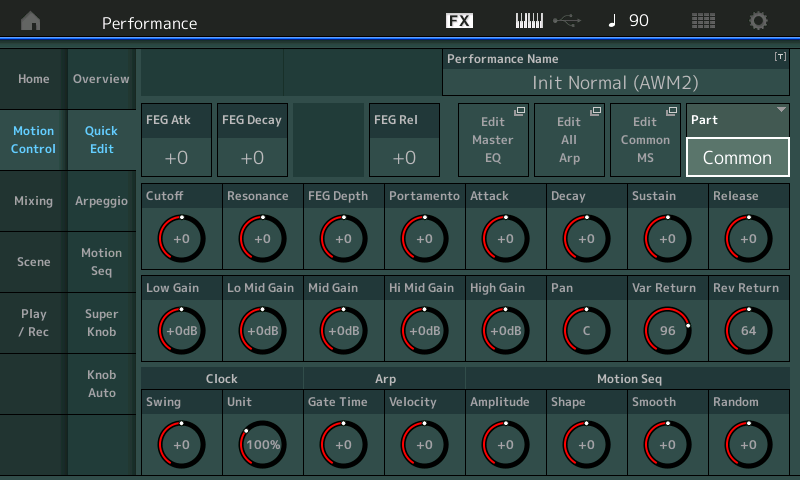
We should mention that in addition to the Assignable Knob functions, the eight Rotary encoders can be used to access the QUICK EDIT parameter for the currently selected PART (or all Parts together, when “Common” is selected). This is similar to how the Motif XF had three rows of 8 parameters each that could be applied to the currently selected PART or all PARTS together (Common). A dedicated lighted button will indicate the currently active row.
You may notice the parameter selection here is a bit different… Row 1 TONE = Cutoff, Resonance, FEG Depth, Portamento, Attack, Decay, Sustain, Release Row 2 EQ/FX = Low Gain, Low Mid Gain, Mid Gain, High Mid Gain, High Gain, Pan, Variation Return, Reverb Return Row 3 ARP/MS = ClockSwing, ClockUnit Multiply, Arp Gate Time, Arp Velocity Rate, Motion Sequence Amplitude, Motion Seq Shape, Motion Seq Smooth, Motion Seq Random
The cursor highlight (above) is showing the selected PART item – which can be “COMMON” (all Parts together) or any of the 16 potential Synth Parts within the PERFORMANCE. This is called “QUICK EDIT” because they allow you to apply offsetsto the stored value within the program. The CUTOFF knob in the TONE row, for example, offsets the eight potential Filter Cutoff Frequency settings within the currently selected PART (if a LPF is selected for its Elements). When editing a single PART, remember, there are 8 Elements, each Element with its own Filter and Filter Cutoff Frequency setting; if you simply want to make the sound brighter adjusting this CUTOFF knob in a positive direction (clockwise), is like applying an offset increase to 8 separate Low Pass Filters. To select the first Knob to offset PART 1’s Cutoff Frequency you would select PART [1], make sure the front panel [TONE] button is illuminated. These QUICK EDIT functions allow for overall changes to be made quickly. As we will see, you can dive deeper and select a specific Element, a specific Filter and assign one of the Assignable Knobs to it (separate from all others).
If COMMON is selected that one QUICK EDIT knob could, in theory, be adjusting the Filter of all the PARTs together… similar to the Motif/MOXF-series Quick Access Knobs. In the Motif XF, for example, you also have 24 Knob parameters for the selected Part, two of them being assignable (AS1/AS2)… Here you have 24 Knob parameters, however, since you have eight Knobs that are *assignable* per Part, you do not see them listed here among the 24 – the 8 AssignKnobs are in addition to the twenty-four dedicated parameter knobs. The 8 AssignKnobs have a separate view.
Each Part, when individually selected has 24 Quick Access knob parameters plus it’s own eight fully Assignable Knobs. And yes, each of the fully Assignable Part Knobs can be set to control multiple destination parameters, simultaneously, each with their own range and direction!
SUPER KNOB always available The SUPER KNOB does not have to be selected, nor does any special condition need to exist, for it to control its assigned parameters. Even if you are using the Knobs to control a specific Part directly, (via QUICK EDIT, as in Part 1’s CUTOFF), the Super Knob can still be used to function, as assigned, to control the PARTs it is assigned to control. The [ASSIGN] button that is just to the left of the Super Knob simply alerts you to what the red step-ladder indicators that encircle each of the Rotary encoders are indicating at the moment. It does not affect whether or not the Super Knob is functioning, the Super Knob functions whether this [ASSIGN] button is lit or not.
As we go along, you will see how useful the Super Knob can be when performing on MONTAGE (and how important it is to use an optional Yamaha FC7 sweep pedal to control it). We will be introducing you to concepts that are bound to be new, but we will attempt to unfold them a step at a time so that you can follow along. It is highly recommended that you explore the basic programs provided (as a download) with this series of articles – rather than diving into the Factory Performances (which include many, many advanced routing scenarios that may or may not be easily decypherable at first glance). The basic examples provided here have no extra frills to disturb the learning process – seeing and hearing the results will be the best way to learn what is going on. Theory is one thing, experiencing it is entirely a different thing. You will notice that all 8 of the Knob icons and lighted step-ladders LEDs around the Assignable Knobs move together, initially. You will be able to adjust the movement, the range and the direction and apply that to the selected (assigned) parameters, as you require. And in a similar fashion to how one creates sound with a huge room filling modular synthesizer, you will be making assignments (routing connections) that cause different components within the synth engine to interact.
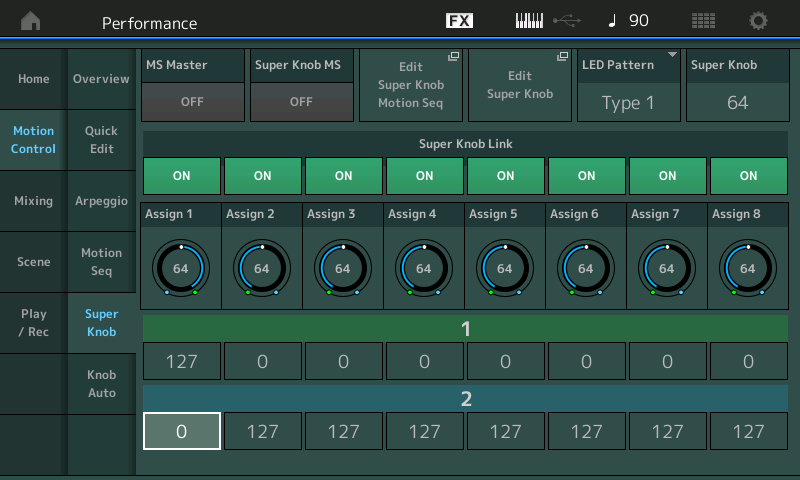
As you can see, the default for the Super Knob is for it to change values from a Minimum (0) at 7 o’clock (green), and a Maximum (127) at 5 o’clock (blue). The green color for VAULE 1 indicates Minimum, and the blue color for VALUE 2 indicates Maximum. You can easily reverse the direction by making VALUE 1 = 127 and VALUE 2 = 0 (shown below) for AssignKnob 1.
Now when you move the Super Knob, Assign Knob 1 will move in the opposite direction from the other seven knobs, effectively reversing the direction of application of the controller. As we go along we will see that this can be useful for fading something out, while another knob might be fading something in… etc. Also by adjusting the VALUES for green (1) and blue (2) you can limit the range of application to just a specific region. Later we will see how this can be used to fine tune the application of your controller function. This will be done by ear, based on the musical results that are useful for your program. The application of a physical controller is a very personal performance gesture. For example, “how far” you actually have to move the PB Wheel to get the response you require, is a personal perference – so is setting the range and direction of movement within the Motion engine.
In this series of artciles we will tackle “Super Knob Common” assignments – controlling parameters within one of the SYSTEM EFFECTS. The SYSTEM EFFECTS are “shared” by all PARTs; in that they are available via an Auxiliary Send per channel. Control over them would indeed be a COMMON assignment. If, for example, you wish to control one of the two INSERT EFFECTS assigned to a specific SYNTH PART that would be handled on the PART (Assignable Knob) level of programming – because each Synth Part has its own set of 8 Assignable Knobs! In articles that follow, we’ll dive deeper to the individual Part parameter assignments, where we are specifically controlling one Part separately from the others. For now let’s deal with COMMON (parameters every Part has access to).
Background on Controllers and the Parameters they Control When thinking about assigning parameter destinations to control from physical controllers, the musician must think about the physical gesture used to apply the controller and the direction of response. In other words, a Mod Wheel moves from a nominal minimum position (fully down) smoothly to a maximum position (fully up). You can quickly understand this best matches parameters that have values that move in that direction, 0 through 127, for example. Attempting to assign control for panning to the MW would not seem to be optimum because you would always be guessing about where center is exactly. Some parameters are minimum to maximum, like volume, send levels, etc. – while some move above and below a center point (pitch bend, pan position, etc.) and some times you just want to limit the amount of change. Assigning Volume to the Mod Wheel is a controller parameter match, as both move from a minimum value toward a maximum. But for every rule there are going to be exceptions. So let’s throw away the rule book! Say you want use the MW to pan one sound from the left position in a mix to the right position, while simultaneously panning another sound from right to left! In this case they will pass each other somewhere in the middle.
The way the 8 individual Assignable Knobs interact with the Super Knob and the application of change is what we will be digging into here. And this is where you will discover why it is indeed “super”. Although the gesture will be simply moving the Super Knob from minimum to maximum, you can define the result that this has on the tone engine to a degree that will boggle your mind. The single gesture of sweeping the Super Knob from minimum to maximum can have these two sounds, criss-crossing in the stereo panorama, passing each other several times with just the single gesture!
The application of controllers can be understood as a “personal preference”. It’s how far you like to move the Mod Wheel to get the amount of vibrato you like. It’s how far you move the PB wheel to get the amount of change you desire. It’s how hard you have to strike a key to get the response you desire. It’s all of these things and they are as individual as you are. What we will do here is introduce you to basics of assigning and then we’ll get deeper into the depth of application. Please follow through with some experimenting when instructed. Hearing the influence a parameter has on the result IS what learning is about here. Remember, programming is really making decisions that are personal preferences within your music, this is a key.
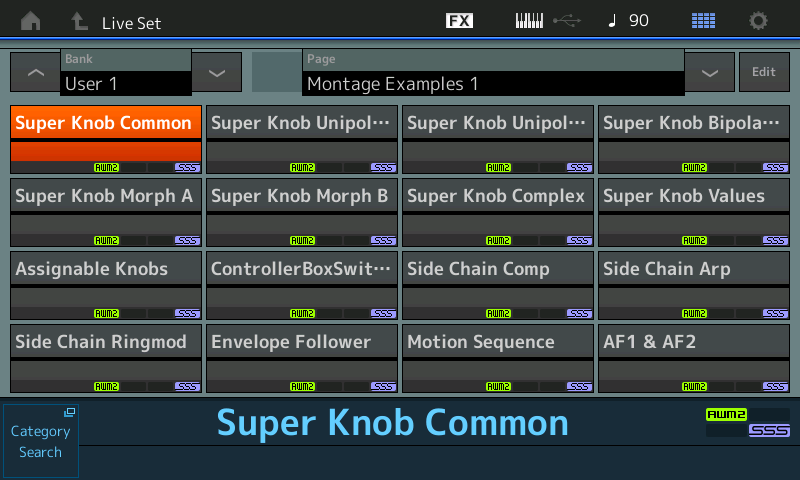
The download data provided at the bottom of this article will present 16 basic AWM2 (based) Performances contained in a “Live Set”. We will use these to illustrate the fundamentals of navigating and looking at the Controller assignments. Please follow along with the given examples, as they are designed to take you through discovering the different layers of the architecture. Each example is designed to start your exploration, and the article assumes you are following along hearing exactly what is being affected by the assignments being discussed. These example Performances were originally assembled by Peter Krischker (Easy Sounds, Europe) for the Yamaha programming team, we have simply edited and expanded on these basic setups and use them as programming launching points to explain and explore the architecture.
Warning: Be sure to make a backup USER file (.X7U) so you will have a document of your own user data. Loading the data below will overwrite any data you have in User memory.
Over the course of this series, we’ll look at a variety of elements and functionality. We’ll have a look at Side Chain Modulation using the Compressor, using Arpeggiators, and using Ring Modulation. Then we’ll have a look some possibilities with the Envelope Follower, Motion Sequences, and our old friends the Assignable (Function) switches.
As we go along we will introduce several programming “shortcuts” that will help you navigate from the Controller Assignment directly to the controlled parameter.
If you have any questions or comments about this article, please join us to discuss them on the Forum here.
If you haven’t had a chance to check out our kick-off article for this series, “Mastering MONTAGE: Getting Started” you can access it here.