When working with MIDI in your DAW (Cubase) Local Control should be set to OFF. The currently selected (highlighted) MIDI Track in Cubase will determine which Device (MIDI OUT) and which MIDI Channel, your data is Echoed Back (Thru) on. This means you will determine which of the 16 possible PARTS will sound by setting the MIDI OUT device (MOXF) and setting the MIDI Channel number (1-16). This means that the MIDI Transmit channel of your MOXF does not matter. Cubase will re-channelize the data for you. You can understand now why this is the preferred setting, because the currently selected Cubase MIDI Track OUT assignment will determine what instrument (be it the MOXF or another VSTi) you will trigger.
The “Local Control” is one of the settings made when you select a QUICK SETUP Template. For example, if you select QUICK SETUP = DAW REC or VST REC, Local Control will automatically be turned OFF. We’ll cover more about these Quick Setups below.
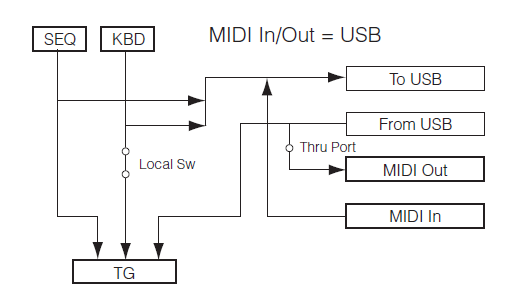 Shown at left is a block diagram showing the routing of signal in the MOXF. The KDB (keyboard) is normally connected to the MOXF TG (tone generator) direct when the Local Sw is closed (ON). If this connection (LOCAL CONTROL) is broken (OFF), you can see that the keyboard data will only be able to be routed out via the “TO USB” path. The “TO USB” connection travels to the computer finds its way to the currently active MIDI Track. The MIDI OUT setting of that Track (device + channel) will determine which tone generator will respond to the key presses of the MOXF. If the MIDI OUT is routed to the “MOXF VST – MIDI IN” on Channel 1, for example, then the PART or PARTS assigned to MIDI Channel 1 of your MOXF will sound. You can see the “FROM USB” path – this is the signal coming through (“echoed back”) from Cubase.
With this type of configuration, you can understand how the MOXF keyboard and its controllers can be used to trigger any connected synthesizer or software synthesizer available to Cubase. If, for example, you wished to play the VSTi Yamaha YC-3B organ or Steinberg’s Groove Agent, using the MOXF keyboard, by setting LOCAL CONTROL OFF, your MOXF becomes a controller _ it will not trigger itself when you press the keys or move a wheel or knob, those gestures are re-routed via the settings you make within the computer DAW. In fact, in order for the MOXF keyboard to trigger the MOXF tone generator (when LOCAL is OFF) it must be routed through the active Cubase MIDI Track.
If both routing paths are allowed you will hear doubling – both signals trigger the synth tone engine _ which when routed to the MOXF will sound like a very short time delay, similar to flanging or chorusing. If you are routing the active MIDI Track’s MIDI OUT to another synth engine, you will notice you will hear both synthesizers, simultaneously.
Monitoring the instrument sound
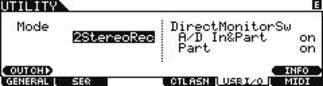
When recording to Cubase, there are two methods of monitoring: Direct Monitor “on” and “off.” Direct Monitor parameter can be set on the [UTILITY] > [F5] USB I/O display (or by selecting a Quick Setup Template) on the MOXF6/MOXF8.
 Direct Monitor on
With the Direct Monitor on, you can monitor the instrument sound directly from the instrument without latency.
Direct Monitor off
With the Direct Monitor off, you can monitor the sound transmitted to the computer and returned back to the instrument. This method lets you monitor the sound to which the volume level/effect/EQ parameters have been applied on the Cubase mixer.
Okay, so which one do you use?
When you are playing on the MOXF, you will want to monitor your playing direct… Direct Monitor ON. You will notice that there are two switches, one called “A/D In&Part” the other “Part”. These are USB 1/2 and USB 3/4, respectively. The A/D Input is fixed to always use USB 1/2 in the Dual Stereo Record Mode (2StereoRec) – this allows you to isolate whatever is coming in via the A/D Input on its own separate routing to Cubase. The reason it also says “…&Part” is because, in special cases you can reroute any of the Internal MOXF PARTS on this bus. Say you want to isolate one of the MOXF Parts to its own Audio Track. Because all 16 PARTS default to USB 3/4, by rerouting that single PART to USB 1/2 you can route it on its own bus to Cubase. So you are offered these two switches to accommodate what you are recording at the time.
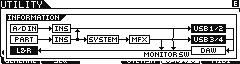 Shown here, you can see the “A/D IN” travels through an INSERTION EFFECT, and just before it is routed OUT via USB 1/2, there is a line traveling down (this is the Direct Monitor Switch)… as you can see it allows the A/D IN to travel to the L&R (Main MOXF Outputs) when the switch is closed (ON)… before it goes to the USB 1/2 OUT and DAW. Significantly, signal is traveling through both pathways.
The “PART” travels through an INSERTION EFFECT, but then there is an arrow pointing up (this is the internal MOXF PART being re-routed to the “…&PART” or USB 1/2 path) or it can continue through the SYSTEM (Reverb and Chorus) EFFECTS, and MASTER EFFECT, next it reaches the Direct Monitor Switch (arrow pointing down) … before it goes to the USB 3/4 and DAW. Again, significantly, signal is traveling through both pathways.
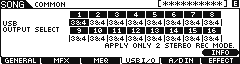 Shown at left is the USB OUTPUT SELECT screen. This is where each of the internal MOXF PARTS are assigned, by default, to USB 3/4. And you see that this only applies when you have selected “2 Stereo Rec” Mode (Dual Stereo Record). The A/D INPUT PART defaults to USB 1/2 and all the music PARTS default to USB 3/4… effectively allowing you to reassign any one or more of the internal PARTs, when necessary, to isolate it on its own record bus.
So the signal is split here and doubling can occur if the DIRECT MONITOR SWITCH is ON. You can see how the doubling occurs. So in this case you must prevent the doubling in the DAW (Cubase). If you only want to hear the DIRECT signal you will need to MUTE the audio coming through the DAW. The signal coming through the DAW is the LATENT signal (yes, the computer does take a few milliseconds to receive, process, record, and send out the signal. To avoid being “downwind” of this latency, is why you elect to MONITOR DIRECT.
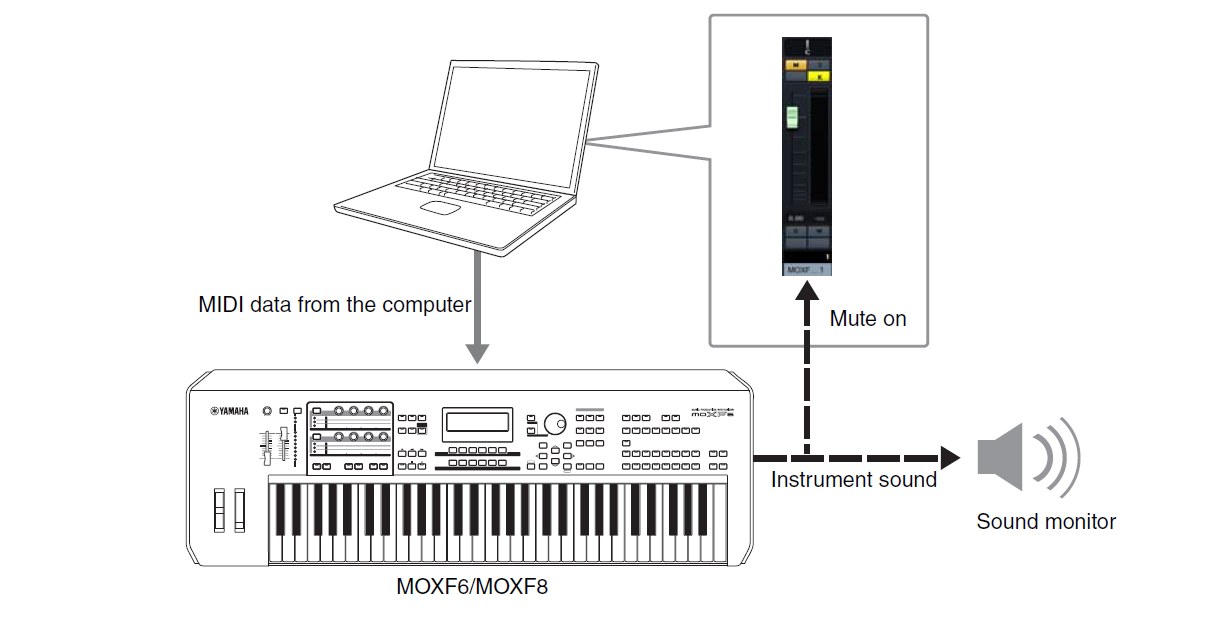
Shown here is what is happening. MIDI data coming from the DAW triggers the MOXF tone generator… and because the DIRECT MONITOR SWITCH is ON, the instrument’s sound goes directly to the MAIN audio Outputs… in Cubase you would choose to prevent the audio coming through the computer by setting the MUTE ON. You find the MUTE in the MOXF’s AUDIO LANE.
Ok, when we say, in general, that you don’t want to be ‘downwind’ of latency, why, then is there an option for Direct Monitor OFF?
Direct Monitor Off would allow you to monitor the audio that you see move the meter on the Cubase MOXF VST Audio Lane. This the audio that traveled from the MOXF tone engine, digitally via USB, to Cubase. This is the VST routing path, the audio signal arrives and can be processed now like any other VSTi. You can now apply other VST Effects.
There are going to be times when, in spite of the latency, you want to monitor after the signal has traveled through the DAW. This would be a case where you want to process your signal with a VST Plug-in Effect. In order to hear that effect being applied you will want to be downwind (after/post) the signal traveling through the computer. The latency is really only a factor when you are recording and/or overdubbing. It is (usually) a very few milliseconds, and depending on the CPU necessary for the VST Effect to do its thing, it may not adversely affect your playing. Latency is not an issue when you are only playing back.
The other scenario is when you setting up to create a mixdown. In a mixdown situation, you are playing back all tracks from (or post) the DAW in preparation to create a final stereo file. The finished product. The latency does not matter in plackback because things are not complicated by you attempting to play along. Direct Monitor is Off, the signal that will become audible goes through the DAW. Shown below:
 When working with the MOXF with Cubase, the audio sent from Cubase travels via USB back to the MOXF (now acting as audio interface) through the front panel slider labeled “DAW LEVEL”. You can balance audio coming from the computer with the volume of the MOXF (main volume slider).
Extra Credit: Connecting the Dots
Most stand alone audio interfaces do not have a built-in synthesizer, so the doubling dilemma never surfaces, but because your MOXF has it built-in you have to appreciate the advantage and accept the responsibility. This means it is necessary to select the routing scenario most appropriate for what you are attempting to do. It will be simple logic: Do you want to hear the MOXF directly or not. Different scenarios will dictate exactly which options you select.
In general with studio work there are three main scenarios:
Original Record to Cubase… all devices are outputting, Cubase is receiving everything
Overdub Record with Cubase… typically Cubase is playing back all but one device, which is set to send data into the DAW
Mixing down the final stereo mix… Cubase is all playback, no devices are inputting, everything is output.
The MOXF has QUICK SETUPS that can help make all the necessary MIDI and AUDIO settings for you. Let’s talk a bit about a few of them to get you started.
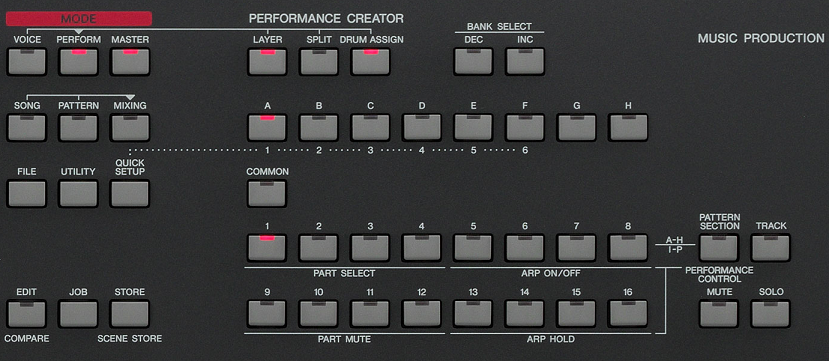 See the QUICK SETUP button is conneced by a series of dots to the six “Group” buttons A-F (numbered for this use as 1-6)
[QUICK SETUP] + [1] = DAW REC (use when recording to MIDI track of the DAW)
[QUICK SETUP] + [5] = VST REC (use when recording VST to DAW)
For both of these templates, the MOXF Audio is setup so DIRECT MONITOR = ON, LOCAL CONTROL = OFF.
In Cubase: MUTE (m) the MOXF VST audio lane when recording “live” tracks. This prevents the doubling!
The reason we Mute the Audio Lane in Cubase and not just lower the DAW LEVEL slider is, you’ll probably need to hear the click (metronome) while recording Midi Tracks to Cubase. Remember all audio coming from the computer arrives throug the DAW LEVEL slider on your MOXF front panel.
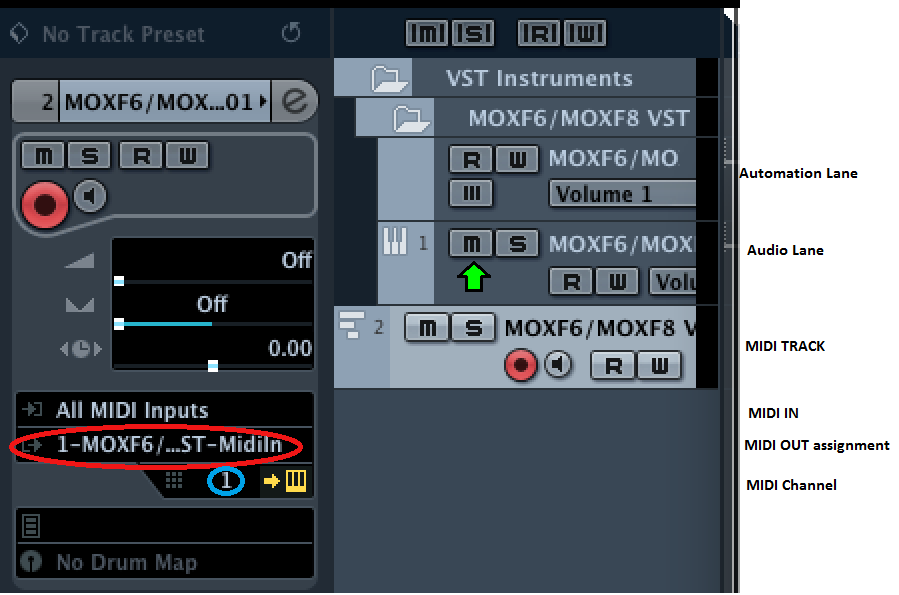 Shown at left is the Cubase Track Inspector. Notice the Folder structure. There is a “VST Instruments” folder – which will contain all the VSTi’s you decide to run. In this case the MOXF6/MOXF8 VST is the first one. The MOXF6/MOXF8 VST has an AUTOMATION LANE – this is where you can Write (W) and Read (R) automation commands for controlling the performance of the MOXF. Under the Automation Lane is the very important “AUDIO LANE” – this is where audio from the MOXF is “returned” to Cubase. It is not a “track” per se, because the audio is only monitored here; it is a ‘virtual’ audio track _ it does not become an actual audio track until you “EXPORT AUDIO MIXDOWN” _ a Cubase process to turn virtual audio into an actual track and waveform. Such ‘virtual audio’ data can also be rendered to a temporary audio file by the Cubase “FREEZE” function. You will see that this returning audio has a Stereo meter indicating the relative volumes of the left and right channels. We’ve inserted a very green arrow to indicate exactly where the MUTE (m) button for this AUDIO appears on the Track Inspector.
You can see MIDI IN = “ALL MIDI INPUTS” (icon is an arrow point inward: 
Below this you see the MIDI OUT (icon an arrow pointing outward) in this case it is routed to the “1-MOXF6/MOXF8 VST-MidiIn” (circled in red)
_ The ‘1’ – the first instance of the MOXF6/MOXF8. Multiple MOXF’s can exist, but you must use the FREEZE function (this will be covered in a future article)
_ “MOXF6/MOXF8 VST – MIDI IN” – this is routing the MIDI events through the Editor (where you will make setting for the audio path). The Editor is in a 1:1 relationship with your hardware MOXF.
Linked to the MIDI OUT is the Channel assignment (circled in blue) _ all data from this particular MIDI Track will be re-channelized and OUTPUT on MIDI channel 1. You will create a NEW MIDI Track for each PART you wish to view your MIDI Tracks separately. (If you set this channel setting = “ANY”, then the channel of the incoming signal will be used as the OUTPUT channel _ allowing a single MIDI Track to be used). This is a preference. If you elect to use separate MIDI Track then the MIDI Channel will be necessary. As you select a MIDI Track in Cubase, the corresponding PART assigned that MIDI channel will also automatically be highlighted… and vice versa, when you select a PART on the MOXF or in the Editor, the corresponding MIDI Track in Cubase will be selected.
Next to that is a small keyboard icon that will allow you to SHOW/HIDE the MOXF Editor’s Graphic Interface.
The MIDI Track (with its Red Record Ready button, Monitor Speaker icon, and Read/Write functions) is shown highlighted (bright grey). When it is highlighted (also called “selected”) it will be the active MIDI Track. Playing any devices listed you’ve as “In ‘ALL MIDI Inputs'” will be able to trigger the MOXF on MIDI channel 1, and the MOXF will return the AUDIO to the AUDIO LANE. Because you are playing this part “live”, in most cases you will opt to DIRECT MONITOR (ON) and activate the MUTE switch preventing the doubled audio from sounding in the VST AUDIO LANE.
Toggle the MUTE button (green arrow in the diagram) several times so you can hear the difference between doubling (loose and unfocused) and the proper/correct single signal path (tight and focused). Audio from the Audio Lane returns to the MOXF via the DAW LEVEL slider on the MOXF front panel.
Summary: a healthly signal flow is as follows: when you press a key on the MOXF, because the MIDI setting “Local Control” is Off, MIDI messages travel OUT via USB to the computer. And because we have set the MOXF’s USB-MIDI port 1 as one of the potential MIDI Inputs, we can see our key press register as a single bar meter on the MIDI Track. The MIDI OUT assignment is to the MOXF VST’s MIDI IN… you should then be able to see the note you played instantly on the Editor’s graphic keyboard. The Editor is responsible for passing the MIDI messages immediately to the MOXF tone generator. The MIDI Channel setting of the Cubase Track determines which MOXF Part will respond with audio signal. The audio signal travels from the MOXF as digital signal via USB to the computer. Because we have setup the MOXF as the Audio System, the audio signal is routed (returned) by the system to the MOXF VST Audio Lane via USB 3/4. You will see the meter respond with a separate left and right channel. This meter is now audio. (MIDI’s meter is a single bar, because Midi is not mono or stereo, it’s only data, coded messages; the Audio lane is stereo because it represents audio signal routed through a stereo bus, left/right).
If you wish to hear yourself direct, Direct Monitor On, mute the Audio Lane (return).
If you wish to hear yourself post the DAW, DirectMonitor Off, unmute the Audio Lane.
QUICK SET Quick Reference
Quick Setups are user editable templates where multiple parameters are configured by simply selecting the appropriate Quick Setup button. Each of the affected parameters can be set individually, however. The Quick Setup template simply applies all the necessary settings in one single operation. So it is strictly a convenience feature. The engineers/designers of the keyboard provide the most common scenarios. Knowing when to use each is your responsibility… Choose wisely. They are very handy. Because the MOXF has its own built-in sequencer, connecting to an external DAW, like Cubase, can be a bit complicated – depending on your specific goal. Both the MOXF keyboard and the MOXF’s arpeggiator said can be routed, or not, to tracks of its own sequencer, or as the templates will indicate, routed out, to an external sequence recorder.
The first two below, we have covered, in depth above; these are your “go to” setups when recording to a DAW. Not yet discussed, but fairly self explanatory is the third in this group: VST PLAY
[QUICK SETUP ] + [1] = DAW REC (Use this setting when recording MIDI Tracks to your DAW)
[QUICK SETUP] + [5] = VST (Use this setting when recording VSTi)
[QUICK SETUP] + [6] = VST PLAY (Use this setting when playing back your VST recording, this defeats the MOXF Direct Monitor, meaning you are hearing just the MOXF coming from the computer… what you recorded).
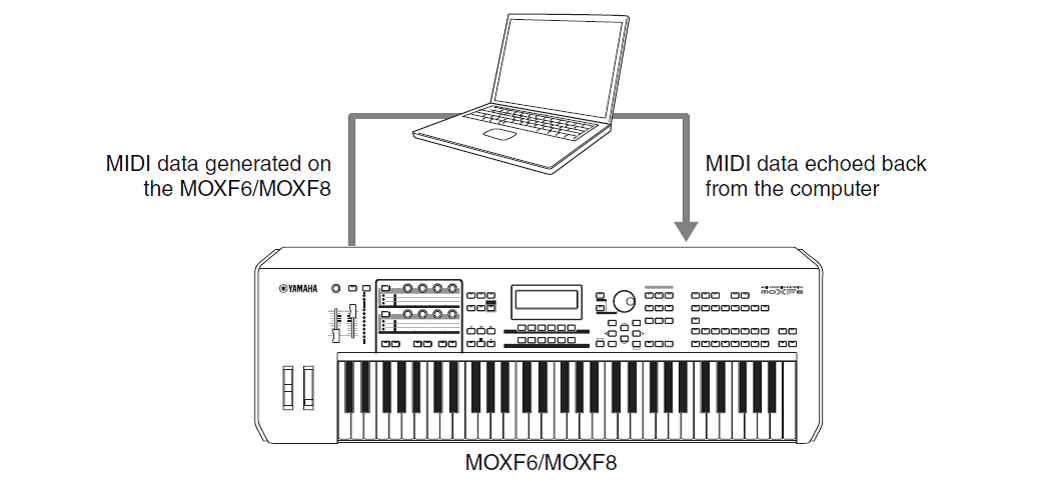
There are two Quick Setups to help when recording the MIDI data generated by the MOXF Arpeggiators to an external DAW. Since Arpeggios are not generated by touching the keys alone, two streams of MIDI events are being generated: your trigger notes, and the events generated by the arpeggio phrase. When it is the output of the arpeggiator that you need to record, Local Control must be On. This way your key presses go to the Arpeggiator, and it is the Arpeggiator that generates the data you wish to record. (Covered separately).
[QUICK SETUP] + [2] = ARP REC (Use this for recording normal note arpeggios where the Key Mode is either ‘sort’ or ‘thru’
[QUICK SETUP] + [3] = DIRECT ARP (Use this for hybrid and controller arpeggios where the Key Mode is either ‘direct’, sortdirect’, or ‘thrudirect’
And finally, perhaps the most important one to remember when you are NOT going to connect to the computer!
[QUICK SETUP] + [4] = Stand Alone (Use this when you are not using the computer at all). If ever you are troubleshooting because your MOXF is strangely not making any sound… add Quick Setup #4 to your checklist. It resets the MOXF to NORMAL play!!!
“Normal play” means when you press keys on the MOXF messages are sent locally direct to the MOXF tone generator, and it means the audio from this action is sent directly to the main Left/Right outputs!


 The normal situation is for Local Control to be set ON. Literally, this is the Keys and Controllers of your MOXF directly addressing your MOXF Tone Generator. With Local Control = OFF, the MOXF is disconnected from triggering itself directly — it will be looking to the USB-MIDI connection for this data. You are now dependent on completing the circuit through the DAW (Cubase).