If your computer does not recognize your reface unit right away, you may require the Yamaha USB-MIDI Driver available from http://download.yamaha.com
Refer to page 41 of the reface Owner’s Manual for details about setting your preferences. If you plan on recording MIDI data to your DAW, for example, you may wish to turn LOCAL CONTROL = OFF, turn MIDI CONTROL = ON and turn the SPEAKER OUTPUT to Off.
LOCAL CONTROL is the setting that determines whether the key presses (note-ons) and controller movements are sent to the reface tone engine directly (ON), or sent OUT via MIDI to the DAW for routing (OFF). It is typical to set Local Control OFF when working with an external sequencer.
MIDI CONTROL is the setting that turns specific parameters to CONTROL CHANGE (cc) MIDI messages. These can be documented to your sequencer track as MIDI messages. This setting turns on both transmit and reception of MIDI control messages.
SPEAKER OUTPUT is the setting that allows you to monitor the reface through settings determined in your software. When Speaker Output is OFF you must connect the main L/R outputs to your computer’s audio interface for monitoring control.
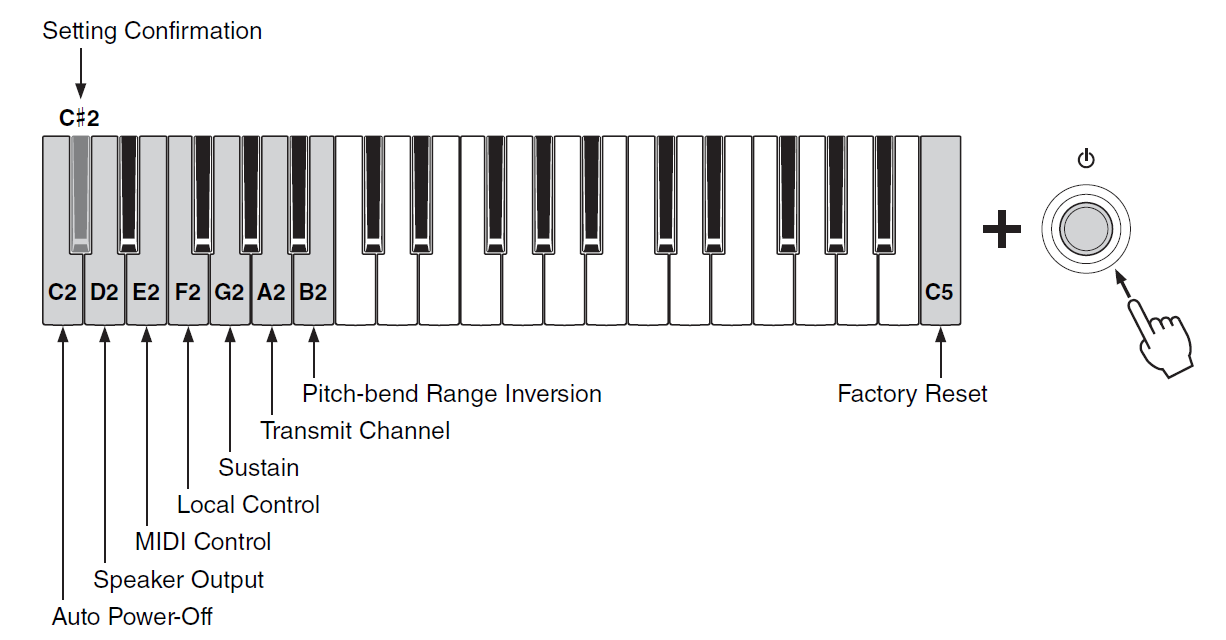
F2 _ Local Control = Off
E2 _ MIDI Control = On
D2 _ Speakers Output = Off
The settings are made by holding down the KEY indicated and powering ON the instrument. Repeat for each setting you wish to make. For example, hold D2 (lowest D) and power On to turn Speaker Output Off. Then hold down E2 and power On to turn MIDI Control On, and so on. Your settings will remain until you either Factory Set the instrument or you manually change them. So if this is how you plan on using the reface, it will power on ready for work next time you need it.
You can power On while holding C#2 to verify the condition of your setting following the guide in the Manual. In general when you power ON holding the highest key (Factory Reset) you can return all setting to Factory default conditions.
reface DX
 The reface DX is the exception to the rule… Because it has a screen and internal memory, the Local Control and MIDI Control parameters can be set from the front panel by pressing [FUNCTION] repeatedly to select Function screen #2 “MIDI”.
  Advance to screen #3 to set the Speaker Output as desired. Using the corresponding red ‘button’ in the touch area, you can toggle the settings.
If you are going to play the reface from an external MIDI controller, use your DAW’s ability to route MIDI signal to each external device. Most DAWs will automatically channelize incoming MIDI signal so it will not be necessary to set the MIDI Transmit Channel. You will want to configure your DAW setup so that you can record MIDI data from the reface itself, (even if you are playing an external controller) – each of the front panel controls sends CC (Control Change) messages OUT via MIDI (except the main Volume and Octave Transpose). This means “playing” the front panel is possible – every move will be available to be recorded and played back. (See the Data List booklet for details).
And if you plan on using your computer setup to record audio, you will require an Audio Interface with at least two input channels to accommodate your reface (Left/Right) main audio outputs. The audio interface is responsible for routing the audio signal to the computer, and routing the audio output of the computer to your monitor speakers. In such a setup you will want to turn the reface’s speakers OFF.
The reface instruments default to OMNI MODE ON – which means they are set to RECEIVE MIDI data on any (and all) MIDI channels. If you are in a situation where you would like the reface to play on a specific MIDI RECEIVE CHANNEL, you can turn OMNI MODE to OFF with a cc message placed on the MIDI channel set to address the reface. Enter the Control Change cc124 (also referred to as a CHANNEL MODE MESSAGE) into your MIDI data to set OMNI MODE OFF. Turning OMNI MODE OFF will automatically set the reface to MIDI RECEIVE Channel 1. If you require a different channel (other than 1) you can send a Parameter Change (System Exclusive) message (see separate article on reface Advanced MIDI Functions).
