This tutorial (in several parts), will introduce you to several skills, including creating your own loops by RESAMPLING within the XF Sequencer; we’ll cover, loading .wav files, even how to edit (trim) a sample. Looped audio clips can be mapped to keys and manipulated in various ways. Remember: audio in the Motif XF is always samples. The advantage of being samples is that you can turn them on and off conveniently with your Keys: note-on/note-off events. This is ideal in a keyboard music production synthesizer – as the keys make very convenient on/off switches. A typical use case would have the audio begin at Note-On and continue to play (loop); tempo would be set to match the audio clip. From here, you can add additional MIDI tracks, play along with it, etc., etc. Controlling audio clips from the keys of the keyboard can be used in a variety of ways. Each of the 73 keys in a drum kit Voice could feature a different audio loop or, as we’ll learn, a single Key can actually contain multiple audio loops that trigger at different velocities. This first installment we will take a look at why a Drum Kit makes an ideal place to manage as many as 73 audio loops – we’ll start with the unique Drum Amplitude Envelope Generator (AEG).
Controlling audio loops in a drum kit means also you can apply useful parameters to control playback, like ALTERNATE GROUPS, RECEIVE NOTE-OFF, and apply an AEG (Amplitude Envelope Generator) that will hold the sample indefinitely. If you have your audio clip’s KEY parameters set so that it ignores Note-off (as most drum sounds do), and the AEG’s “DECAY 2 TIME” parameter is set to 127 (maximum) this will mean when you hit the key the audio clip begins playback and you will not have to hold the key down in order to make sound continue. It will automatically continue on its own until you hit another KEY in the same ALTERNATE GROUP. That KEY could be the beginning of a new audio clip or it could be a “silent” Key. A “silent” key is a key with a blank waveform assigned to it – it simply is used in the same ALTERNATE GROUP as your other audio clips to end playback. The ALTERNATE GROUP is what allows the Closed HH and Pedal HH to stop the Open HH from sounding, they are all assigned the same ALTERNATE GROUP – only one from the group can ever sound at the same time. The Mute Triangle stops the Open Triangle because these two are set to the same GROUP, etc. There are 127 Groups!
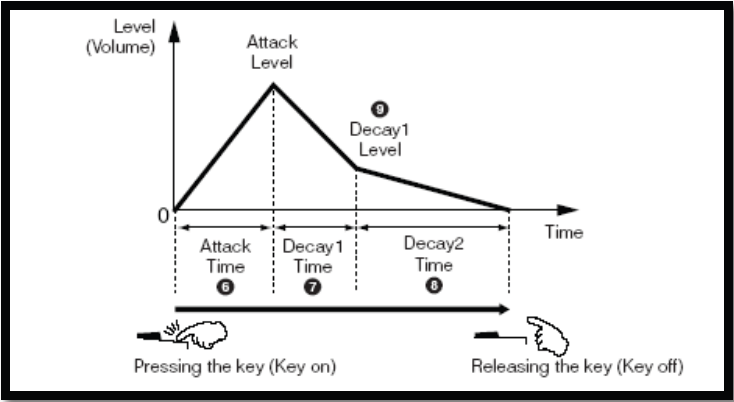 A Drum AEG is different from a Normal Voice’s AEG. The “ATTACK TIME” is how fast the level rises to full volume (Attack Level). “DECAY1 TIME” is how fast it drops in volume to “DECAY2 LEVEL” (which is fixed at 0). “DECAY2 TIME” is how fast the signal dies away to zero. By definition all percussion sounds eventually die out. “DECAY2 TIME” can be any value between 0 and 126, or 127 (127 which would be equivalent to HOLD). For sample loops that you want to remain at the same volume indefinitely, set the Decay2Time = 127.
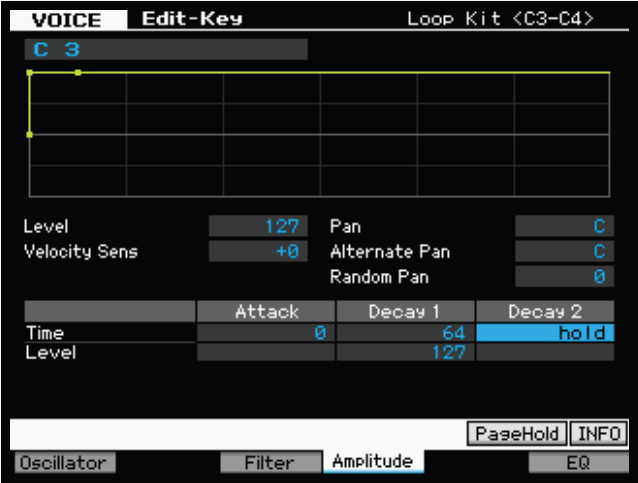
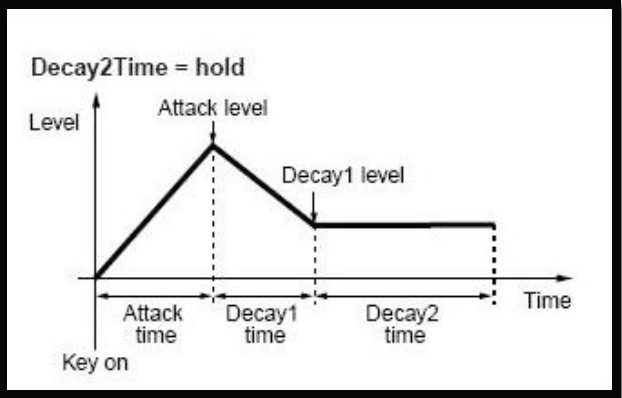 At left you see the AEG set where “Decay2 Time” = 127. The envelope will continue indefinitely or what is considered “HOLD”. When you have a long audio clip this is the only setting that will allow it to play completely. Below see the actual Drum Key Amplitude screen. You are in VOICE mode (upper left tab always tells you where you are), you are in EDIT and you are editing a KEY, C3. The Output Level of this drum is 127, and the Velocity Sensitivity (its ability to get louder as you strike a key harder) is +0. This means that the velocity is fixed so that every note-on event will be triggered at the 127 level.
 Velocity Sensitivity (Velocity Sens) can be set to any value between minus 64 and plus 63. A setting of +32 is the equivalent of a linear curve. That is where the harder you hit it, the louder it is. Any value above +32 will mean that extremely slow strikes will not be heard at all. By the time you reach +63 only an extremely hard (fast) key strike will trigger a sound. Negative values work the opposite to positive values. The softer the key is stuck the louder the sound.
The audio clips should have Velocity Sensitivity = +0 so they play at full volume. Use the CS (Control Slider) of the PART to control how they fit in the mix (in relation to other Parts or tracks). You will notice that there is PAN, ALTERNATE PAN and RANDOM PAN parameters per drum KEY. Notice that with the TIME and LEVEL parameters, there is no ATTACK LEVEL. This level is determined by the audio of the sample itself. And there is no “Decay 2 Level” which is found in a normal Voice, because it will always be 0 for a percussion family sound… except when “Decay 2 Time” is set to maximum (127/Hold) which would be useful for audio clips (and sample loops, etc.). The ALTERNATE GROUP parameter (discussed below) will give us a method to turn OFF the audio clip playback.
Triggering audio via MIDI Note-On events opens the door to many creative possibilities. Wild stutter triggering effects can be easily accomplished via key presses. And think about this: When you designate a drum kit for audio clips/loops, you have 73 different keys on which to place audio. Turning a track on or off is easily done, either manually with the keyboard, a controller or automatically using the sequencer. Drum Voices offer 73 keys to place audio, while a Normal Voice has 128 keys on which to place audio. Each Sample can contain 6 minutes and 20 seconds of audio in stereo… up to the maximum sample RAM.
Extra Credit: It should be mentioned that when placing audio in a Drum Kit, the rule of the Drum Kit Voice will apply. It is highly recommended that your audio loops be assigned one to a Waveform (same as any percussion or drum sound, one to a Waveform) and the original pitch should be assigned to “C3”. This will allow you to use it assigned to any KEY within the Drum Kit and have it sound its original pitch.
Not all audio will be appropriate to trigger from within the Drum Kit Voice. Here’s why: There is a “silence detection” function going on inside Drum Kit Voices. The Decay2 Time “hold” feature and the fact that individual Keys can be set to ignore Note-Off messages could potentially cause a polyphony use issue… As soon as you pressed the 129th note you’d have no more notes to hold. There is a silence detection that shuts down the envelope if there is no audio for a period of time, this so that notes just don’t reserve the polyphony indefinitely. Tyip ally, in a Drum Kit all samples are cued so the sound starts immediately at KeyOn, and the entire sound plays without having to hold the key down. The envelope closes according to the Decay2 Time parameter setting. Once the envelope closes, the polyphony is returned to the general pool. If silence is detected for a continuous period, the envelope is forced closed Automatically. Audio clips with long silences in them may not behave as expected inside the Drum Voice. For clips that contain silences, you will need to use a “Normal” Voice and either a finger or the SEQUENCER to “hold” the note for you. In a separate tutorial we’ll cover using a Normal Voice to house your audio clips and loops. It offers a different set of creative uses and has its own set of rules.
About the provided data:
Included in a zipped downloadable file at the end of this article is an example of how a User Drum Kit was used to house various audio clips. The data was actually re-sampled from internal Pattern data… giving you a different way to trigger playback of your musical Sections. The key thing to recognize is that you can achieve absolute sonic parity between the original data and the resample – actually you can even improve it. The world of digital sampling opens up lots of possibilities. In terms of the polyphony saved you can start to see the benefit of this type of loop creation. You can resample the Pattern Section in full or in part and make unique combinations of data. Please follow along with this tutorial to gain a full understanding of how this all works together.
Make a backup ALL data file of your own data before loading the tutorial file!
The provided data will overwrite your internal USER information. If you make a backup ALL data file of your data, you can easily return to it after you have completed this tutorial session. (Backup Now, No Cry, Later!)
 Special Note: The data in the provided File (found ‘zipped’ at the end of the article) was created with the Waveforms and Samples in the 128MB USR SDRAM of a Motif XF. This means they can be directed to your instrument’s internal 128MB SDRAM. For those of you with FLASH BOARDS make sure to safeguard your Flash Board’s Waveform List from any changes by setting their load option to “None”: The LOAD OPTIONS (lower right corner) should be set:
USR > USR
FL 1 > None
FL 2 > None
Load the ALL data file: DrumKitLoop1.n3.X3A
User Drum Kit: Call up USER Drum Kit: UDR: 001(A01) Loop Kit C3-C4
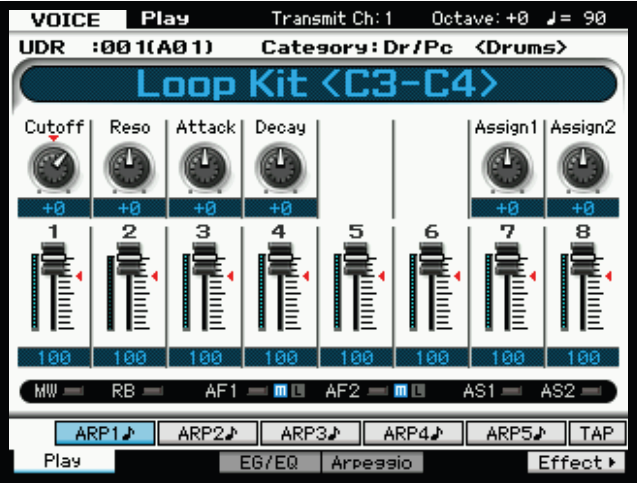 There are eight audio loops assigned to the white keys from middle C (C3) up an octave through C4. Each audio clip as we will see is set to loop endlessly. You can stop an audio clip from playing in one of two ways:
1. Start another audio loop by pressing any white key between C3 and C4
2. Press any black key between C#3 and A#3.
How this works is all the notes between C3 and C4 are assigned to the same ALTERNATE GROUP. An Alternate Group (there are 127 of them per Drum Kit) allows any sound assigned to the group to cancel any other sound assigned the same group. You are probably familiar with this when working with hihat sounds. By assigning the Closed, Pedal and Open Hihat sounds to the same Alternate Group, playing one will stop the other from sounding.
 In this case all the notes between C3 and C4 are assigned to Alternate Group #3. Each white key contains an audio clip; each black key is assigned an empty waveform number (silent) and acts as a ‘stop’ key. (See screen shot at right.)
The ASSIGN MODE is set to “single”. This is important so that only one instance of the loop assigned to this key can occur at a time. If ASSIGN MODE is set to “multi”, then multiple key presses will start multiple versions of the audio clip.
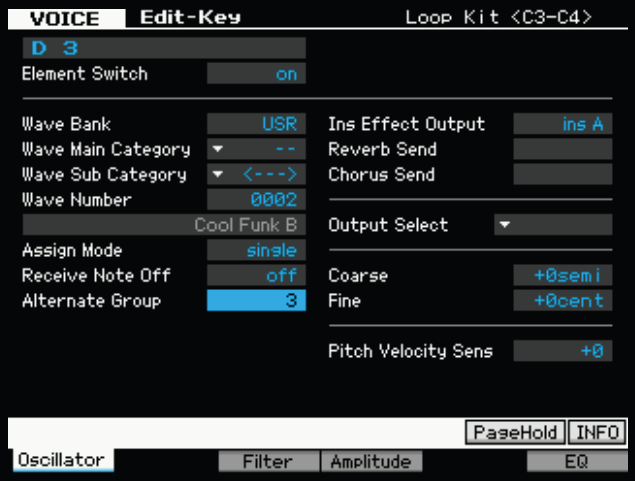
RECEIVE NOTE OFF, as discussed in the “What is a Drum Voice?” article, is what makes drum sounds play without you having to hold down the key. This is what separates drum and percussion sounds from “normal” musical sounds. In a normal musical sound you hold the key down until you want the sound to stop and when you let go KEY-OFF is sent and the sound moves immediately to the RELEASE parameter of the Envelope. With drum sounds you do not HOLD the key down. You want the entire drum envelope (AEG) to transpire without having to keep your finger on the key. As you can hear, all of the audio clips continue to play without you having to hold down the key – because, additionally, the AEG (Amplitude Envelope Generator) is set so “Decay2 Time” is 127 (HOLD).
Each of the audio clips (loops) are routed to INSERT EFFECT OUTPUT = INSERTION EFFECT A, which is setup to use the VCM COMPRESSOR 376.
By navigating to the [EDIT] > [COMMON EDIT] > [F6] EFFECT screen, you can see each Drum Key’s routing through the effects. (Unlike when in KEY-Edit, the information here does not automatically update in the screen. Highlight the KEY OUT parameter (upper left corner) hold [SF6] KBD and touch the KEY to select its routing information).
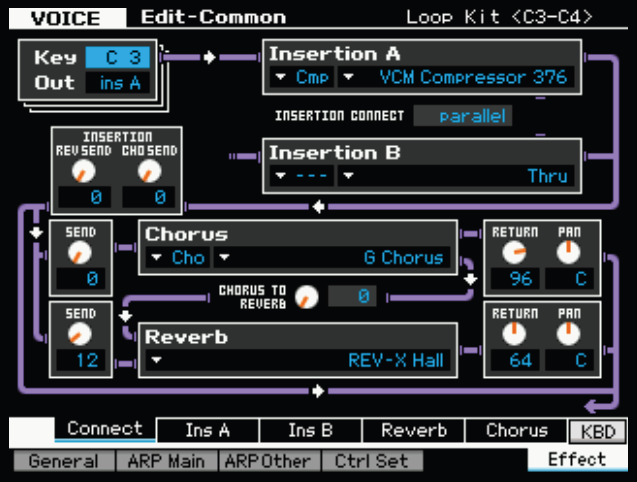 At left you see the KEY OUT for note “C3”. It is routed to INS A > Cmp: VCM Compressor 376.
If you follow the purple line you will see you have an opportunity to route the INSERTION EFFECT’S output to the System Effects via the “Insertion Reverb Send” and/or “Insertion Chorus Send”. There is also a “Chorus To Reverb” Send amount, as well as Return amount and Pan position controls for each of the two System Effects.
It is possible to route a Drum Key, post (after) the Insertion Effect, to the System Effects that are assigned to the Kit. When you do this, then this will be respected when the KIT is placed in a MIXING setup. In other words, if you do not have a KEY routed to the Reverb or Chorus Effect in VOICE mode, it will not be able to have reverb or chorus effects when you turn up the send for the KIT in a MIXING setup. This way one drum can have no reverb while another can be bathed in reverb. Typically, a kick drum is dry (no reverb) and a
snare drum is wet (has reverb).
If you want to add reverb to the audio clip loops you should turn up the “INSERTION REV SEND” and the SEND just to the left of the REVERB processor. The “INSERTION REV SEND” returns signal from compressor and allows you to route it through the System Effects, or not. Set it to 127. Then set the subjective amount with SEND knob just to the left of the Reverb block. You can experiment by routing the Drum Key to various effects. Next, let’s take a quick look at Controllers and Controller assignment. Try setting this up:
• Press [F4] CTRL SET (Control Set)
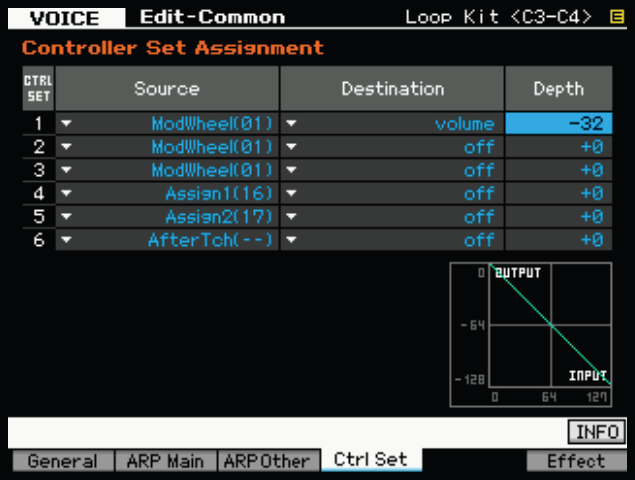 Here you can assign various physical controllers to vary the sound in real time. You will see that you can assign controllers to certain INSERTION EFFECT parameters, to overall Volume, and to Reverb/Chorus Send amounts. Please see the Data List booklet for more information on the available parameters per Effect type.
(Shown at left) CONTROL SET 1 is set so that the Modulation Wheel is controlling VOLUME and the DEPTH is set to a minus 32. As the graph shows, when you raise the Modulation Wheel you will decrease OUTPUT – the audio clips will fade out.
This Drum Kit Voice can be used alone to perform your loops. It could contain as many as 73 audio clip keys – each key, as we will see, could hold multiple clips. And as we will also see, it can be used in a MIXING program or in a PERFORMANCE with other Voices.
In the second Control Set route the ModWheel(01) to Destination “reverb send”, with a Depth of +32. Now as you raise the MW the volume fades out, and reverb increases from the value you set for the SEND amount.
Using Audio Clips in a PERFORMANCE
Call up Performance USER 1:001(A01) Cool Funk & Sax
 Here is a simple example PERFORMANCE made up of two PARTS. PART 1 is the “Loop Kit” mapped so that it plays from C1 through C2 (so it can be reached from a Motif XF6 whose lowest key is C1 – this is accomplished by using the PART parameter “NOTE SHIFT”). PART 2 is “Velo Growl Legato” saxophone, mapped from C#2 and above. You can see that you can control the Sections with the octave C1-C2 and solo on top. If you’d like you can edit this PERFORMANCE to select other instruments, for example:
Press [F2] VOICE and activate the B3 organ sound “First 3 w/Perc” and/or the synth lead “Feeling” by placing a red check mark next to the PART 3 and/or 4 (this activates the PART SWITCH). Then use the [PERFORMANCE CONTROL] function’s PART MUTE to turn on and off the right hand sound you want to use or simply fade them IN and OUT using the Control Slider associated with the PART in question.
Learning moment: The PART SWITCH activates the VOICE in the PART. Initially the Performance had just two Voices activate (see the main screenshot, PARTS 1 and 2 are lit green above the fader, and highlighted in blue in the PART NAME list). PARTs 3 and 4 must be activated… that is the PART SWITCH must be turned ON. Once it is, then you can MUTE and UNMUTE – which simply connects and disconnects the PART’s audio from the output.
How the Loop data was prepared:
Although the source of your audio Loop data can be virtually anything on the planet… since we are involved in learning the Motif XF, we want to show how data made from internal Arpeggio Phrases could be used to create PATTERN Phrases and Sections that could then be RESAMPLED in the XF’s Integrated Sampling Sequencer. By routing the PATTERN data to the XF’s Sampler you can turn your data into CD quality audio Waves – which as we have seen, can be mapped to keys and triggered by single note-on events at any time.
Go to PATTERN mode and recall PATTERN 01 “Cool Funk”. The eight audio clip loops were re-sampled directly from the XF sequencer. In fact, the music parts were mainly derived from data generated by on-board arpeggio phrases. Of course, you can generate your loops in any number of ways. 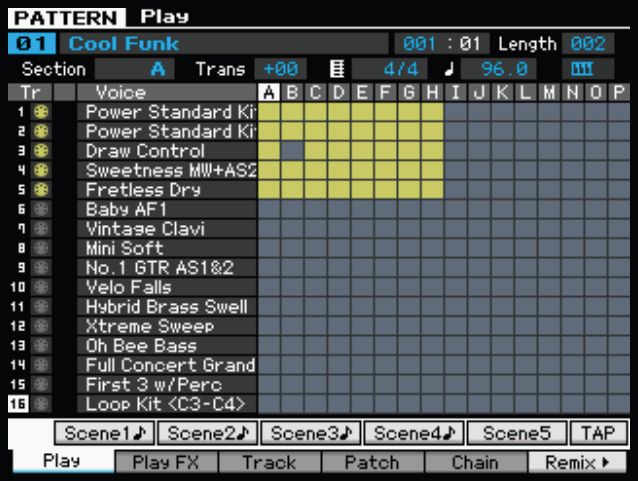 For example, in another example we will show you how to import (load) a sample wave into a Drum Kit. But for this first example, the eight Sections, A-H, were RESAMPLED directly to RAM. Then the Waveforms were assigned to INITIALIZED Keys within a USER DRUM Kit.
You can see that we have assigned our User Kit “Loop Kit ” to PART 16 of this Pattern. If you select Track [16] you can manually play the SECTIONS by simply touching a Key.
You can actually play this PATTERN without ever hitting the PLAY button. Select Track [16], press “C3”. Section [A] will play. You can then switch to Track [15] and play over it with an organ sound.
This first example is purposefully kept simple for sake of demonstration. But as you can imagine you can resample as many tracks as you desire… even as many as all 16 tracks to an audio clip. You can resample just the PARTS you know are going to use a lot of polyphony… say you have a big string ensemble, brass section, orchestral sound that you created and you realize you are pushing up against the limit of the 128 note polyphony. By re-sampling just those tracks you can reduce your huge polyphony-hungry sound to a single note-on event. This is the equivalent to sub-mixing (creating a mix within a mix) – only this time the purpose is to reduce the load on the polyphony. Knowing how and when to re-sample, means you will never run out of polyphony. Also it will free up those tracks for additional recording (an added benefit).
• Select PART [16]
• Press [MIXING]
• Activate the INS FX Switch (VCM Compressor 376) on PART 16.
By placing a red check mark in the “Ins FX Sw” box for track 16 (circled in red) we are recalling the VCM Compressor 376 that was assigned to the Drum Kit in VOICE mode. 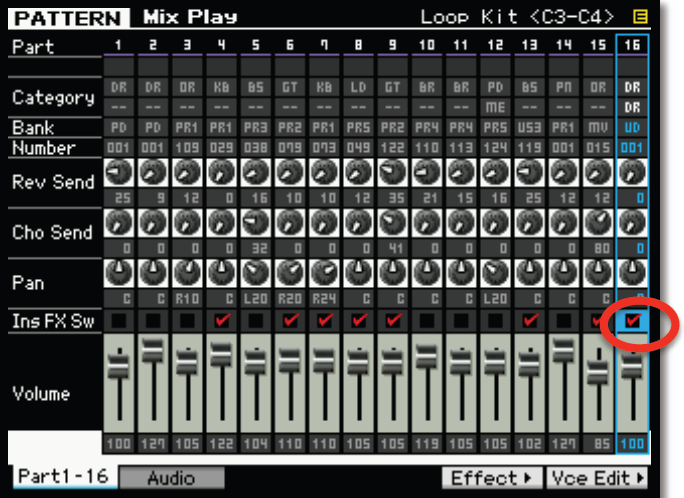 Remember any eight PARTS of a MIXING setup can recall their Voice mode Insertion Effects. For those who worry if their samples are going to be loud enough… you can hear that even without the Compressor the level of the original PATTERN data is pretty much matched in the audio clip… even with the Volume set at just 100. By placing a user sample in a Motif XF Voice (Drum Kit Voice, in this case) you have all of the same Voice parameters that will ‘dress up’ the audio and it will compete quite nicely with internal sounds. When the INSERT EFFECT is added there is a little extra punch added to the sample. A compressor is a leveling amplifier that adds “presence” to the audio source.
Compare the audio clips with and without the INSERTION EFFECT. Yes, the compressor makes it a bit louder, but what you want to train your ear to hear is that it has a definite punch, as well. Once you have activated the red check mark on PART 16, you can A/B (compare) the signal with and without by using the dedicated [INSERTION EFFECT BYPASS] button on the front panel. Compressors change the volume footprint of the sound – increasing its apparent ‘weight’ (significance, presence).
You can manually play the audio clip simply by triggering a note-on event on PART 16. You can compare it with the whole PATTERN Section.
C3 = Section A
D3 = Section B
E3 = Section C
F3 = Section D
G3 = Section E
A3 = Section F
B3 = Section G
C4 = Section H
The black keys in this middle octave act as Loop Off switches (C#3, D#3, F#3, G#3, A#3 and C#4).
In the next installment of this tutorial, “Creating the LOOP KIT Data“, we will take you through the process of recording these Sections as Audio Waves (loops).

