Loading Peter Jung’s CS-80 Library to MOXF
Motif XF File formats .X3A or .X3V
MOXF File formats .X6A or .X6V
There is VOICE compatibility between the MOXF and the Motif XF. This is true even though they do not share the same number of Banks. The Motif XF has four USER Voice Banks, while the MOXF has but three. This means you cannot just load ALL data from the Motif XF file to the MOXF internal. The products are indeed different. Data that is stored in a Motif XF File in the User 4 folder, must be redirected to one of the available Banks of the MOXF. Here are some of the basics you need to be aware of:
Motif XF __ MOXF VOICE Mode
PRESET 1 __ PRESET 1
PRESET 2 __ PRESET 2
PRESET 3 __ PRESET 3
PRESET 4 __ PRESET 4
PRESET 5 __ PRESET 5
PRESET 6 __ PRESET 6
PRESET 7 __ PRESET 7
PRESET 8 __ PRESET 8
________ __ PRESET 9
USER 1 _ __ USER 1
USER 2 _ __ USER 2
USER 3 _ __ USER 3
USER 4 _ __ N/A
Fortunately, when loading data from a Motif XF ALL data (.X3A) or ALL VOICE (.X3V) File, you can opt to load individual Voices or redirect an entire Bank of 128 to any available target Bank In your MOXF. The MOXF is able to read and extract specific types of data from Motif XF Files. This is covered in the REFERENCE MANUAL on page 157.
As it points out not every Type of data will be loaded when you attempt to LOAD a file created for the Motif XF. Only Voice, Performance, Arpeggio, Mix Template, and Waveform data can be extracted from a Motif XF File. And from the SEQUENCER (Song/Pattern) files only the Waveform data that was recorded using the Motif XF’s INTEGRATED SAMPLING SEQUENCER will be loaded to the MOXF. The actual sequencer track data must be transferred via Standard MIDI File (SMF) in a .MID file.
FLASH BOARD Slots:
The Motif XF has Flash expansion capability of two boards; 2048 Waveforms per Board, 4096 Waveforms total.
The MOXF has one Flash expansion slot; 2048 Waveforms total.
VOICE Bank Locations:
The Motif XF has one more USER bank than the MOXF. The Motif XF can hold 512 USER VOICE, the MOXF can hold 384. Therefore, if you are loading data created for a Motif XF you must follow instructions and learn to redirect the VOICES you want to the Banks and locations you want to place them in your MOXF.
VOICES: Waveforms and Samples
We will state this here because it is the KEY to understanding this whole thing: a VOICE is the individual playable sound in the Yamaha Music Production synthesizer. A Voice is made up of three main building blocks: an Oscillator section, a Filter section, and an Amplifier section. The sound source is the Oscillator, which in the case of the Motif XF and MOXF is always based on a digital audio recording (sample). Sampled audio is stored in memory and is recalled when you play a Voice. This data is stored at a sample rate of 44,100 samples per second. By far the largest data is this sampled audio that makes up the Oscillator. Literally, hundreds of individual samples can be used to recreate a single VOICE. And this data can be quite large in size. This is why it is “burned” to the Flash Board so that each time you want to access it, you do not have to wait several minutes for it to load.
When you recall a VOICE like the Full Concert Grand Piano (which is stored as a Preset Voice) the Voice data knows where to “look” to find the appropriate Waveform (audio) data. The hundreds of Samples that are used to recreate this 9-foot Concert Grand are organized by several Waveforms that have a permanent numbered location. Even if you STORE edited versions of the Full Concert Grand to a number of USER Voice Bank locations, the Voice data will always “know” where to find the Waveforms and Samples that will make it sound properly.
The VOICE can be relocated, the data will always “point to” the correct Waveform location! What you will be doing when you install (burn) data to the Flash Board, is giving the Waveforms of the Voices you Load a semi-permanent numbered location on your Flash Board. This way any time you load the Voice data from one of YOUR files, all the instructions about where the Waveforms are to be found is there… This is how YOUR instrument “knows” how to find it without you having to wait for the audio to load.
Waveforms on your FLASH BOARD cannot be overwritten. Not by mistake, and not even on purpose. The only way to remove an installed Waveform (and the Samples that it organizes) is to DELETE it or FORMAT the BOARD.
INFORMATION About the FILE
The CS80 Library is made up of the following data:
Approx 470MB of data total – this requires the majority of a 512MB board and about 47% of a 1GB Board.
61 Waveforms
1179 Keybanks (samples)
Total VOICES = 128
VERY IMPORTANT INFORMATION
The original VOICE data for this Library for the Motif XF was housed in USER 4 bank of the file – so you cannot just blindly load the data without knowing where it is or where you are going to put it.
How can you know where the original Voices are coming from (which Bank)? Read the included documentation that comes with the File. The person (in this case Dr. Peter Jung) who created the original File (for the Motif XF) determined which USER Bank they are contained in. The File will contain five Folders, one for each Motif XF USER Bank, as follows:
USER 1 – contains 128 normal Voices
USER 2 – contains 128 normal Voices
USER 3 – contains 128 normal Voices
USER 4 – contains 128 normal Voices* *this is the CS80 Voice data
UDR – contains 32 drum kit Voices
_ “CS80.n2.X3A” is the name of the File as it appears in the Motif XF… the name will be truncated to fit the MOXF screen dynamics: “CS80N2~1.X3A” is the file name as seen in the screen of your MOXF.
Load via “1 BANK VOICE” Method
According to the included instructions, the Voices are located in the FILE at the following location:
USER 4 Voices: 001-128
_ Place the “CS80N2~1.X3A” File in the root directory of a USB stick that you use with your MOXF.
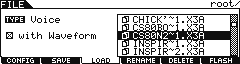
Press [FILE]
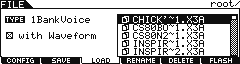
Set the File TYPE = 1 BANK VOICE
Highlight the “CS80N2~1.X3A” file
Mark the box “[x] With Sample”
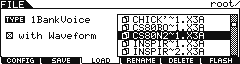
We will redirect the load intended for the Motif XF’s USER 4 bank to USER 1, 2 or 3 of your MOXF. (As explained above, the MOXF has no USER 4 bank, necessitating this redirection)
Press [ENTER]
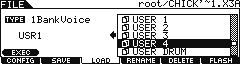
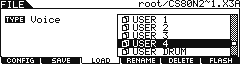
You will see the 5 Folders of the original FILE
Highlight “USER 4” in the column on the right side (It contains the 128 new Voices)
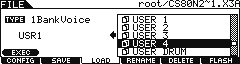
Move the cursor to the LEFT and set the target as USR1, USR2 or USR3 in your internal MOXF. (USR1 is shown)
Press [SF1] EXEC to execute
This will load all the VOICES from USER 4 Bank of the FILE to your MOXF USER Bank 1. When loading this Library with Waveforms it will take approximately 53 minutes to load the Voices to the User 1 Bank and to “burn” the audio data to a Flash Board. Once you determine that you will “keep” a Waveform set, you never have to wait for this data to transfer again. The initial installation is a lengthy process. This is normal. But please recognize that this is not some thing you do often. Only when auditioning new Libraries or installing new data to your collection.
The installation of audio to the FLASH BOARD will take some time…
Please use this time to either relax or do another activity: A watched pot seems to take much longer to boil than if you get involved with something else during this time. The screen will indicate that data is being installed on the Flash Memory Expansion Module. Do not interrupt it. Do not conclude it is not working. DO note the time on the clock – 53 minutes will seem like forever only if you are watching the pot boil. Be patient. “Flash” does mean quick – but it does not refer to this BURNING (installation process). “Flash” means quick in that when you press a key and demand as many as 128 channels of audio from any of these samples, the MOXF’s Flash Board will access this data in nanoseconds… in a flash.
Now that you have customized your WAVEFORM data on your FLASH BOARD, you must make a BACKUP file of your data. The fact that you redirected the CS80 data to your Flash Board, needs to be documented in a MOXF ALL data file to back up your work. Do so.
From now on you would use your file (not the Motif XF File). Your File will be in a native MOXF format, and having the data backed up as a MOXF File means it will be easier to access in the future. You may only decide “to keep” a select number of the Waveforms in this Library. Assembling the data you require is always a FILE LOAD task. When you load an individual Voice, the MOXF will load the Waveforms and Samples to make the VOICE work. If it detects that it has already loaded (installed) the Waveforms from this File, it smartly redirects the Elements within the Voice to the Waveform’s new Flash Board location.
This is is why it is imperative to backup this data in a MOXF “ALL” data File “with Samples”. It will make the process of “selection” much easier later when you decide which Voices from this Library you like.
Alternate Method: Loading Individual VOICES from an ALL data File
The most efficient way for a MOXF Owner to load this Motif XF data is to load the entire BANK of 128 as described above. Loading all 128 as “1 Bank Voice” is the best way to audition the Library. Decide what Voices appeal to you, then you can Format the Board and selectively install only the data you need “permanently” to your Flash Board.
The steps for loading individual Voices from a Library File follows:
Place the .X3A (or .X6A) File in the root directory of a USB stick that you use with your MOXF.
Decide ahead of time which 128 VOICES you wish to overwrite in your current USER 1, USER 2 or USER 3 banks. When you first encounter a MOXF, data in USER 1, 2 and 3 Banks are simply repeats of data found elsewhere in the Presets Banks… So feel free to overwrite any of these locations.
The CS80 Voices are located in the FILE at the following location:
USER 4 Voices: 001-128.
Let’s say you decide to load the VOICE data to the locations of USER 1 in your MOXF.
What this means in layman’s terms:
Data in the Motif XF FILE originating at USER 4:001(A01) will be directed to USER 1:001(A01).
This can be done one VOICE at a time as follows:
Press [FILE]
Press [F3] LOAD
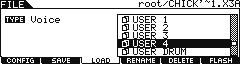
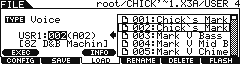
Set TYPE = VOICE
Move the CURSOR into the DIRECTORY (right side of the screen) and highlight the CS80N2~1.X3A file
Make sure the “WITH WAVEFORM” is marked.
Press [ENTER] to ‘open’ the FILE
You will see the five FOLDERS: USER 1, USER 2, USER 3, USER 4, USER DRUM
Highlight the “USER 4” Folder (The unique VOICE data for this Library is contained in the USER 4 Folder)
Press ENTER to view data in the Motif XF USER 4 FOLDER… you will see a list of 128 VOICES that occupy the File’s USER 4 Folder.
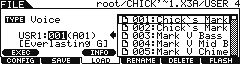
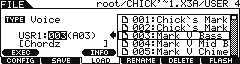
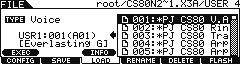
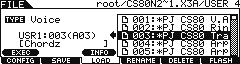
Highlight the first Voice in the list: “001:*PJ CS80 V.A”
Move the cursor to the LEFT side and select the Target DESTINATION
Set the Destination to USER 1:001
Press [SF1] EXEC to execute.
Screen translation: The VOICE data will be loaded from the root directory of the File “CS80N2~1.X3A”, from the Folder named User 4 to the internal USER 1:001(A01) of your MOXF – overwriting the current VOICE data in “USR1:001(A01) Everlasting Glory”
The VOICE data will be placed into USER 1:001(A01) and the Waveform and its Samples will be installed on your Flash Board (The Voice data will be converted to MOXF format, then the audio data will be installed).
When complete (all Waveforms/Samples necessary to make this Voice sound properly will be installed),
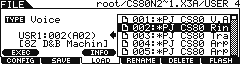
You can setup to load the second VOICE… Simply move the cursor to the LIST on the Right and select “002”; Then move the cursor to the Left side and set the target to USR1:002(A02).
If the Waveforms and Samples are already in place (and your MOXF “knows” it) and the Voice will load very fast. As you select VOICES to LOAD, the MOXF will determine if the WAVEFORM name is already installed on your Waveform List, if the data is not found – then the MOXF will install the data to make the VOICE work. If the data is found, the MOXF will skip duplicating the data and simply repoint the VOICE to the data’s currently internal Flash location.
An important thing to learn here is:
Because the data is all coming from the same Source File, the MOXF “knows” if the Voice you’ve selected to load uses the same Waveforms and Samples as data already installed and it will not duplicate its work. It simply repoints the new Voice to the Waveform List location it placed the data of the first Voice. So the VOICE parameters load in about 2 seconds when the MOXF detects that the WAVEFORM has already been installed from this file. What this means is anytime you need a VOICE that uses the CS80 data, that data is semi-permanently installed on your FLASH BOARD. This means loading VOICEs you made that use that data will only take sesonds… not minutes.
Continue to direct the USER 4 Voices to the corresponding locations in USER 1 of your MOXF… 003 to USR1:003(A03) and so on. You can actually point the Voice data to any internal location. The internal location does not really matter in terms of the Waveforms and Samples. The MOXF “catalogs” where every bit of the audio data is placed. This means no matter in which User Bank and Voice location you direct the Voice data, the MOXF will ensure that each Element finds its Waveform.
And as long as you are loading from the same Source File, or one of your backup Files, your Waveform information is documented.
POST SCRIPT:
When you have loaded all of the Voices you desire and played each to verify they are sounding properly, make a BACKUP ALL data file (.X6A) – this is critical and the most important step… Because not only is this now going to make a fully compatible MOXF file, it will contain unique information about exactly where it placed your Waveforms!
You will no longer use the Motif XF (.X3A) file. By creating a new File, it will be in native MOXF file format which will allow you to have the proper number of USER Folders for your instrument. Every ALL data (.X6A) and/or ALL VOICE data (.X6V) you create will automatically include YOUR unique Waveform List. Even when you opt to Save “without Samples”, the Waveforms (instructions for where to find the Samples) are always written to the file. Because the Sampled audio is archived (burned) to the Flash Board, loading in just the Voice data is quick and efficient.