All possibilities could never be covered in a short guide but this should get you on your way. After going through this article feel free to experiment with other assignments.
Get your MOXF DATA LIST booklet and refer to the CONTROL LIST on page 118: “CONTROL SET DESTINATIONS” and “LFO BOX DESTINATIONS”. You will also want to refer to the EFFECT PARAMETER LIST (pages 98-105). As we begin to explore the operating system, be prepared to dig a bit on your own. If you are new to editing Effects or Controllers, exploring and looking items up will help you make the associations necessary to move toward mastery. We will make specific assignments, get actual proof and thereby gain a feel for the making these settings. Please follow the examples closely, to pickup exactly what is being pointed out. Each example is designed to make a point. Once the points are made, it is easier to connect the dots!
Assigning Controllers in Voice Mode
It is fundamental in the MOXF that controllers are assigned in VOICE mode. They are an integral a part of the Voice – as important as the Oscillator, Filters and Amplifiers that shape the sound. The assignments made to the VOICE will be available even when the VOICE is placed in a PART of a PERFORMANCE, or in a PART of a SONG/PATTERN MIXING program. You can count on the fact the assignment of controllers will follow the VOICE wherever you use it with very few exceptions. We will point those out later in the article. Within the architecture of each AWM2 (Yamaha’s sampled-based) Voice is a set of 6 controller assignment setups, called the “Control Set”. You can program how the physical controllers will be assigned to affect a specific part of the sound. There are some 101 possible Destination parameters – which include the Vocoder, the Insertion Effects, and parameters within the Voice architecture. The assignable physical controllers are:
FC1 – Foot Controller 1 (optional FC7 pedal)
FC2 – Foot Controller 2 (optional FC7 pedal)**
FS – Foot Switch (optional FC4/FC5 pedal)
AF1 – Assignable Function button
AF2 – Assignable Function button
MW – Modulation wheel
PB – Pitch bend wheel
Assign 1 – Knob 3 (Tone 3 row)
Assign 2 – Knob 4 (Tone 3 row)
AT – Aftertouch*
RB – Ribbon Controller**
BC – Breath Controller**
*Although the MOXF keybed does not generate Aftertouch messages, the MOXF tone generator is fully capable of responding to this message when received via MIDI or via the sequencer.
**Although the MOXF does not physically accept an FC2 jack, a Ribbon Controller or BC3 input, the instrument nevertheless is able to respond to and send these controller numbers. More on this later in the article…
The ELEMENT:
In VOICE mode… the concept of an ELEMENT must be clear. An Element is one of eight possible tone sources within a VOICE. Each Element accesses an AWM2 Waveform. The Waveform is a set of parameters that collect raw Samples into accessible group. Think of the Element as a set of parameters that further sculpt the sound into a playable entity – the Element uses the Waveform as its Oscillator, and it includes parameters for control of Pitch, Timbre and Loudness changes; and by adding a Pitch Envelope, a Filter Envelope, an Amplitude Envelope, Modulation sources, as well as routing to Insertion Effects and its own EQ device. An Element can represent an entire instrument or it can be one component in building an instrument. You will find a single Element that represents an entire Acoustic piano and you will also find an Element that is only responsible for the sound of the felt hammers falling back into place on an acoustic grand piano. An Element can be just a set of samples that represent a soft strike of each note across the piano’s range. Each Drawbar of a Tone Wheel organ could be encased in an Element. A single Element could be an entire symphonic orchestra or a single violin. The term OSCILLATOR is related to an ELEMENT… in that it is a tone source, one of eight possible tone sources in a Normal Voice or seventy-three in a Drum Kit Voice; each with its own Filter, its own Amplifier, its own routing to the Insertion Effects, each even has its own EQ. One difference in the sample playback engine and the traditional analog synth, is each of the Oscillators has its own complete set of tools to make a finished sound. It is not that you couldn’t do this with analog synthesizers; it is just that it required a wall of modules and lots of patch cabling.
Certain Control Set assignments are common to all Elements and others can be specific to a particular element of the sound. There are 6 Control Sets, each allows the user to pick a physical controller (Source) and assign it a parameter (Destination) – the target parameter you will be changing. It is possible with this system to assign more than one controller to the same destination by using more than one CONTROL SET. The degree (or Depth) of the control of each physical controller can be programmed, as well. In fact, the Depth parameter is very important – because without a Depth amount the assignment is meaningless. Think about the Depth setting as controlling how far the controller will be moved to get the response you desire. This is your performing gesture and should be set to your taste and style. (It is okay to have an opinion when setting this parameter – it is going to be as personal and individual as the velocity curve response).
You can view and set the parameters for the Controller Setups in the MOXF itself or via the “MOXF Editor” in your computer. To navigate to the Controller Sets in the MOXF from Voice mode:
· Press [EDIT]
· Press [COMMON], if not already selected
· Press [F4] CTRL Set
 · There are 6 sets accessible via the [SF1], [SF2] and [SF3] buttons.
· Setting the SOURCE/DESTINATION: select a Source controller and assign a target Destination parameter.
· Destination Elements or Common: The Element Switches activate control for each Element. If the destination is ‘common’ to all Elements you will see dash marks for each individual Element contained in parenthesis. Dash marks in parenthesis means you cannot get at it (this is the equivalent of being, literally, ‘grayed-out’). In this case because all Elements will be treated together. Some typical Common parameter destinations are Volume, and the SEND amount to the two SYSTEM EFFECTS: Reverb Send and Chorus Send. If the Destination can be assigned to a specific Element(s) you will see the destination parameter name such as “ELM-Lvl” = Element level, “ELM-Pan”, etc. You can select which Elements are to respond to this control setting. An Element Switch (ElmSw) setting with a number, 1-8, represent a setting where an Element will be affected, and the others, with a dash, are unaffected. We’ll see an example of this a bit later in the tutorial.
· DEPTH: The setting here must be set with care and some thought. The range here is –64 ~ 0 ~ +63. How the MOXF responds to a setting will depend on which parameter and which controller is selected. (See below some example assignments). A Depth setting of 0 defeats all other settings in the Controller Set (and renders them meaningless). In general, the higher the number the more it increases the range of control. Negative value settings reverse the effective direction of the controller. You will have to be logical here.
BIASING a parameter to a CONTROLLER
Example Assignment: In this example we deal with controlling VOLUME via controllers within a MOXF sample-based Voice. This can be tricky, but this example should make clear how it works. The parameter you wish to control may, in fact, be under control of another setting in the architecture, therefore some analysis of what is going on within a VOICE is necessary. This process will allow you to learn about how physical controllers are assigned within a VOICE to various functions – these are in addition to those already assigned via the 8 knobs and 3 rows of functions in the upper left corner of your front panel – the [KNOB FUNCTION CONTROL] area. Each Voice when selected will have access to these 24 real time parameters via the dedicated knobs. As we will learn, the front panel knobs will have a given role, what you can do with the CONTROL SET is really fine tune your control over the selected VOICE.
Experiment #1: Biasing the Control at the VOICE level
–Let’s say you want to control the total Volume of the Voice with the Modulation Wheel. MIDI control change message #001 is the Modulation Wheel. The modulation wheel can be assigned to control all manner of parameters within a synthesizer, not just vibrato. But for our example let’s see what happens when you attempt to assign the MW to control overall volume. For our experiment let’s initialize a voice. This way we are not inheriting values from a preprogrammed Controller Set. From [VOICE] mode:
Press the following buttons to “initialize” a VOICE:
· [JOB]
· [F1]:INIT
· [ENTER]
· [INC/YES] to execute.
This will create an INIT VOICE with just initialized waveform 0001 (piano wave) in it.
· Press [EDIT]
Let’s select a synth wave. Navigate to the OSCILLATOR page:
· Press Track Select button [1] to drop to the Element level of editing.
· Press [F1] OSCILLATOR
· Select the Wave…
Wave Category: Wv
Wave Number: 1327: Padd

(Notice the ‘E’ in the upper right corner and the ‘El 1’ on the top line – denoting the Voice has been edited but not yet stored and we are editing Element 1.)
Now, for fun, let’s activate a second Element in this Voice.
· Press the Track Select [2] button that represents Element 2.
· You can now turn the Element Switch ON
The parameter at the very top of the OSCILLATOR screen is the Element Switch – if this is not set to ON, the Element cannot contribute to the VOICE, and will require no polyphony. When set to ON, the amount of polyphony drawn by this Element will be determined if the both “Velocity Limit” and “Note Limit” requirements are met. An Element only uses polyphony when a key is struck within both is Velocity range and Note range, and if the XA CONTROL (Expanded Articulation Control) requirement is met. More on that in future articles.
· Set Element 2 to waveform #1496 Wave Category: Wv; UniBass
We’ve picked these two because they are sonically different and easily distinguishable.

(Notice that the LED for button [10] now lights to signify that Element 2 has been activated. Both [9] and [10] indicate that Elements 1 and 2 are now active. And since both are mapped to velocities 1-127 and note range C-2~G8 they require a note of polyphony each.)
· You can use Track Select buttons [1] – [8] to select Elements. Currently we can use buttons [1] and [2] to *select* Elements to view, and we can use the dedicated [MUTE] button, which will illuminate an Element when it is available to sound. When [MUTE] is lit all currently active Element (Track Select) buttons will light. This will allow you to isolate each Element when you want to concentrate on just one at a time. Practice this basic skill. When the Light is lit, the Element is sounding, when the LED is not lit, the Element is muted.
· Navigate to the Control Set page. (Press the [COMMON] button to return to Common edit. [F4]:CTL SET
· Set the CTL SET 1 as follows:
 In this example, the Volume parameter is ‘common’ to all Elements. We know this because the Element Switches are “grayed out”. If you were to activate additional Elements they would also share the same setting when you select a ‘common’ destination. The Modulation Wheel will effect all the Elements. The +63 Depth setting sets the maximum range of the controller. Try it…move the mod wheel…
Hey! It doesn’t work. Is the unit broken? Not at all… Here’s why it is not working: This is not the place that the overall volume of the sound is set, only where you assign control to it. We need to go to the overall Voice volume parameter and reduce it to zero. Another parameter is providing Volume for this Element so moving the Mod Wheel up does not affect the sound which is already provided by another setting. Here is how to change it.
Navigate to the Common OUTPUT page:
· Press [F2] OUTPUT
Here you will see a parameter for the total OUTPUT VOLUME of the Voice = 127. Program it to 0. That’s right, 0.

Now when you move the Modulation Wheel you have total control over the volume of the Voice. The position of the modulation wheel is now an absolute representation of the current common volume, 0-127. We call this process ‘biasing’ the parameter (in this case, volume) to the controller. In other words, it will now look to this controller (Mod Wheel) for volume instructions.
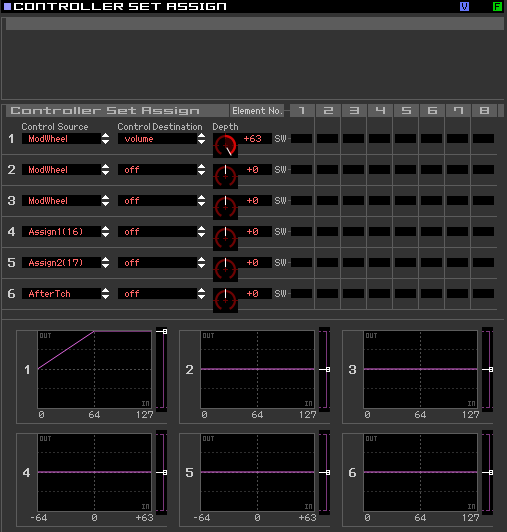 Before we move on, by setting the DEPTH parameter to +63 you will observe that the maximum value is reached by the time the Wheel is raised half-way. DEPTH has to do with HOW MUCH of the controller need be applied to get the desired result. It should be set by your own preference for movement of the controller. (The screenshot here is taken from the Yamaha MOXF6/MOXF8 Editor Standalone/VST). A Depth setting of +63 will reach maximum Output value at 1/2 of its travel upward. If you use a Depth setting of +63 for the Rotary Speaker Speed Switch, notice the SLOW-FAST swith is ‘flipped’ at 1/4 of the travel of the MW. Try it!
If however, you set the Depth = +32, you will observe that the INPUT (Wheel movement) must reach the top of its excursion in order for the Output (result) to reach Maximum. Try it!
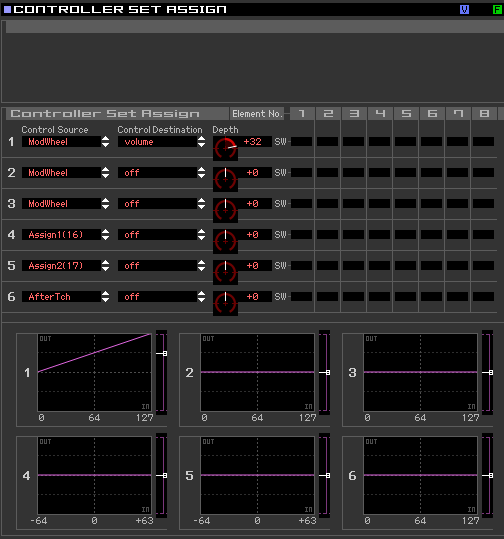
Actually a setting of +32 will yield a linear result for the MW – where for each unit INPUT you get a unit OUTPUT. If set to +32 you will need to move the wheel at least halfway for the SPEED to switch from SLOW to FAST or vice versa.
Spend a moment or two understanding this graphic. This is an X-Y graph, the x-axis goes South-North (OUTPUT) and the y-axis goes West-East (INPUT). In our graphic the amount of movement of the Controller (INPUT) is on the y-axis (left-to-right). The values (for the MW) increase as you move from 0 along the bottom towards 127. The value sent (OUTPUT) is measured going up from 0 towards maximum at the top edge of the graphic. To connect the mental dots, experiment with different positive (+) values for the DEPTH parameter and move the SOURCE (controller) to experience the response (Output) – you should experience a difference in the distance you must engage the controller to get a result.
The start point of the purple line is determined by the CONTROL SOURCE (physical controller) you select. For example, if you select a CONTROL SOURCE that goes above and below 0, ( like the AS1, AS2, RB, or PB) the graphic will reflect the startpoint as -64 and the maximum as +63.
Understand that by setting the DEPTH = +63 from the Mod Wheel corresponds to a response where maximum volume output (top of the graphic) is achieved by the time the MW controller is halfway engaged. Moving the MW beyond that the response remains the same (flat above 64 the mid-way point).
When the DEPTH = +32 it corresponds to a response where the maximum volume output of +127 is only reached when the MW controller is completely engaged. The graphic is “linear” in nature.
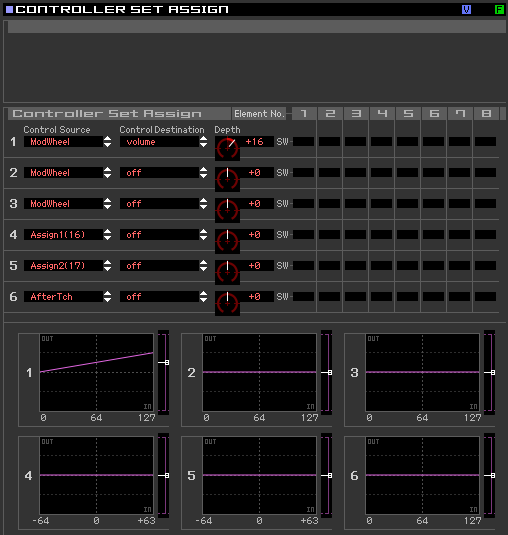 When the DEPTH = +16 it corresponds to a response where the maximum volume output is not reached, even when the MW controller is completely engaged. This can be useful to prevent excessive change.
All values in-between are available – so you can tailor the response as you may require. Moving a controller does not have to be ALL or NOTHING AT ALL, you can customize it, by ear, by feel, to the response you desire. You may wish to apply a controller with a minimum of effort – that is what the DEPTH parameter will allow you.
Experiment #2: Biasing the Control at the ELEMENT level
Okay, before continuing: return the Common Voice Volume to 127. Here’s how:
Press [COMMON]
Press [F1] GENERAL
Press [SF2] PLAY MODE
Set the VOLUME = 127

Similarly, a volume assignment can be made on the Element level. This would allow the player/programmer to have control over specific parts of the sound (Elements) within a Voice. In our Control Set instead of making the Destination = Volume (Common overall volume) like before, this time assign it to ELM-Lvl or Element Level. When ELM-Lvl is selected you can individually assign which Elements will respond to this Control Set’s Depth setting when the physical controller is moved.
Return to Control Sets:
· Press [COMMON], if necessary
· Press [F4]:CTRL SET
· Select ‘ELM-Lvl’ as the Destination
Set only Element 2’s level to be controlled via the MW (Element Switch). This is accomplished by moving the cursor to the Element Switch line and removing all but Element 2. Move the cursor to highlight one of the eight locations and use the [INC]/[DEC] buttons or the DATA DIAL to activate/deactivate each Switch in turn.

What this accomplishes is that only ELEMENT 2 will respond to the MW position for its Volume, however, in a similar scenario to our previous example, we must set the Volume of Element 2 to zero. Here’s how…
· Press the Select button [2] to view Element 2 parameters
· Press [F4]: AMP (Amplitude)
· Press [SF1]:Level/Pan
· Set EL2 Level to 0

Instead of “Total” Voice volume we are controlling the level of this particular Element. When you set Element 2’s Level to 0, it is biased to the MW. This is a very flexible arrangement. You can expand upon it and dream up your own configurations. For example, you could take Control Set 2 and program it to control just Element 1 with the same Mod Wheel but set the E–Level DEPTH to a negative (–64). Now when you move the wheel forward it will fade out one Element and fade in the other. A negative DEPTH setting will reduce the normal Volume setting.
Notice you did not have to set the Element Level for Element 1 to 0. This is because if you did and then applied a minus value to it… this would be illogical…because levels below 0 are still inaudible.

Experiment. Try changing the controller to the AS1(16) for both Control Set 1 and Control Set 2. The Assign 1 knob defaults to sending Control Change message number 16. This is shown in parenthesis as: AS1(16)
Now that you have the AS1 controller selected for both Elements, you will notice that only one Element is active when the AS1 is centered, value (+0), but if you move the knob fully clockwise (toward +63) only Element 2 is heard, in fact for all values greater a certain point. And as you turn the knob counterclockwise from the +0 point, only Element 1 is heard. All values below zero there is no change… All the timbre change takes place between +0 and +32. This is because the AS knobs, unlike the wheel is a “left(negative)-center-right(positive)” controller (more on this later in the article). If Control Set 1 is set Depth +63 and Control Set 2 Depth is opposite at -64, notice how when the screen reads out a value of +16 you are getting an equal amount of each Element. Setting the maximum DEPTH = +32 and DEPTH = -32 you get balance between the two Element Levels at about the +32 value on the Knob.
We just want you to observe that now.
Almost any controller can be used for this purpose (crossfading) – some make more sense than others in certain situations.
FOOT PEDALS
The same scenario holds true for controlling volume with an optional Yamaha FC7 (sweep control pedal) plugged into the Foot Control jack (FC2). Foot Control (cc #004) can be assigned to control many different parameters within a synth voice. It too can be potentially routed to any of 101 Destinations – and as we’ll see, some make more sense to control with your foot than others. (cc004 “Foot Control” is freely assignable as to its function, and should not to be confused with Foot Volume (cc #007) which will always control MIDI Channel Volume). There is always some confusion here because they both can use the same FC7 pedal – however, the function can be quite different. One key difference is that if you use cc007 every thing connected to that MIDI channel will be controlled exactly the same. However, if you use the assignable Foot Control cc004 you can choose the destination parameter for the foot pedal and it will only affect the MOXF and only the Elements of the MOXF sound that you designate. Just FYI: cc007 is the Control Change message that controls the overal Volume of the VOICE, or the PART in a PERFORMANCE, SONG/PATTERN MIXING.
Foot Control (cc004) can be assigned to control the internal volume of the MOXF in a similar fashion to how we did the MW experiment. Simply follow the same steps we did with the MW, above, to assign the Foot Controller (FC04) to be the Source and set “volume” or “E-level” as the Destination. When you set the Volume to 0 you will have biased total volume to the Foot Controller.
Extra Credit: If the parameter to be controlled is set at any value other than 0, you are, in affect, setting a minimum value for that parameter. In the case of our volume output example, this would be the minimum volume when the controller was in the heel-down position (or wheel down position). In some instances you may wish to set the minimum to a value other than zero as the stored condition (especially for “live” players or those in the recording studio, this is invaluable). An example of how this is useful could be when you are using the Foot Control assigned to control the string layer in a Piano & String Voice – the Piano Elements can remain unchanged while you use the FC7 sending cc004 set to “Element-Level”. You can set the maximum volume for the for the VOICE using the Voice Volume’s overall setting, but set a minimum value for the Element to which the Strings will not dip below… If you always set the minimum to 0 (silence) you may not recognize that setting the actual Element’s Level to a value, say 60, can allow you to easily control the swell and withdrawl of the strings between two predetermined output levels – this can, indeed, be useful. If you know what output levels work, you can setup your controllers to work in specific region that you predetermine.
After any and all Voice edit procedures you should [STORE] and then SAVE data (if it is worthy of keeping). If you started editing a Preset or you started editing an Internal Voice, simply point the Store procedure towards a desirable Internal location. Press [STORE]; Select a location; press [ENTER]; then [YES]. If you are using Cubase, give your newly edited Voice a name and save it, individually, as a VST PRESET in the Cubase Sound Browser. Doing so will allow you to retrieve this Voice anytime you need it in the future (and you will not have to hunt through various USB drives looking for it – simply name it, categorize it, rank it, even leave notes for yourself about its use.
Note: At the end of any editing session you should make a backup copy of all your new Voice edits. Save sounds either to an optional USB drive, or to your computer in ALL (.X6A) or ALL-VOICE (.X6V) files or backup the current set via a MOXF Voice Editor File (.X6E).
If you have FLASH BOARDS installed: You only need to make a (big) backup SAVE “with Sample” when you have actually changed the data on your FLASH BOARDS. If you have not manipulated (added, subtracted new) Waveform data, then you simply make a (small) file SAVE “without Sample”.
What other things can be assigned?
To answer this question we must recognize that there are answers for internal Voices/Performances and answers for external communication via MIDI Master Keyboard setups. But first, let’s gain an understanding of how the controllers work. MIDI provides for standard physical controllers. Some are fixed as to what Control Change message they send, while others are assignable. We must consider what these controllers are doing to the internal MOXF sounds and what they are doing out via MIDI. These two things can be quite different, by design. Sound tricky? It is – so pay attention
🙂
First, here is how it works with Voices. MOXF Voice banks hold the factory programmer’s best work. These are your fundamental, playable sounds. A Voice can have as many as eight completely independent multi-sampled waveform sets within it – Yamaha calls these components Elements. Each Element can be individually controlled by MOXF parameters such as filters, envelopes, LFOs, etc. You can assign the various physical controllers to control specific areas within the sound. The physical controls available are:
PB – Pitch bend wheel
MW – Modulation wheel
Assign 1 – Knob 3, Tone 3 (cc016)
Assign 2 – Knob 4, Tone 3 (cc017)
AT – Aftertouch
FC1 – Assignable Foot Control (011 Expression)
FC2 – Assignable Foot Control (004 Foot Cntrl)
FS – Assignable Foot Switch
BC – Breath Controller*
SUS – Sustain
Control Knobs alternate mode 1 – 8 – SysEx, cc007, assignable
AF1 – Assignable Function 1 (cc086)
AF2 – Assignable Function 2 (cc087)
PB (fixed) – Pitch Bend wheel will always send information that is Pitch Bend data (it has its own category of MIDI message) both internally and out via MIDI. Exactly how the data is interpreted by the tone generator (receiving device) is programmable. For example, it is possible to use the wheel for something other than just pitch bend by programming the sound to have a Pitch Bend Depth of 0 and then assigning the PB wheel to a different parameter. Typically, however, on the internal AWM2 sample-based Voices PB range is set to up/down 2 steps (+2 and -2 semi tones equals a whole tone; see below). When a VOICE is moved to a PART (Performance mode, or Song/Pattern Mixing mode) the PB range maybe reset to the default (+2/-2).
Pitch Bend range is a COMMON parameter and can be set per Voice on the [EDIT] > [COMMON] > [F1] General > [SF4] Other:

MW (fixed) – Modulation Wheel will always send Control Change message 001 and this data is typically used for vibrato depth both internally and out via MIDI. Exactly how the data (Control Change message 001 – written cc001) is interpreted by the tone generator (receiving device) is programmable. For example, it is possible to use the Modulation Wheel for something other than just vibrato depth by programming the sounds PMD (Pitch Modulation Depth to 0) and assigning it another parameter. (PMD is the technical name for what musicians call “vibrato”.) For example, the Mod Wheel makes a good mix control. You can use it to fade one layer in (+ depth/level at 0) while a second layer is programmed to fade out (- depth/level at 127). The assignment to vibrato (Pitch Mod) is not automatic. Each Voice that uses the MW as vibrato has it assigned in a Control Set. Do not take this for granted – simply because many Voices use the MW for vibrato, please recognize that is an assignment that is made, per Voice, in the COMMON > CONTROL SET.

Here you see a typical synth lead Voice PRESET 5:049 (D01) “Mini Soft”. A two Element Voice that has the Mod Wheel as the ELFO-PM Depth control – this translates to Element Low Frequency Oscillator- Pitch Modulation Depth control. Depth = +16. As you move the wheel up you will add vibrato (pitch modulation) to the Voice. In some Voices the programmer may have elected to use the C-LFO or Common Low Frequency Oscillator. This is strictly a matter of preference. The C-LFO has different options available via a special ‘matrix’ called the “BOX”. This has to do with targeting specific destinations within a VOICE. (the Common LFO will be covered in a future article).
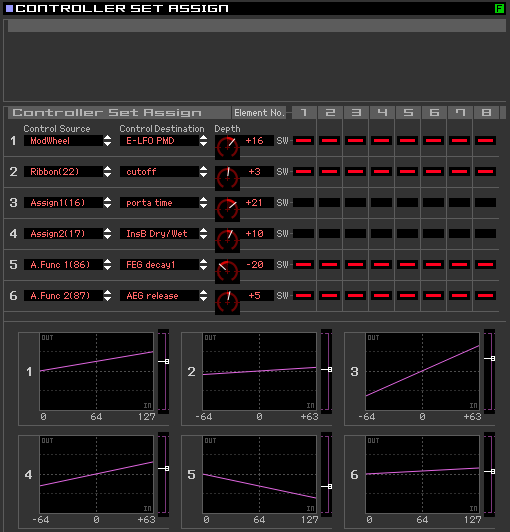 The DEPTH setting of +16 (see the x-y graphic Set #1 at left which indicates the controllers applicaton curve). As you raise the MW from the down 0 position you begin applying modulation. Notice that the DEPTH of the Modulation never reaches 127 (top edge of the graph), the programmer felt that a value of +63 OUTPUT would be more than enough modulation for their use. (This is what DEPTH is about – it is your personal setting for HOW FAR you would like to move the MW to get results you still find useful). What you will discover that is that values from +33 through +63 make early movement less sensitive. At +63 you must move the wheel to an extreme to begin modulation.
Tip: Avoid setting parameters to the maximum value. Analyze whether or not it actually works for what you are attempting to do.
AS 1 – ASSIGN 1 does not have a fixed message like the PB or MW. It can be assigned as an internal control device. You can use Assign 1 to change Element level, filter cutoff/resonance, effect send, etc., etc. (see Control Set Destination list). It can independently be assigned any control change message, (cc1-cc95, except 32), for transmitting out via MIDI. The default assignment is cc #016 called: “General Purpose control 1”. If you reassign the default control change assignment (global setting found in UTILITY) to cc #002 Breath Control, for example, you will in effect have a Breath Controller on a knob.
AS 2 – ASSIGN 2 does not have a fixed message. It can be assigned as an internal control device. You can use it to change Element level, filter, effects, etc., etc. (see Control Set Destination list). It can independently be assigned any control change message for transmitting out via MIDI. The default assignment is cc #017: “General Purpose control 2”. If you reassign the default assignment (global setting found in UTILITY) to cc #002, for example, you will in effect have a breath control on a knob.
AFTERTOUCH (fixed) – The MOXF keybed does not send AT. Aftertouch is a command control that occurs when extra pressure is applied to the key. Aftertouch, like Pitch Bend, has its own category of MIDI message. How this controller data is interpreted, if at all, is a function of the Voice parameters in the tone generator/receiving device. Some players use Aftertouch to vary PMD (pitch modulation depth), vibrato. Others like it to brighten the sound and assign it to filter cutoff. AT is only received by the MOXF tone generator – it is not generated by the MOXF, at all.
A word on Aftertouch: The MOXF can receive a kind of Aftertouch called Channel Aftertouch (ChAT). The VOICE set to receive AT will respond – if and when the message is received via MIDI. There is a sensor under the keys of the transmitting keyboard that detects additional downward pressure on the keys. Aftertouch defaults to be FILTERED from being recorded to the MOXF sequencer. (This is also the default condition for many of the popular software and hardware sequencers). You must remove the filter or deactivate the filter before attempting to purposefully record Aftertouch. The reason it is so often filtered is it can use up valuable sequencer memory and can cause timing problems even when it is not being used specifically. Those heavy-handed players will fill-up their tracks with superfluous data.
FOOT CONTROL 1 (FC1) – An optional FC7 pedal plugged into the Foot Control 1 jack is available as an assignable controller. You select what it will send from VOICE mode:
· Press [UTILITY]
· Press [F4] CTL ASN (Controller Assign)
· Press [SF1] ASSIGN
 The default is cc011 (Expression) which is similar but not the same as cc007 (Main volume). Many people mistake these two as being the same thing. While they both control ‘how loud’, they have different functions. For example, in a Song you plan to play a B3 organ Voice on top of a sequenced rhythm section. You set the mix volume of the organ to a level of 96. (Because 96 is the perfect setting for as “loud” as you will ever need to be compared to the rhythm section). You are setting “how loud” the organ sound will play on a scale from 0-127 – relative to the other sounds. If your FC1 pedal is set to control 011 (expression) – the toe-down postion will never exceed the ’96’ Main volume setting of the Part. If, on the other hand, if you have the FC1 assigned to cc007 (Main volume) the volume will be set by the absolute position of the pedal – toe-down will reset the volume to 127 – and you will be too loud. Expression (cc11) is relative volume within the maximum set by the individual parts Level. Volume (cc07) is absolute volume for the current MIDI channel.
FOOT CONTROL 2 (FC2) – The MOXF does not have a second Foot Controller jack, as found on its bigger siblings, the S-series and Motif-series. You may wonder how this works. An optional FC7 pedal plugged into the Foot Controller jack is available as an assignable controller. You select what it will send from VOICE mode:
· Press [UTILITY]
· Press [F4] CTL ASN (Controller Assign)
· Press [SF1] ASSIGN
FC1 defaults to sending Control Change message 011 Expression; while FC2 defaults to sending cc004 Foot Control. Either can be reassigned to any control change number 1-95 (globally). The “jack” itself is FC1, by setting the Control Change number of FC1 to the same value of another control device it will take on the role of that device. If you set FC1 to cc001, it will become, in effect, a Mod Wheel. If you set FC1 to cc004 it in effect becomes FC2 – which is set to cc004. When you set FC1 = FC2’s cc number you can now freely assign what it controls within a Voice.
_ Control Change 011 Expression is a fixed function control that will always affect Volume.
_ Control Change 004 is freely programmable.
So the choice you must make on the MOXF is:
Do I want my Foot pedal as a global Volume pedal, or do I wish to decide on a Voice by Voice basis what it will control?
How cc004 is interpreted by the tone generator/receiving device is programmable. For example, it is possible to use the foot control for filter cutoff (wah-wah) on an internal sound and have an external sound set to interpret cc #004 as something entirely different. If on the other hand, you have your Foot Pedal send Expression both the internal and external sound on this channel will respond with a Volume output change (fixed).
FOOT SWITCH (FS) – Use an optional Yamaha FC4 or FC5 (sustain-like momentary switch). It can be assigned any cc number between 1-100. It will always send a control change value of 127 when activated; The nature of the switch makes it ideal for OFF/ON operations – it is referred to as a “momentary” switch because remove your foot and its application goes away. This message can be used to turn something from off to on or vice versa. The default assignment is cc #088 an unassigned cc number. Assigned to cc #098 or 099 you can advance or move backward through Voices or Performances. You could even use it to ARM/DISARM the arpeggiator (cc96*), Start/Stop the sequencer (97). *The MOXF default for Arp Sw – this can be very useful in PERFORMANCE mode.
· Press [UTILITY]
· Press [F4] CTL ASN (Controller Assign)
· Press [SF2] FT SW (Foot Switch)
Set to cc66 it will become a Sustenuto pedal.
Set to 100 it will reset the OCTAVE transpose.
BREATH CONTROL – Although the MOXF does not have a Breath Controller jack (nor can it use the optional BC3 directly) it is still capable of sending and receiving this standard MIDI message (cc002). So a Voice can be biased to Breath Control and you can send this message from any assignable controller. How this data is interpreted by the tone generator is programmable. This is accomplished for Voice mode:
· Press [UTILITY]
· Press [F4] CTL ASN (Controller Assign)
· Press [SF1] ASSIGN
It is assignable globally. Breath Control can be sent in via MIDI using an external device like the MIDI Solutions Breath Controller adapter box (which allows you to plug in a BC3 and send Breath Control via MIDI) or from another controller keyboard capable of BC input or from a device like a Wind MIDI Controller (like the Yamaha WX5). Biasing a parameter to Breath Control is handled like all others (as described above).
SUSTAIN (fixed) – will always send a Control Change message 064. This MIDI control number is HOLD 1. (Other controllers can be assigned to send cc064 sustain but a momentary pedal plugged into the Sustain jack will always send sustain). The MOXF can use either an FC4/FC5 or and FC3 as the sustain pedal. This must be selected in UTILITY mode:
· Press [UTILITY]
· Press [F4] CTL ASN (Controller Assign)
· Press [SF2] FT SW (Foot Switch)
Set the Sustain Pedal approriate for your requirement and model.
The optional FC3 adds additional functionality to the MOXF (Half-Dampering) covered in a separate article. Do not overlook this feature. Sustain pedals in the past were fairly simple. The Half-Dampering has to do with a subtle piano gesture dealing with controlling length of sustain. It can generate additional MIDI data – so you want to be sure you are using it wisely. For example, set it to “Half On” when recording a MIDI track that requires accurate piano style sustain pedal work, otherwise you should probably set the FC3 Sustain parameter to “Half Off”. The FC3 connects via a TRS jack.
If you are using a standard (T-S jack) Foot Switch, then set the Sustain Pedal select to FC4/5
When you connect an optional FC3 (equipped with the half-damper feature) for producing the special “half-damper” effect (as on a real acoustic piano), set this parameter to “FC3 (Half on).” If you don’t need the half-damper feature or want to disable it while still using an FC3, set this parameter to “FC3 (Half off).”
CONTROL Knobs 1 – 8 – These can be used for a variety of functions as defined by the [KNOB FUNCTION CONTROL] section. Options are in rows of four, as follows – information in parenthesis is sent out via MIDI:
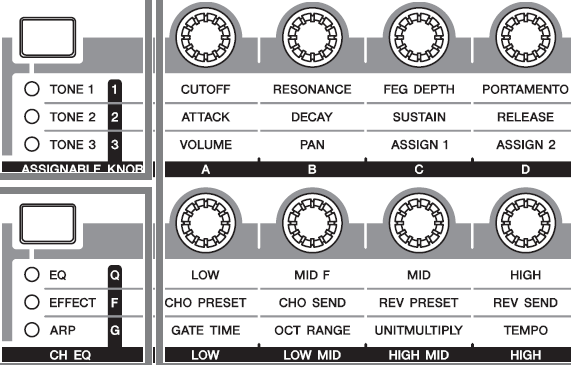
Tone 1
· Cutoff (cc71 also called Brightness)
· Resonance (cc74 also called Harmonic Content)
· Filter Envelope Generator Depth
· Portamento (cc5 Portamento Time)
Tone 2 (ADSR)
· Attack (cc73)
· Decay (cc75)
· Sustain (not sent via MIDI)
· Release (cc72)
Tone 3
· Volume (Sysex)
· Pan (cc10)
· Assign 1 (cc16)
· Assign 2 (cc17)
Equalizer (not sent via MIDI)
· Low Gain
· Mid Frequency
· Mid Gain
· High Gain
Effect
· Chorus Preset (Sysex)
· Chorus Send (cc93)
· Reverb Preset (Sysex)
· Reverb Send (cc91)
Arpeggio Play Effects (not sent via MIDI)
· Gate Time
· Octave range
· Unit Multiply
· Tempo (tempo change, sent only if CLOCK OUT is ON)
Data that is sent out via MIDI can be recorded to either the internal or external sequencer. Not all Knobs control recordable messages.
When in [MASTER] mode (Master LED illuminated) you select the “ZONE” function for the control knobs as follows:
· Press [F2] MEMORY
· Set MODE and MEMORY
The Mode can be VOICE, PERFORMANCE, SONG or PATTERN
· Press [F3] ZONE SW
(shown below)


This allows the Knobs to be programmable per Zone.
CONTROL KNOB ‘ALTERNATE FUNCTIONS’ 1 – 8 The “alternate functions” we are talking occur in each mode when you press both the Knob Function buttons simultaneously…. (all LEDs light). The role of the knobs 1-8 change according to the RULES of the selected MODE. They default to controlling individual Output Levels in Voice and Part Volumes and Pan position in Performance mode. They are assignable per Zone in an 4-zone Master Keyboard setup to Control Change messages. In a Master Keyboard ZONE setup they are individually programmable – you can select the parameter they each control.
Press both KNOB FUNCTION buttons simultaneously: All six LEDs will illuminate
_ When in VOICE Mode, the two rows of Knobs will send System Exclusive messages to control the individual Element levels, 1-8, within the current Voice;
_ When in PERFORMANCE mode, the Knobs, 1-4, control individual PART Volumes via System Exclusive. Knobs 5-8 function as Pan position for Part 1-4 respectively.
_ When in SONG or PATTERN mode the top row sends cc007 (main channel volume) and the bottom row sends cc010 (pan position) on the MIDI channel selected for the TRACK. If more than one PART is assigned to the Channel which the Knob is controlling – they, too, will be controlled by movement of the knob. When a TRACK [1]-[4] is select the knobs correspond to PARTs 1-4, when a TRACK between [5]-[8] is selected, the knobs correspond to PARTs 5-8, and so on – in four groups of four.
_ When in a MASTER Setup you can select which function is the active function. The Knobs will then behave either according to the rules of VOICE mode, PERFORMANCE mode or SONG/PATTERN MIXING mode or, if you set ZONE KNOB = ON: then the Knobs are then individually programmable per the Master setup). Please see separate article on MASTER mode.
Extra Credit: If you require more than one Knob for a single ZONE, you can customize the setup. It is probably the rare case when you are using all 4 ZONES – if that is the case you can assign that unused ZONE to the same MIDI Channel as the Zone you are using. You will need to ensure that you do not duplicate Note-On messages from more than one ZONE (this can be accomplished for external devices by setting the Note Limit High = C-2 and Note Limit Low = G8; this affectively prevents the ZONE from triggering the tone engine an additional time).
ASSIGNABLE FUNCTION 1 and 2 – AF1/AF2 These functions default to cc086 and cc087, respectively. The [AF1] and [AF2] are switches that can be programmed to be either “momentary” or “latch”. This means they can either be used by holding the switch down for a quick change or they can toggle something on or off without having to continue to hold the button. For example, if you want to change quickly from on articulation to another (add a spiccato attack on a few string notes) and return to normal play the ‘momentary’ setting would be selected. If however, you want to change from one articulation to another you might opt to have the ‘latch’ function setting.
PRE 4: 002(A02) Violin Solo 2 AF1 – features AF1 switching momentarily to spiccato, while AF2 is set to latch, offering an alternate selection for lower portion of the keyboard (D2 and below). Play this Voice, without an explanation of the string term “spiccato” you will quickly conclude how to use it… when articulating a violin phrase you might begin the first attacked note while holding down (momentarily) the AF1 button, releasing it to articulate the rest of the phrase.

PRE 4:001(A01) Violin Solo 1 – features AF1 latching an ensemble feel, while AF2 is also latching switching to the violin element without vibrato. Together AF1+AF2 you get yet another timbre and a change in what happens below the violin’s natural range. If you prefer to control the vibrato of the violinist with a traditional synth LFO and Depth applied by the MW: engage [AF2] instead of using the violin Waveform with the natural vibrato of the player, the XA CONTROL (eXpanded Articulation Control) will switch you to the non-vibrato Element (which sits dormant until you engage [AF2]).

In a future tutorial we will provide additional Tips and Tricks with the [AF] Assignable Function buttons.
Control Sets Summary: Each MOXF Voice has six Control Setups where a physical controller, called the Source, is assigned a specific controllable parameter, called the Destination and a Depth value that determines ‘how much’ effect the controller will have. This flexible system will enable the user to tailor the sensitivity of each controller’s movement. Sensitivity or Depth refers to how far you move the controller to get a desired result. This is an important setting because you want to be comfortable working the controller while you perform. A controller can apply a negative value, but as we have seen, you must consider is the controller a “minimum-to-maximum” device, or does it apply “above/below” a center value of 0.
The CONTROL SET DESTINATIONS are listed in detail on page 118 of the MOXF Data List booklet (PDF). They include destinations like Voice volume, reverb send, chorus send, and some 64 Insertion Effect parameters (not all Insertion Effect parameters are real time controllable), 101 locations total. An array of Common and individual Element parameters like filter cutoff, resonance, LFO speed and depth, tuning, key on delay, Pan position, Pitch, Filter and Amplitude envelopes, etc., etc., can be programmed.
Controller Rangers and Parameter Ranges:
Put on your thinking caps…this is tricky. Remember I mentioned logic – well here we go. Minimum-to-Maximum controls versus Negative-to-Positive controls: Consider the Mod Wheel versus the Pitch Bend wheel as an MOXF physical control device. One has its zero position in the middle, while the other is at zero in the down position. One changes values from minimum towards maximum, the other above and below a 0 center value. These factors must be considered when you make an assignment of a parameter to a physical control. Think about all physical controllers in these two groups:
Minimum to Maximum Controllers
Modulation Wheel
Foot Controllers: FC1/FC2
Breath Controller*
Aftertouch
Foot Switch/Sus *min. or max. only
Foot Switch (FC3 Half-Dampering ON) minimum through maximum
AF1/AF2: on or off
Control Sliders CS1-CS8
Negative ~ 0 ~ Positive Controllers
Pitch Bend Wheel (self centering)
Knobs (0 as center value)
Ribbon (Reset or Hold)**
Now think about the parameters and the range of possible values. Some parameters go from minimum to maximum (like volume and effect sends: 0-127) while others move above and below a center zero point (pan position: L-C-R), and filter cutoff: -64 closed, 0 normal, +63 open).
This can be an issue if, for example, you assign a minimum to maximum parameter, like Common volume 0-127, to a negative to positive controller like Assign 1.
Here’s what happens if you, say, bias the total Volume control to the AS1 or AS2 Knob: The MOXF has continuous turn knobs – a pop-up screen will show you the CURRENT Value and the ORIGINAL Value (so you always know where you are when you begin turning it).
The ‘center’ position will be 0 volume, while +63, fully clockwise, will be maximum volume. For all settings below the center position, 0 through –64, the minimum volume is sent out, 0. The control seemingly only works half the time. You can’t hear less than 0. All values 0 through -64 are silence.
Conversely, if you assign a parameter that is negative to positive to a controller that does not have a center détente (a minimum to maximum controller like MW), you may find it difficult to place it back to neutral.
It is not an issue when you assign a negative/positive parameter, like pan position, to a negative/positive controller like a MOXF knob. In such a case, negative values pan left, positive values pan right and the center position is center. It is a problem if you assign something like pan to a controller that only sends 0-127… You will find that you can only pan to the right.
Conclusion: Consider the above when selecting a controller (Source) for a specific parameter (Destination).
The Control KNOBS – alternate function
There are 8 Control Knobs. We need to talk about their ‘alternate function’ in Voice, Performance, Sequencer and Master Keyboard modes.
Press both KNOB FUNCTION buttons simultaneously: All LEDs light up.
Why don’t the Knobs send cc007 in Voice Mode?
The Knobs send Element Level (via system exclusive messages). In Voices that combine up to eight (sampled) Elements you have a knob for each Element. Of course, they do not send cc007 (Main Volume) in Voice mode – cc007 is main channel Volume and would control all components together. You would lose individual control. It would set all Elements to the same Volume no matter which knob you moved.
Why don’t the Knobs send cc007 in Performance Mode?
The Knobs send Voice Level (again via system exclusive messages – which will affect only the MOXF). In a Performance that has up to 4 Voices each knob on the top row controls the volume of one of the Parts, and the knob directly below it controls pan position. Of course, the knobs do not send cc007 in Performance mode – that would be chaos. Again you would lose individual control. Any one of them would set all PART to the same Volume no matter which knob you moved. Pan is also handed by System messages.
What do the Knobs send when I’m in a SEQUENCER mode (SONG or PATTERN)?
They send cc007 which is main (channel) volume. And they will transmit this out on the MIDI channel that the corresponding Track is set to transmit. Because in MIXING mode each PART is on a separate MIDI channel this makes perfect sense. If you place more than one PART on the same MIDI channel all PARTS on that channel will be effected by the knob.
What about the Knobs in Master Keyboard Mode?
The sliders are assignable to any control change number from 1-95, when you are setting up an 4-zone setup. You determine what each slider sends to each corresponding zone. You determine the MIDI channel and destination (internal TG or MIDI or both) for each zone. The default is cc #007 (volume) for each zone and this is sent out via MIDI (if you want). Controllers can be activated or deactivated per Zone. Of course, they can send cc007 in Master mode because each Voice can be on a separate MIDI channel!
What happens when I want to control Voices in a Performance, independently?
A Performance is literally, up to 4 Voices addressed together. If you want to control one Voice a certain way and another a different way within the same Performance you may need to program each individually back in Voice mode. That is what you learned about in this article – assignment of controllers in Voice mode. You now can assign parameters in a Voice and when you place that Voice in a Performance the controller assignments will apply. For example, you want to control a Performance with three sounds: PIANO, STRINGS and a PAD. You want to control the string sound independently with a FOOT CONTROL pedal. You could program the individual Voices involved, however, you do have the option of activating or deactivating a controller for an individual PART within a Performance. Each PART has a RECEIVE SWITCH. You will have to determine if you need to make adjustments to individual Voices or can you simply activate or deactivate certain controllers to accomplish your goal. In a Performance you can see which Controllers are active per Part by pressing: [EDIT]/ Touch program button [1] to select PART edit level/ [F5]: RcvSwitch.
You can use [SF6] to toggle the view between viewing all 4 PARTS in four lists, or “1 PART” as shown below:

Here you can set each Part, as necessary. A ‘check’ means the Controller is active on this PART.
Tricky things to know: “Expression” at the bottom of the list determines whether or not, this PART will respond to the FC1 pedal sending cc011. Simply unchecking the box for Foot Controller 1 does not prevent this PART from responding to cc011. Expression (artistic volume) is a separate command and therefore, has its own special receive switch. In a case where you have globally reassigned your FC1 device to send a different CC number, then blocking Foot Controller 1 will work.
One last tip concerning your controller assignments: There is a default condition for each when a Voice or Performance is recalled. This is affected by the “CONTROLLER RESET” parameter which can be set globally in [UTILITY]/ [F5]:CONTROL/ [SF2]:MIDI. This parameter can be set to either RESET or HOLD. Hold will allow each Voice to inherit the current condition of a controller. How can you use this? For example, if you use a Foot Controller as your master Volume level, setting this to HOLD will mean that the next setup you call up will hold at the current volume of your pedal. This will apply to all physical controllers with the exception of the Ribbon controller which as mentioned, is programmable on a per Voice basis.
Velocity:
We have not mentioned Velocity in any detail. It is a control device that has its own parameter set in each of the primary building blocks: PITCH, FILTER, AMPLIFIER.
Beyond its role in switching between sample Keybanks, velocity is typically setup so that the more energy INPUT, the more activity OUTPUT. It also can be setup in reverse. In fact, when the term “velocity sensitivity” is mentioned most people associate this with loudness response to Key On. This is applying velocity to the Amplifier block. But velocity can be also applied to the Filter block – in general, the more energy used to hammer, strike, pluck, blow or bow a musical instrument the richer it is in harmonic content (in addition to being louder). And when you think about the physics involved in acoustic instrument sounds, there are subtle pitch variations that can occur in response to energy in… Or when higher energy subsides.
This is why you will find a set of VELOCITY SENSITIVITY parameters on the Element’s Oscillator, Filter, and Amplitude tabs. This is where customization takes on new meaning. On a per Element basis, you can fine tune its contribution based on how you trigger the keys (velocity). Within each block you have a custom velocity curve with “weighting” – response can be set to match your playing approach. And the energy can be directed towards specific regions of the envelope generator. If you have an Element responsible for the “Attack” portion of the Voice, you can direct velocity have a greater influence to that portion of the Envelope. In general, liking or disliking what a VOICE does is greatly due to how it responds to your input from the keys. Once you begin to dive into this area of programming you begin to see how you can optimize what you like in a sound and truly make it your own.
With the DEPTH and CURVE setting controls, you can even prevent an Element from responding to low velocities – you can customize the response curve. We will pick up our discussion here in a future tutorial article because it is worthy of more than a short paragraph.
This is just the beginning – you can setup for manual control over destination parameters (as we’ve seen) but a world of automation exists within the MOXF… In future installments we’ll take a look at: Velocity, and using the LFOs to control specific destinations within a Voice. We’ll tackle creating your own LFOs and tempo synchronizing movement within a VOICE… Until next time. (As always, we welcome your questions in the FORUM area).
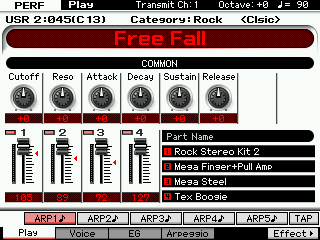
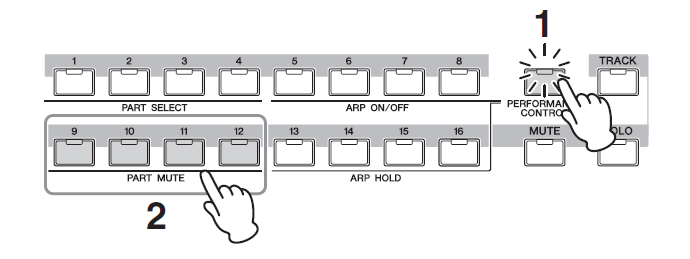
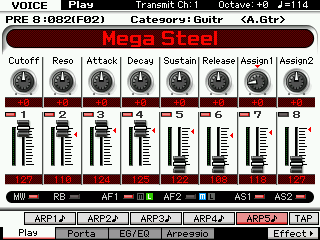
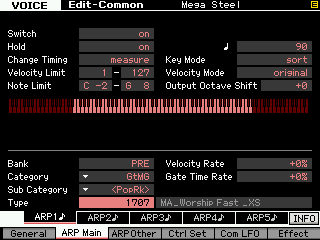 Extra Credit: Arpeggios are not really a part of the Voice. Arpeggios are associated with a Voice but they are not, technically speaking, part of the construction of the Voice. Just as, in the real world, what a guitar player plays (a musical phrases) is not a part of the instrument they are holding. This is why when you place a Voice in a Performance or a Mixing setup, it does not automatically “bring along” the Arpeggios associated with the Voice in VOICE mode. Arpeggios are musical performances (a stream of MIDI notes in this example), that can be associated with any number of Voices and is not a part of the instrument that is assigned to play it. It’s a separate thing. Any arpeggio can be associated with any Voice. There is an important difference between the parameters that “describe” the instrument and those that are used to manipulate or control aspects of its performance (See “Parameter with Voice” for how to copy these associated and offset parameters between the Voice mode (where the instrument is originally programmed) and the Performance, Song/Pattern modes (where you are placing the Voice in a PART).
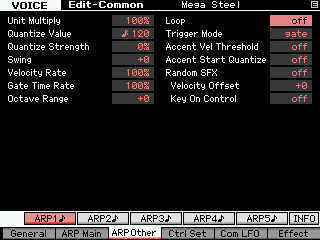 Extra Credit: Set the Arpeggio Phrase to play just once. Typically, an arpeggio phrase is set to “loop”, but recognize that this is a setting you can make. The Arpeggiator can be set with Loop = Off, this would be used to play a specific riff on cue. This use would require that when you touched the “trigger note” or played in the Note Range set to control the Arpeggio, the phrase would play through once and end. You can also use the trigger note to “toggle” a phrase on and off.
 · There are 6 sets accessible via the [SF1], [SF2] and [SF3] buttons.

 In this example, the Volume parameter is ‘common’ to all Elements. We know this because the Element Switches are “grayed out”. If you were to activate additional Elements they would also share the same setting when you select a ‘common’ destination. The Modulation Wheel will effect all the Elements. The +63 Depth setting sets the maximum range of the controller. Try it…move the mod wheel…
 Before we move on, by setting the DEPTH parameter to +63 you will observe that the maximum value is reached by the time the Wheel is raised half-way. DEPTH has to do with HOW MUCH of the controller need be applied to get the desired result. It should be set by your own preference for movement of the controller. (The screenshot here is taken from the Yamaha MOXF6/MOXF8 Editor Standalone/VST). A Depth setting of +63 will reach maximum Output value at 1/2 of its travel upward. If you use a Depth setting of +63 for the Rotary Speaker Speed Switch, notice the SLOW-FAST swith is ‘flipped’ at 1/4 of the travel of the MW. Try it!
 When the DEPTH = +16 it corresponds to a response where the maximum volume output is not reached, even when the MW controller is completely engaged. This can be useful to prevent excessive change.


 The DEPTH setting of +16 (see the x-y graphic Set #1 at left which indicates the controllers applicaton curve). As you raise the MW from the down 0 position you begin applying modulation. Notice that the DEPTH of the Modulation never reaches 127 (top edge of the graph), the programmer felt that a value of +63 OUTPUT would be more than enough modulation for their use. (This is what DEPTH is about – it is your personal setting for HOW FAR you would like to move the MW to get results you still find useful). What you will discover that is that values from +33 through +63 make early movement less sensitive. At +63 you must move the wheel to an extreme to begin modulation.
 The default is cc011 (Expression) which is similar but not the same as cc007 (Main volume). Many people mistake these two as being the same thing. While they both control ‘how loud’, they have different functions. For example, in a Song you plan to play a B3 organ Voice on top of a sequenced rhythm section. You set the mix volume of the organ to a level of 96. (Because 96 is the perfect setting for as “loud” as you will ever need to be compared to the rhythm section). You are setting “how loud” the organ sound will play on a scale from 0-127 – relative to the other sounds. If your FC1 pedal is set to control 011 (expression) – the toe-down postion will never exceed the ’96’ Main volume setting of the Part. If, on the other hand, if you have the FC1 assigned to cc007 (Main volume) the volume will be set by the absolute position of the pedal – toe-down will reset the volume to 127 – and you will be too loud. Expression (cc11) is relative volume within the maximum set by the individual parts Level. Volume (cc07) is absolute volume for the current MIDI channel.


