Adding Voice Libraries to Cubase as VST PRESETS
“MOXF Editor VST”
If you have purchased Voice Libraries or if you have created your own custom Voices, you may wish to have access to these sounds when working in Cubase without having to find the particular file which may be on any number of separate USB sticks. And without having to use the FILE LOAD routine every time you simply want to audition a VOICE. There must be a way you can have total access to your data! You can add your favorite sounds to the VST SOUND Browser function within Cubase as “VST PRESET”. You can keep a copy of every VOICE and every MIXING setup (including Mixing Voices) as accessible data via Cubase. And this includes Voices that may access custom Waveform and Sample data on your optional FLASH BOARD. This is a powerful example of the integration of your hardware with your software.

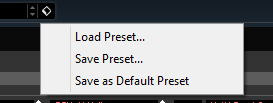
VST SOUND – you may have noticed a small “cube” icon at the top of the MOXF Editor VST. This is your “quick access” button to a Sound Browser that will allow you to search for a specific Voice (or as we will see later, an entire MIXING program). You can access your sounds by selecting LOAD PRESET… (more on this as we go…)
THEORY OF OPERATION:
In Cubase you have the full-featured MediaBay and Sound Browser, which allows you not only to search for synthesizer Voices, but for all types of media (be they MIDI files, audio clips, loops, video clips, full Projects, effect presets, etc.). However, even in the entry level Cubase AI you can get a very useful introduction to this powerful functionality. What we will learn here is not only is this a great way to organize your individual Voices but it is a great tool for backing up and storing entire Libraries, and Mixing setups. Although you can search your entire computer for all types of relevant music/video related data, in this case we will be interested in the SOUND BROWSER to organize and make available our MOXF sounds. As the name implies, the Sound Browser will limit the context of our search to synthesizer sounds, specifically MOXF sounds. Let’s start with individual Voices.
This means that any VOICE can be easily searched for and found and recalled. You actually are keeping a version of that Voice data on your computer, and Cubase will “know” where to go to find it. It will be searchable by Category, Sub Category and/or by name. Even if you only remember a portion of the name you can do a TEXT SEARCH and all relevant data will be shown. The item when found will be bulked to the VOICE Edit Buffer of the MOXF – where you can experience the VOICE with its full complement of processing and offset programming. If you decide you wish to use this VOICE or would like to hold it, simply STORE it to a location in your Normal USER 1-3 Banks. By moving the data to the VOICE mode Edit Buffer you can fully access the Voice data and switch between several Voices in the same category… ideal for auditioning.
The Sound Browser is already populated with the entire MOXF factory Library – these were installed when you installed the “Yamaha MOXF6/MOXF8 Editor Standalone/VST” on your computer. The data for every Voice was sent to a special VST3 FOLDER on your computer. We will show you how to add your own data to this librarian function. As an example in this article I will use the DCP VOICE LIBRARIES: “Vintage Keys” – You can use any Library that you wish to import into the Sound Browser, or any VOICE that you edit, change or tweak.
After playing through the “Vintage Key” Library I decide that these are sounds I would like to have quick access to at all times when I’m working in Cubase. I can import the entire library (128 Voices) into Cubase’s VST Sound Browser, en masse, and then I do not have to worry about finding this particular file, on any number of USB drives and I don’t have to worry about loading individual Voices from a File. When I want a sound, I can have Cubase search for it, I click on it and it is sent to my MOXF just as fast as System Exclusive messages can fly! Too cool! In this fashion I can audition dozens of Voices from the Edit Buffer of the instrument and when I make a selection I can transfer it in seconds to the current internal Library. Plus all of my sounds are in one place!
How to get started
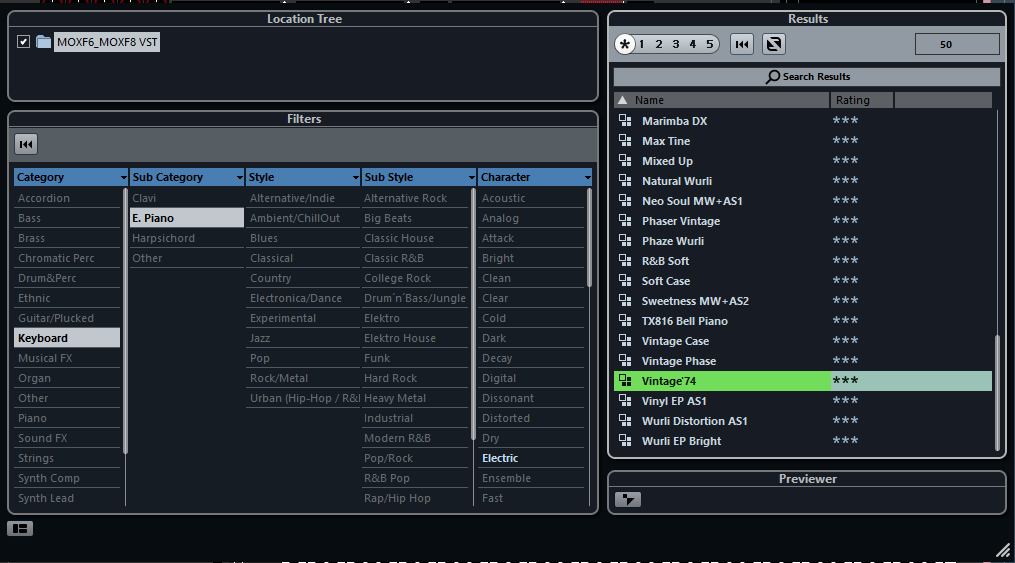
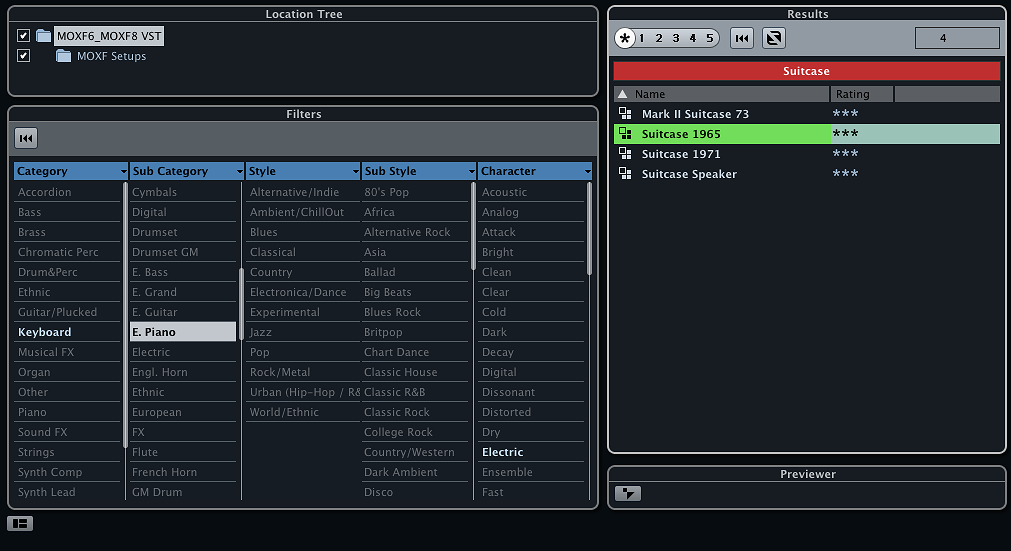
First, this function is launched from the MOXF Editor VST. In the upper left corner of the Editor VST you will see the VST SOUND cube icon. This is where you click and select “LOAD PRESET…” to open the convenient Browser & Filters window (shown below).

In the extreme lower left corner, click on the icon and you can set the attributes of what you will be viewing: “Location Tree”, “Filter” and “Previewer”, make sure all are selected – you should get a view similar to one above. With a Folder that is your MOXF VST. Currently it contains all of the Voice data from your basic MOXF Library. Above you can see how the CATEGORY: Keyboard> SUB-CATEGORY: E.Piano > (Character: Electric) > RESULT: “Vintage’74” is selected. Clicking on the Voice will send it to the MOXF and select [VOICE] mode on the hardware. You can play it (Audition) it directly from here. Try it to get a feel for what happens. Naturally, it finds the VOICE because these represent the PRESET VOICES in the default Library. As we will soon see, once we have saved a VOICE as a VST PRESET, the Voice does not have to be currently loaded in the MOXF – you will be able to audition any of your Voices whether they are loaded into the MOXF at the time or not – by accessing them from your computer. We should mention, this is accomplished through the Editor bulking the Voice data to the hardware’s Voice Edit Buffer. In the Edit Buffer you can play it, explore it, edit it further, and if you wish to use it – STORE it to the hardware. If you do not STORE it, moving away discards it. So this is the ultimate way to Audition Voices – and this is the use case. If you have a client or you, yourself, are looking for an appropriate Electric Piano sound for a Project you are working on, gaining access to scores of electric pianos now is at your fingertips. Over time you will undoubtedly amass quite a large selection of Electric Piano Voices, from various Libraries and from edits and tweaks you have made yourself – all your Voices, no matter the original source, in one place, instantly accessible!
We will be adding the DCP “Vintage Keys” VOICE Library to this browser so we can easily search for them. The right hand side of this window is the RESULTS area… you see a magnifying glass and “Search Results” option at the top – this is where you can click and then type in the name or a part of a name to have the browser search for the Voice data. Just above the Search Results line you see a return symbol (like a REWIND icon) to clear the text search and restore the full currently selected listing. On the left hand side of this window is the LOCATION TREE and the FILTERS areas… again you see a return symbol (like a REWIND icon) if a specific Category is selected your Search will only be in that Category, if you wish to search the entire MOXF data base, hit the REWIND icon to reset the FILTERS to search the entire data base.
Of course, the left hand side lets you narrow the search by Main Category and Sub Categories.
Troubleshooting: When adding new items to the data base you may need to refresh the listings, you do so by unchecking the MOXF VST folder, at which point you will be asked if you want to KEEP, REMOVE or CANCEL; Select “Keep”. Click and place a CHECK by the Folder. By unchecking and then rechecking the folder (which will turn RED) Cubase will search its CONTENT folders for your MOXF VST Voice data. And this will refresh your listings. NOTE: If the Browser closes after you uncheck the Folder, relaunch the VST SOUND Cube… and recheck the Folder. This action causes Cubase to re-scan the VST3 Folder and automatically updates your Sound Browser with all new entries.
Okay, for our example lets add the DCP “Vintage Keys” Library to the data base (If you don’t have this particular Library, you can use any Voice Library you wish to import as VST PRESETS).
Load the Vintage Keys Library (or the Library you wish to install as VST Presets) to the MOXF – as you would normally. We will use the Editor’s ability to extract the VOICES as follows:
Open CUBASE normally.
• Launch the MOXF Editor VST
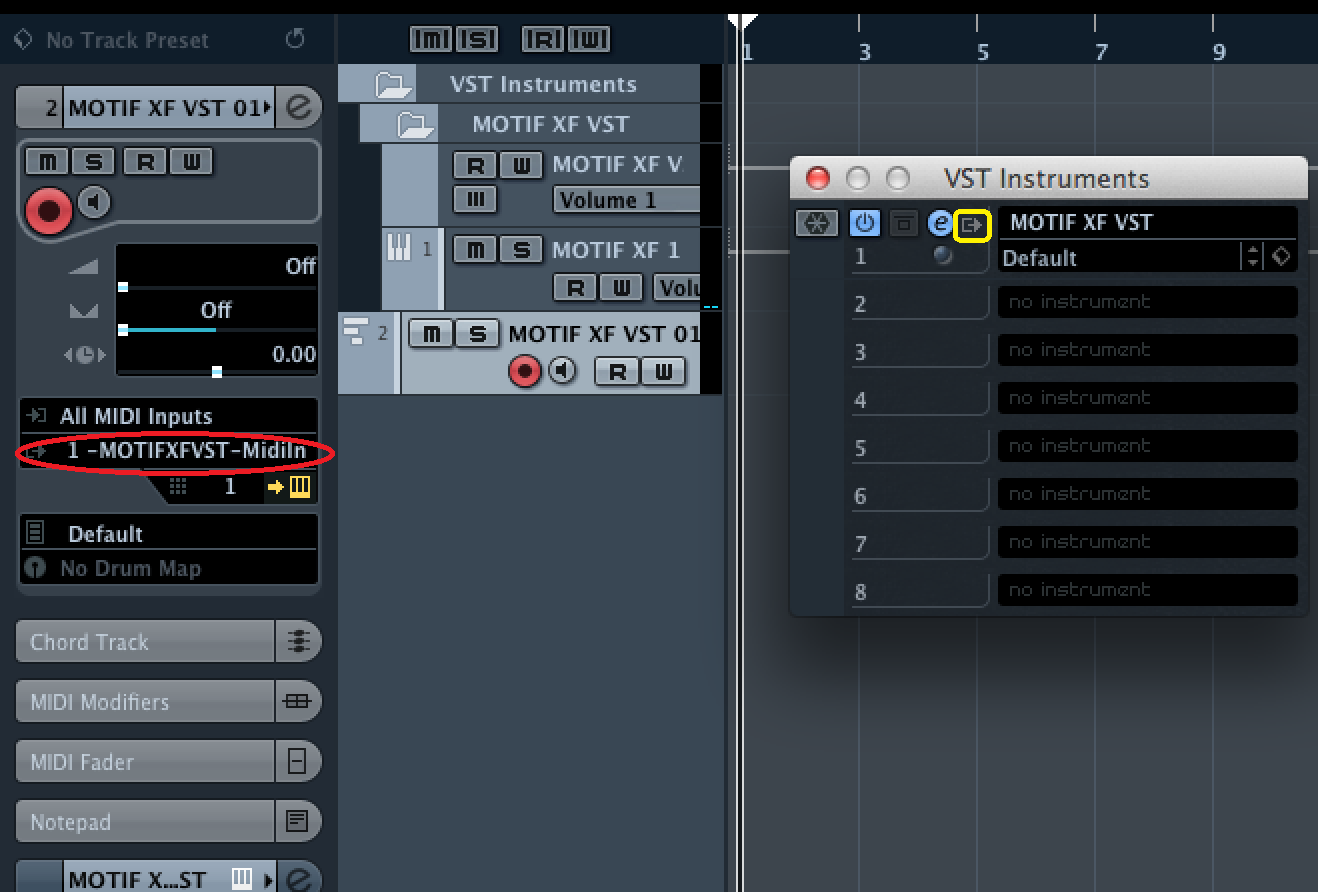
• You do so by going to DEVICES > VST INSTRUMENTS > in the “Instrument Rack” click in a rack space to add an instrument > select EXTERNAL > MOXF6/MOXF8 VST
• You will be asked to create a MIDI Track – do so. The Editor will open and come ONLINE.
• Click ONLINE to take the Editor temporarly OFFLINE (this will allow you to move data from the computer to the Voice Edit Buffer without overwriting data: Audition)
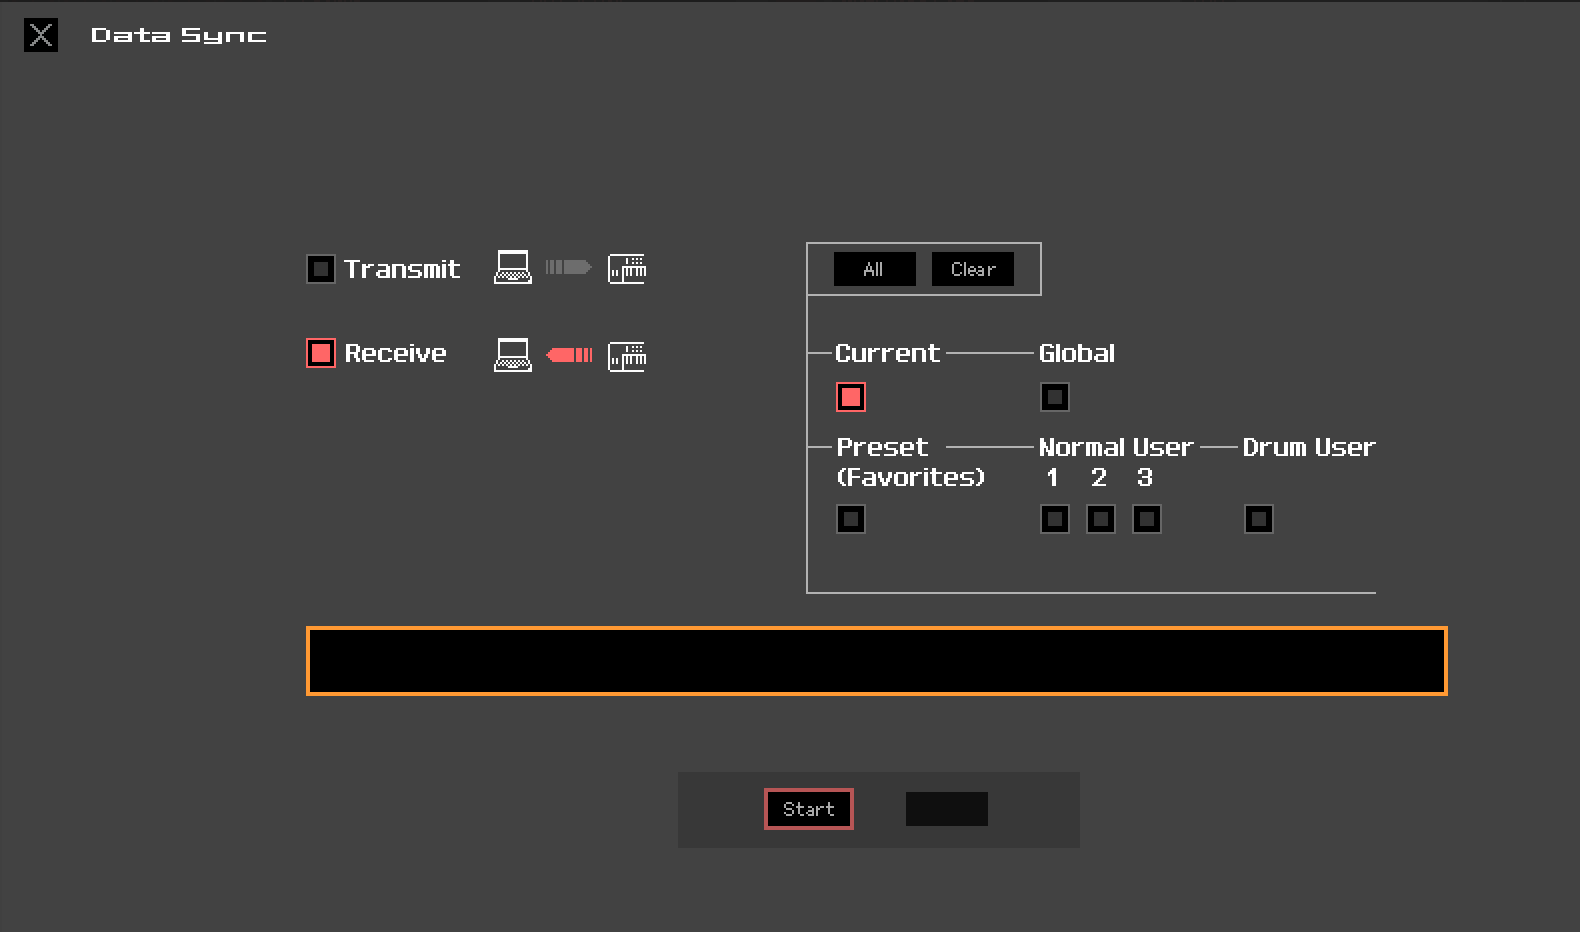
• On the Editor VST’s toolbar go to BULK > DATA SYNC
• Click “RECEIVE” as the data flow direction (we will be receiving the data into the Editor).
• Select the USER BANKS containing the VOICES in question and execute the Bulk transfer.
This will capture the VOICE data and bring it into the EDITOR – from here we can transfer it to the Sound Browser. This can be done with the EDITOR “OFFLINE” (active but Offline). If you do this with the EDITOR “ONLINE” you actually load the Voice to the MOXF hardware. (Just FYI).

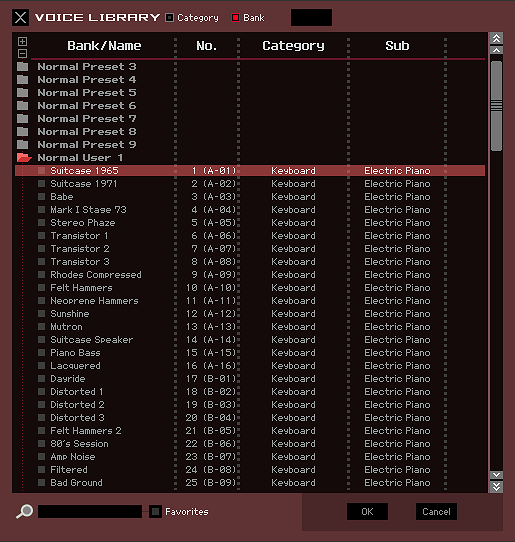
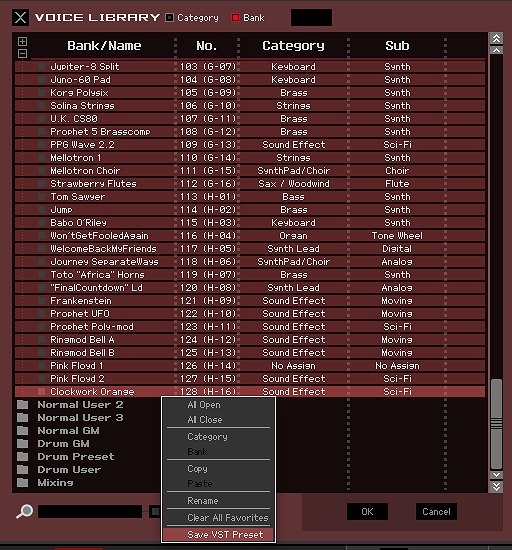
The VOICE LIBRARY window shows the list of FILE’s data. On the main Editor screen, click on the NAME in PART 1 to bring the VOICE LIBRARY overlay…
On the top line you can select to view the data in this FILE by Voice “Category” or by “Bank” number. You will want to view by “BANK” so that you can select the NORMAL USER Folders (In my example I have transferred the VOICES in question to USER 1 – I have loaded the 128 sounds for this particular Library). It is from here that we can transfer the parameters for each Voice into the VST PRESETS folder on our computers.
VOICE LIBRARY (overlay):

Select “Normal User 1” (shown above) and highlight the first sound in this Bank.., which should now read: “Suitcase 1965”
At this point you could RIGHT CLICK on that VOICE and select “Save VST Preset” – which would write this one VOICE to the Sound Browser. That is how you can select a single Voice; you could select any number of non-contiguous individual Voices by CTRL clicking, or you can SHIFT-CLICK to capture a contiguous range. What we will do is use the SHIFT-CLICK option to select all 128 Voices in the Normal User 1 Folder:
Import all 128 (Vintage Keys) Voices to Cubase as VST PRESETS.
Here’s how:
In the screen shot above you can see that “Suitcase 1965” is highlighted
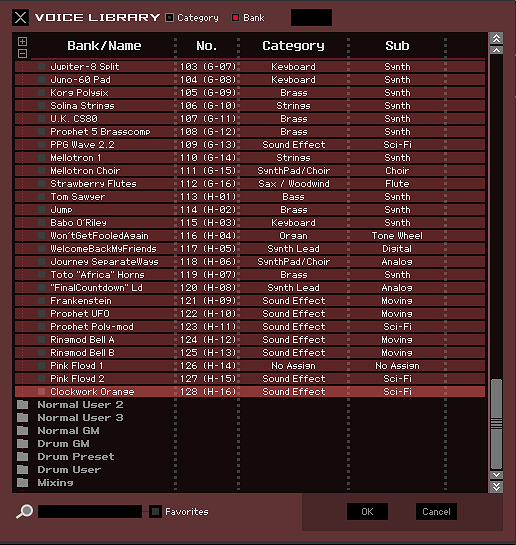
In the column on the far right is a ruler that we can drag down to see the list of 128 sounds… drag that down so you can see the last sound in the “Normal User 1” list.
While holding [SHIFT], click on Voice 128 “Clockwork Orange”
This will select all 128 Voices in the list. (Shown below)

Now you can Right Click on the last VOICE and select the “SAVE VST PRESET” option.

This will take all 128 Vintage Keys Voices and copy them to Cubase AI’s MediaBay/Sound Browser and allow you to access these Voices via the VST SOUND cube icon – “Load Preset…” You can access the VOICES of this Library whether or not they are actually loaded into your USER 1-USER 3 bank locations. By this you can greatly extend the number of VOICES accessible for any given project. In fact, every VOICE you acquire can be installed in the SOUND BROWSER! What a great way to have all of your sounds organized. No more hunting through half a dozen USB sticks with various Voices listed in various Files… everything right where you can get at it. And once you realize that you can access even those Voices that access Samples and Waveforms installed on an option Flash Board, this becomes an essential workflow.
In order for them to show up in the Librarian we may need to REFRESH it by rescanning the Folder for the newly added data.
Again: You do so by unchecking the MOXF VST folder in the Browser & Filter area (if you do not see the folder make sure that the “SHOW LOCATION” radio button is pressed).
You will be asked if you want to KEEP, REMOVE or CANCEL… Select “KEEP”
Now, recheck the MOXF VST folder
It will briefly turn RED while it searches for and updates your listings… when the rescan is complete the folder turns its normal color and the listings are updated.
You can now search through your MOXF sounds by Category, Sub Category, or simply click on “SEARCH RESULTS” and type in any portion of the name to access any of your sounds.
Shown below, I have typed in “Suitcase” in the Search Results area, immediately any Voice containing the word Suitcase will appear…

I then click on “Suitcase 1965” and in a few seconds, the data will be bulked to the hardware. “Suitacse 1965” has been added to the VST SOUND search… and the Voice is recalled in the MOXF in VOICE mode.
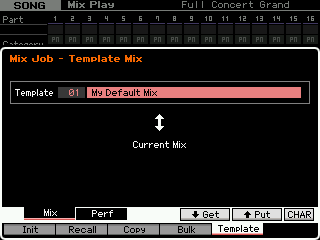
It is actually sitting in the MOXF Edit Buffer – If your Editor is still OFFLINE, you have not overwritten anything just yet – you are in a position where you can fully audition the Voice, even tweak it. If you think it is one you want access to for this project you STORE it and access it in through the MIXER view for your SONG or PATTERN. The Editor allows you to audition the Voice in the VOICE mode EDIT BUFFER, and when you decide on the VOICE you can either immediately audition another, or you can STORE the Voice to an internal USER location in the hardware. When you return to your SONG or PATTERN you can access this Voice through your MIXING setup. The beautiful thing is you are assembling Voices for just this Project and they will always be associated with this Project. Plus you can have access to your entire collection of MOXF Voices!
Vintage Keys (by DCP) and other MOXF Voice Libraries are available at the YamahaMusicSoft.com website: Yamaha Music Soft
