Motif XF SONG Import – is a two step process. The music performance (MIDI data) and the synth setup data (MIXING).
For this you must have installed the Yamaha “Motif XF Extension” to your Cubase program. This can be obtained at the Official Yamaha Download Site
Select your country
Type in the Model Number: Motif XF
When the SEARCH RESULTS are shown, confirm your instrument by clicking: Motif XF
You want to download the SOFTWARE for your computer type and OS: Motif XF Extension
This adds functionality to Cubase that will allow you to IMPORT a Motif XF Song directly into a Cubase Project from a Motif XF ALL data file (.X3A). This is the most efficient way to move Song data from your XF to Cubase. It is a two-step procedure. First, your musical performance data (sequence) and then your mix data (synthesizer setup) into a Cubase Project – where it will all be recombined and stored together in a Cubase (.CPR) Project file.
This is very useful when you have started a project in your Motif XF and want to now continue work in the Cubase environment. This will be particularly useful for those of you using an audio interface to RETURN audio via the Virtual Studio Technology routing scenario. Either the FW16E (FW option) or any another audio interface can be used. With the FW16E you get sixteen inputs to the computer from the XF (16-in/6-out); with external audio interfaces you will connect via the XF’s analog outputs: main Left/Right outputs and two assignable outputs.
As we will see the “Motif XF Editor VST” will allow us advanced communication within Cubase and we can take advantage of VSTi routing. This means that even though the Motif XF is external to the computer, we can handle its signal in a similar manner to any “in the box” soft synth. And this includes total recall and internal effect processing. Our example here assumes you have the FW16E (FireWire) input/output expansion option installed. If you are using another audio interface, you can also benefit from returning audio via VST routing (with a maximum of 4 channels of audio).
Since the “Motif XF Editor VST” runs inside of Cubase, it will be taking care of your Mixing setup data (everything concerning your synthesizer tone engine can be accounted for) – so in the future, when you open this Cubase Project (.CPR), not only will your MIDI and audio track data be restored but every Voice, Mix Voice, and setting of your Motif XF can be restored, as well. This is part of the Studio Connections Recall initiative whose goal is: true integration of hardware and software.
The way this works is that the MIDI data recorded to tracks, any audio sampled to the Integrated Sampling Sequencer using the “Sample+Note” Record Type, and all the MIXING Part parameters and all USER Voice data can be saved into the Motif ALL data file (.X3A). The Motif XF Extension software that you installed allows Cubase to extract the MIDI data and assign it to MIDI tracks. It can extract the audio data from the Motif XF File, and using the measure:beat:clock Start Point and End Point markers to position the audio on Audio Tracks in your Cubase Project.
Here’s how to proceed:
When you have completed your session in the Motif XF make sure you press [STORE] to write the final version to internal Flash ROM.
Then go to [FILE] and save your Motif XF data to a USB drive as an ALL data file TYPE (.X3A).
This ALL data file will contain all the information you need to move the data into a Cubase Project.
Step 1: Move in the Sequence – MIDI track and Audio data
Step 2: Open the Synthesizer Mix settings in the Motif XF Editor VST.
Cubase has been “taught” to open and import the SONG track data from a Motif XF ALL data file. This step is handled by the Import Motif XF Song extension. Which imports Midi data and audio data contained in a Sample Voice assigned by the Integrated Sampling Sequencer. The second step, importing the Mixing setup is handled by the Motif XF Editor VST. Of course, the “Motif XF Editor VST” can ‘open’ the ALL data file and import the synthesizer (tone generator) settings. You can then direct all the Tracks to whatever tone generator you wish to have play them (this includes soft synth VSTi, or any other connected device) – but here we will learn how to setup the Motif XF as a VSTi and, importantly, how to redirect all the imported MIDI Tracks to this “Motif XF VST”. By doing so we can take advantage of the Virtual Studio Technology’s audio processing features and advantages.
Once MIDI data has been imported to Cubase you can assign any of the Tracks to any internal or external synthesizer tone generator you desire. This is handled on the TRACK INSPECTOR’s MIDI OUT setting, on a per Track basis. If you are new to Cubase, as well, the Track Inspector is what gives you details about each individual Track – e.g., where the INPUT is coming from and where it is set to OUTPUT the data – this determines what tone engine is going to sound in response to this data (using MIDI Channels and Port assignments). We will need to output the imported Tracks to the “Motif XF VST’s MIDI Input”. This is a separate routing option from the regular “Motif XF MAIN” – we are literally rerouting the MIDI data starting from the Cubase Track through the Editor VST, the EDITOR will direct the MIDI data to the XF hardware – which RETURNS audio – the settings in the EDITOR will redirect the audio; Instead of going directly to the main outputs, it is redirected so it can enter and be processed within Cubase, like any virtual synthesizer generated by the computer CPU. This audio setting is made within the EDITOR VST – found by going to FILE > VSTi SETUP. This is where the audio returning from XF is setup.
This facilitates using computer-based VST Effects and using advanced features like FREEZE and EXPORT AUDIO MIXDOWN… Which would otherwise be unavailable to external devices. This is one big difference in Cubase AI. Cubase AI allows for this advanced routing situation – even though it is the free entry level version. By allowing the Editor VST to redirect signal, we can take advantage of returning audio to a virtual lane and deal with rendering the WAVEFORM when you MIXDOWN. So instead of recording an actual AUDIO TRACK, audio from the Motif XF is initially returned through a ‘virtual’ audio lane. So we can preview the exact sonic condition of the signal before committing (rendering) it as an audio waveform in Cubase, e.g., via the MIXDOWN process.
Imagine being able to process your XF with all your boutique software Effects as well as with the Motif XF’s own built-in (VCM) modeling and other Effects – in a “what-you-hear-is-what-you-get” scenario – you know exactly what will print (be rendered) to the final “real” audio Track. Advanced Integration. (All of the commerical versions of Cubase have this capability, of course).
Here is how it works:
Step 1:
Here is how our example Song, “How Would You Feel” looks in the Motif XF:
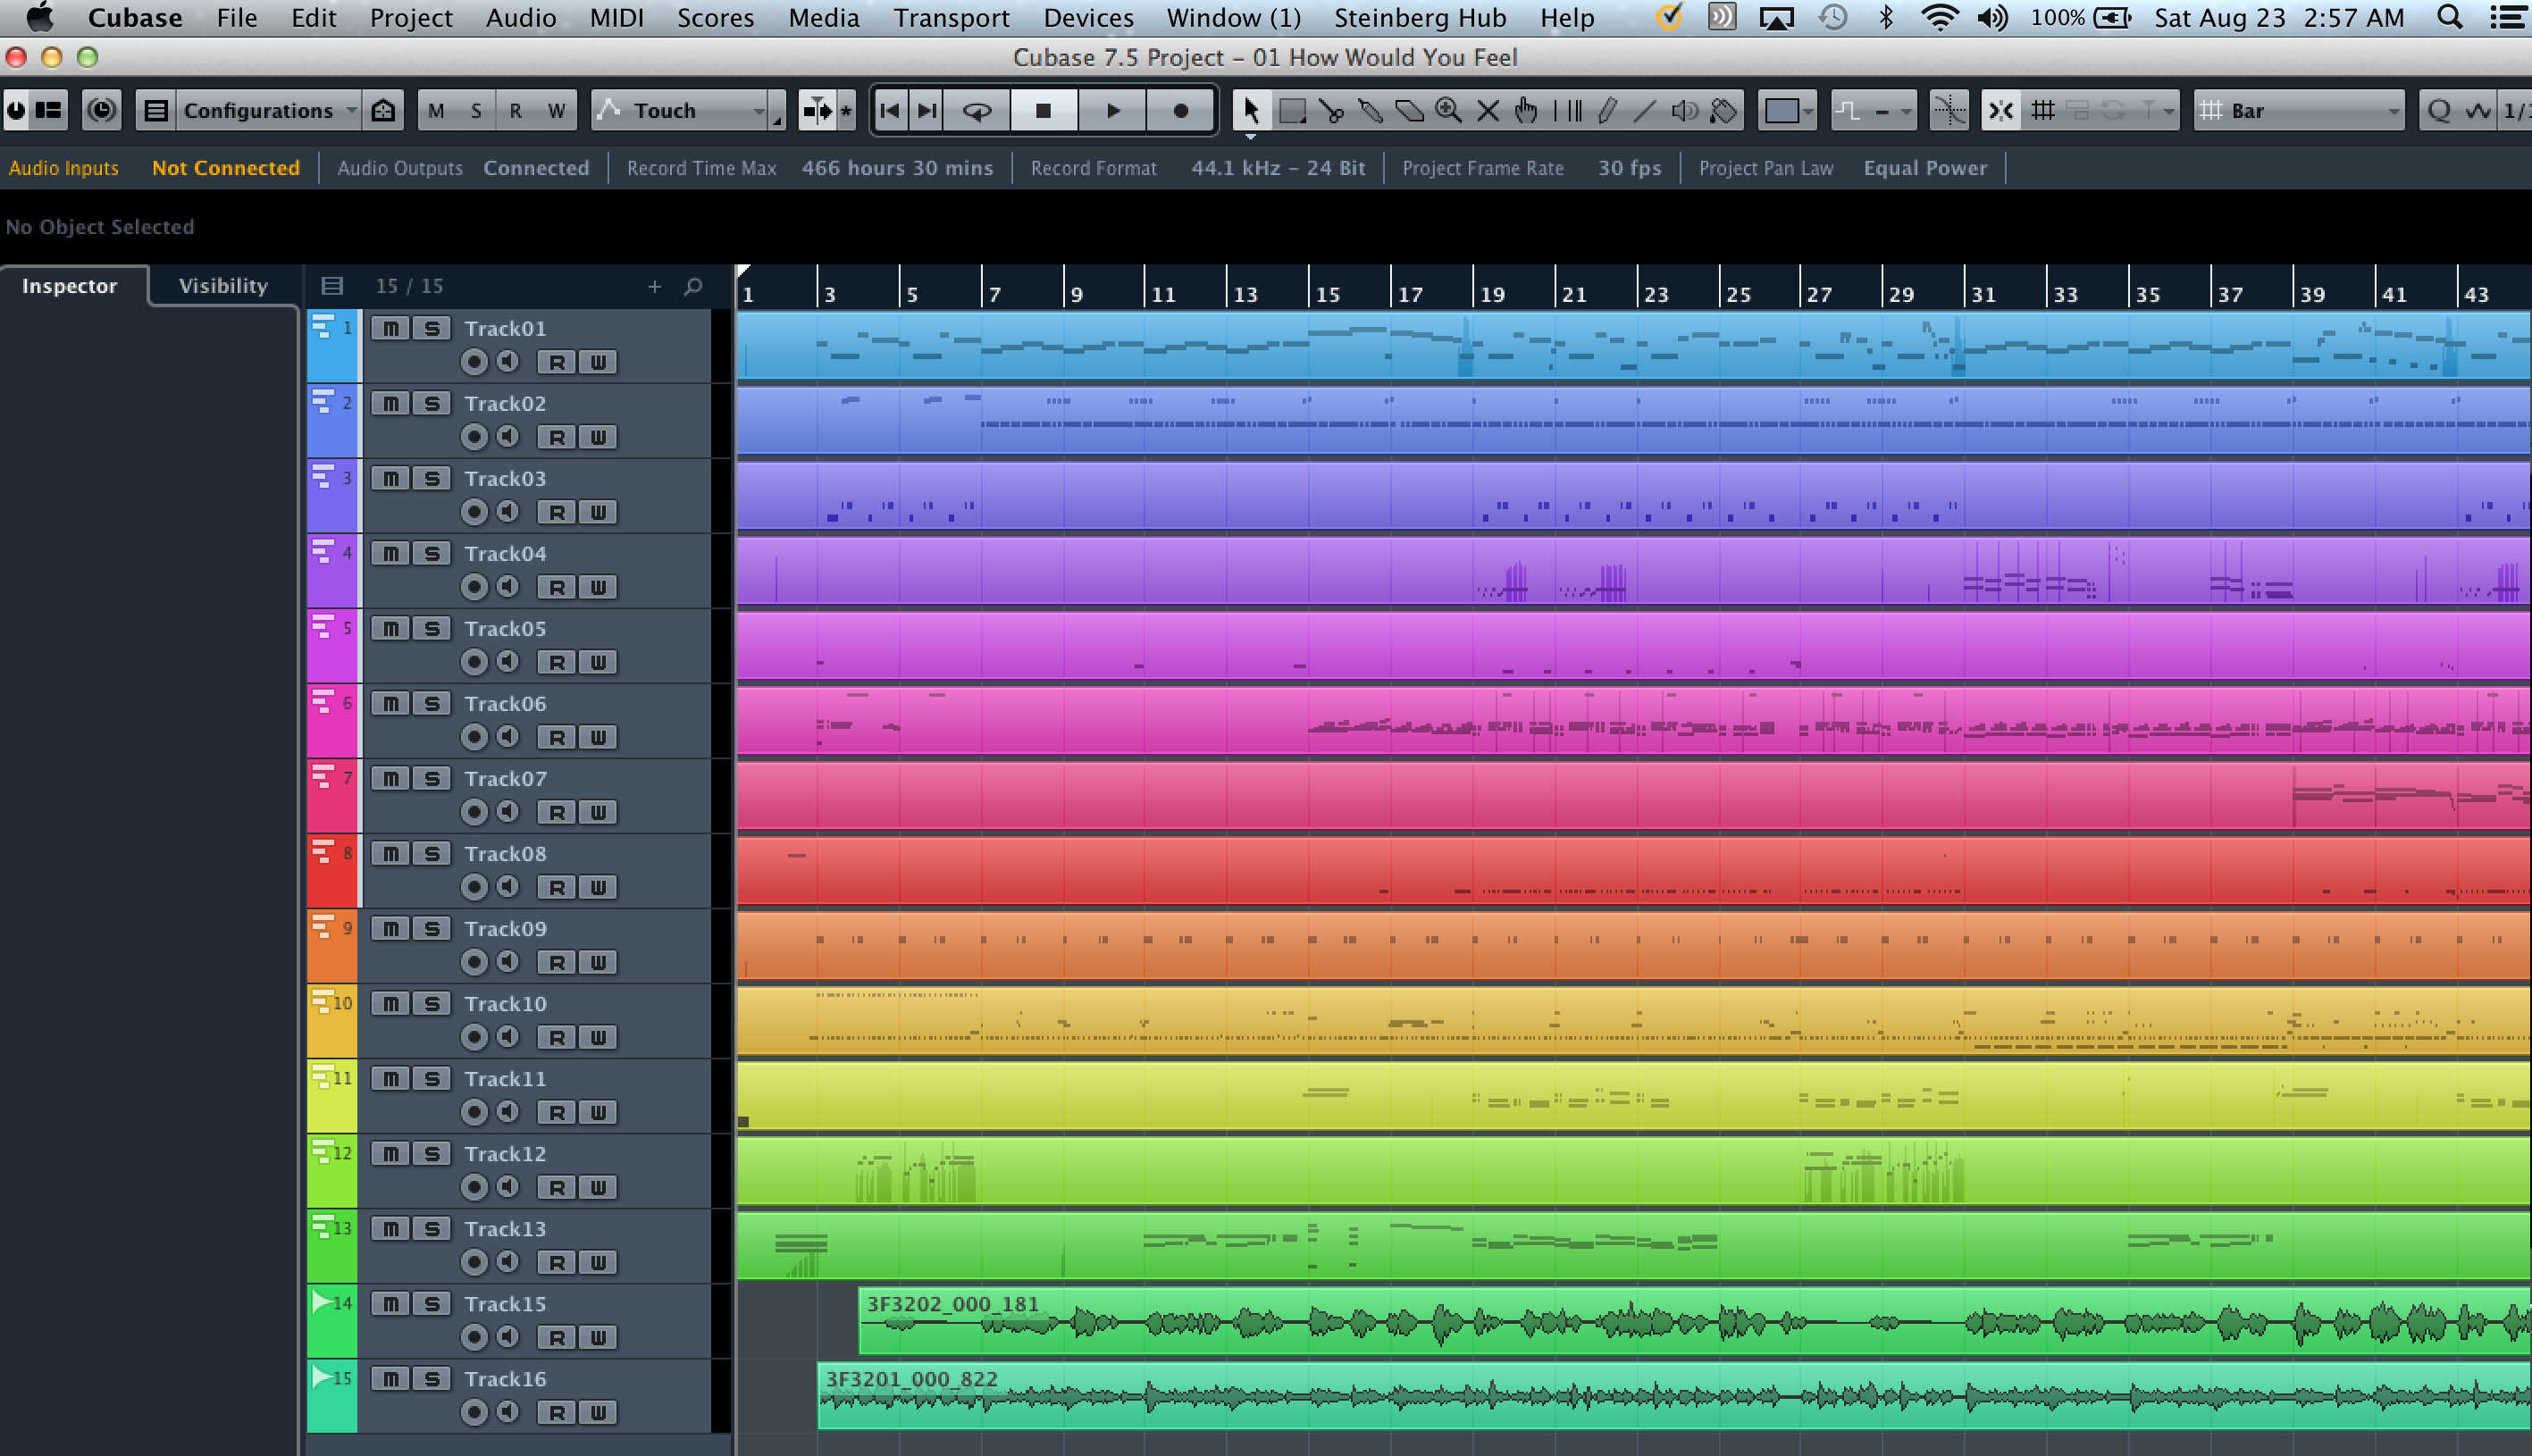
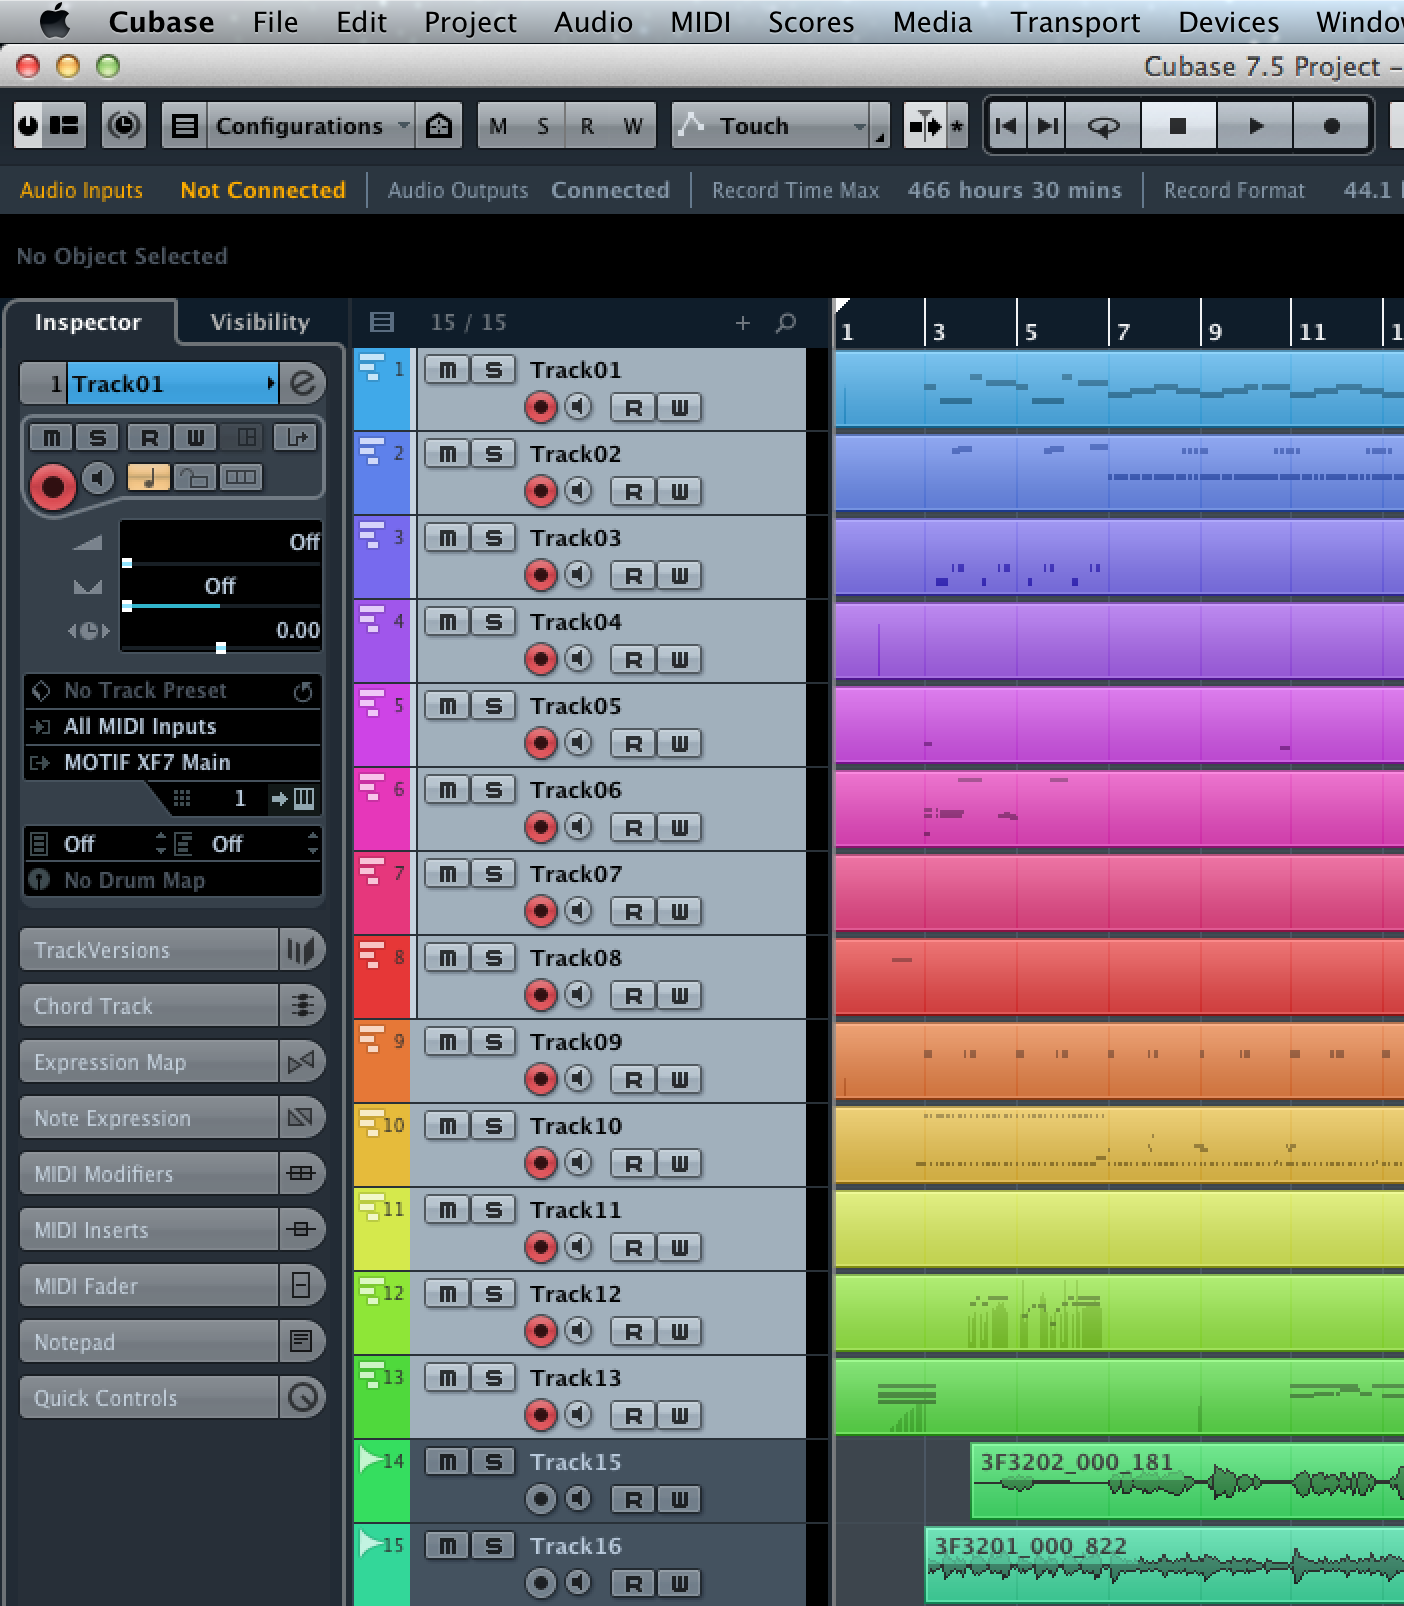
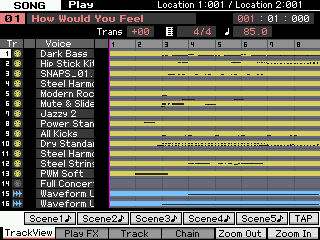 There are fifteen tracks recorded in this particular example: thirteen MIDI Tracks, 1-13, and two Audio tracks 15 and 16. Track 14 is not used at all.
The active MIDI tracks each have a yellow 5-pin MIDI jack icons in the TRACK (TR) column. The sampled Audio recorded to the Integrated Sampling Sequencer on Tracks 15 and 16 have a blue Wave icon in the TRACK column.
Track 15 is a lead Vocal that starts at measure 004 and Track 16 is an acoustic guitar that starts at measure 003.
 Each Audio Track was recorded to the ISS using the Record Type = “Sample+Note” which places a MIDI Note-On Event precisely at the audio punch-in point and sets the duration of that Note event through to the punch-out point. These “markers” are interpreted by Cubase when it imports the Audio Waveform (Media). This tells it where to place the audio sample. So you do not have to create complete Audio stems. Your audio will be precisely placed where you recorded it.
This means is if you have punched in at odd measure:beat:clock positions, manually, your audio data will still be properly positioned, automatically, by this Import function. This means you can be very economical – complete “stems” (Audio tracks that fill the entire Song from start to end) are cool but wind up being mostly empty space unnecessarily using megabytes of data.
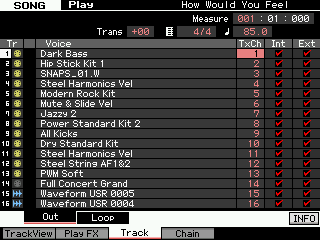
The samples on tracks 15 and 16 have the default names “Waveform USR 0004” and “Waveform USR 0005”. Because two tracks were used here, the audio will be imported to Cubase on two separate audio tracks.
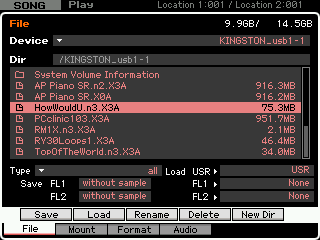
We pressed [STORE] to write our example sequence data to the internal Motif XF Flash ROM prior to SAVING the data to our USB stick as a file.
Create an ALL data File:
Press [FILE]
Set TYPE = “all”
Press [SF1] SAVE
Give the File a Name
Press [ENTER] to execute
Shown below is our FILE on the USB stick as viewed from the Motif XF screen:
 Now we can shuttle the USB stick physically over to our computer. Plug it into an available USB port… and proceed with the IMPORT.
This ALL data file “HowWouldU.n3.X3A” contains everything we will need to import the entire Motif XF SONG and MIXING into a New Project in Cubase.
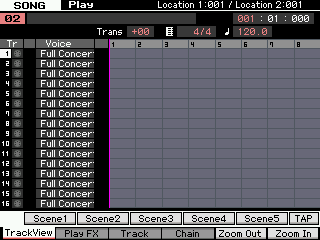
On your Motif XF you can select a blank SONG location – this way you can be clear on just how we import these two separate things into Cubase. First the MIDI and AUDIO (sequence) data, then the MIXING (synth) settings.
 When we import the data – the Motif XF Editor VST will “bulk” all the synthesizer tone generator settings to the Motif XF – we select a blank SONG location so you can see how the Editor will faithfully restore every thing you require.
Find a blank SONG location in your Motif XF – when opening a Project in Cubase you will use this blank location to house the tone generator’s MIXING setup.
All you need to do is place your USB drive with your ALL data file into your computer. (Alternatively, if you are storing directly to your computer via Ethernet, you only need to access the .X3A file on your computer)
_ Open Cubase
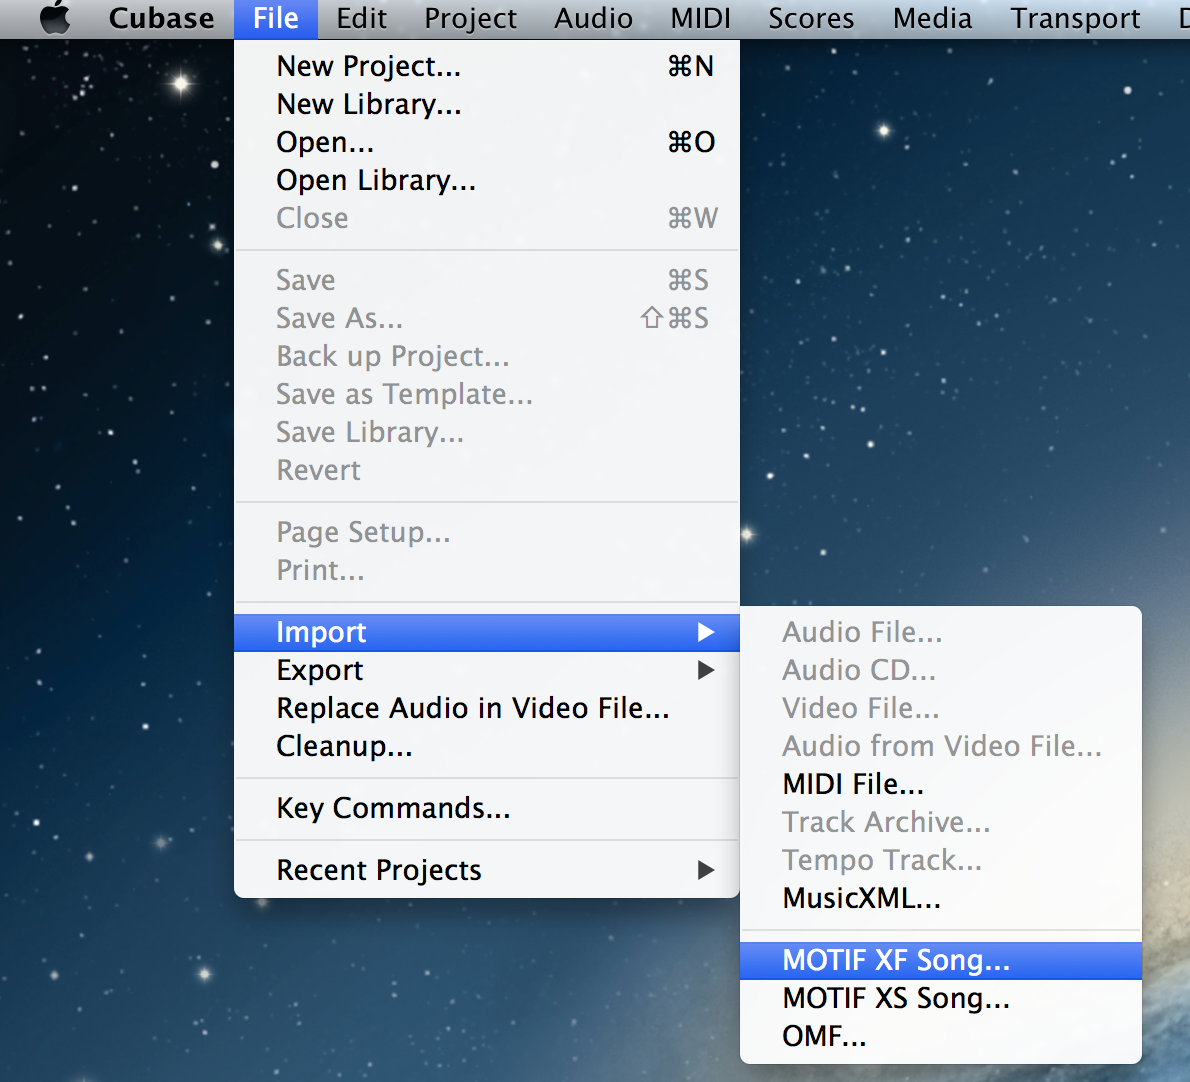
_ Under FILE in Cubase select IMPORT > Motif XF Song
If it does not appear – Make sure you have downloaded and installed the Motif XF Extentions
The option to “IMPORT > Motif XF Song“ is added to Cubase when you properly install the aforementioned Extension.
_ Navigate to your Motif XF ALL data file (.X3A), highlight the file and click OPEN

_ Select a target Directory on your computer for this new Cubase Project. This should be somewhere on your computer (do not make a directory on your USB stick). You are being asked “where” do you want to create the new Project.
Below I have created a “Cubase Import” FOLDER on my Desktop for this Project.
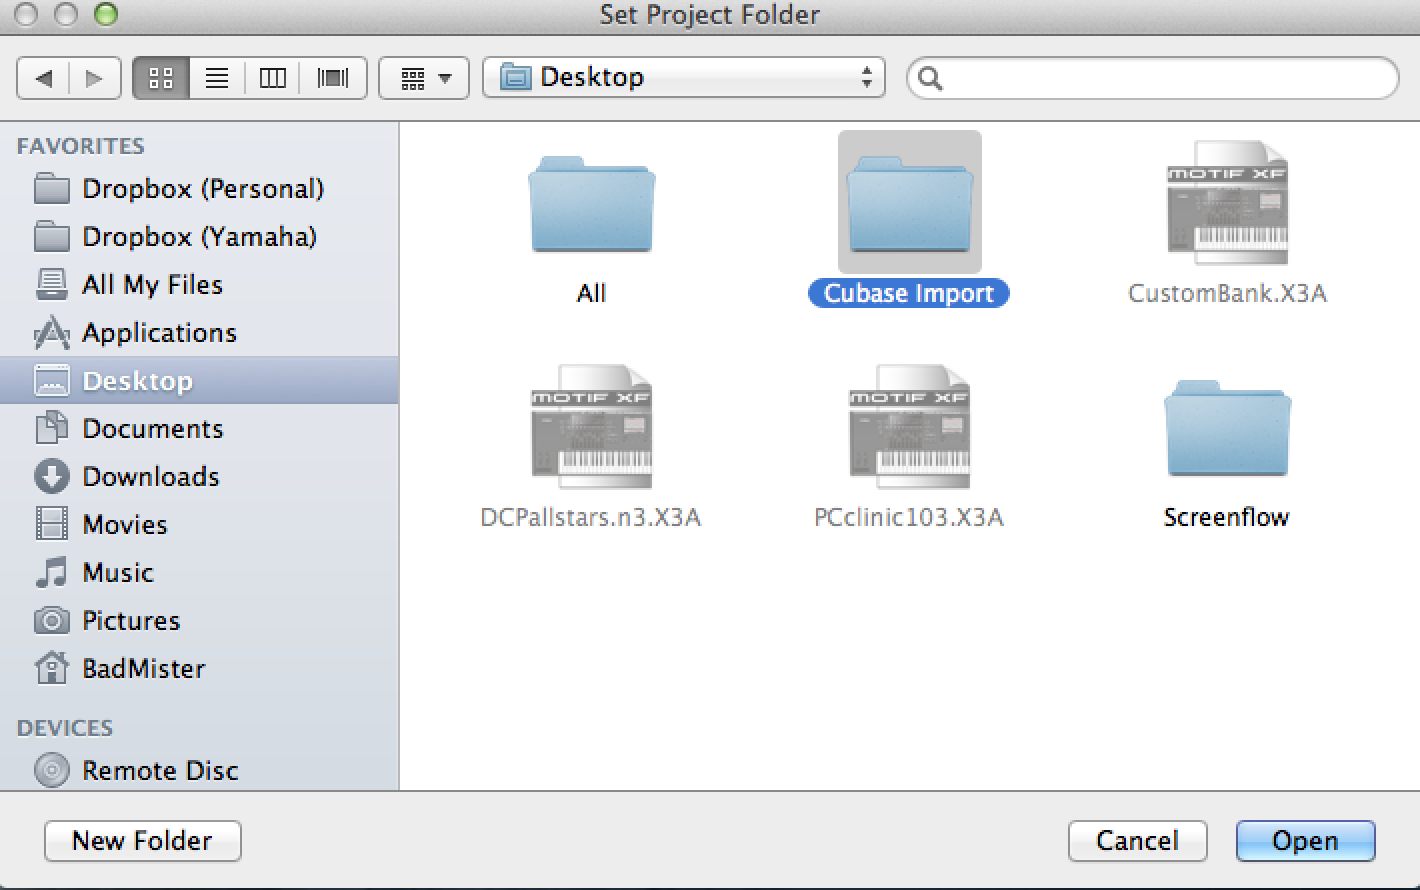
_ Click OPEN
_A dialog box will open revealing your “IMPORT OPTIONS”
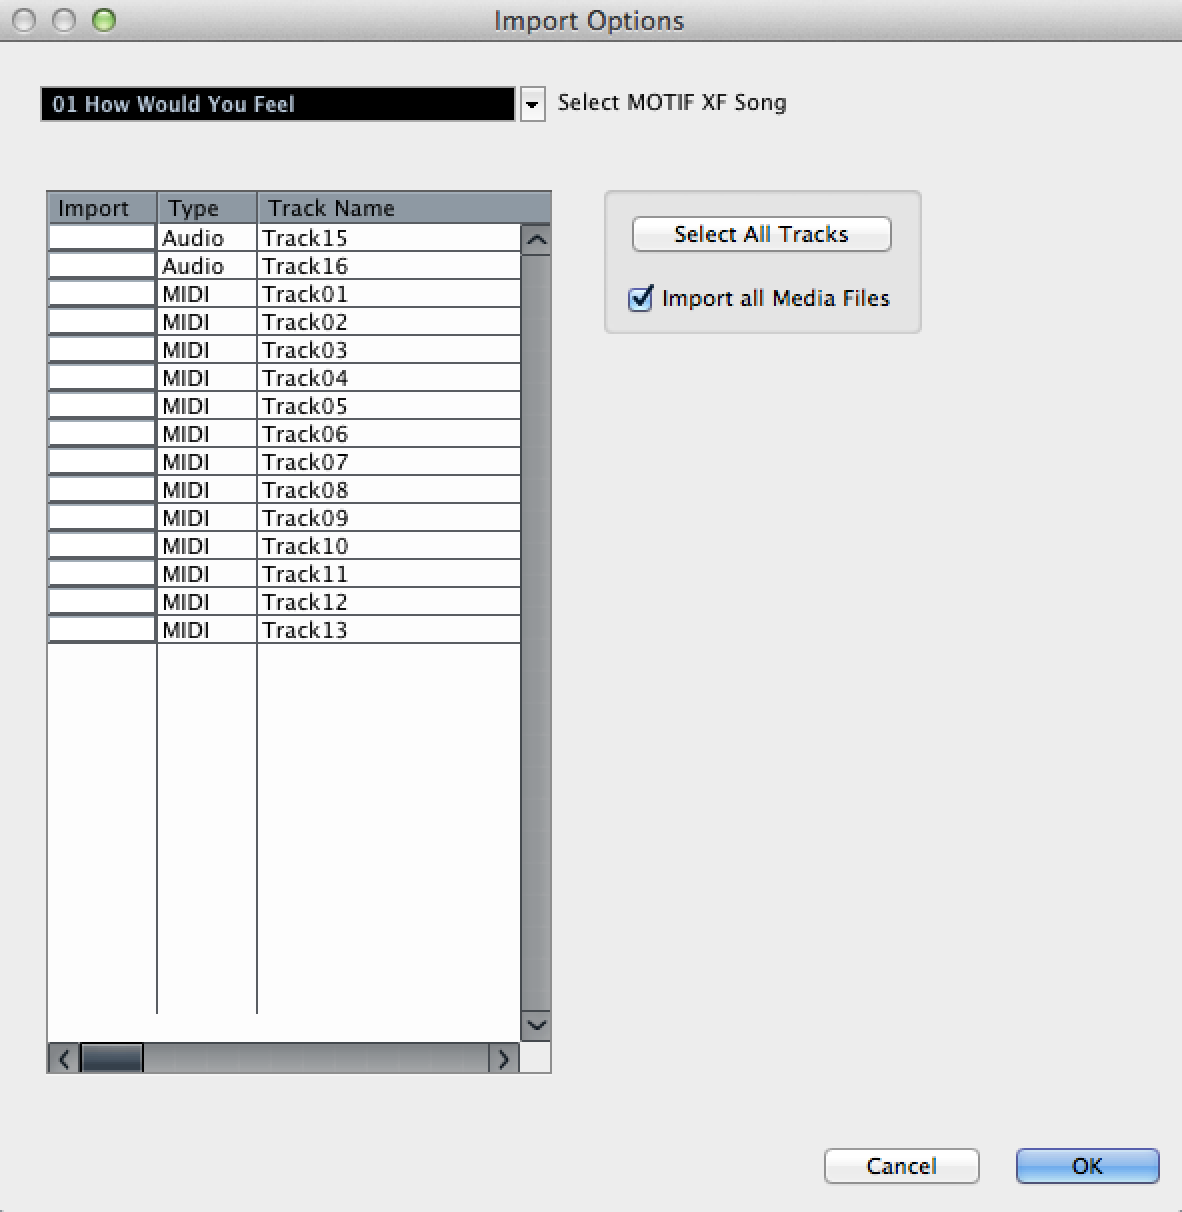 _ Select the SONG by title (click on the small chevron in the corner of the title window to see the full list of Song’s contained in your ALL data file.
_ Click the “Select All Tracks” option to mark IMPORT column for all tracks.
When you have recorded audio tracks to the ISS (Integrated Sampling Sequecer) using the SAMPLE+NOTE Record Type, they wll appear at the top of the list and will be identified as TYPE = AUDIO.
Check the option for “Import all Media Files“ – This will allow Cubase to import and place all of the audio you have sampled to the ISS properly within your Cubase Project (this includes any outtakes or unassigned audio clips). If left unchecked only those bits of audio associated with a Note-On Event will be imported.
 _ Click OK. This will import each track to a separate track of the appropriate kind, in Cubase.
Motif XF MIDI Tracks will be imported to Cubase MIDI Tracks – the import function will create a new MIDI Track assigned to the appropriate PART for each MIDI traack you recorded in the XF sequence.
And any audio you have recorded (sampled) to the Integrated Sampling Sequencer (User Sample Voice data) will be properly imported and positioned on an Audio Track in Cubase – it uses the exact position and duration of the NOTE-ON Event created by the SAMPLE+NOTE function to place the audio clip precisely within the Cubase timeline. This ensures proper playback of your audio and is extremely efficient and accurate.
Below you can see how the IMPORTED data looks: the thirteen MIDI tracks followed by the two Audio tracks.
Because the MIXING Setup is already in your Motif XF you could play it back using the setup you used to create the composition and the ALL data FILE – The MIDI Tracks will be assigned to playback through the regular “Motif XF Main” (MIDI IN/OUT Port assignment). But what we will need to do is duplicate the current settings and not only capture them in our Cubase Project, but redirect them through the “Motif XS Editor VST”. We can begin by simply opening our example File: “HowWouldU.X3A” with the Editor VST and extracting the information we need.
So now let’s focus on the Synth Tone Generator: We will make sure the Motif XF Editor VST is communicating (ONLINE) with the Motif XF. (If you are completely new to the Editor; please see separate article on the setup).
STEP 2:
Since you originally did the SONG in the Motif XF, your MIX and Voices are already in its memory. However, when transferring data to Cubase it simply makes sense to store all of the data in the Cubase Project file. This is so next week or next year when you remember you did this song, and you open the Cubase Project everything (every sound, every setting) will be recalled automatically! And while in Step 1 we imported the data associated with the Tracks of the Sequencer, here we are only concerned with the synthesizer Tone Generator and its settings.
Next you will want to import the MIX data and place it in the Motif XF Editor VST. The Motif XF Editor will deal with the organizing the synth sounds and Mix data.
_ Go to DEVICES > VST INSTRUMENTS > External > Motif XF VST to launch the Editor:
_ Click on “RACK INSTRUMENTS“ to find a list of the Virtual Synthesizers available for your Project. The “Motif XF VST – D“ will be found under the EXTERNAL (red arrow in the diagram)
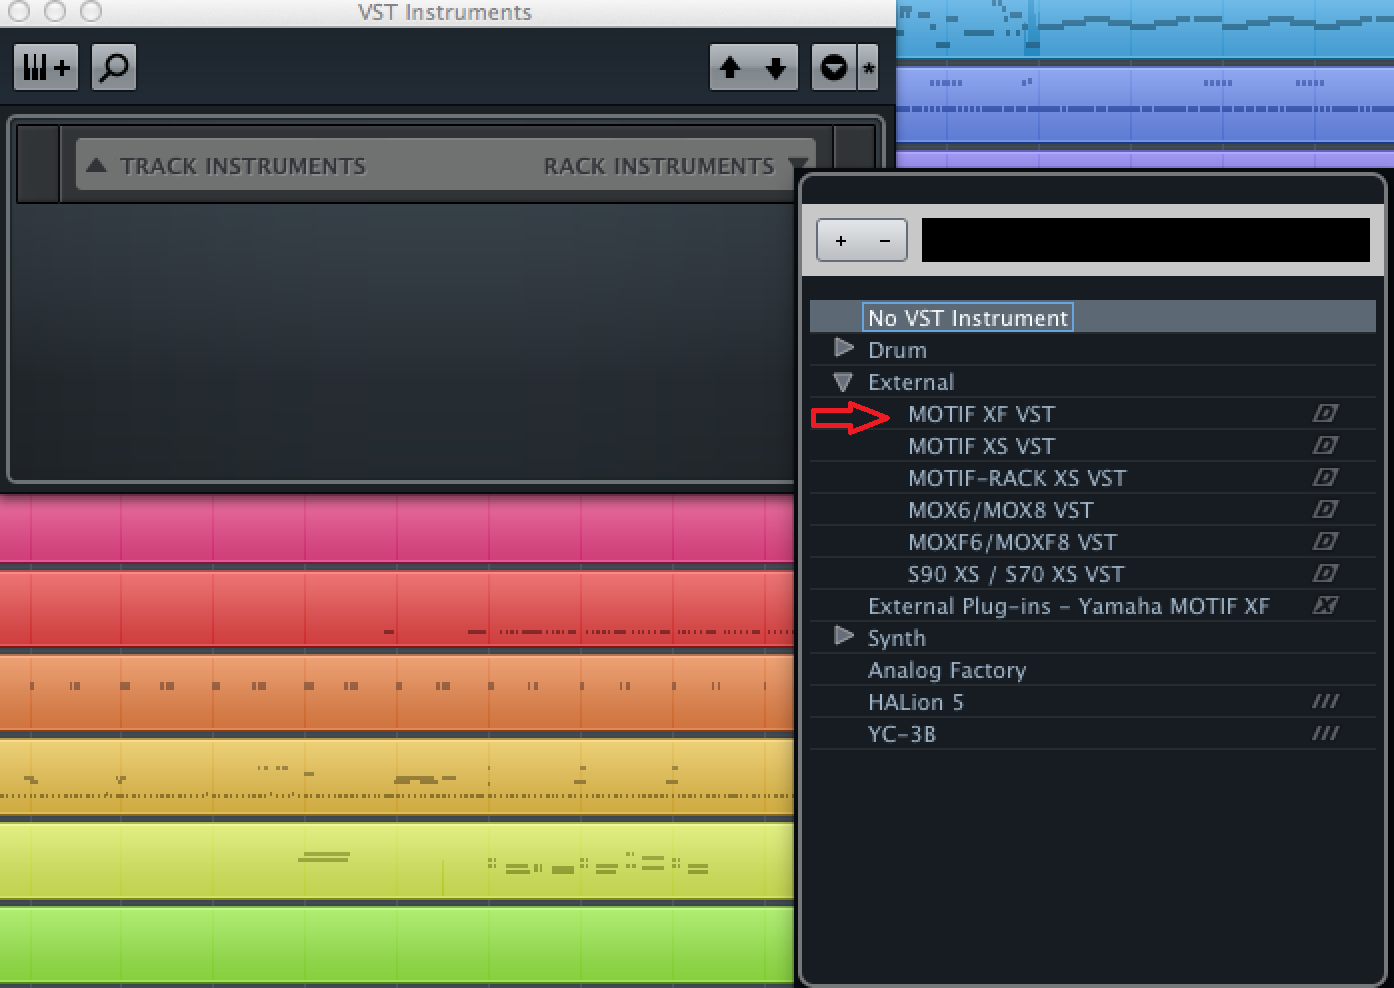
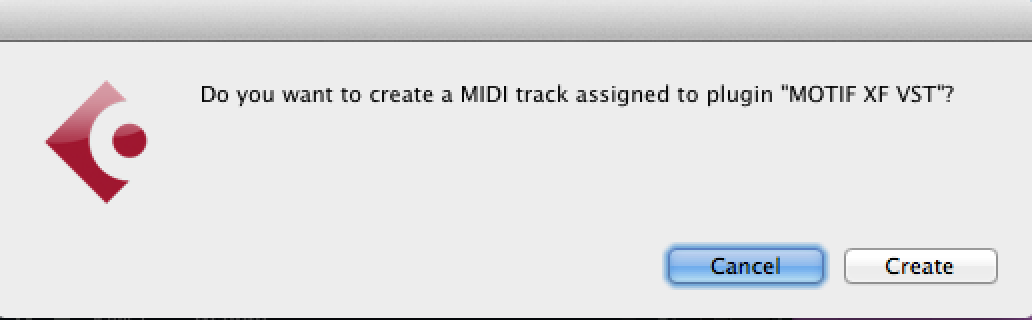
You will be asked if you want to create a MIDI Track for this VSTi – you can CANCEL because your MIDI Tracks are already imported.
Our next task will be to point all of the Imported MIDI Tracks to the VSTi (Motif XF VST). We will literally be routing the MIDI OUT of each Cubase MIDI Track to the MIDI IN of the Motif XF VST. When the MIDI Tracks are initially imported they are likely set to output MIDI to the “Motif XF Main” or whatever your default preference indicates. We will need to route the MIDI Tracks so that the data passes through the Motif XF Editor VST before it triggers the Motif XF hardware. By diverting the signal through the Motif XF Editor VST we put it in a place where it can determine where the AUDIO signal gets directed. Instead of simply going directly to the MAIN XF audio outputs, audio is rerouted deeper into Cubase, where we can process it and monitor it via the VST INSTRUMENT Audio Lane.
Note: The VST AUDIO LANE is found in the VST INSTRUMENT FOLDER which is created whenever you launch a VSTi. Within that folder there is the “Motif XF VST” sub-folder – it contains a virtual Audio Lane and the Automation Lane for the Motif XF VST. The number of Audio Lanes will depend on the number of active output pairs. The Motif XF VST has at total of 8 stereo pairs of outputs… initially all PARTS are assigned to the Main L&R stereo pair Outputs which are called “Motif XF 1” or just “L&R”.
_ Highlight the first MIDI Track in the Cubase main window.
_ Hold [SHIFT] and click on the last MIDI Track.
In our example, I will need to select tracks 1-13 using this method. Shown below tracks 1-13 are highlighted together. Now when I set the MIDI OUT for one – it will set it for all selected Tracks.
This will allow me to redirect all thirteen tracks at once to the “Motif XF VST – MIDI In” _ now that we have launched the Motif XF VST we can select it as a destination.
With all the items selected together we can quickly (and easily) redirect all of them to the tone generator destination we require – in this case the “Motif XF VST” and its MIDI IN
On a Mac you would hold down [SHIFT] + [OPTION] while changing the MIDI OUT assignment from “Motif XF Main” to the “01. Motif XF VST – MIDI In” option (shown below):
On a Windows computer you would hold [CTRL] + [ALT] while changing the MIDI OUT assignment…
 By setting the Track’s MIDI OUT = 01. Motif XF VST – MIDI In we ensure that all the tracks traverse the Motif XF VST Editor. Now when you select a Track button, [1]-[16], on your Motif XF front panel it will automatically select the corresponding Track in Cubase and the corresponding PART in the Editor VST’s graphic interface. When you playback the composition, (by pressing the SPACEBAR), the keys of the Editor will indicate exactly what notes are being activated for the currently selected track.
_ On the XF Editor’s menu bar go to FILE > OPEN…
_ You will be asked if you want to SAVE CHANGES to the current Editor – click “No”
_ Set the “Files of Type” option so that you are looking for Motif XF ALL data file type (*.X3A) – it will initially be set to (*.X3E) but we want to look in the ALL data file type.
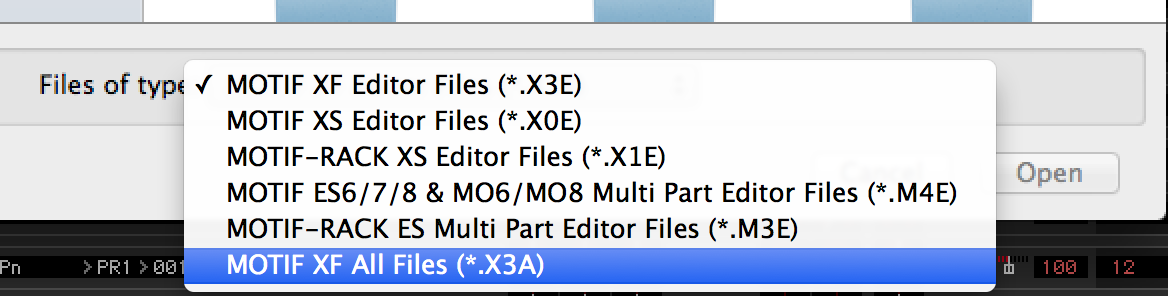
_ Navigate to and highlight the same .X3A file on the USB stick and click OPEN
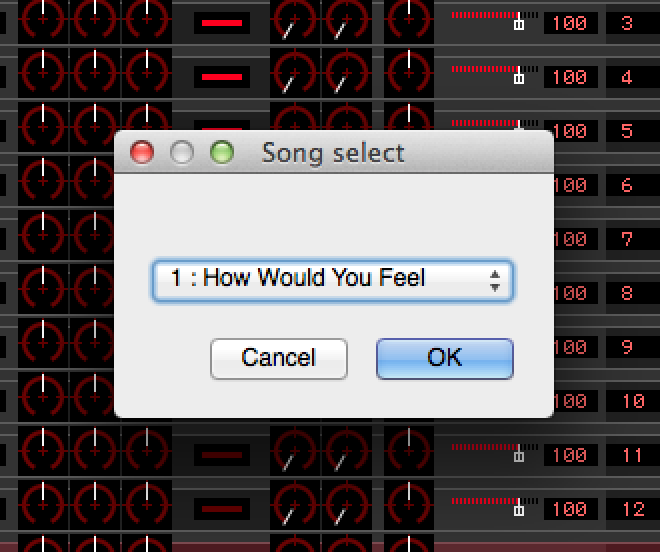
A “SONG SELECT” dialog box will appear and allow you to see the songs contained in the ALL data file. Use the small triangular chevron to view a list of all song titles.
_ Select the SONG by title and click OK.
The Editor will open the file and find the requested data. This will take a few seconds… as it imports all the USER sounds, and the current Mix, including any MIX VOICES you have done (so all your possible edits have been imported as well).
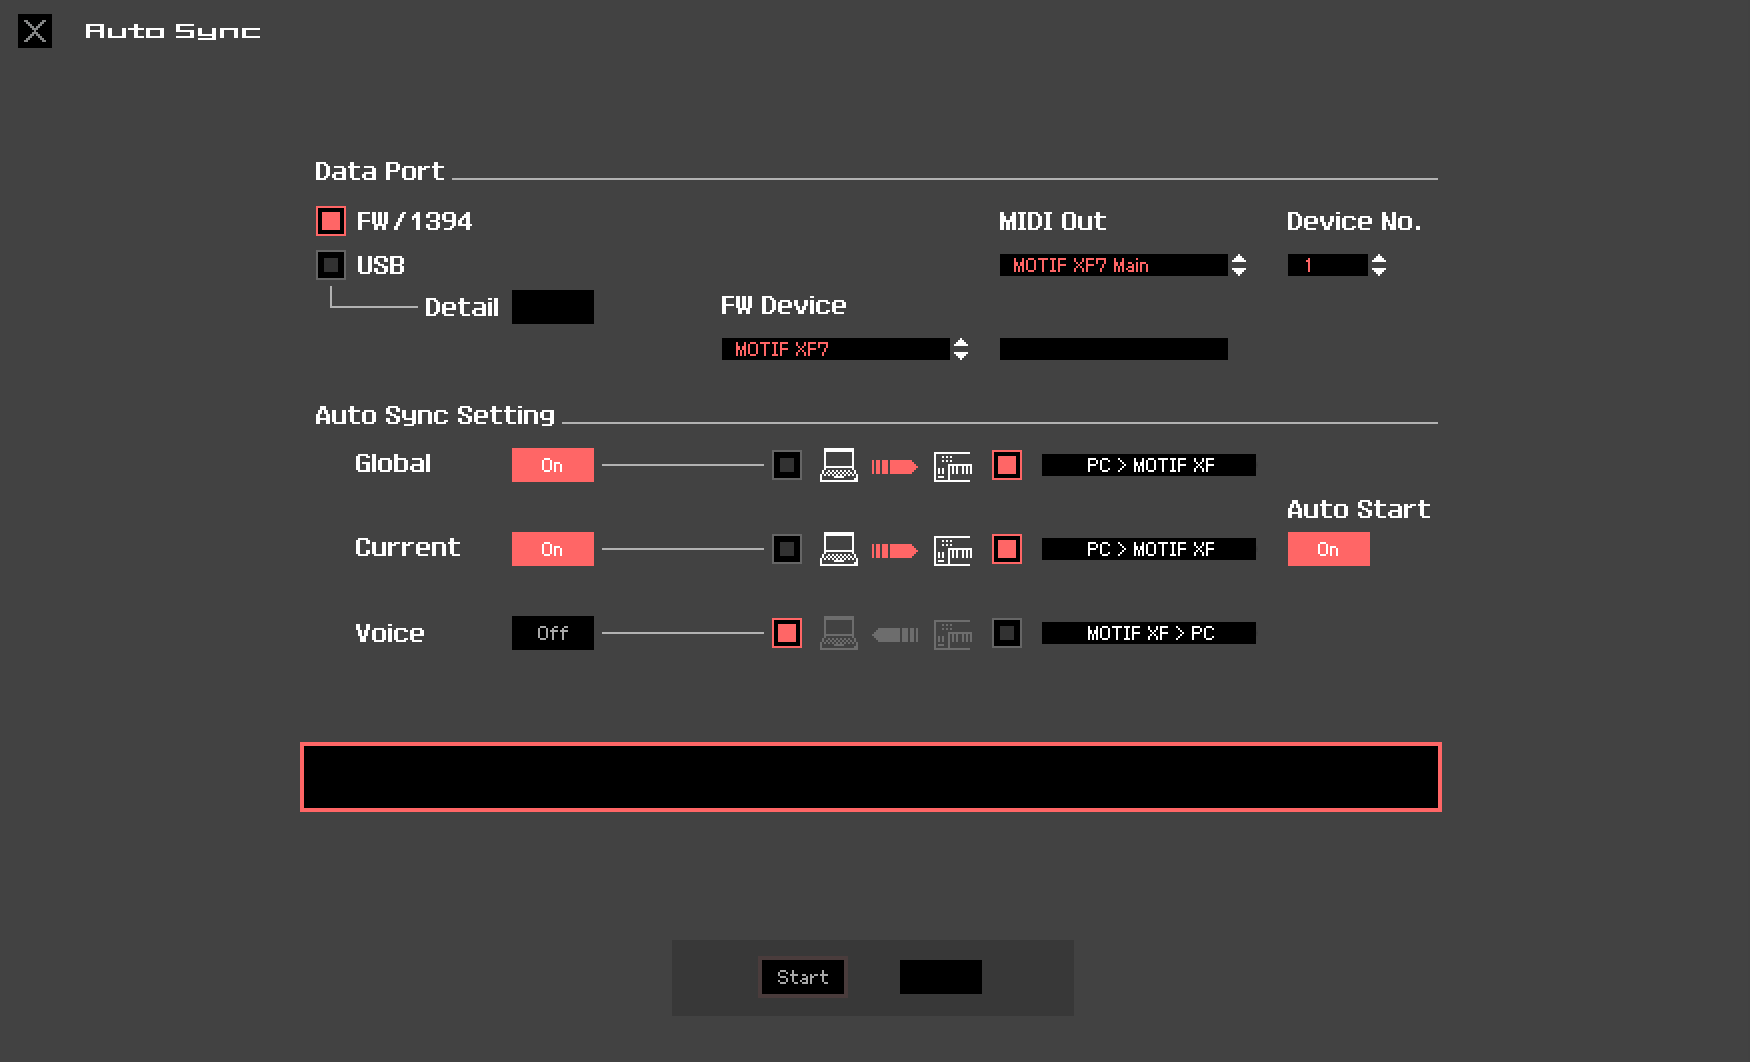
Then the Editor’s AUTO SYNC window will appear and you can select to send the GLOBAL and the CURRENT Mix from the COMPUTER => the Motif XF. (PC > Motif XF)
You do not want to set the VOICE option in the same direction. It is not necessary to send the entire set of 512 VOICES from the FILE (computer) to the XF at this time. In fact, in this situation you do not want to set this option in the COMPUTER => Motif XF direction because – this will overwrite your current Motif XF internal Library with the same USER VOICES that presumably are already are in your Motif XF.
We recommend that later, some time after you have Imported the Sequence and Mix, you may wish to use the BULK > DATA SYNC option to import (RECEIVE in the Editor) the specific User Banks from the current internal XF Library that you would like to include with your Cubase Project. This, again, is only necessary if desire to keep the USER Voice Library with the Project. You probably do not need all 512 USER VOICES with every Project. But may, however, wish to capture any customized DRUM KITs. You will definitely want to capture the USER KITS with your Project, if you customize the Drum Kits for any Project. The BULK > DATA SYNC routine is more efficient at capturing just what you need.
Extra Credit Tip: In most cases the “GLOBAL” and “CURRENT” options are sufficient for the purpose of initially importing a project to the DAW and will give us “total recall”. This will be particular true when you utilize the “MIXING VOICE” bank when you need to edit/customize any Normal Voice for a particular Song. This is the most efficient way to catalog your VOICES. Each PART containing a Normal Preset or User Voice can STORE a custom MIXING VOICE. The Voice will be “associated” with this group MIXING setup. Sixteen Mixing Voices can be saved per MIXING Setup. Drum Kit Voices are huge (73 Elements each) and must be stored to one of 32 USER Drum Bank locations. This is why, we recommend you make use of the MIXING VOICES and the USER DRUM KIT Bank when you are going to be using Cubase and the Editor VST. Rather than storing everything, everytime; you can streamline what gets saved in your Project. It make managing your customized sounds neat and efficient.
Click START and the Current Mix and Global settings will be sent to the Motif XF. If you have selected a blank location – it will now resemble your exact original setup (sans the audio waveforms – which are now on their own Audio tracks in Cubase). You have restored all your work created in the XF and opened it in Cubase. Cubase MIDI Tracks will be output through the “Motif XF VST” and will then trigger the Motif XF hardware – The hardware will RETURN audio via the Motif XF VST routing and make its way into Cubase as “virtual audio” – where it can be processed and finally output via the assigned Motif XF VST AUDIO LANE. It then travels back to the Motif XF hardware which outputs the signal to your Monitor speakers! Quite a journey – but this is what makes it so very powerful and flexible. In future articles we will learn more about what can be accomplished with this VST Routing and the FW16E.

