
S90 XS/S70 XS EDITOR VST
A Getting Started Guide: S90 XS/S70 XS EDITOR VST
There are two different ways of running the S90 XS/S70 XS Editor. It can run as a standalone program, or it can run as a VST3 plug-in for audio integration (requires an external audio interface), called the “S90 XS/S70 XS VST”. The VST version requires a DAW software capable of running VST3 plug-ins. The advantage of running the S90 XS/S70 XS Editor as a VST is that it allows not only advanced audio routing, but when you SAVE your DAW Project file, all the Voices, Multi setups and settings of your S90 XS/S70 XS are remembered along with the Project. When you next open this Project it will restore every setting of your instrument!
VSTi Audio Routing:
The advanced audio routing (requires an external audio interface) means you can use software based plug-ins to process your audio streams coming from the S-XS. Without this advanced routing you would typically be recording just standard MIDI tracks into your DAW (Cubase), and as we all know MIDI is not audio and therefore processing MIDI tracks with VST Plug-in Effects is not possible. But VSTi routing means that the MIDI data for the hardware S90 XS/S70 XS engine will be routed in such a way that the (hardware) tone engine returns audio to your audio interface/Cubase (instead of just OUT via the speaker system), VST routing redirects the signal back to Cubase via the special VST Instrument AUDIO LANE provided for each VST Instrument Output. This “audio lane” allows you to hear exactly what will be rendered when you execute the “Export Audio Mixdown”. VST Instruments all play through the VST INSTRUMENT FOLDER which contains an AUDIO LANE and an AUTOMATION LANE – the AUDIO LANE is “virtual” audio, it is not yet printed as an audio waveform – you are simply monitoring the audio before it is rendered as a Waveform by the process known as EXPORT AUDIO MIXDOWN. This is exactly how all soft synths are treated – via the ‘virtual audio’ lane prior to rendering the waveform. It is only during the EXPORT AUDIO MIXDOWN that the “virtual audio” becomes “real audio”. External VSTi are rendered in real time – this makes sense because the MIDI data needs to be played back to the XS for the XS to generate the AUDIO which is then converted to a high resolution audio waveform on the computer.
Saving your VSTi Setup:
When you Save the Cubase Project, you do not have to save the S90 XS/S70 XS VST data separately. It is automatically saved with the Cubase Project. So exactly like any software synthesizer you may have used, the S90 XS/S70 XS and all its Voices, Edits, etc., are saved as apart of the Project itself. You can opt to save just the CURRENT MULTI setup or you can Save the entire Voice Library contained in your S90 XS/S70 XS at the time of the project. This includes any MIXING VOICES, or custom USER VOICES you may have created. If you are using the XS Editor as ‘standalone’ naturally, you will need to save an Editor File (.X2E) for your S90 XS/S70 XS setup and you will need to restore it manually.
We cannot strongly enough recommend that the one thing you should do while learning to use the S90 XS/S70 XS VST is to read through the 55 page online (PDF) HELP manual that comes with it.
The Standalone version of the S90 XS/S70 XS Editor cannot be run simultaneously with the VST version because you only have one S90 XS/S70 XS (in all likelihood). The Editor represents the hardware – it has a VOICE mode and a MULTI mode. You never need to open more than one instance of this Editor. The one instance handles both VOICE mode and MULTI mode!
Let’s see how the S90 XS/S70 XS Editor VST is accessed within Cubase as a VSTi (depending on the version of Cubase you are using – screenshots might appear slightly different)…
· Start a NEW PROJECT
· Use the EMPTY Template
· Once the empty Track View window is showing:
· Go to DEVICES > VST INSTRUMENTS (or use the quick key: F11)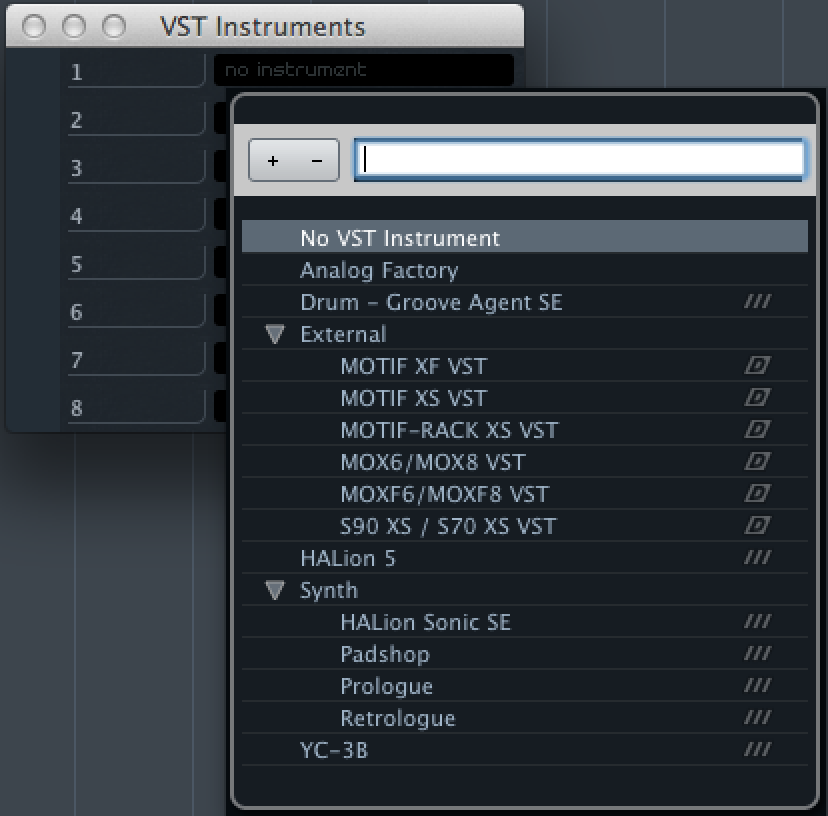 In the first space in the VST Instrument Rack click where it says “No Instrument” and select “External” > “S90 XS/S70 XS VST” – D
This is how you access the new “S90 XS/S70 XS Editor VST”. In a similar scenario as you would in setting up any VSTi, you will be asked if you want to create a MIDI track assigned to the “S90 XS/S70 XS VST”.
Create the MIDI track. The MIDI Track is assigned to the VST MIDI In. You will create a new MIDI track assigned to the “S90 XS/S70 XS VST MIDI In” for each S90 XS/S70 XS PART you wish to use … or as we’ll see in another article, you can set the MIDI Track’s Channel = “ANY” (more on this later)
The MIDI track for S90 XS/S70 XS data and a VST Folder for the audio lane will appear. Later you can create as many MIDI tracks, assigned to this VSTi, as you require. Each new PART you want to use in your multi-timbral S90 XS/S70 XS requires you create a new MIDI track assigned MIDI OUT to the S90 XS/S70 XS VST’s MIDI IN. Do not miss this point: The “S90 XS/S70 XS VST MIDI In” (circled in red in the screenshot below) is different from the “S90 XS/S70 XS MIDI In” – and is selected as different. The VST MIDI IN allows the MIDI stream to traverse the graphic user interface that you consider the “editor”. Not only do the keys on the Editor’s keyboard animate to indicate what you are playing, the knobs and parameters in the Editor will animate in response to the data you are generating – it is literally the XS’s 1:1 representative in the computer. Each MIDI track will address this one multi-timbral instance of the S90 XS/S70 XS VST. The number of audio lanes will depend on the number of audio Outputs you activate for the XS. We are simply placing the Editor VST between the MIDI OUT of the Track and the XS hardware.
Activating outputs is done on the VST INSTRUMENT rack by clicking on the OUTPUT icon (indicated in the white box below) or by activating them in the S90 XS/S70 XS Editor VST (small chevron in the upper right corner of the Editor VST). You can select to activate all outputs or simply click on the output you require. There are Dual Stereo Outputs available: the main analog L/R and the assignable L/R which can be used as two separate mono outputs or as a second stereo pair.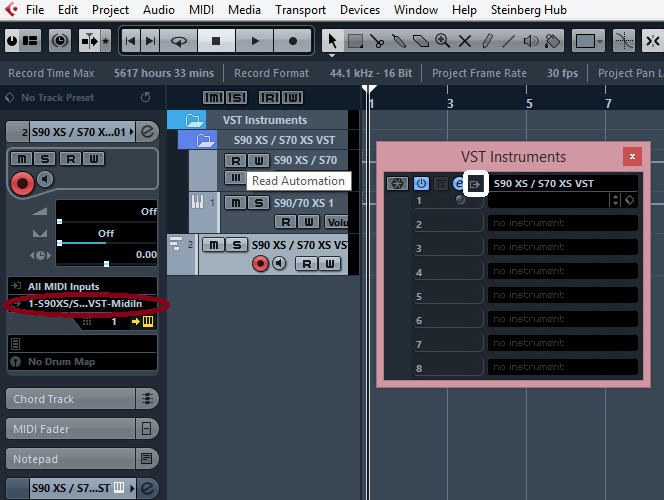
Important note: Audio Output from the S90 XS/S70 XS is always via the analog outputs on the rear panel: Main L/R and Assignable L/R. You would connect your OUTPUTS to your Audio Interface and would select the ASIO Driver that controls that interface within the S90 XS/S70 XS Editor: Go to FILE > VSTi SETUP > make sure you select the ASIO Driver you use for audio as the LEFT and RIGHT RETURN in the very first slot. Remember multiple MIDI PARTS can share an audio output. You may wish to group or solo your musical PARTS, as makes sense for your music project. PARTS of your S90 XS/S70 XS MIXING setup are routed to the different OUTPUT buses with the OUTPUT SELECT parameter on the main Editor window (on the far right of the screen).
The Editor will launch. If it does not automatically find the ports and communicate with your S90 XS/S70 XS take the following steps:
· Make sure the S90 XS/S70 XS is set to communicate via USB. Set the MIDI In/Out parameter to USB. (The Editor cannot be run with just a 5-pin MIDI interface).
· On the menu bar of the S90 XS/S70 XS Editor VST click FILE > SETUP
Make appropriate Device and Port settings on the Setup screen and click OK. Shown below is the USB Data port assignments for Port 1 and Port 4.
If you are using the USB-MIDI port for MIDI and an external audio interface, you will need to additionally connect your external audio interface in order to successfully use this Editor’s audio routing functions. Select USB and turn the DETAIL ON.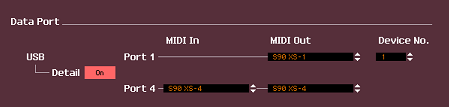
Select for PORT 1: “S90 XS-1” (Port 1) under MIDI OUT.
Select for PORT 4: “S90 XS-4” (Port 4) for both MIDI IN and MIDI OUT
The VST version of the Editor works by establishing both the MIDI path between your computer software applications (Cubase) and an audio path for the returning audio signal (discussed below). Often you will see the reappearing question where the answer outlines the difference between MIDI and audio. We will repeat that discussion, here, as it is pertinent. MIDI data cannot be heard. It only represents the music as notes on staff paper represent the music; as holes punched in the paper of a piano-roll represent the music… these coded messages must be reinterpreted and translated back to the instrument of origin in order to be turned back into music (audible to the human ear).
By establishing a signal path that routes the MIDI data from Cubase to the S90 XS/S70 XS tone engine and then returns the audio from the S90 XS/S70 XS to Cubase, we can establish the same kind of relationship that a computer-based VSTi has. When you launch a computer-based VST Instrument, you establish a MIDI track for the data that is routed to the VSTi engine, because its audio path is known (within the computer) you can process the signal using VST Effects and use the EXPORT AUDIO MIXDOWN to render your MIDI data to audio tracks. Basically you are sending MIDI to the tone engine and then returning audio from the tone generator… the only difference is the S90 XS/S70 XS is external hardware. External to the computer – we reach it by ROUTING the MIDI signal back to the hardware, and the AUDIO signal then arrives in the Cubase VST INSTRUMENT audio lane!
The VST EDITOR allows you to establish this type of communication by enabling the returning audio path. Shown below is the VSTi INSTRUMENT SETUP within the S90 XS/S70 XS Editor VST.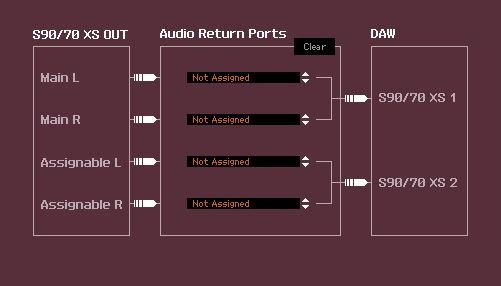 Go to FILE > VSTi Setup
The center panel shows the four analog outputs of the S90 XS/S70 XS that can be connected to your AUDIO INTERFACE (which sends the signal to the DAW). All PARTS routed to OUTPUT SELECT will travel to the DAW via the indicated bus.
Special note for users with an external audio interface: In the center panel above you would select the Audio Return Ports of your particular Audio Interface. Your audio interface’s ASIO Driver L and R would be selected here. If your audio interface supports just stereo outputs from the S90 XS/S70 XS (you would connect the Main (analog) Left and Right outputs of the S90 XS/S70 XS to the appropriate inputs on your interface), therefore, you would set the first two RETURNS for the LEFT and RIGHT channels, respectively, of that audio interface (you will not be able to use the other stereo bus). If your audio interface has additional inputs, you might opt to connect cables between the Assignable L/R and that interface.
For example, if you have a Steinberg UR44 as your audio interface – you could connect all four of the analog S-XS audio outputs to the UR44 and create a workflow where the Main L/R outputs are for Stereo monitoring of your tracks, while you can selectively use the Assignable L/R when you wish to “bounce” (render) certain Parts, in isolation, to the DAW; Using the Assignable outputs to track audio when you need to record a PART separately. In such a case, you would select the ASIO Driver for the Steinberg UR 44 under the “AUDIO RETURN PORTS” – changing the “Not Assigned” to reflect to which port on the UR44 you connected each of the S90/70 XS’s physical OUTPUTS.
VSTi Routing will allow you to further process this audio within your DAW before ‘rendering’ (committing to) the waveform to a proper AUDIO TRACK. VSTi Routing gives external synthesizers (hardware) all the advantages of a synthesizer generated on your computer (a soft-synth): All the settings are automatically stored and recalled with the Project; the signal is virtual and is rendered in a separate MIXDOWN operation; you can process the audio signal with additional VST plug-ins prior to printing the audio waveform; you can even use the “FREEZE” operation, which creates a temporary audio file) to lower the overall drain on your computer’s CPU. Running the VST Editor is worth it, even if you do not edit, because it will update everything (even when running in the background) as long as it is ONLINE. Or you can develop a workflow where you have it take snapshot of all your settings before you close the Project.
Auto Sync parameter:
To really start enjoying your S90 XS/S70 XS Editor VST it will be important to get a handle on the Auto Sync function. This deals with the direction of the flow of information. You have two choices: Data can flow from the S90 XS/S70 XS to the computer, or vice versa, from the computer to the XS. Thinking this through, if you start work in the hardware XS, and want to capture what you have done as far as setup data, you want the arrow pointing from the XF to the computer. However, when you have archived a session and wish to recall your work, this is when you want the arrow pointing from the computer towards the XS.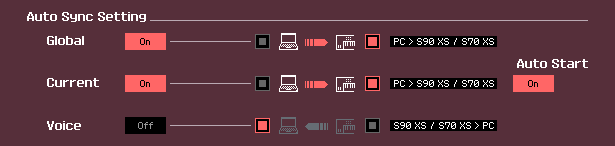
Stating this sounds so very obvious, but you will not appreciate it until you wipe out some work that you have done by replacing it with all piano Voices in all 16 PARTS. Even if this happens to you, do not panic. Remember the hardware S90 XS/S70 XS can be returned to the last stored state by simply recalling the current program. So even if you have a setup you’ve made in the S90 XS/S70 XS and you have the Editor’s AUTO SYNC setup to go in the wrong direction, all may not be lost. You can simply recall the current Program in the hardware S90 XS/S70 XS and then set the Auto Sync in the correct direction.
Also learning to use the ONLINE/OFFLINE function will be important. Anytime you want to make a change in the hardware without the software documenting it, you can simply click the ONLINE option. This will take the Editor OFFLINE. You can try out your change. If you like it and want to keep it you can bring the Editor back ONLINE.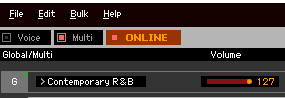 · ONLINE (active) data will automatically be synchronized in hardware and software
· OFFLINE (active) data will not automatically be synchronized
· OFFLINE (non-active) you have a problem to troubleshoot as you have no communication.
The “BULK > DATA SYNC” function is also an important tool. This tool allows you to initiate Bulk dumps from the Editor to the S90 XS/S70 XS (TRANSMIT) or to receive bulk dumps from the XF into the Editor (RECEIVE). This can be accomplished with the Editor in the active OFFLINE status.
Data Sync can be used to import the Normal USER and Drum USER Voices into the Editor – this, as mentioned, is useful when you want to store an entire Library (all or a bank of Voices that you used for this Project) – Rather than limit you to just the 16 Voices of the multi-timbral MIXING setup, you can have the Project store/recall every Voice currently in your XS. This is useful when your Project includes several Program Changes and/or you are not completed and wish to keep your current Library of Voices available. To restore all the VOICES in the Library, you would opt to configure the AUTO SYNC SETTING for VOICE (if you recall, we did not have that set to synchronize, because it does take some time to restore all 512 Normal User Voices and 32 Drum User Voices from memory and this would only need to be done once, and for this specific use case).