
Arpeggio Study: Recording “Sort+Direct” Velocity Zone Arpeggios

Performance: USR1:105(G09) Traumzeit
Category: Electronica
SubCategory: Chill
Tempo 70BPM
You may wish to read an introductory article on Velocity Zone Arpeggios as a concept before reading this article… link here:
Velocity Zone
To see what Preset VOICES are assigned to make up this PERFORMANCE simply press [F2] VOICE from the main screen.
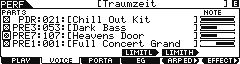
PART 1: [Chill Out Kit] is Note Limited across the keyboard
PART 2: [Dark Bass] is Note Limited to the lower portion of the keyboard
PART 3: [ Heavens Door] is Note Limited to the lower portion of the keyboard
PART4: [Full Concert Grand] in Note Limited to the upper portion of the keyboard
Press [F5] ARP ED or the dedicated [ARP EDIT] front panel button
Press [F1] COMMON

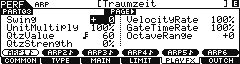
Here you can see the Tempo, main ARP ON/OFF Switch (toggle this ON/OFF here or with the dedicated front panel button); how the sequencer will position the start of the Phrase when changing [SF1] ARP1 – [SF6] ARP6: (SYNC QUANTIZE VALUE); also you can OFFSET Quantize Strength %; Velocity Rate; Gate Time Rate (duration); and Swing.
Press [F2] TYPE
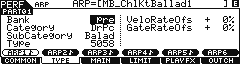
Here you can view the assigned ARPEGGIO TYPES (phrases) per PART. Notice the PART number in the upper left corner directly below the mode indicator (PERF). Use the numbered front panel buttons, [1]-[4], to view each PART and their assignments.
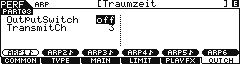
Select PART 3: Press [3] “Heavens Door” and explore the assignment.
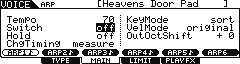
Press [F3] MAIN
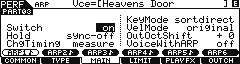
The Part ARP “Switch” = ON
“Hold” = Sync-Off – this means the arp phrase will stop when you lift your hand but will maintain its musical position within the phrase until you trigger it again. (In other words: it plays, unheard, in the background).
“Change Timing” = Measure – this means that when select a new ARP to play using [SF1]- [SF6] that change will take place at the TOP of the next measure.
“Key Mode” = sort+direct – this means that not only will the “trigger (direct) notes” be heard, but data from the arp phrase will be heard as well
“Velocity Mode” = original – this means the preprogramed velocity will determine how loud the phrase plays
“Out Octave Shift” – determine if each subsequent pass changes octaves and in which direction
“Voice With Arp” – is a “utility” function for finding the Voice that was originally used to create the Arpeggio Phrase.
Press [F4] LIMIT
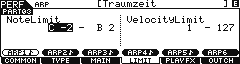
Here you can see the KEY RANGE (Note Limit) and the VELOCITY RANGE (Velocity Limit). The ARP “Note Limit” determines which keys on the keyboard will control the arpeggiator for this PART.
Press [F5] PLAY FX
Here you can control the “feel and attitude” of the Phrase itself.
Press [F5] OUT CH
Here you can set the ARPEGGIO Phrase assigned to PART 03 to transmit OUT via MIDI and you can select the MIDI Channel on which it will be transmitted. This allows you to trigger an external device independently of the internal tone engine.
Analyzing the PERFORMANCE and Making a Plan:
Because the “Heavens Door” Voice uses the “sortdirect” KEY MODE, you will want to split its eight Elements into two separate Voices and build a new PERFORMANCE using these two *newly* created Voices. One Voice will contain the normal “pad” Elements and the other will contain the Elements doing the random arpeggiated wave sequence. This will allow each to be recorded properly to a separate track – this circumvents the “sort+direct” conundrum: A track can only record your trigger notes (normally) or it can record the arpeggio, not both. By placing the Elements in separate Voices, assign in a Performance in separate Parts, we can dedicate a track to record normal (direct) play, and the other to record arpeggiated (sort) data. We can setup and record the acoustic piano, separately – once we have laid down the drums, bass, pad and random arp.
If you goal is to record this PERFORMANCE to the internal MOXF sequencer you will need to setup and do it in two separate passes. We recommend creating a new PERFORMANCE that has the following four PARTS:
PART 1: Chill Kit
PART 2: Dark Bass
PART 3: Heavens Door Pad
PART 4: Heavens Door Arp
Recording these as your basic backing tracks – then in a separate pass in the destination Mode (SONG or PATTERN) overdub your acoustic piano.
Let’s take a close look at the VOICE in question and learn what makes it tick…
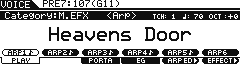 Go to [VOICE] mode and recall the VOICE: PRE7:107(G11) Heavens Door
Make two copies of this VOICE to USER1:001(A01) and USER1:002(A02)
Press [STORE]
Target the Store routine to USER 1:001(A01)
Press [ENTER]
Press [STORE]
Target the Store routine to USER 1:002(A02)
Press [ENTER]
What we will do is edit these two copies of the VOICE so that the first one will be the “pad” Elements (that sustain and play normally) and the second one will be the “arp” Elements (that dance in response to the arpeggiator’s sorting)
Exploring this VOICE will help you discover just how the Velocity Zoning works. This type of Velocity Zone arpeggio is built so that items played with a Velocity between 3-127 will trigger the PAD sound normally, while the arpeggio data is set so that it delivers notes that do not exceed a Velocity of 1-2. Because the arpeggiator can consitently and accurately “play” notes at velocities of 1 and 2, this is not a problem (as a human you would have to really attempt to trigger a note that soft… and you would never be able to do it consistently to make this phrase work!). It is so difficult to play a key with a velocity of 1 or 2, that this ZONE VELOCITY works – you will undoubtedly play harder than a velocity of 3 and therefore your normal play will only make Elements 1 and 2 sound. And the ARPEGGIO Phrase, which consistently reproduces notes at a velocity of 1 or 2, whill trigger the Elements 3-8 in random fashion! When you construct your PERFORMANCE with the Heavens Door Arp Voice as PART 4, look at the EVENT data generated by the Phrase – all the velocities are set to 1 or maximum 2.
 Press [EDIT]
Press numbered button [1] to select Element edit parameters
Press [F1] OSC
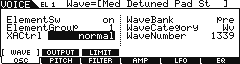
Press [SF1] WAVE
Here you can see that Element 1 is set to XA CONTROL = normal
This means this will play normally in response to key-on events.
Use the corresponding numbered buttons [1]=[8] to view each Element in turn. You will discover that Elements 1 and 2 are set to “normal”, while Elements 3, 4, 5, 6, 7, and 8 are set to “waveRandom” which causes a random movement in response to the arpeggio phrase. We will make USER 1:001 a two Element Voice with just Elements 1 and 2 active (turning OFF Elements 3-8)
To turn OFF an Element you must use the ‘ElementSw” (Element Switch) parameter.
Use buttons [1]-[8] to access each Element and set the Element Switch.
Press [COMMON]
Press [F1] GENERAL
Press [SF1] NAME
Add “PAD” to the end of the Voice’s Name
We will tweak the following parameters to ensure that this VOICE will play as we expect:
Set the ARP SWITCH = OFF
Press [F5] ARP EDIT or the dedicated [ARP EDIT] button
Press [F3] MAIN
Set the SWITCH = OFF
Once the VOICE’s ARP SWITCH is set OFF< the other arpeggio parameters are moot (meaningless).
STORE the VOICE to USER 1: 001(A01)
Later we will insert this in our PERFORMANCE as one half of the “Heavens Door”
Recall USER 1:002(A02)
Here we will turn OFF Elements 1 and 2, and activate Elements 3, 4, 5, 6, 7, and 8
This, being the “ARP” sound we will ensure that the ARP EDIT “Switch” is set to ON and the KEY MODE is set to “sortdirect”. This Voice will respond to the arpeggio data.
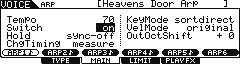
Here you can see that the SWITCH = ON
HOLD = SYNC-OFF
KEY MODE = SORTDIRECT
Rename this Voice “Heavens Door Arp”
You can tweak the Voices as you desire… we have included a zipped ALL data file (ARPSTUDY.X6A) that includes all the work (download link is at the bottom of this article) – unzip it and transfer it to a USB stick you use with your MOXF.
WARNING: Make a backup ALL data file of your own data before loading this data, this way you can return to where you were with your own work _ Loading any ALL data file will overwrite your internal USER locations.
The data is FACTORY except for the following: (1) Performance; (3) Voices; (1) Mix Template; Song01 setup; Pattern01 setup.
PERFORMANCE MODE: USER 1: 001(A01) Traumzeit Study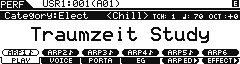 PART 1: Chill Kit
PART 2: Dark Bass
PART 3: Heavens Door Pad
PART 4: Heavens Door Arp
Here are the four PARTS setup in a PERFORMANCE ready to record correctly to the internal sequencer.
The Effect SEND Amounts for the four PARTS: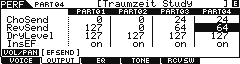
VOICE MODE:
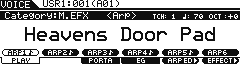
VOICE USER 1:001(A01) Heavens Door Pad
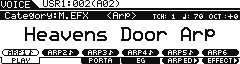
VOICE USER 1:002(A02) Heavens Door Arp
VOICE USER 1:003(A03) Full Concert Grand**
Here are the custom edited Voices that were necessary to accomplish this. The Heavens Door Pad and Heavens Door Arp are used in the PERFORMANCE< while the edited “Full Concert Grand” is used in the SONG/PATTERN MIXING – as PART 5
MIX TEMPLATE:
MIX TEMPLATE 01 = Traumzeit Study
Mix Templates store the MIXING setup for recall in any SONG or PATTERN.
FINAL NOTES:
You can record this PERFORMANCE to PART 1-4 of either SONG 01 or PATTERN 01
I have inserted the edited “Full Concert Grand**” piano Voice to PART 5 of both SONG 01 and PATTERN 01 – this way when you use DIRECT PERFORMANCE RECORD, the first four PARTS will be “Chill Kit”, “Dark Bass”, “Heavens Door Pad”, “Heavens Door Arp”. Once you have recorded these four PARTS as your backing you can remain in SONG or PATTERN mode and overdub your Full Concert Grand** PART to Track 5. In the download example, I have set the “Heavens Door Pad” and “Heavens Door Arp” so you have the full range of the keyboard to play (you can edit this if you wish). I left the Dark Bass so that it only is controlled below B2 on the keyboard.
