In order to record to the Motif XS/XF sequencer you want to select Sequencer Quick Setup #1: “Using internal sequencer”
• Press [SONG] or [PATTERN] mode to enter the sequencer (whichever you prefer).
• Press [SEQ SETUP]
• Press [F3] QUICK
• Select SETUP NUMBER #1 “Using internal sequencer”
• Press [ENTER]
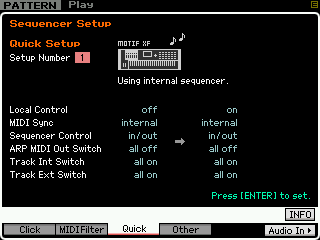
This is the default setup. It sets the Local Control to ON. This is a requirement when recording to the internal sequencer from the XS/XF key bed. When using the internal sequencer, the keyboard and its controllers transmit data to the tone generator via a sequencer Track. The SEQUENCER is located physically between the Keyboard and the Tone Generator. This routing is important to understand. It is the same when working with any type of sequencer, be it the internal or a computer DAW program – the keyboard does not trigger the tone engine directly, rather key presses travel to the sequencer’s currently active Track which receives the data and routes on a specific MIDI channel to the tone generator. If you are going to use an external module, you will need to still use this routing scenario. Therefore both the internal and your external module assigned to the MIDI Channel will initially respond. We will simply MUTE the internal PART during the record process. Then when finished recording we will make a permanent routing assignment and STORE that into memory.
HOW THE MUTE FUNCTIONS WORK
The Motif XS/XF has two MUTE functions: MUTE TRACK and MUTE PART. If you have not appreciated the difference thus far, this operation will make the difference in their functions clear. One is a function of TRANSMIT and the other RECEIVE. A Track will Transmit data to a Tone Generator PART which Receives the data.
Muting a TRACK will prevent all connected devices from responding.
Muting a PART will prevent just that one particular PART from responding.
Therefore, when we MUTE the internal PART, only the external module will respond…
If however, you MUTED the TRACK, well, neither the internal nor the external module would be able to respond. Make sense?
_ If you want an internal Motif XS/XF sound to play on a particular MIDI channel this can be set per PART in the MIXING EDIT – PART area (discussed below).
_ It is also a requirement to have the TRACK INT SWITCH checked (ON) when recording to the internal sequencer. If the INT SWITCH is not checked MIDI events will not be recorded to the internal sequencer. Very important to know!
If you do not want a particular track to transmit OUT via MIDI this can also be set on a per track basis by unchecking the EXT SWITCH (shown below) on an individual track-by-track basis. Here’s how:
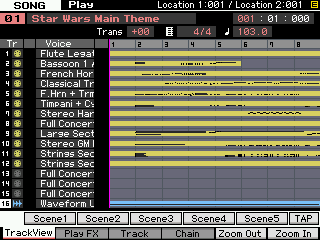
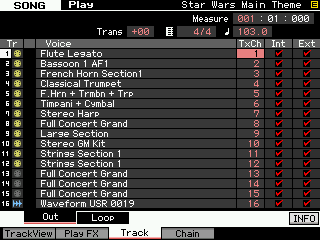
From the main SONG/PATTERN screen press [F3] TRACK > [SF1] OUT; you will see five columns:
 Tr – Track, if a 5-pin MIDI jack icon appears in yellow this indicates data MIDI data is recorded to that track. If it is grey the track is empty. (If a blue wave icon appears it will indicate that a USER sample Voice, bank 63/60, is being triggered by that track).
Voice – The internal Motif XS/XF sound set to receive the Track data is shown.
TxCh – Transmit Channel is the current MIDI channel that the track is set to transmit.
Int – Internal indicates the data on this track is going to be routed internally to the Sequencer and on to any Voice set to receive the selected MIDI channel.
Ext – External indicates the recorded Track data is going to be routed externally OUT via MIDI on the MIDI channel indicated in the TxCh column.
In a situation where you want an external device to play a track and not have the internal engine respond, you cannot simply uncheck the INT SWITCH (the INT SWITCH is necessary for key presses to be recorded to the internal sequencer. But what if you do not want the Internal tone engine to sound? You must MUTE the Internal PART.
There are actually two steps you must take to prevent the Motif XS/XF tone engine from responding to track data:
1) Use the MIXING PART MUTE to temporarily silence the internal PART (during record)
2) Then when you want to play it all back: Set the Internal PART’S MIDI RECEIVE Channel to OFF. This will permanently silence the internal PART (after recording is complete)
PRIOR TO RECORD: MIXING Mode PART MUTE
There are two levels of MUTE in the Motif XS/XF sequencer. One is called TRACK MUTE and the other PART MUTE. It is like having two separate products: a sequencer with its own mutes and a tone generator with its own mutes. If you are in SONG or PATTERN mode (LED lights green) the MUTE button will allow you to temporarily stop a sequencer track from transmitting data. Neither the internal tone engine nor the external device will receive any MIDI data. However, if you are in SONG mode or PATTERN mode and additionally press the [MIXING] button (LED lights) you are now working with the internal tone generator PARTS. Now the Track Select MUTE buttons will prevent temporarily the internal tone engine from sounding (the internal tone engine will not receive the track data). We say ‘temporarily’ because this status cannot be stored. We are simply muting the internal PART so that you can hear your external module assigned to the current Track’s MIDI Channel.
AFTER RECORDING IS COMPLETE: SET RECEIVE CHANNEL OFF
If you have determined that you want a track to be routed OUT via MIDI, only, and do not want the Motif XS/XF to respond to that track’s data, you can simply reassign the MIDI receive channel of that PART to another MIDI channel. (This will layer it with another internal sound). Or you can turn it OFF. From [MIXING] mode:
• Press [EDIT]
• Touch the Track Select button [1]-[16] of the PART you wish to permanently remove from the MIX
• Press [F1] VOICE > [SF1] VOICE. Set RECEIVE Channel = OFF
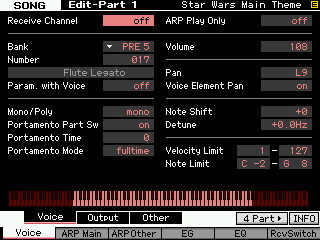
We call this ‘permanent’ because this status will be stored with your Sequencer and Mix information. In the screen shot, the Receive Channel parameter is shown highlighted; use the Data Wheel or the [INC/YES] button to set the Receive Channel = OFF.
Do this for each of the PARTS 1-16 that you do not want to sound internally. When you have assigned all your PARTS appropriately press [STORE] to make the changes to your MIX permanent.
When you return to the main SONG PLAY or PATTERN PLAY “Track View” screen you will see that the listing for the internal VOICE for that track has been replaced with a blank (shown below) area in the VOICE column, indicating the OFF status:
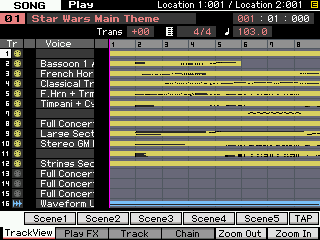
In the screen shot, above, PARTS 1, 7 and 11 have been set to Receive Channel OFF, these Tracks will only transmit OUT via MIDI. No internal PART is set to receive data from those. No polyphony will be used in the Motif XS/XF. And this will be the information stored and saved to your FILE.
We should explain that you could, on playback, simply set the INT SWITCH = OFF from TRACKS 1, 7, 11 and this would accomplish the goal of ‘permanently’ defeating the internal PART from responding. We recommend the MIDI Channel assignment = OFF because visually you get notice (on the main mode screen) that the internal Tone Generator is not contributing data on Tracks 1, 7 and 11. Both methods can be STORED to your file.
NOTE: For those of you who were former Motif ES owners, the implementation of the INTERNAL and EXTERNAL SWITCH functions are slightly different in the Motif XS/XF. This is due to the direct PERFORMANCE RECORD feature. The INT SWITCH must remain ON (checked) for the keyboard data to be recorded to the internal sequencer.

