REAL TIME LOOP REMIX – Applied to AUDIO SLICE & MIDI Phrase

REAL TIME LOOP REMIX – Applied to AUDIO SLICE & MIDI Phrases

Mastering this unique tool, originally developed for the Yamaha RS7000 Music Production Studio (back in 2001), can bring you closer to permanently ending writer’s block. Real Time Loop Remix is as close as a product has come yet to a “talent button”. Seriously…we laugh about this but think of it this way: When you hire a musician to play drums, guitar or bass in your band you want them to bring something special to that role. You often encourage them to add their own ideas to yours and bring some life into the music. Real Time Loop Remix can take MIDI phrase data and restructure it – giving you new and often stunning results – it creates a new MIDI phrase. It is like handing a chart to a real good player – one who can take your original idea and offer you variations on your theme. If you don’t fully understand the concept of the Pattern Phrase – this feature will bring it into clearer focus. A Phrase, which is defined as any recording on a Pattern Section track, can be associated with a sound and can be used as a building block. The Pattern PATCH function – allows you to mix and match Phrases.

A Motif XS/XF Pattern Phrase controls the playback of audio. That audio can be a preset ROM sound or it can be user sampled sound (RAM). The Sample SLICE function can take any audio loop (up to 8 measure in length) and divide it into time segments – we call “slices”. The SLICE function can analyze and detect where and when audio activity occurs – you work with a “Sensitivity” parameter to fine-tune the function’s analysis. These sliced audio segments are mapped chromatically to the MIDI keyboard and are played back by a precisely timed chromatic scale that reassembles the audio phrase by playing them one after the other – in a similar fashion to how a stack of single pictures flipped quickly can animate a cartoon character – the chromatic scale reassembles the original audio clip. The real beauty of the audio SLICE function is that the audio clips maintain their original pitch and can be artifact-free when tempo adjusted. 

The Real Time Loop Remix takes the controlling MIDI phrase and like a magical musical Cuisinarttm, spins the data into a new phrase, which has the effect of rearranging the audio clip. Since the Real Time Loop Remix is rearranging the MIDI data it will work on any Pattern Phrase. The possibilities are truly endless. You can remix the remixed phrase, and then remix it again. If you have ever attempted, manually, what this does automatically (you will want to sue somebody to get those days back) you will appreciate how fast and easy this function makes manipulating audio data. Manually cutting samples into slices can be hours, days, even weeks of work …and then rearranging them into some kind of musical meaningful phrase… Yikes!!! The Motif XS/XF does this in real time!!! It was designed to work on audio drum loops, but as you will quickly see, it can be used on any MIDI Pattern Phrase with unbelievably great results. This is probably one of the most compelling tools for creating “new” from “old”, “cool” from “lame”, “awesome” from the “mediocre”. Does it always come up with something useable? – well, no! That’s your job to tell it when it has and when it hasn’t – you play producer.

Included with this article is a simple drum loop to experiment with… Slice it and then Real Time Loop Remix it. Have fun!
Download link: Real Time Loop Remix 

In order to import the wave data and work with the audio SLICE function you will need to add DIMMs expansion RAM to your Motif XS (see page 295 of the XS Owner’s Manual for details). The Motif XF can use its 128MB of built-in SDRAM. Although, as the article mentions, you can use Real Time Loop Remix on MIDI data only, but to appreciate its full effect sampled audio loops are necessary. If you don’t have DIMMs there also is a section for working with Real Time Loop Remix on MIDI data (provided in the included .X0P file) and it is described at the end of the article.

Real Time Loop Remix
This function gives you a variety of semi-random presets for dividing the MIDI sequence data and altering the note positions and note lengths, letting you create completely new variations of a Pattern. This function is particularly effective when applied to a track that contains a sample voice created by using the Sampling Slice feature; i.e., with the SLICE+SEQ sample type or samples processed using the Sample SLICE Job. But can be applied to any MIDI phrase whether or not it is a user sliced sample.

Set up the parameters (outlined below), and then press the [SF5] APPLY button to execute the Remix operation. You can do this while the sequencer is stopped or while it is playing. You will instantly hear the results of the Remix. If you’re not satisfied with the results, try another Type/Variation and press [SF5]. If you want to keep the changes, press [ENTER]. (Undo cannot be used with Remix: User Phrases are added to your library for the current Pattern Style. Up to 256 User Phrase can exist per Pattern Style. You can simply delete phrases as necessary.) To return to the original display without altering the data, press the [SF4] CANCEL button.

Since the remixed data is stored as a new phrase and assigned (“patched”) to the current track, the original phrase data remains as an unassigned phrase. For example, if you record a simple drum groove in Phrase 001, if you press [SF5] APPLY to REMIX the phrase and then press [ENTER], the Remix will create a new user Phrase in the lowest numbered empty user Phrase location – i.e., 002. It will automatically “Patch” this new Phrase into the Section, leaving the original Phrase (001) unassigned but available if you need to recall it. Real Time Loop Remix does not delete your data – it only creates new data. Each new Phrase that you CREATE is added to your library of Phrases. You can have a maximum of 256 User Phrases per Pattern.

Type Determines how the data in the selected track will be divided and rearranged. The division and rearrangement rules are different for each remix type. The type is also shown graphically in the display and gives a general idea of where the activity is concentrated. Settings: 1~16
Variation Determines how the original MIDI sequence data will be modified.
Settings: Normal 1~16, Reverse 1~16, Break 1~16, Pitch 1~16, Roll 1~16, and Fill-in 1~48

_ • Normal 1~16…. The original data is only divided and rearranged. 16 variations are provided.
_ • Reverse 1~16 …In addition to division and rearrangement, some portions of the data may be played in reverse (if, and only if applied to a “sliced” user sample phrase). 16 variations are provided.
_ • Break 1~16 …In addition to division and rearrangement, some portions of the data may be deleted to create breaks (gated effect). 16 variations are provided.
_ • Pitch 1~16…In addition to division and rearrangement, some portions of the data may be pitch-shifted (if, and only if applied to a sliced user sample phrase). 16 variations are provided.
_ • Roll 1~16……….In addition to division and rearrangement, some portions of the data may be played with a roll effect. 16 variations are provided.
_ • Fill-in 1~48… Some portions of the data will be arranged to create a fill-in type effect. 48 variations are provided

RealTimeLoopRemixEach combination of TYPE and VARIATION will give a consistent result when applied to the same data. In other words, if you apply TYPE 1, VARIATION NORMAL 1 to the exact same phrase – the result will be exactly the same each time. Therefore, you can count on the results if ever you need to return. Applied to different data, of course, the results will be different – like when applied to a variation of the original phrase – but each time applied to the same data, the results will be predictable.

Interval: The Interval parameter determines at which measure the remix will occur. A setting of 1 would mean that each measure would be remixed. A setting of 2 would remix every other measure and so on, through to once every 8 measures. This is useful, for example, when you want to take the eighth measure of a Phrase and make it a transition to a new Section.

Reverse and Pitch Variations apply specifically to sliced sample segments. When these are applied to regular MIDI phrases, do not expect to hear reverse or pitch changes (that is reserved for phrase data controlling sliced audio only). You will hear different timing and note length changes, however.

SamplePlayDirection
When you apply the Reverse or Pitch variations to a sliced phrase, it will actually alter the sample waveform by either reversing playback of certain segments (Reverse is actually the instrument reading the wave from End Point to Start Point rather than the normal way) or offsetting the original tuning of certain audio contained in the segment. These are destructive edits. You can go to [INTEGRATED SAMPLING] > [EDIT] > [F2] PARAM and view each individual segment of the audio phrase and tweak each one, as necessary …even manually edit the pitch with the Coarse Tune/Fine Tune parameters or you can change how the segment plays with the Play Mode parameter (Play Mode determines direction: one shot, reverse, loop)…

ReversePlayMode
This is useful because every now and then you REMIX a phrase and it gets really, really close to the ‘perfect’ phrase but you want to change just a few of the events. Knowing how the Reverse and Pitch work on samples can be a valuable tool. See the section on “Things to Try” later in this article for more details on editing individual slices.

Although primarily developed for sliced rhythm loops this REMIX function can be used to great advantage with absolutely any type of phrase data. To understand this point it is important to know it is the MIDI data that is being shifted/remixed – it simply is triggering the audio (ROM or RAM). For example, you can use the Motif XS/XF arpeggiator to “paint” a track with a Phrase, perhaps a bass line (recording it to a Pattern Track), then send that Phrase into the REAL TIME LOOP REMIX algorithm and twist it into half a dozen variations. It will use the notes of the Phrase but change their timing and position, making a related phrase that can be auditioned against the rest of the tracks. Once a new Phrase is created it, in turn, can be REMIXED again and again – there is no limit to the number of times you can alter the notes. All this can happen in real time, making what we call the ‘Phrase Factory’ concept a fabulous tool for creating new Tracks.

Import and Slice an audio loop:
Go to [PATTERN] mode. Load the drum loop wave called “-24-#2~1.wav” to track 1 of an empty pattern.
TYPE Wav• Press [FILE]
• Select TYPE = “Wav”  
• Highlight the “-24-#2~1.wav” and point it to PART 1, KEY C3
• Press [SF2] LOAD
• Press [INC/YES] to execute

Press “C3” and listen to the audio of this loop. This imports the wave to the Track – but it has no MIDI data to trigger it, yet. Like any VOICE assigned to a Track, you must create Note data to trigger its playback. there is no note data yet, to make this sample Voice playback.

When you import a sample or create an original sample in a SONG or a PATTERN the Motif XS/XF will place this audio into a specia VOICE bank 63/50. (SP) is shoft for “Sample”. A trigger event must be made. We will use the sample SLICE function to create note data that will trigger this Voice.

What you need to tell the sequencer, since it can’t “know”, is how many measures this audio phrase is, and in what time signature is it counted. Once it “knows” that, it can divide it into musically relevant segments. 

Let’s SLICE it – this will create the MIDI dta to trigger the sample.

• Press [INTEGRATED SAMPLING]
This will take you to the SAMPLE EDIT screen. Make sure that your imported sample is the currently selected WAVEFROM. You can use the [SF1] AUDITION button or press the “C3” key. The only parameter on this screen is the WAVEFORM Number. Once you have ensured you have the correct Waveform:
• Press [JOB]
• Press [F1] KEYBANK
• Select JOB 11: SLICE
• Press [ENTER]

SampleJobSlice

Set the parameters as follows:

Slice1

• Press [SF4] APPLY to execute It will take a few seconds to analyze the waveform. By selecting the Type BEAT 1 we have asked the technology to analyze where there are peaks of audio and to create a sliced segment based on the Sensitivity (Sens) setting (3). Sensitivity affects how many slices it makes. Each audio segment (slice) will be triggered by a precisely placed MIDI event that will be inserted on the track.

Slice2
Before you accept the results, you can AUDITION it by holding down [SF1] or by playing each sliced note on the keyboard. Hold down the AUDITION button and try it at various tempos. The Slice function has created a chromatic scale of notes that it ‘plays’ to reassemble the waveform. This is why you can adjust the tempo without the “pitch change” penalty and without generating a lot of annoying artifacts (over an amazing range of tempos). However, just because it is working from the AUDITION button does not mean you want to keep it. Also verify each slice by playing each note going up the keyboard starting at the “Lowest Key”, note C3. Here you will find out if it actually created too many slices or too few slices. Too many slices would sound like a kick or snare hit was divided to two keys. It is important to understand that when it does this, you need to set the SENSITIVITY lower (for less slices). You want a clean hit on each key, ideally. It is important to test your results with both available methods.

Press [ENTER] to keep the results or press [SF4] to discard the results and try a new Sensitivity setting. The higher the sensitivity value – the more slices it creates, the lower the sensitivity the fewer slices it creates. When you accept the results the SLICE function will create a new waveform (0002).

It also creates a Phrase – precisely timed chromatic events to reconstruct the audio phrase:

SliceMIDIevents

It will “PATCH” this Phrase into the Section grid.

• Press [PATTERN] to return to the main Pattern screen.
• Press [F4] to view the PATCH setup

Your new Phrase 001 is placed on Track 1

PATCHslice

• Move the cursor to the right: “Phrase Name”
Name it “Sliced Loop” or something appropriate. Also notice that the phrase length is also shown” Track 1, Waveform 0002 ” Sliced Loop”, 002 Measures in length.

Now that we have an audio drum loop that is sliced properly and we have a named MIDI phrase to play it back patched to the Section, let’s create some variations using the REAL TIME LOOP REMIX function.

• Return to the main Pattern screen
• Press PLAY [>]. You can adjust the tempo now without the pitch change penalty. Literally, any tempo will work. Try 100.0 BPM
• Press [F6] REMIX

SlicePatched
How the remix works: Each time you select a TYPE, VARIATION and INTERNAL then press [SF5] APPLY, the REAL TIME LOOP REMIX function will alter the data.
[SF4] CANCEL and [SF5] APPLY allow you to reset and try new variations. Press [ENTER] to accept (fix) the results. If you accept, a new phrase is created and will be “patched” to the Section grid. If you “Cancel” the original data returns and the Patch remains the same. No data is overwritten – when you accept – a new phrase is simply “patched” to the Section’s [F4] PATCH grid, while the original remains in memory – you can recall it by simply setting the Phrase number to 001.

TYPE: 1-16; the higher the number the more complex the remix.
VARIATION: Normal, Reverse, Break, Pitch, Roll and Fill
_ • Normal refers to play direction of the audio sample
_ • *Reverse will play certain of the sliced audio segments backwards by flipping the waveform around
_ • Break will gate certain of the segments by making the MIDI event a staccato note.
_ • *Pitch will alter the Original Key parameter of certain keybanks (slices) so that it will sound at an altered tone.
_ • Roll will play certain of the segments in a drum roll fashion.
_ • Fill will create transition type alterations.

*The Reverse and Pitch Variations will only be fully affective on sampled audio – if applied to normal MIDI event phrases although the timing and position of events will change you will not (strictly speaking) hear reverse notes or pitch changes. Reverse and Pitch edit the user sample waveform directly.

SampleVceMixer

Things to try
Use the technique of transferring arpeggio patterns to Pattern Phrases and try applying the REMIX to them. With over 6600 arpeggios in the XS and over 7800 in the XF and an unlimited number of remix variations, you will never run out of things to try.

Try applying any of the TYPE/VARIATIONS to them. If you get something that you like, “create” it as a Phrase by pressing [ENTER] to fix. In this manner you can create your own drum fills, breaks, etc. Do not be aftraid to try it on any kind of MIDI data, although originally conceived for use with audio sampled drum loops, you will find it very affective on everything from bass lines to horn riffs to clavinet parts. Remember it use the notes that YOU have played so it will always be in key. The MIDI phrase that it creates can be used as is, or you can further edit, append, split, copy and/or paste them, as necessary.

Because the Variation parameters are well thought out and are what we call “semi-random”, they are repeatable templates… therefore if you find a rhythmic pattern that works for your drums try applying that same Type/Variation/Interval setting to your bass line. This can have an awesome affect marrying the bass line to the kick drum. The main thing is to real ize that the particular settings do specific things and can be repeated – there is a lot of intelligence and musical though that went into making these remix templates. Yes, there is a lot of trial-and-error here and patience is a big asset in working with Real Time Loop Remix. Much like mining for gold you have to have an idea of what you want to accomplish, and pick an area to prospect and work with it. When you find a gem you will know because you get to hear it immediately. It is real time because you can do it as it plays.

Editing the individual Slices: Once an audio waveform has been sliced, it is divided into several time segments and a MIDI note based on when that segment occurs is placed in a MIDI Phrase. Actually a new waveform is created – so your original data is still there, in tact. Below is a series of screens shots showing our audio wave after it has been sliced. A new Waveform 0002 has been created and mapped chromatically from C3. The first segment is shown selected below. It is mapped to key C3:

SlicedKeybanks

By holding the [SF6] button (labeled “KBD” in the right corner of the screen) and touching note C#3 you can recall the next slice in the chromatic map.

Once a KEY has been selected its data will fill the screen when you press the [EDIT] button.

As each Keybank is selected and recalled via this method, you can view its data. Below the slice occupying D#3 has been selected and is shown.

SlicedD3

At [F1] TRIM the Start Point, Loop Point and End Point can be edited as required. It is possible to have use the Real Time Loop Remix function to construct a drum kit. Here how that concept works:

Say you have an audio drum loop and you like the sounds. If you setup to slice it and get the Sensitivity set so you can get a clean drum hit on each KEY, you can then manually play these as a drum kit. The Kick will be isolated to a single Key, the Snare will be isolated on a separate Key, and so on. Now you can record yourself playing this sliced Drum set using the sounds you found in your sample.

SampleOneShot

At [F2] PARAM (shown above) you can edit the particulars about the individual sliced audio segment. It is here where the Remix changes Coarse and Fine Tuning (Pitch Variation) and Play Mode direction (Reverse Variation).

SliceMIDIevents2
Quantize… resist the urge to quantize the results. The Remix function analyzed where the audio peaks actually occurred, thus it automatically preserves the original feel of the audio clip. If you quantize the data you may get bogus results. Your mileage will vary. But recognize that each MIDI event is placed perfectly so that the audio is reassembled in a seamless (sample accurate) manner. Quantizing the data will only cause gaps and/or overlaps. It is the note data recorded to the track that you can REMIX – each note triggers a different portion of the audio so by rearranging where and how often these MIDI notes occur Real Time Loop Remix, remixes the phrase. When REVERSE or PITCH is the selected Variation, the function will actually edit the individual Slice attributes. Also BREAK will adjust the “gate” time or duration of the MIDI note event. 

The Other SLICE TYPES
While developed with drums in mind, the Real Time Loop Remix and Slice functions can be used on any type of data – musical instrument tracks, vocals, etc., use your imagination. The SLICE TYPES each has a purpose that can really expand this function. The BEAT 1, 2 and 3 Types are obviously designed for percussive audio data – where there is a defined rhythmic quality to the audio clip. With drums and percussive audio it is quite easy to find space between the audio events. This is particularly true with the high sample rate – remember at a tempo of 120BPM there is a full second between beat 2 and beat 4. The PHRASE 1, 2, 3 and 4 Slice TYPES are used when you are slicing an audio clip where there is less rhythmic quality and more legato phrasing or long decay times.

The Phrase Types actually create new data so that each sliced segment has audio added to the front and to the end of the division. This way as you adjust the tempo of playback you are less likely to get gaps and artifacts. This is a brilliant innovation – how it accomplishes this is to play some of the individual sample data near the slice point forward and some of the samples backward. In this manner it pads the audio – but your ear cannot detect a single sample @ 44,100 cycles per second that is reversed. As you might imagine this actually increases the size of the sample because it is adding new data before the sliced segment and after the sliced segment. It does this again, because as the tempo slows each segment will have to be longer so that it does not leave an audio gap.

Motif  XS Owners: See the Owner’s Manual page 250 “Tips for using the SLICE TYPES”. 
Motif XF Owners: See the Reference Manual page 210 “Tips for using the SLICE TYPES”.

The PHRASE 1 Type creates the most additional data. BEAT 3 and all four of the PHRASE TYPES add a SUB-DIVIDE parameter. These Slice Types with high Sensitivity will give the most data. When you select any of the Phrase Types you can set a musical Sub Divide value – this is useful in determining where the function looks to make subdivision in addition to the audio peak activity. Remember by telling it the length of the phrase in measures, the Start and End Points, it then knows where the musical values should occur. If, for example, you take a musical passage which has a decidedly triplet feel and set the Sub-Divide to 16th note triplets with a high Sensitivity you will get 48 slices for the 2 measure phrase.

MIDI Data (only): Remixing COOL FUNK
Provided with this tutorial is an XS/XF PATTERN file on which you can experiment. Load the“CoolFunk.X0P” file to a blank Pattern in the XS/XF.

Select Track 1 and experiment remixing the drum MIDI data in context of a music track.
Press [F6] REMIX

Set the dialog box as follows:
• Type = 1
• Variation = Fill 37
• Interval = 4

Press [SF4] to APPLY
Keep increasing the TYPE value to hear more and more complex FILLS. The interval at 4 measures means the fill-in will occur every 4th measure.
Press [SF3] CANCEL to return the original phrase.

Select Track 2 and Remix the Latin Percussion.
Try Interval = 1 so that each measure is remixed.
• Type = 2
• Variation = Roll 04
• Interval = 1

Select Track 3 and Remix the Bass line.
• Type 4 
• Variation = Normal 01
• Interval = 1

Select Track 4 and Remix the Electric Piano track.
Set the parameters as follows:
• Type = 2
• Variation = Break 01
• Interval = 1

Experiment – you will have to decide what sounds and feels good. The higher the number for TYPE and VARIATION the more wacky they become… Remember while MIDI data cannot REVERSE or change PITCH – those Variations will still rearrange the data’s timing.

Try the Electric Piano Track 4 with: 
• Type = 3
• Variation = Pitch 03
• Interval = 1

Or

• Type = 4
• Variation = Reverse 08
• Interval = 1

You can press [EXIT] to exit from the Remix function – change tracks and then press [F6] REMIX to continue – all without pressing the STOP button… Work with this and get into a flow. The more you play with it the more you learn about how it works. Enjoy!

Drum Track Construction Tools Motif XF

Preface: Working methods – it is up to you.
SONG mode is a linear structure where measures are counted from 001 through 999. You can place any instrument on any track. You can record against a metronome or you can create a drum track to help you work. Discussed in this article is how to create a playback LOOP in SONG mode. This is useful when you simply want to have a basic groove to play along with and later you can go back and construct a complete drum track. This is simply one way to work. Constructing a complete drum track does not have to take place first. Many times you are refining different portions of your composition. The purpose of this article is to let you know some of the tools that are available so that you can develop a method that is comfortable for you.

It is not only possible to use both SONG and PATTERN mode together, it is recommended (another of the topics covered in this article). Many are surprised to learn that they can be used together to make a complete composition come to life. Say you create a basic drum groove in Song mode that you use to play along with while laying down your music track. You can then go to PATTERN mode and create an in depth drum track and transfer that data to the appropriate measures of the Song. We will learn about how you can move all or some of the data from one mode to the other, accomplish a task and then move the data back. It would be like taking a portion of your work to a specialty workshop to refine it before reassembling the final piece.

There are so many tools in the Motif XF for music production and composition. The 7891 arpeggios (more than 2300 of them drums) can be used in your compositions.

As an alternative method you could start work in PATTERN mode. Pattern mode allows you to work in smaller musical sections, i.e., Verse, chorus, solo section, interlude, etc. Construct your music by Sections… then Chain the Sections into a linear Song.

At anytime you can move data between the modes to accomplish a specific function or task. Say you have recorded in a SONG and find that between measures 49 and 64 you want to rework some of the data. Perhaps you have been using the same drum fill-ins transitioning from one musical Section to another and want to come up with something a bit more unique. You can ‘cut and paste’ those measures into a PATTERN mode SECTION (using the SPLIT SONG TO PATTERN Job) and then work on it in isolation. Use the Real Time Loop Remix function found in PATTERN mode to create and try out several different drum fills. The cycling paradigm of Pattern mode makes it easy to concentrate on just those measures. When you have perfected it you can simply place the data back in your SONG structure.

The [JOB] functions are very powerful. I have found that far too many users only discover a small portion of the Motif XF Sequencer and get into a debate about “Do you use PATTERN mode or do you use SONG mode?” Song and Pattern are two tools within the Motif XF Sequencer. I’ll quote myself here: One is a hammer …the other is a screwdriver. They are both construction tools. If all you have is a hammer, pretty soon you are banging on everything because every problem starts looking like a nail.

Basically you start looking to solve every issue the same exact way… Break the mold!

Hopefully this article will shed some light on some of the things that you can accomplish – in each of the modes. Certainly some combination of the two will allow you to accomplish most any task.

Future articles will cover things like audio loops used to construct drum tracks, “Real Time Loop Remix” and “Sliced” audio phrases, and using sampled audio clips to create unique drum kits.

What is a Drum Voice and how is it different from a Normal Voice?
A Motif XF Drum Voice is an extra special Voice. If you are new to Yamaha synth workstations, you may have never encountered a Voice architecture like this before. Just as there are “normal” musicians and then there are Drummers, the Drum Voice is a very special case. Typically, a Normal Voice will consist of just a single instrument, like a Piano, or a Flute, although sometimes you might find a combination VOICE like “Piano & Strings” or a String Ensemble or Horn Section. The Drum Kit Voice is actually a combination of up to 73 individual instruments. Each KEY in a Drum Kit Voice is an independent instrument. Even though you may initially think of the Drum Kit as the instrument a drummer plays, and you most likely have never run into a drummer with a 73-piece kit! But that is just what you have here in the Motif XF. Each key has a different drum instrument with its own set of parameters you can manipulate.

A drum kit, in music history, is a 20th century invention first used in Jazz… called a “Trap Kit”. But prior to the jazz trap kit, drums were very much played individually (and still are played individually in many instances). Think of a marching band. You have several people carrying single Bass drums, and even more carrying just a single snare. And some others who carry just a triangle… they are indeed individual instruments. And on Yamaha synthesizers the Drum Kit Voices is made up of 73 instruments or Elements. An Element is a multi-sample. In drums, the multiple samples are stacked vertically on a single key for velocity triggering – where in a so-called ‘normal’ Voice they could be laid out both across the keyboard (horizontally) and vertically.

The way Yamaha constructs the Drum Kit Voice is so that you can place any drum and or percussion instrument sample into a Voice – typically each sample is on a separate KEY, C0 – C6. Each KEY can have its own group of vertically stacked samples – when we say ‘vertical’ this is describing a velocity swap. (A velocity swap will mean that as you increase the speed at which a key is struck you will switch between samples. For example, call up the Power Standard Kit 1 play the snare drum mapped to E1. As you increase the velocity you will hear it switch between five different snare drum samples; the closed high hat on F#1 will switch between four different samples). Each KEY has its own Volume, pan position, filter, envelope, EQ, routing to the Effects, routing to the audio output, Pitch Control, etc., etc.

A Drum Kit is like 73 VOICES combined in one – each instrument occupies one key. This allows you a great deal of flexibility when creating your music. Each KEY can be selected and edited individually. You can even assign your own favorite drums into your own USER KIT. This is useful when the snare you like is in one kit and the kick you like is in another. Individual drum KEYS (instruments) can be routed to assignable outputs – combine this with the Firewire option and this can be a very important component in your professional recording activities. This means that even though a drum is a member of a kit (occupying/sharing a single track of your sequence), an individual sound within that kit can be routed to its own individual output. This makes the Drum Voice extremely powerful, extremely flexible and opens the door to unprecedented control in your music production.

Drum Key edits and assignments are accomplished in VOICE mode by pressing [EDIT] then pressing the Track Select [1] button to see EDIT – KEY parameters. Now when you touch a key on the keyboard, its information will come to the screen.
There are four tabs available: [F1] Oscillator, [F3] Filter, [F4] Amplitude and [F6] EQ.

DrumKeyVceMode[F1] OSCILLATOR – On this screen you see the currently selected KEY, an Element ON/OFF Switch, the WAVE selection parameters (Bank, Category, Number), the Assign Mode (single/multi), Receive Note Off, Alternate Group, the Effect routing, the Output assignment, the tuning (Coarse and Fine), and the drum’s pitch sensitivity to velocity.

Turning the “Element Switch” parameter to OFF will deactivate a drum KEY entirely. Of interest is the Alternate Group parameter… Any samples placed in the same Alternate Group will replace the playback of any other in the same group. This is how the Closed High Hat, Pedal High Hat and the Open High Hat replace each other. And is how the Mute Triangle stops the Open Triangle. The RECEIVE NOTE OFF parameter is an important one to understand about drum sounds. You will notice that for most every drum sound this is set to OFF. This is what separates drum and percussion sounds from “normal” musical sounds. In a normal musical sound you hold the key down until you want the sound to stop and when you let go KEY-OFF is sent and the sound moves immediately to the RELEASE parameter of the Envelope. Well with drum sounds you do not HOLD the key down. You want the entire drum to sound without having to keep your finger on the key.

In order to get a full understanding of this parameter, press note A2 (the “A” just below middle “C”) do the following: This will be a CRASH cymbal; set the RECEIVE NOTE OFF parameter ON. It now will behave like a regular keyboard sound… meaning as soon as you release the key the sound will stop. This can be useful in creating a “choke” cymbal.

The Effect routing is per drum. A drum can be routed to the System Effects (reverb and chorus processors) or it can be routed to one of two Insertion Effects selected for the kit. When a drum is routed via the INSERTION EFFECT OUTPUT it is removed from the System Effects. When a drum is routed to an Insertion Effect it will arrive at the main drum kit output but it will have the insertion effect present. Any two Insertion Effects can be assigned to a Drum Kit Voice (found in [COMMON EDIT] > [F6] EFFECT). They are treated in parallel or routed from A-to-B or B-to-A. “Parallel” means each is separate and a drum can go through one or the other. The A-to-B and B-to-A routings are what is called “in series” (one after the other).

OUT SEL FW1When routing individual drums to an individual FW output for audio recording purposes in a DAW software, you would use the OUTPUT SELECT parameter (shown highlighted at left). In order to use the individual (assignable) outputs the KEY should not be routed to an insert effect. And it will ignore any System Effect Send amount. By sending the KEY to an assignable output you are removing it completely from internal processing and are going to process it externally. Say you want to process the kick drum in Cubase on a separate output. On this screen you can send just the kick drum through an assignable output (say FW1)… then in Cubase you can process the kick drum discreetly (externally) and record it to a track in Cubase.

This is extremely powerful. Even though your kick drum is contained in a kit and that kit is in a MIXING setup, you can still individually route a drum to an assignable output, with its sound completely discreet. This is accomplished by editing your drum Voice, then placing the USER KIT in your MIX and setting the entire drum kit PART to OUTPUT SELECT = “drum”. This means that all the routing you do in a 73 Element drum kit will be respected when that kit is used in a sequence. This is extremely powerful. (See the Advance Application tutorial on FW AUDIO SETUP)

DrumFilter[F3] FILTER – Each Drum has it own filter. Basically a Low Pass Filter with programmable Cutoff, Resonance, Velocity sensitivity percentage and High Pass Cutoff parameter. Why a filter is important on synthesizers is to alter the fundamental tone (harmonic content) of a sound. In general, the more energy you put into playing (attacking) any acoustic instrument the richer it becomes in harmonics (see the article on EQUALIZATION in the Behind the Manual area for a discussion of harmonics). A Low Pass Filter, literally, allows the low frequencies to pass as long as they are below a particular “cutoff” point – this cutoff frequency is where the filter starts to attenuate (lessen) the loudness of certain harmonics. If you apply velocity sensitivity to a LPF, this means the harder you strike the key the more harmonics that will be allowed to pass… The faster a key goes down the higher the cutoff frequency moves – thus allowing a brighter, richer harmonic sound. This very much mimics what happens in the acoustic world. The harder you play the richer the tone. This is again, programmable per drum in a drum kit.

The High Pass Filter Cutoff frequency parameter allows high frequencies to pass and therefore attenuates lows. This is useful when you wish to remove low tones from a drum sound. As you increase this parameter you will reduce low frequencies in the sound assigned to this key.

DrumAEG2[F4] AMPLITUDE – Each Drum has its own amplitude envelope. Here you can also find PAN, ALTERNATE and RANDOM PAN options. Amplitude is how loud a sound gets and more specifically in the case of an envelope – how the loudness changes over time. All percussive instruments are hammered or struck in some fashion. This causes what is referred to a “transient peak”. Simply put, a loud spike at the time of the attack, the sound then decays slightly and the body of the sound continues before it disappears completely. Think of a bass drum being struck by a mallet… now think of the whole process in extreme slow motion. There is the click of the mallet as it initially contacts the drumhead. There is a rapid spike in loudness, this is shortly followed by the booming response of the drum as the head starts to vibrate and is enhanced by the shell (shape) of the drum. CLICK > BOOM. The click is a peak, the boom is somewhat softer and somewhat later in time… and finally the sound disappears. That is what the ATTACK, DECAY1 and DECAY2 parameters are all about. LEVEL is how loud, while TIME is how long it takes.

[F6] EQ – Each Drum has its own Equalizer. This device can be configured as a 2-band, single band Parametric or act as a straight level boost (+6dB, +12dB or +18dB). Being able to equalize (balance the tone and loudness) of each individual drum is extremely useful in getting the exact sound you want from your drums. Use this equalizer when you want your KICK drum to boom or you want more snap from your snare. In other products you only have an overall equalizer (if you get that)… in the Motif XF you have individual equalizers for each Element… repeat – you have individual equalizer for each Element.

You may wonder why a 2-band and a 1-Band parametric EQ (instead of a three band, four band or a graphic EQ)… The reason is it is assigned to a single drum sound. In any percussion sound there is the cause (the CLICK) and the response (the Boom)… two bands is more than sufficient for a single drum sound. A single band parametric (parametric means you can zero in on a specific frequency, boost or cut and control how wide an umbrella above and below is affected) is perfect for Element equalizing when you need to fix a specific tonal region.

Recording a basic drum groove in SONG mode
SongLoopIt is possible to record your own original drum tracks. This can be done in Pattern mode or in Song mode. The Motif XF has a new feature that allows you to PLAYBACK loops in SONG mode. This is extremely useful if you are working a composition and wish to play along with a basic drum groove, rather than just simply playing with a metronome. Often a drum groove can give a better “feel” for what you want to accomplish. Therefore you may want to temporarily setup a drum groove to cycle while you are recording “linearly” in SONG mode. Later you can go back and construct a more complete drum track adding fill-ins and variations.

From the main Song screen press the [F3] TRACK and then [SF2] LOOP. Here you can set any track to loop from any measure to any measure. There is a column for the loop icon – when showing this will indicate that the track is set to cycle. In the screen shot (above) you can see that track 1 is set to LOOP between 001 and the top of measure 005 – this creates a 4-measure cycle.

Say you record the first four measures with a drum kit, you can then set measures to loop continuously by setting the START parameter to 001:01 and the END parameter to 005:01, then set the LOOP On by pressing [INC/YES] when you place the cursor in the LOOP box. This will playback looping the first four measures. Yes, you must set this so that the measure:beat region is inclusive. For details on this see page 185 of the Owner’s Manual “Loop Playback Settings”.

The loop can be set at any particular point in the composition. For example, many songs begin with a musical introduction, and the drums come in after some time with a build up and a roll into a crash, before settling into a groove. For example, the piano may start the song for 8 measures alone, but in measure 7 and 8 the drums do a build up and then drops into a groove at measure 9. You can set the loop to go between measure 009~017. Use your imagination.

The SONG LOOP function is here as a ‘work-in-progress’ tool and you will probably finalize a complete drum track before completing the SONG. You can use the arpeggiator or the PATTERN mode to create specific drum measures to finalize a complete drum performance. Please see the Tweak of the Week article: “Painting Drum Arpeggios to SONG mode” for information of how to easily transfer drum arpeggios to the sequencer. Later in the article we will talk about how you can move data or get data and bring it into your SONG.

Recording your own original drum Pattern
You may opt to use PATTERN mode for drum track creation. Pattern mode itself is designed around how old-style drum machines worked. That is, you have a set number of measures that will automatically loop during the RECORD process and allow you add data on each pass. This became popular as most drum machine purchasers where not drummers, and therefore needed multiple passes to complete a complete sounding drum pattern. Also memory on early drum machines was extremely limited. You could record a maximum of 1 or 2 measures at a time… then you linked (chained) those short patterns together to make a drum composition.

You can record by overdubbing (adding while listening to what you have so far) as the phrase cycles around. If you have never played drums before, not to worry… programming drum grooves from a keyboard is not for everyone. But you may find that you have an undiscovered talent for it anyway.

Drummers are not even aware sometimes that they make the best drum programmers, because there is such a thing as “thinking like a drummer”. The most convincing drum grooves are those that sound as if they could actually be played. The principal keys (notes) for the basic drum kit are found between C1-B2 on the keyboard. There you will find a kick or bass drum, several different permutations of snare (full, sidestick, handclap), toms, high hats, rides, crashes, tambourine, vibra-slap and cowbell. Above this you will get into full on percussion and other miscellaneous stuff. Below C1 you will find alternate kicks, snare rolls, brushes, etc.

The more you listen to good drummers the more you will be able to effectively program convincing drum grooves. One word of advice though, nothing says you have to emulate real drums but remember a drummer has only four limbs that they use for playing the kit. They only use two sticks and have only two feet (in most cases)… so if you have toms rolls, snare hits, high hats, crashes and rides all happening at once, just remember you have created a science fiction “virtual” drummer. Good and great programming leaves the listener unconcerned (and unaware) that it is not a real person sitting behind a real kit.

If you have no talent for programming your own drums, remember the Motif XF comes with more than 2300 drum patterns in the arpeggio section. Up to five different arpeggio types (grooves) can be assigned to the [SF] buttons. You can record while activating the different arpeggios so it is easy to outline a track with fill-ins and transitions.

• Go to PATTERN mode and assign a drum kit to Part 1 of a blank pattern.
• Press [MIXING]
• Press [EDIT]
• Press Track [1] to view PART parameters
• Press [F2] ARP MAIN
• Set the SWITCH = ON
• Set HOLD = ON
• Set CHANGE TIMING = MEASURE

This will allow the ARP to play the drums, you will not have to hold down a key manually and when you do change arpeggios they will change at the top of the next measure (making the transition between arp types occur only at the top of the next measure). It is a good idea and is recommended that you turn LOOP OFF when you record arpeggios to PATTERN mode – this is so that the sequencer STOPS automatically at the end of the LENGTH you have selected.

In general, you will see a two-letter prefix (as part of the ARP name) that will give you a clue about what type of drum groove you’ve selected. If “M” is the first letter it is for Main and the letter following is degree of complexity with B being more complex than A, C being more complex than B, and so on. “MA” for example, is a Main “A” section groove, “MB” is a Main “B” section groove. “F” as the first letter is for Fill-in, “I” is for Introduction, and “B” as the first letter is a Break. But this is in general, you can use whatever you want; wherever you want – after all, it is your music. Simply pick the drum arpeggio type by ear – not necessarily by what is being suggested by the prefix.

At the bottom of the screen you can select from the more than 2300 “DrPc” category (Drum and Percussion) arpeggio types – listed between #3815 and #5723.

As a quick example make the following assignments:
ARP4479patt• Press [SF1] ARP1 and assign: 
Bank = PRE
Category = DrPc
Sub-Category = Rock
Type = 4479 “MA_Standard Rock”

In turn assign the following:
• Press [SF2] ARP2
Type = 4480 “MB_StandardRock”
• Press [SF3] ARP3
Type = 4481 “MC_StandardRock”
• Press [SF4] ARP4
Type = 4482 “FA_StandardRock”
• Press [SF5] ARP5
Type = 4483 “FB_StandardRock”

Activate the main [ARPEGGIO ON/OFF] button.

You can hear that #4479 (MA) is like the verse, and #4480 (MB) the drummer opens the groove to the ride cymbal (chorus), and you can use #4482 (FA) as fill-in to transition between the main A and the main B grooves. And you can use #4483 (FB) to transition between the main B and main C grooves #4481. That is how it is designed to work… but you do not have to do this at all – just file that away in your memory banks. There are no rules about using any of this. You can decide to use a Fill-in as a main groove – it’s your music.

If you wanted to record yourself making these types of transitions, you simply press [RECORD], then press [F2] ARPEGGIO, and you are given access to the [SF] buttons controlling the arpeggio types. Now when you press the PLAY button to start the transport – you can still access the [SF1]-[SF5] buttons in real time. You can interactively recall Fill-ins and move from arpeggio to arpeggio. This can be done in PATTERN or in SONG mode to facilitate real-time selection of arpeggio types.

The unusual: Looking for some inspiration? Here we will give you a tip on some of the unique drum arpeggio gems that you may not discover on your own or even know about. Drum/Percussion arpeggios #6789-6810 are in a category called “Genrl” (general)

• Call up Arpeggio Type #6802 “16BeatSlice1”
ARP6802pattThese “General” arp types can be used in a unique fashion to create alternative drum patterns – you will have to use your imagination and not be afraid to experiment.

• Hold down note “C1” (kick drum). Observe that a rhythmic pattern plays.
• Add note “D1” (snare drum) – so that now you are holding down both “C1” and “D1”
• Add note “F#1” (closed hihat)
• Add note “A#1” (open hihat)

Any held notes will create a drum pattern – the last four notes played will be active. Alternatively you can play individual notes and trigger a pattern that way. For example, in succession play a tom-tom fill using D2, C2, B1, A1

There are several ROLL arp types. To use these you may want to set the ARP’s LOOP = OFF
This is found by pressing [F3] ARP OTHER (shown below)
AcctVelThresh
At [F3] OTHER you will find also the TRIGGER MODE parameter, which can be set to “Gate” or to “Toggle”. Gate is the normal setting and is easily understood – when you press a key the arp plays and depending on the HOLD setting, when you let go it will stop. Toggle is the setting that allows the first touch to start playback of the arpeggio phrase and the next touch stops it.

The ACCENT VEL THRESHOLD parameters sets a velocity level that when exceeded can add pre-programmed “accent”. Refer to the DATA LIST 2 booklet to see if a particular drum arp type features VELOCITY ACCENT. Initially, this parameter maybe set to a value of 64 which can be an issue – set as you desire.

You can very much influence how an arpeggio is playing on this particular screen. Experimentation is the name of the game. For definitions of each parameter please see the Reference Manual pages 59-60.

REHEARSE – ERASE and other cool functions
There is a very useful REHEARSE mode on the Motif XF. Let’s setup to record a PATTERN…

• Press [PATTERN]
• Select a blank Pattern
• Press [CATEGORY SEARCH]
• Press DRUM/PERCUSSION
• Select a drum kit you want to work with… Press [ENTER]
• Press the RECORD button to see the [F1] SETUP screen

On the Setup screen you can see the REC TRACK that is selected (red circle in the REC TR column); you can select the RECORD TYPE (REPLACE or OVERDUB); you can set the LOOP function ON or OFF; additionally you can see that you can verify your Voice, select to QUANTIZE (automatic timing correction) and so on.

At [F5] CLICK you see a speaker icon indicating that the metronome is set to sound when you press the PLAY button [>].

The Tabs available are [F2] ARPEGGIO and [F4] ERASE. The [F2] ARPEGGIO tab would be selected, as we mentioned above, if you have assigned different arp phrases to the [SF1] – [SF5] buttons. You can select arpeggio phrases to play as you press these buttons – what we refer to as “painting the track” with arpeggios. The [F4] ERASE tab is there (in white) because as your Pattern cycles around if you want to remove a drum or drums you can hold [F4] ERASE + the offending KEY or KEYS to remove its data from the phrase. This is a real time erase feature.

While you are recording, you can temporarily drop out of record mode without stopping. This allows you to rehearse what you are going to play. It also allows you to find a drum key. It sometimes is difficult at first to remember the location of each sound. The REHEARSE function is very useful. To activate it simply press the [RECORD] button again – it will begin to flash, indicating you are temporarily out of record mode. No new data will be written to the track. You are free to play the keys without adding new data to your cycling pattern. Additionally, you can even move to a new track, select a sound, then drop back into record.

Inspiration for drum programming:
Many keyboard players spend a significant amount of time learning the fingering so that they can articulate an entire drum groove in a single pass. The good news is you do not have to if you don’t want to… there are no rules about how to record your drums and you get no extra points for being able to play it all at once. Spend time listening to real drummers – it can help you “think like a drummer”. Every year at the Winter NAMM trade show, Yamaha puts on a couple of concert events. One of them is called “Groove All-Stars” … Basically some of the world’s premiere drummers, get together with a kicking house band. Each Drummer picks a song and they show off their “pocket” so to speak… they simply groove. It is not about taking a solo or who can play the loudest, it is all about finesse and groove. After this year’s event fellow Product Specialist from the Great America Northwest, Blake Angelos, said to me, “I can’t wait to get back to my XF, I just learned a whole bunch of things I want to try!”

And that really is the point: watching and listening to real drummers can teach you a lot and even though you may not be as able to pull off exactly what they do, I guarantee you will learn something that will make your programming better. Real drummers will always have something that you cannot capture (hopefully); don’t worry about that… do the best you can. One key is that they only have four limbs – respect that (or not). I say, “or not” because, maybe your goal is not to sound like real drums… and that is legitimate too. Know the rules so you know when you are breaking them!

Try recording one drum at a time. On the RECORD Setup screen in the upper right corner you set the LENGTH parameter – this is very important. It tells the XF when to cycle the pattern. If you are new to counting music, learn how. If you are in 4/4 time… this means that there are 4 Beats to a measure and each ¼ note gets one beat. By far this is the most popular time signature in today’s popular music. Hipper than playing in 2… most folk music is in 2… Marches are also in 2. I met a professor who contended that most folk music is in 2 because even those with no sense of rhythm can find the beat, and if they miss it they are only off by 1 and no one knows and no one feels silly! Music in four, on the other hand, leaves plenty of room for the uncoordinated to get lost. The ‘back-beat’ evolved to help keep everyone in line. The “back-beat” is the strong accent you find in many types of popular music that occurs on beat 2 and beat 4. Without getting into a big discussion about what is hip?… let’s just say, the more you listen the better you will be able to program your own.

What is a PATTERN ‘Phrase’ and what is a PATTERN ‘Patch’?
PATT Patch1
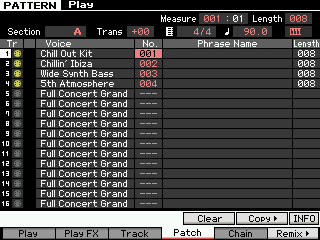
Any time you record something in PATTERN mode, the Motif XF sequencer will place that information on a track in an entity called a Phrase. So a Phrase is a group of MIDI events that can then be moved, recalled and edited as a unit. For example, say your record a drum kit to Track 1 – you use a Kick, snare, high hat closed, high hat open, and a crash cymbal. You record for 008 measures and then stop. The Motif XF sequencer will automatically number this recording and archive it as PHRASE 001. Press [F4] PATCH (shown at left). You can make a total of 256 individual recordings like this in a PATTERN. They can be drums, bass, guitars, etc., the instrument does not really matter. Any time you record in a PATTERN the data is placed in a PHRASE and given the lowest available number designation between 001 and 256. Why 256? Because there are 16 tracks in the sequencer and there are 16 Sections in Pattern mode [A] through [P]. 16×16 = 256 possible phrases per PATTERN number.

You can additionally name each phrase if you wish. Most people find that the number is sufficient. But if you are one of those people who like to keep things strictly organized, you can name each Phrase. This can be handy – because the PHRASE can be activated in any Section. Say you know that the basic groove you just recorded in SECTION “A” (your first verse), will be used again in the composition for the third verse (SECTION ‘C’)… different musical parts on top but the same drum groove. You do not have to COPY it, simply go to SECTION ‘C’ and activate PHRASE 001, on the PATCH screen. Phrases can be recalled simply by selecting them – very convenient. You select or “patch” phrases into Sections.

You can see that on TRACK 1 – the “Power Standard Kit” has been used to record Phrase number 001. To the right there is a blank space for you to name this phrase if you desire. The Length parameter on the far right is an indication of how many measures you have recorded. You cannot change the number of measures you have recorded here (without performing an edit “job”), however, you can control the number of measures that SECTION “A” plays back independent of the number of measures you have recorded… The LENGTH parameter on the top line (right corner) controls how many measures SECTION “A” is currently set to play. What does that mean? If in the shown example, where I have recorded 8 measures of each track 1, 2, 3 and 4, were I to change the LENGTH parameter in the top right corner to 3, the current Phrases would only play the first three measures:

1-2-3, 1-2-3, 1-2-3.

If I change the LENGTH to 7 they will only playback the first seven measures, and so on.
If I set it the LENGTH to 9, then they will play:

1-2-3-4-5-6-7-8-1, 1-2-3-4-5-6-7-8-1, 1-2-3-4-5-6-7-8-1 and so on.

Therefore you can think of that LENGTH parameter in the upper right corner as the SECTION LENGTH… the number of measures that will play before the Section repeats.

We mentioned that in order to change the LENGTH indicated in the far right column of each Phrase you must perform an EDIT Job. There are several ways to lengthen or shorten a phrase after you have recorded it.
• JOB: Append Phrase to lengthen it – this allows you to copy one phrase to the end of another or to the end of itself.
• JOB: Split Phrase to shorten it – this allows you to divide a phrase into two separate phrases or you can simply send the second portion to OFF (to make it go away).

You can think of the LENGTH parameter on the right of each Phrase as the PHRASE LENGTH.
Please see the Reference Manual page 183-184 for details on these two Job functions.

Quantize: Before or After
Quantize is the function that lets you change the positioning of notes against the time. In the Motif XF sequencer this can be done as you RECORD, or can be applied to your data after-the-fact. This is your choice. Quantize is one of those “tools” you find in modern sequencers that many feel funny about using. It is the ‘ultimate cheat’ because it moves your notes from where you actually played them to some other pre-determined position so that the timing is corrected. It is particularly useful for drum programming because it is difficult enough to play musical sounds in time, no less program drum grooves from an interface like a keyboard. When you press the RECORD button, the SETUP screen offers you an opportunity to set a Quantize value. This will be the smallest musical timing interval that the sequencer will record. For example, if you set the Quantize value to a sixteenth note (120 clock ticks), then all notes played will be placed on the nearest sixteenth note. This can only help you if you are consistently late or consistently early. If you miss the beat entirely and have absolutely no sense of rhythm, QUANTIZE can actually make things worse. It can be used to tighten up loose timing but it cannot fix things if they are too far off. Don’t blame the sequencer – it’s YOU!!!

The Quantize function is found on the RECORD SETUP screen, and it is found as a sequencer NOTE Job.
• Press [JOB]
• Press [F2] NOTE
• Select Job number 01: Quantize

Quantize can be strict or loose because it is programmable. If, for example, you are a little off at a particular point in the song you can use the quantize job to move your notes to nearest musical value of your choosing. The resolution of the XF sequencer is 480 pulses per quarter note. This means it divides each quarter note into 480 equal parts. That is, 1920 clock ticks per 4/4 measure. These clock ticks are often referred to as: pulses per quarter note or ppqn.

480ppqn = 1/4 note, 4 quarter notes per measure in 4/4
240ppqn = 1/8 note, 8 eighth notes per measure in 4/4
120ppqn = 1/16 note, 16 sixteenth notes per measure in 4/4
60 ppqn = 1/32 note, 32 thirty-second notes per measure in 4/4

320ppqn = 1/4 note triplet, 6 quarter note triplets per measure in 4/4
160ppqn = 1/8 note triplet, 12 eighth note triplets per measure in 4/4
80 ppqn = 1/16 note triplet, 24 sixteenth note triplets per measure in 4/4

Picture in you mind’s eye that quantize is as follows: the resolution of the sequencer is 1920 pulses per 4/4 measure. Each of these “Clock ticks” is a pin sticking up; 1,920 of them… and your notes are like ping-pong balls, that when dropped, must land on one of these pins. Cool, huh!

There are major pins (1 foot long) every 480 (those are your quarter notes. There are pins (half as long) every 240 pins (those are your eighth notes). There are pins half again as long every 120 pins… and so on.

Although quantizing during record can be used to tighten-up your timing, you have the options of recording your data without quantize and applying it, where necessary, after the fact. This is accomplished with the Quantize NOTE Job. When you apply quantize after the fact, you have more options about how this timing correction is applied… including allowing you to artfully change the feel of the music.

Let’s say you are trying to land on an “1/8 note” pin and you are late by 12 clock ticks, er, a pins. Quantize (at 100% Strength) will move your ping-pong ball (note) to the nearest pin that represents the value you select. If you set the “Strength” to 50% what this means is that it will move your note half the distance to the strict value. In my example you missed the 8th note pin by 12 ticks late, meaning you might have landed on clock tick 252 when attempting to land on clock tick 240. A quantize to the nearest 8th note (240) with a 50% Strength will move you 6 ticks toward a value divisible by 240; to 246… which is half way between 240 and 252.

QuantizeWhen using the QUANTIZE job you can select a measure, beat and clock tick range over which to impose it. You can select a quantize value, a Strength %, a Swing Rate (which offsets the upbeat value up to 50% of the quantize value) , Gate Time (changes the duration of notes, careful here – this will mess with your feel). Once you execute a quantize, listen closely to what it has done. You can UNDO it, as well. The last JOB executed on a track can be undone.

• Press [JOB]
• Press [F1] UNDO/REDO
• Press [ENTER] to execute

Using the REMIX function to create variations
RealTimeLoopRemixLet’s say you are not the wizard programmer of drums. And it seems that all your grooves come out sounding the same (it’s just us here now, you don’t have to front like you have a million different ideas). Truth is everyone gets writer’s block at some point. This can particularly happen when it comes to something like drum grooves. This is one of the things we discussed when the Motif XF was being planned and is the germ idea behind what we call the PHRASE FACTORY. Not only do we give you more than 2300 drum grooves, we give the innovative REAL TIME LOOP REMIX function (or “Remix” for short). This function is one of the most powerful interactive tools you will ever work with… let me say out front, it does not always come up with great ideas, YOU have to decide what is a ‘great idea’. The thing that it does that is brilliant is that it takes your input and spins it into literally thousands of possible variations.

Real Time Loop Remix divides the MIDI data on a selected track into several pieces of a specified note length, and then randomly rearranges a portion of the data, letting you easily create completely new and unique rhythm variations based on your own original input. (It is not limited to just MIDI tracks – it can also be applied to SLICED audio. This is a topic for an completely separate article/tutorial). But let’s just say this is one very powerful and, hopefully, useful tool.
Now when the description says “randomly” – do not think that there is just no thought to this. Quite the contrary – you will want to read the Owner’s Manual section on this (page 217) to get an idea of how this function is analyzing what is on the track and how it then according to your settings, rearranges the data. It is not totally random because if you apply the same settings to the same data three times in a row it will do exactly the same thing. This is a good thing because you can count on the results when you want to use this “live”. (That’s right, you can use this function to “take a drum solo” in a live situation, it is that cool – it is after all called “REAL TIME Loop Remix”).

So when they say random it is a ‘qualified’ random. However, if you accept (keep) the results and continue to apply the same setting, each variation will be farther and farther away from the original. This will all make more sense once you begin working with it.

You set three different parameters: Type, Variation and Interval.

• There are 16 different TYPES.
• The VARIATIONS include: 16 Normal, 16 Reverse, 16 Break, 16 Pitch, 16 Roll, and 48 Fill
• INTERVAL can be set to every measure through every 8 measures.

TYPE:
As the TYPE number increases the complexity increases.

VARIATIONS:
Normal – means the data is repositioned
Reverse* – works on sliced audio samples. It will randomly reverse the play mode direction of some of the time slices. On regular MIDI track data this will not matter as play direction does not change
Break* – will gate the duration of the note-on events and will create a stop action feel. This one is particularly useful on sliced audio samples, as well.
Pitch* – works on sliced audio samples. It will randomly alter the original playback pitch of the sample in particular time slices.
Roll – this creates drum rolls, press rolls on different drum sounds – very useful for creating realistic drum rolls.
Fill – these are great for leading back to the top of a pattern.

* The Reverse, the Break and the Pitch Variations work particular well when applied to SLICED audio drum phrases. For example, the Break Variation will create gated effects because the sampled slices will be varied in duration, giving a quite unique quality. This occurs only on sounds that are capable of RECEIVE NOTE OFF. The Pitch Variation will only be applied to audio samples as the each time segment’s original key is shifted – you will not notice any change on MIDI data alone. Same will be true of the Reverse Variation – after all a MIDI note backwards is meaningless. Reverse only is applied to a slided audio segment. That said, even if the phrase does not respond fully to the Variation the timing (placement) of note data will be applied.

INTERVAL:
This controls how often the altered data will occur. 1 = every measure, 2 = every other measure, 3 = every third measure and so on, up to every 8th measure.

Real-time Loop Remix is a “trial-and-error” function. Depending on the original pattern you play what it comes up with will vary. If any portion of what it creates is useful, press [ENTER] to register it in a new Phrase. It will be given the lowest empty Phrase number and will be “patched” to your SECTION. You can extract the data that you like and use it somewhere. To get the most of out this function you have to have patience, a good ear, and imagination.

Divide Drum Track
“Divide Drum Track” – which is found by pressing [JOB] > [F5] TRACK from the main PATTERN screen is a sequencer JOB that basically allows you to use the first 8 tracks of the sequencer to initially construct your drum track. Then once you have worked out the drums you can reassemble them on to one track. So this assumes you are starting your composing from the drums, or that you are working in SONG mode and are using the PATTERN mode as a construction tool to create your drum track, which you will export to the SONG mode. You will be using the sequencer’s first 8 tracks as a work area and when you have completed your work you can clean up and free those tracks for music data.

Concept: You record your basic drum groove using a single KIT on Track 1. Divide Drum Track will then analyze what you played and automatically EXTRACT the different components and split them (dissolve) to separate tracks 1-8. The idea is so that you now have separate tracks for your Kicks, snares/Handclaps, cymbals, toms, percussion etc.

This will allow you to do things like quantize the different components with different swing values. In general, quantize (timing correction) can be done in the sequencer either as you record or after the fact… moreover, it can be done either permanently or non-destructively. You can now shift just the snare drum behind the beat… you can swing just the high hat parts… basically you can bring the full power of the sequencer editing jobs on each individual drum component.

Divide Drum Track will also allow you, if you wish, to keep the drums (permanently) on separate tracks, choose different kits. Or you can choose different sounds and then assemble those sounds into a custom drum kit… (we will see how that is done a little later). The possibilities are many. However, once you have edited the timing (swing) and velocity of the performance on separate tracks you can reassemble the drums to a single track (using the MIX TRACK Job).

Divide Drum Track will take your kicks and place them on tracks 1 and 2, the snare/handclap or any item that functions on the back beat and place them on 3 and 4, cymbals and other dressing on 5 and 6, toms and percussion to 7 and 8. So you can think of this JOB as a special type of EXTRACT job.

There is also a specific EXTRACT EVENT [JOB] found at [F3] EVENT, that lets you take all of one particular note (or range of notes), for example and move it to a separate phrase – which can then be ‘patched’ to a new track. This is useful for example to pull out one drum and then affect its performance data in some way and then place it back (using the MIX job). The DIVIDE DRUM TRACK Job will overwrite data in the target location. However the EXTRACT EVENT and MIX Jobs will merge the data.

Depending on your final goal, you can either leave your drums divided out on separate tracks or you can reassemble them to a single track. If you are recording to an external DAW software like Cubase via FW, for example, you can assign individual drums from within a KIT to individual FW outputs for separate audio processing.

If you are not going to need the additional tracks then you can simply skip the MIX TRACK job and use tracks 9-16 for your music. But if you require the tracks for you other music, you can create a custom kit containing just the sounds you like – assembling drums into a kit is easy enough (covered in the Manual’s REFERENCE section “Editing a Drum Voice” > Key Edit Parameters (page 129).

Jobs: Extract Event, Mix Track and Mix Phrase
Extract Event
• Press [JOB]
• Press [F3] EVENT
• Select JOB 04: EXTRACT EVENT
This Job lets you define a measure region (even a single note) and remove that region of events by moving them to an empty track. The data is actually removed from the source track and placed in the target destination track. This allows you to remove all of one type of data, be it volume data, system exclusive data, note events, etc. You can isolate a snare drum assigned to note D1, extract it to an empty track; perform an edit and then place it back in with the original data using the MIX TRACK Job

Mix Track
• Press [JOB]
• Press [F5] TRACK
• Select JOB 03: MIX TRACK
This Job lets you take data from the source track and combine it with data on the destination track. It does this without deleting the source track and it merges the data with existing data on the destination (target) track. Because the source track data remains you can delete it separately or keep it to combine it with another track.

Mix Phrase (Pattern mode only)
• Press [JOB]
• Press [F4] Phrase
• Select JOB 03: MIX PHRASE
This Job lets you take data from a PATTERN mode phrase and combine it with data of another PATTERN mode phrase. You can use this to combine data even if that data is from a different PATTERN number entirely. It is non-destructive as both the source and destination phrases will remain. When combining Phrases within the same PATTERN check the Current Pattern box.

Earlier in this article we discussed the Divide Drum Track job. What it does is use the Extract function to divide drum kit notes by kind splitting them to empty tracks. You can then edit those tracks and finally recombine the data (if you wish) using the MIX TRACK or MIX PHRASE Jobs. If you EXTRACT a snare drum, for example, you can then select a special DRUM kit that is nothing but snare drums and assign that to your track. These ALL Snare Drum kits (“Acoustic Snares” and “Grouped Stereo Snares”) are useful because then by simply Note Shifting (using the PLAY FX) the data you can audition many different snare drums in rapid succession. When you find a particular snare drum you like, you can either just leave the note ‘shifted’ to that pitch or you can identify which snare that is and edit it into your own custom KIT.

There are also ALL bass drum Kits, as well, (“All Kicks” and “Dance Kicks”) which in a similar fashion can be used to try out different Kick drums in rapid succession. Depending on your final goal, you can either leave your drums divided out on separate tracks or you can reassemble them to a single track. If you are recording to a DAW software like Cubase via FW, for example, you can assign individual drums from within a KIT to individual FW outputs for separate audio processing. If you are not going to need the additional tracks then you can simply skip the MIX TRACK job and use tracks 9-16 for your music. We should mention again that the last edit JOB that you perform can be undone by selecting the JOB located at [F1] UNDO/REDO. Before executing a Job, the current data is placed in a special UNDO Edit buffer. This allows you to toggle back and forth between AFTER and BEFORE. If the JOB creates an unsatisfactory result simply UNDO it.

Swing Quantize and the Play FX: Non-destructive Quantize
This is found on the main sequencer screen at [F2] PLAY FX. The XF has a special function that allows you to set up your own groove quantize. It basically has parameters that can be applied (non-destructively) to your drum data. When we say non-destructively, this means that the changes occur in real time without actually re-writing the events on the EVENT LIST. This allows you to try out different things without having to actually damage the data. The principal parameters are: Quantize (Value and Strength), Swing (Velocity, Gate, Rate), Note Offset, Clock Shift, Gate Time, and Velocity (Rate and Offset).

PlayFXHere Quantize can be applied after the fact, forcing notes to different timing. You can take straight time and apply the various timing grids outlined in our last section (straight or triplet). These are applied in real-time. You can use this PLAY EFFECT, to try out quantize setups before making them permanent. Remember quantizing is not a cure-all. The use of quantize cannot not always fix all timing issues in your recording. It is possible that quantizing can actually make it quite a bit worse. If, for example, you select a value too large, you may find that notes are jammed to the same clock pulse. Say you played 16th notes and you quantize to 8th notes, you will likely hear notes moved on top of each other. You will have to determine this for yourself. If you are unfamiliar with the musical symbols for timing VALUE, you may want to get a basic book on music notation. A note with 3 flags is a 32nd note, a note with 2 flags is a 16th note, a note with 1 flag is an 8th note, and a note will no flags (just a stem) is a quarter note. Any of these values followed by the number “3” denotes a triple value. The STRENGTH parameter (Str) will determine whether the notes are moved fully to the quantize value (100%) or to some lesser degree.

For years computers have attempted to Swing. What’s on order here are the three components of Velocity (how strongly the “swung” note is sounded), Gate (how long the “swung” note is held) and Rate (the amount in clock ticks that the “swung” note is offset). The “swung” note is the offbeat note. The GATE will only be heard on instruments set to receive note-off commands – so you may not hear its affect on a preset drum because drums are typical set to ignore note-off (remember?). The RATE value will depend on the quantize value you select. If you select 8th note quantize, the maximum RATE offset will be 120 clock ticks (or half the value… 120 ticks being a 16th note). If you select 16th note quantize, the maximum RATE offset will be 60 clock ticks (again half the value of a sixteenth note which is a 32nd note). The Swing parameters are also found in the Arpeggio Play FX. Offsetting the ‘swung’ note means you can position earlier or later in the beat.

The Note Shift function is useful to actually shift the drum KEY that is sounding; with drum sounds this is very useful. When used in conjunction with Extract or with Divide Drum Track you can easily and quickly alter the drum sound played by a track. For example, say you recorded a pattern and want to try out a different snare drum sound – you can either extract or use divide drum track to isolate the drum to its own track, then you can use the NOTE SHIFT to shift that drum to a new sound using the dedicated snare kits.

You can Clock Shift any event occurring on a track by designated number of clock ticks. You can shift it as far back as 120 ticks (a 16th note) or you can “push” the beat by shifting it as many as 120 clock ticks forward. Sometimes shifting a snare 6-10 ticks back is just enough to give the right feel. This function is like a programmable quantize.

Gate Time is how long a note sounds. Now while most of the preset drum sounds are programmed to ignore note-off, you can edit a drum sound or if you have a user sample that is set to respect note-off, you can change the duration of any of the sounds. This is very useful on a crash cymbal when you want to create a “choked cymbal”…. Edit the Crash cymbal in your drum kit so that it “RECEIVE NOTE OFF” = ON. This way the GATE parameters will affect it. You can also use the Gate parameter very effectively on musical (non-drum) sounds.

You will find this GATE TIME (duration) parameter most useful on ‘normal’ music sounds. Part of what makes something swing is as much when you play it as it is how long you play it for. If you picture a band with a horn section hitting a riff together – it is as just as important to know where the note stops as it is where it begins. If one of the horns hangs a note over into the next beat it will kill the swing.

The Velocity Offset can be used to add accents or de-accent a particular beat. Offset adds or subtracts a set value to each event. Remember swing is not just timing, but about impact and volume of what is played. “Ghost” notes can add great realism to your drum track. The Rate parameter here under velocity, is offsetting the velocity but by percentage – so instead of adding a fixed value to each event (offset) it increases or decreases the value in proportion. 100% is no change 200% doubles the velocity of all notes, while 50% reduces the value by half. Of course you cannot exceed a maximum value of 127 nor can you reduce output level below a velocity of 0. (Duh!). With this function you are setting up a custom quantize – think of it as a programmable Groove Quantize.

While on this subject (Velocity), it is a good idea to make your principal kick and snare strikes somewhat less than 127. A drummer does not always hit the snare drum as hard as they can on each stroke. They have something in reserve. How can you program an accent if every hit is 127? If you make your main kick and standard backbeat snare a velocity of 96 or 105, then when you punch it up to 127 it will have some IMPACT! This, of course, is subjective. But recognize that in listening to live drummers you can pick up on things like this. For example, they very often “punch” up a crash cymbal by simultaneously hitting the kick drum. Use the mixer in the Motif XF to mix. If you want the drums up front (as in many types of popular music), you can still do that without making every snare and kick 127. Learning how to turn some things down so that others stand out is the “art” of mixing. You will find that 0-127 is a nice range if you use it… if you have everything up near 127 you cannot appreciate the soft-loud dynamics of your own music. It is that soft-loud dynamic range that makes music (and sounds, in general) interesting to the human ear. Of course, the genre of music dictates how much, but when dealing with MIDI recognize that the full dynamic spectrum ranges from 0 through 127 – and if 127 is the absolute loudest that you can get, you probably want to reserve this for the very loudest portions of the music composition. It is just common sense.

Normalizing Play Effects
Normalizing Play Effects takes any non-destructive alterations you have made to the Play FX function and writes those changes into the track data. This makes a destructive or permanent change to the data. When you Normalize Play FX the Play FX grid will be “zeroed” (returned to neutral values).
• Press [JOB] from the main PATTERN or SONG screen
• Press [F5] TRACK
• Select JOB 05: Normalize Play Effect
• Select the track or select all tracks.

Use this [JOB] when you want to lock in the changes and write that data to the track. As mentioned, Play FX can be applied non-destructively and can be stored/recalled with the SCENE “snapshot” buttons. You can use your discretion here: do you want to dynamically apply the Play Effects or make their influence a permanent part of your Event List data? As an alternative to applying the JOB: Normalize Play Effect, you can simply place the track in OVERDUB Record and let it play through once. This will realign the data according to the settings you have made on the [F2] PLAY FX screen… just as if you had sifted the data through a grid and realigned it.

This normalizing function should not be confused with the normalizing of an audio sample waveform. When you are talking about normalization of wave data, you are changing the output level of a sample so that the loudest peak reaches 0VU on the meter. This normalization (of MIDI data offset) is all about making the non-destructive edits you have made permanent.

Building a custom Drum Kit and editing individual drum keys
You can build your own custom Drum Kits. This is useful when you want to have a kick drum from one kit, a snare from another and toms and percussion from yet another. You can either build your own custom kits from scratch or you can simply edit any already made kit to suit your needs. We point that out because you may not want to spend the day picking 73 different sounds to create an entire kit. Remember, you most likely will not use all of the drums in a Kit – if you do, seek professional help! Your music may just be a bit too busy. 

Go to [VOICE] mode and select a drum kit, you can press [EDIT] and start to customize the kit immediately. Like all EDIT functions in the XF you have two levels of editing: a general overall and a specific
• COMMON EDIT – overall parameters that are shared by the entire VOICE (Name, Kit Output Volume, Controller assignments, Arpeggio assignments, and Effect selection.
• KEY EDIT – (press Track Select [1] – shown below) individual keys contain a drum instrument, and here you will find all the parameters to control that individual drum instrument (Oscillator wave, assign mode, alternate group, effect routing, output routing, tuning, pitch sensitivity, filter, output level, amplitude envelope, EQ).

Each drum has its own EQ, amplitude envelope, filter, etc… so when we say each key is like a separate instrument we mean it has the same type of controls you would find on each normal Voice. That is why a drum Voice is so very big compared to a normal Voice. You have an unprecedented amount of control over setting up the kit. And like a drummer setting up the kit is important prior to playing. That said, during record (i.e., in SONG or PATTERN) you have real time control over Insertion Effect parameter via your physical Controllers.

Call up the drum kit you want to start with – it can be a PRESET or USER kit. (Preset Kits can be edited,. However, when you STORE your edit you will need to store it to a USER location).

• Press [JOB]
• Press [F1] INIT

Here you can select to initialize the entire kit “All Parameters”. This will change all 73 Keys C0-C6 to a default snare wave. You can opt to not initialize “all”, but initialize only a single Key, or just the Common parameters or both. And there is an option to: “Initialize the settings of the waveform assigned to the selected key”.

Initializing KEYS is the way to go, particularly if you simply want to combine some of your favorite principal drums into one custom kit. After you initialize the KEYS you want to work with you can go about selecting drum sounds for those keys. It is recommended that you do initialize a key prior to assigning a new ROM sample or a sample you have imported or created. The reason is: this way you do not inherit any parameters from the previous drum that occupied that key.

DrumKeyVceModeFrom VOICE mode:
• Press [EDIT]
• Press Track Select [1] to view KEY parameters
• Press [F1] OSCILLATOR

It is on this screen that you can select the Wave Bank, Wave Category, and Wave Number

On this screen on the right side you can see the three EFFECT parameters: “Ins Effect Output”, “Reverb Send”, and “Chorus Send”.

An individual drum Element can be routed either to the INSERT EFFECT OUTPUT or to the System Effects (Reverb Send/Chorus Send). It is either/or. If you route a drum to the INSERT EFFECT OUTPUT, you will notice that the System Sends disappear.

If the INS EFFECT OUT = ‘THRU’ then the drum is available to go through the Reverb and Chorus – you have Send amounts for each drum element.

You can setup a Compressor as one of the Dual Insertion Effects (this is a COMMON EDIT parameter) and then route individual drums either to the Compressor or not. At right, “C0” is not going to the compressor, while below “C1” is going to the compressor.

The Dual Insertion Effects in a DRUM VOICE can be “parallel”. What that means is: the two processors are separate. Or you can route INS A into INS B (or vice versa). In that scenario the output of one INSERT goes to the other. This routing applies to the entire KIT. (In the example used below, the routing is “parallel” – so each Drum can be sent to one or the other of the 2 Insert Effects…

A good example of this (and a great one to learn about the routing within a drum Kit) is the Kit called “Garage Kit” PDR: 041(C09)

GarageKit1It has:
INSERT A = Compressor: Classic Compressor
INSERT B = Distortion: AMP Simulator 1
— the insert effects are in “parallel”
Reverb = R3 Room
Chorus = VCM Flanger

From the main screen press the [F6] EFFECT button (this is a shortcut to the [COMMON EDIT] > EFFECT > CONNECT routing screen). Move your cursor to highlight the KEY parameter in the extreme upper left corner (if it is not already there).

You can HOLD down [SF6] KBD and touch a key on the keyboard between C0 and C6 to recall the routing of each drum Key. In the upper left corner you can see that each drum KEY will be routed to one or the other of the Dual Insertion Effect or it will be available for Reverb/Chorus.

While holding down [SF6] KBD you can quickly see and Edit if necessary – each Drum KEY’s routing through the effects. Notice that KEY “C0” is selected and that it is routed to the REVERB and CHORUS processors. It does not go through the Insertion Effects.

GarageKit2You can see that when KEY “C1” is been selected (kick drum), it is routed to INSERTION A, the Classic Compressor. In this Voice you can see that the Insertion A and Insertion B processors are routed in “parallel”. You could select to have the routing configured A>B or B>A or, as shown, parallel.

Because the KEY “C1” is routed to the Insertion effect, notice that the Rev Send and Cho Send are not active for this particular key. So if you want to send just the kick and snare to the compressor you can – when you [STORE] your Kit to a USER location, and then place it in a SONG MIXING or PATTERN MIXING program it will recall all of the edits you made here.

Here is the same information as seen from the EDIT KEY screen for “C1”. Notice that the “Ins Effect Output” = ins A. There is no Reverb Send and no Chorus Send for this drum.
GarageKit3
If a drum is routed to the System Effects (Reverb Send and Chorus Send) it will respond when you raise the overall REVERB or CHORUS send level in the MIXING program, if however, the drum KEY was routed to one of the Dual Insertion effects then it will not be effected by the increase or decrease in the SEND level – it will instead be routed to the INSERTION EFFECT as designated in your VOICE.

Also notice that if you choose to use internal INSERTION EFFECTS – the OUTPUT SELECT parameter is unavailable. When you want to route a drum KEY to an assignable output (FW), you would do so to process this drum externally. Therefore you would route it directly to the assignable output without using any of the internal effect processing at all. For details on routing of individual drum KEYS to FW Outputs please download and study the ADVANCED APPLICATION: FW AUDIO SETUP tutorial.

If you route a Drum to an “assignable” or “FW” output, then in the SONG/PATTERN MIXING setup you will want to set the OUTPUT SELECT parameter = “drum” (shown below). The screen shot is from a Drum Kit selected as PART 1 of a PATTERN MIXING setup. 
OUT SEL drmThis setting for OUTPUT SELECT will recall all of your Output routings from the Voice mode. So it is totally possible to route individual drums to individual FW outputs when recording to your DAW software. This is extremely powerful and useful. It means that even though your Drums occupy a single PART of your 16 PART mix, and even though all their data is recorded on a single track, each drum can still be routed to an individual output. The Yamaha Steinberg FW driver allows you to have 16 audio buses out from the XF at any one time and any instrument (including individual drums) can be routed to a separate audio output. Other synthesizers might have to use a separate track to accomplish this type of advanced routing.

In order for the drum keys that are routed to the INSERTION EFFECT to access their Insertion Effect, the drum PART must be one of the eight PARTS designated to recall its Insertion Effects in the MIXING setup. Remember any eight internal PARTS can recall their Dual Insertion Effects when in a MIXING setup. The AD INPUT PART could be one of the eight PARTS.

ONE SEQUENCER MANY (related) JOBS
There is no one method when constructing your drum tracks. You might choose to record in SONG mode using a basic drum groove as a working tool, and later “paint” the track with arpeggio data. Or you may use the PATTERN mode to refine your drum track… placing fill-ins where necessary. Learning about moving data between PATTERN mode and SONG mode and vice versa can be very useful in creating and placing data where you need it. Each of these (SONG mode and PATTERN mode) is part of the same sequencer. Certain functions are best carried out in one or the other. As we will begin to see in this section of the article, moving data back and forth will open opportunities for you and is easily accomplished. First we will describe moving data from a PATTERN to an associated SONG. You can move all tracks together with some functions or you can move individual track data with others. Then we will describe moving from SONG to an associated PATTERN. Again you have some functions for moving all tracks together and others that will allow you to select individual data and move it.

Not only can you “CHAIN” an entire PATTERN Section play order arrangement and move it to a linear SONG, but you have the ability to put individual Phrase data directly from PATTERN mode to SONG using the PATTERN Mode JOB: PUT PHRASE TO SONG. And conversely, you can use the GET PHRASE FROM SONG Job to grab specific data from a SONG and bring it into your PATTERN workspace.

If you are working initially in SONG mode, you can use the JOB: SPLIT SONG TO PATTERN to move entire measure regions (all tracks) of a SONG to a specific PATTERN Section. And conversely, you can use the COPY PHRASE Job to grab a specific individual Phrase data from a PATTERN and bring it into your SONG workspace.

Moving data PATTERN mode > SONG mode
PATTERN CHAIN: Pattern Chain allows you to string several different Sections together to make a one complete composition. It is like automating the playback order of the musical sections. It lets you try out different arrangements: AABACABAD. For example, create a Section [A] for the intro, a Section [B] for the verse, a Section [C] for the chorus, and a Section [D] for the ending — and you have the basic blocks to build an original composition. You are provided with up to 16 different Sections [A] through [P] simply for flexibility. You may want to make a COPY of a section and then make subtle changes to it so that it is not exactly the same. The created Pattern Chain data can be converted to MIDI sequence data and stored to a Song. To call up the Pattern Chain display, press the [F5] Chain button from the Pattern Play mode. A Pattern Chain can be created for each Pattern, letting you call up a different, dedicated Pattern Chain each time you select a Pattern.

The following events can be recorded to the Pattern Chain.
• Playback order of Sections
• Pattern track on/off—Track Mute status
• Tempo change
• Time signature change—Real time control of measure length

There are two methods to create a Pattern Chain: Recording playback of a Pattern in the Pattern Record display in real time, and programming the playback order of Sections one by one in the Pattern Chain Edit display. The Pattern Chain data recorded in real time can be edited in the Pattern Chain Edit display. It is from the Pattern Chain Edit display that you can convert the Chain to a linear SONG. [SF3] SONG. (See the section of the manual starting on page 213 for details about Pattern Chain function).

PUT PHRASE TO SONG: While Pattern Chain is excellent for moving all tracks from Pattern mode to a Song, the PHRASE JOB called “Put Phrase to Song”, allows you to move just a single Pattern recording (Phrase) to any location within a Song. This is useful if you have worked out a short drum fill-in or transition and want to “paste” it into your Song. Perhaps you used Real Time Loop Remix to create a unique transition phrase and you want to place it on the drum track in your SONG. From PATTERN mode:
• Press [JOB]
• Press [F4] PHRASE
• Select Job 07: Put Phrase to Song
• Press [ENTER]

Of course you can select the Pattern Phrase, you can target the SONG, the Track, select the Measure region, and you can Copy any samples assigned to the track.

Tip: One thing you will really like about setting up to work with SONG and PATTERN mode together is that much of the dialog box information will be setup for you. For example, say you are writing a composition in SONG 01 and working out parts of it in PATTERN 01. As you move back and forth the context sensitive operating system will recognize that you are moving between these two entities. Even if you are working on PATTERN 12 and SONG 03, the association will be made. So, for example, once you establish a link between the SONG and the PATTERN, the Jobs that move data back and forth will use those locations. You establish this link by simply going to SONG mode and selecting a SONG number, move back to PATTERN mode – the link is automatically established (as it “remembers’ what you selected last). If you last selected PHRASE number 039, it will populate the dialog box with Phrase 039 when you select this JOB. If you last selected SONG 22 it will populate the dialog box with Song 22.

GET PHRASE FROM SONG: The PHRASE JOB called “Get Phrase from Song”, allows you to import a region of measures from any location within a Song and create a Pattern phrase. This is useful if you have data you recorded in SONG mode and you want to bring it into the Pattern. In Pattern mode you can Remix it or apply any of the Pattern functions to that data. Or you might grab data from some MIDI file. Perhaps you want to use Real Time Loop Remix to create a really unique transition phrase and then you want to place it back on the drum track in your SONG. From PATTERN mode:
• Press [JOB]
• Press [F4] PHRASE
• Select Job 06: Get Phrase from Song
• Press [ENTER]

You can specify the SONG, the Track, select the Measure region, you can Copy any samples assigned to the track and of course you can select the Pattern Phrase.

Tip: Important to know about the Measure region setting: you will notice that the default region is 001-002. What you need to know here is that this is the minimum setting. In other words, 001-002 is 1 measure. It is from the top of measure 001 to the top of measure 002 (but does not include the information in measure 002). If you want to include the information in measure 002, set the region to 001-003. If you want to move a four-measure phrase using this JOB, you would set the measure region: 001-005

Moving Data SONG mode > PATTERN mode
SPLIT SONG TO PATTERN: There may come a need for you to take an entire region of a linear SONG and move it (all tracks) to a PATTERN Section. If your original idea came about while in a linear SONG, and you want to take region of it and work on it (perfect it) in Pattern mode, this SONG JOB is invaluable.
• Press [JOB]
• Press [F6] SONG
• Select JOB 02: Split Song to Pattern
• Press [ENTER]

Again you will be able to set the measure region – for example, if you wanted to take the first 16 measures of your linear Song and make it a Pattern Section, you would set the measure region 001-017 (this would include all 16 measures). It will target the associated (last selected) Pattern and Section. And if an audio sample is involved the sample data will be copied to the PATTERN.

COPY PHRASE: To complete the ring of Jobs that move data to/from Song and Pattern mode, the SONG Job called COPY PHRASE allows you when you are in SONG mode to grab an individual Phrase from a PATTERN and place it where you need it in your current linear structure.
• Press [JOB]
• Press [F5] TRACK
• Select JOB 08: Copy Phrase
• Press [ENTER]

The ‘associated’ Pattern will be automatically entered, as will the last selected Phrase from Pattern mode. You have an option to select to copy any sample if the phrase includes a sample, and you can target any track and any measure of your current SONG. The targeted measure will be overwritten.

Routing Drums to individual Outputs
If a drum is not being assigned to go through one of the two INSERTION EFFECTS designated for the Kit, it can be routed to an assignable output. The assignable outputs include both the analog “asL” and “asR” but all the digital (FW) outputs “FW1” through “FW14”, plus “L&R”. Please see the ADVANCED APPLICATION: FW AUDIO SETUP tutorial for a detailed example of the routing possibilities, including the background that goes into the decision making process.

Using a Drum Kit Voice for Audio Loops
Finally, a Drum Kit Voice makes the perfect Voice to house any audio clips that you might want to assign to a SONG or PATTERN. The reason is that you can place a different audio clip on each key and control it individually. Remember: audio in the Motif XF’s Integrated Sampling Sequencer are always samples. The advantage of being samples is that you can turn them on and off conveniently with note-on/note-off events. Controlling audio loops in a drum kit means also you can apply useful things like ALTERNATE GROUPS, RECEIVE NOTE-OFF, and apply an AEG (Amplitude Envelope Generator) that will hold the sample indefinitely. If you have your audio clip KEY set so that it ignores Note-off, and the AEG’s DECAY 2 TIME parameter is set to 127 (maximum) this will mean when you hit the key the audio clip begins playback. You will not have to hold the key down in order to make sound continue, it will automatically continue on its own until you hit another KEY in the same ALTERNATE GROUP. That KEY could be the beginning of a new audio clip or it could be a “silent” Key. A silent key is a key with nothing assigned to it – it simply is used in the same ALTERNATE GROUP as your other audio clips to end playback.

AEG1A Drum AEG is different from a Normal Voice’s AEG. The ATTACK TIME is how fast the level rises to full volume (Attack Level). DECAY1TIME is how fast it drops in volume to DECAY2LEVEL (which is fixed at 0). DECAY2TIME is how fast the signal dies away to zero. All percussion sounds eventually die out.

DECAY2TIME can be any value between 0 and 126, or 127 (127 which would be equivalent to HOLD). For sample loops that you want to remain at the same volume indefinitely, set the Decay2Time = 127.

AEG2At left you see the AEG set where Decay2Time = 127. The envelope will continue indefinitely or what is considered HOLD. When you have a long audio clip this is the only setting that will allow it to play completely.

Below see the actual Amplitude screen. You are in VOICE mode (upper left tab always tells you where you are), you are in EDIT and you are editing a KEY of the Power Standard Kit 1. The Output Level of this drum is 111, and the Velocity Sensitivity (its ability to get louder as you strike a key harder is +29.
DrumAEG
Velocity Sensitivity can be set to any value between minus 64 and plus 63. A setting of +32 is the equivalent of a linear curve. That is where the harder you hit it the louder it is. Any value above +32 will mean that extremely slow strikes will not be heard at all. By the time you reach +63 only an extremely hard (fast) key strike will trigger a sound. Negative values work the opposite to positive values. The softer the key is stuck the louder the sound.

You will notice that there are PAN, ALTERNATE PAN and RANDOM PAN parameters per drum KEY.

Notice that with the TIME and LEVEL parameters, there is no ATTACK LEVEL. This level is determined by the audio of the sample itself. And there is no Decay 2 Level which is found in a normal Voice (as mentioned), because it will always be 0 for a percussion family sound… except when Decay 2 Time is set to maximum (127/Hold) which would be useful for audio clips (loops).

Triggering audio via MIDI note-on events opens the door to more creative possibilities. Wild stutter triggering effects can be easily accomplished. And think about this. When you designate a drum kit for audio clips, you have 73 different keys on which to place audio. Turning a track on or off is easily done, either manually with the keyboard or automatically using the sequencer. Drum Voices offer 73 keys to place audio, while a Normal Voice has 128 keys on which to place audio.

So thinking about the number of tracks you have, remember this: In the Motif XF Integrated Sampling Sequencer, any track can be MIDI data and any track can be audio. When you designate a track as an audio track (waveform icon appears) it actually can house lots of audio. Each Key can contain 6 minutes and 20 seconds of audio in stereo… up to the maximum of 1GB of sample RAM.

In a future article we will delve more deeply into Drum Loops, Slicing audio, Real Time Loop Remix and other fun things you can do related to Drum Track Construction… Until then: Make more music!

© 2024 Yamaha Corporation of America and Yamaha Corporation. All rights reserved.    Terms of Use | Privacy Policy | Contact Us