
Using the REMIX Function to Create Variations
USING THE REMIX FUNCTION TO CREATE VARIATIONS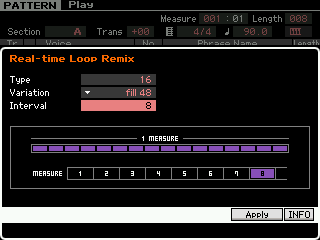 Let’s say you are not the wizard programmer of drums. And it seems that all your grooves come out sounding the same (it’s just us here now, you don’t have to front like you have a million different ideas). Truth is everyone gets writer’s block at some point. This can particularly happen when it comes to something like drum grooves. This is one of the things we discussed when the Motif XF was being planned and is the germ idea behind what we call the PHRASE FACTORY. Not only do we give you more than 2300 drum grooves, we give the innovative REAL TIME LOOP REMIX function (or “Remix” for short). This function is one of the most powerful interactive tools you will ever work with… let me say out front, it does not always come up with great ideas, YOU have to decide what is a ‘great idea’. The thing that it does that is brilliant is that it takes your input and spins it into literally thousands of possible variations.
Real Time Loop Remix divides the MIDI data on a selected track into several pieces of a specified note length, and then randomly rearranges a portion of the data, letting you easily create completely new and unique rhythm variations based on your own original input. (It is not limited to just MIDI tracks – it can also be applied to SLICED audio. This is a topic for an completely separate article/tutorial). But let’s just say this is one very powerful and, hopefully, useful tool.
Now when the description says “randomly” – do not think that there is just no thought to this. Quite the contrary – you will want to read the Reference Manual section on this (page 175) to get an idea of how this function is analyzing what is on the track and how it then according to your settings, rearranges the data. It is not totally random because if you apply the same settings to the same data three times in a row it will do exactly the same thing. This is a good thing because you can count on the results when you want to use this “live”. (That’s right, you can use this function to “take a drum solo” in a live situation, it is that cool – it is after all called “REAL TIME Loop Remix”).
So when they say random it is a ‘qualified’ random. However, if you accept (keep) the results and continue to apply the same setting, each variation will be farther and farther away from the original. This will all make more sense once you begin working with it.
You set three different parameters: Type, Variation and Interval.
• There are 16 different TYPES.
• The VARIATIONS include: 16 Normal, 16 Reverse, 16 Break, 16 Pitch, 16 Roll, and 48 Fill
• INTERVAL can be set to every measure through every 8 measures.
TYPE:
As the TYPE number increases the complexity increases.
VARIATIONS:
Normal – means the data is repositioned
Reverse* – works on sliced audio samples. It will randomly reverse the play mode direction of some of the time slices. On regular MIDI track data this will not matter as play direction does not change
Break* – will gate the duration of the note-on events and will create a stop action feel. This one is particularly useful on sliced audio samples, as well.
Pitch* – works on sliced audio samples. It will randomly alter the original playback pitch of the sample in particular time slices.
Roll – this creates drum rolls, press rolls on different drum sounds – very useful for creating realistic drum rolls.
Fill – these are great for leading back to the top of a pattern.
* The Reverse, the Break and the Pitch Variations work particular well when applied to SLICED audio drum phrases. For example, the Break Variation will create “gated effects” because the sampled slices will be varied in duration, giving a quite unique quality. This occurs only on sounds that are capable of RECEIVE NOTE OFF. The Pitch Variation will only be applied to audio samples as the each time segment’s original key is shifted – you will not notice any change on MIDI data alone. Same will be true of the Reverse Variation – after all a MIDI note backwards is meaningless. Reverse only is applied to a sliced audio segment. That said, even if the phrase does not respond fully to the Variation the timing (placement) of note data will be applied.
INTERVAL:
This controls how often the altered data will occur. 1 = every measure, 2 = every other measure, 3 = every third measure and so on, up to every 8th measure.
Real-time Loop Remix is a “trial-and-error” function. Depending on the original pattern you play what it comes up with will vary. If any portion of what it creates is useful, press [ENTER] to register it in a new Phrase. It will be given the lowest empty Phrase number and will be “patched” to your SECTION. You can extract the data that you like and use it somewhere. To get the most of out this function you have to have patience, a good ear, and imagination.
Extra Credit: Real Time Loop Remix Applied to an Audio Sliced Phrase

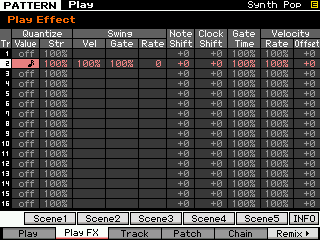 These non-destructive functions let you change quantize, the percentage quantize, even create a swing feel or triplet feel from what you played. You get to hear immediately how you are adjusting the data – there is a NORMALIZE Job that will allow you to make your settings permanent by rewriting the data in the track. PLAY FX are a great way to experiment with the positioning of the notes and more. Swing functions include Velocity and Gate (duration) parameters which can radically change the feel of what was played.
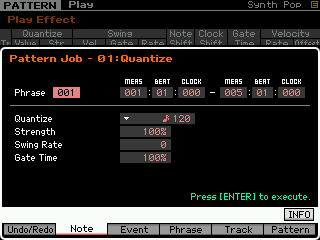
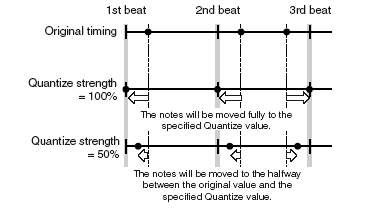 When using the QUANTIZE job you can select a measure, beat and clock tick range over which to impose it. You can select a quantize value, a Strength %, a Swing Rate (which offsets the upbeat value up to 50% of the quantize value) , Gate Time (changes the duration of notes, careful here – this will mess with your feel). Once you execute a quantize, listen closely to what it has done. You can UNDO it, as well. The last JOB executed on a track can be undone.