Using a MIXING Program in your “live” Setup
USING A MOXF [MIXING] PROGRAM IN YOUR “LIVE” SETUP
SONG or PATTERN MIXING programs are ideal for assembling multiple sounds that you want to play. Each of the 64 SONG and 64 PATTERN locations can contain a “MIXING” – which includes a configuration of all the available synthesizer PARTS (16 internal synth Voice Parts). You can easily and seamlessly switch the sound you are playing (without any glitches or interruption in audio) by using the front panel TRACK buttons, [1]-[16], to access the assigned Voice PARTS. You transmit from the MOXF keyboard on the MIDI channel of the currently selected TRACK.
You can setup all of the VOICEs you will need to switch between in a MIXING program, side-by-side. A MIXING program lets you place different VOICESs on separate MIDI channels. To move between sounds you simply use the numbered [TRACK] Select buttons to change transmit channels. Organize the Voices that you need for any particular composition into one MIXING program – then you can switch between them glitch-free!!!!
Tech-talk Background:
There is a reason that synthesizers like the MOXF send an “ALL SOUND OFF” message when you move from one program to another program. The sophisticated and advanced signal routing within the eight Element architecture found in these synthesizers, while ideal for deeply complex individual sounds, means that necessarily you will have sound being cutoff when you move from one complex program to another complex program. Like any recording studio, the routing of signal to and from various processors is accomplished by patching signal from one channel to a device and back. In the studio you use a “patchbay” to make these connections – and the more you route the more complex the patchbay looks. Switching from one “patchbay” setup to another does not happen seamlessly – you have to yank out a lot of cabling. But as you get to know your MOXF you will see that there are different programs which allow for you to setup very intracate routing and these can be recalled all in a single Program so that moving between Voices that you want to play is a part of the setup. For more details on routing you should read the article on how your effect processors are allocated in each of the different modes.
Each Element within a VOICE is a multi-sample and has its own routing to one or the other or both or neither of the powerful INSERTION EFFECTS that are available. This means that a Voice that is Piano and a Synth Pad, layered, can have the Elements that are making up the piano go through a special piano “Damper Resonance” Insert Effect, while the Pad Elements can be discretely routed to their own “Dual Modulator Phaser”. These Insertion Effects include Yamaha’s cutting edge physical modeling technology (VCM = Virtual Circuitry Modeling) and features real-time performance control over parameters within these processors. This adds to the complexity of this particular Voice and it is this type of complex signal routing that is important to how you are able to express yourself on each individual MOXF instrument program.
Insertion Effects are programmed as an integral part of the VOICE, while the System and Master Effects are more about recreating the “outside” environment.
For example, Insertion Effects can be the Rotary Speaker for an organ sound, or a particular distortion for a guitar. These are Effects the ‘real world’ musician would plug into and control in real time. While the System and Master Effects are used to recreate the room acoustics (outer environment) in which the music takes place. The individual musician has less control over the outer environment. Real time control over room size would require a wrecking ball and construction crew!
On the MOXF EFFECT > [SF2] Ins Sw (Insert Switch) screen you can quickly view the PARTS which are recalling their dual Insertion Effects from Voice mode. The mark on the “Ins Sw” row indicates active 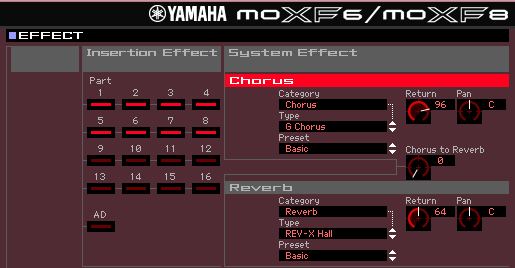 processors. A maximum of eight PARTS can recall their dual INSERTION EFFECTS, which means any eight including any of synth PARTS plus the A/D INPUT Part can all have two INSERTION EFFECTs a piece. You must setup each MIXING program to optimize it for each stage performance. You can setup the System Effects for each. In the example below you can see you can make this work.
How it works:
If the Effect processors are already in place when you recall a sound, then there does not have to be any interruption in the sound. The outer environment (SYSTEM and MASTER effects) will be shared by all instruments in a MIXING program… this eliminates the need to recall a different configuration of these effects. This mimics the real world where all the musicians would naturally be in the same room playing at the same time. Different SEND amounts, available per PART, can be used to place the instruments closer or farther away from the listener in the stereo panorama. And because when you recall a MIXING program all the processors are recalled at once. There is no need for the dreaded ALL NOTE OFF command, and therefore there is no interruption in the sound as you move from one to the next within the program.
When you recall SONG MIXING or PATTERN MIXING program, 16 VOICES assigned to 16 PARTS are recalled, eight of these PARTS recall their Dual Insertion Effects, the shared System Reverb and Chorus are recalled, the Master Effect and Master EQ (if used) will also be recalled. You are now free to move to any PART [1]-[16] of the program without having to worry about sound interruption.
This works because all the System Effects, Master Effects and Master EQ remain in tact, while the INSERTION EFFECTS that are active for PARTS do not have be reprogrammed. The tremendous amount of on-board processing that is available to you is still a huge advantage. Any eight of your PARTS can recall a Dual Insertion Effect configuration, customizable on a per MIXING program basis. This means you can have tons of the cool VCM Effects at the ready. And even with all the effects active, you will never hear an audio interruption when you switch between the PARTS while in this completely programmable MIXING environment. You switch between PARTS by changing the MIDI channel you are transmitting through.
There is certainly nothing wrong with having all this power… You simply have to PLAN to use it wisely. What you want to do is construct an environment for your ensemble of instruments. If you were going to actually have multiple instruments that you were going to play live you set them up in advance and then pick them up as you needed them (you wouldn’t unpack on stage), no, you would set them up for the easiest possible access. This is what MIXING mode is about: QUICK ACCESS to multiple sounds with optimum use of the available cutting edge EFFECT processing that is what the Motif-series is all about. Stop thinking of the SONG MIXING and PATTERN MIXING setups just in terms of recording to the sequencer. The MIXING setups allow you to make optimum use of the powerful processing including the most advanced routing ever within a synthesizer – you do so by recalling all the processors at once in a single program – then you move around within that program. Much like there is a great similarity between a Mixing Console in a recording studio and a Mixing Console in a sound reinforcement scenario. The concept of the Mixer is the same – it is to bring together all the musical instruments, the settings and routings. The MIXING is also an assembly of instruments to be recalled simultaneously but played individually. It is completely logical to use these SONG and PATTERN setups (MIXING) to assemble the multiple instruments you are going to be using “live”. Why use these for live performing:
1) It places the sounds, effects, and everything else exactly where you can get at them quickly, easily, and glitch-free
2) It’s so smart, so flexible, and so powerful, why wouldn’t you use it?
Here’s how to do so:
Go to SONG mode (or PATTERN mode)
Press [MIXING]
Here as if you were setting up to use the sequencer for recording, select your favorite “go-to” sounds for the PARTS of this MIXING setup.
(If you are new to the architecture: One Voice can be place in a PART. A PART is a set of parameters that allow access to the VOICE you select to place there. The PARTS are numbered [1]-[16])
Light the [TRACK] LED just to right of the numbered Track Select buttons. This will activate the function where pressing a button [1]-[16] changes the Transmit Channel of your keyboard – thus it allows you to select the PART you are in communication with. Since all the effect processing is already in place – awaiting you – there is no cut of of the previous sound. In fact, you can hold one sound either with your fingers or a sustain pedal until you wish to release it, while playing on another channel!!!
Here’s a real world application using this “live”: say you need an acoustic piano at the start of the song, then you need to play an electric piano on the bridge, then in the solo section you want to rock out on a B3 organ sound, and behind the Guitar player’s solo you want to back them up with some strings… and for the big finale, you need a big brass section…
You would simply create a MIXING program that contains those sounds:
PART 1 = Piano *Insert Sw = on
PART 2 = Electric piano *Insert Sw = on
PART 3 = Organ *Insert Sw = on
PART 4 = Strings *Insert Sw = on
PART 5 = Brass *Insert Sw = on
You can simply change the transmit channel of the keyboard – using the Track Select buttons on the front panel – there will be no glitch. Each sound in your MIXING setup can be tweaked to your liking for each particular song that you perform. You have 128 MIXING programs: 64 in SONG mode, and 64 in PATTERN mode. You can name each and recall them with as necessary. Each “live” composition could use a different MIXING program.
You can select the PARTS that will be able to recall their Dual Insertion Effects from VOICE mode, but also realize that you can, when necessary drop into full EDIT on any of these VOICES. And you can do so without leaving the SONG or PATTERN MIXING mode. On the MIXING screen you can press [F6] VCE EDIT, this is the secret door that drops you into full VOICE EDIT on a particular VOICE assigned to the selected PART. Here you can even customize the INSERTION EFFECTS (if INS SW= ON), or any other aspect of the VOICE.
Recalling an entire SONG MIXING or entire PATTERN MIXING setup will glitch, quite natuarlly – it is tons of data and lots of individual control functions – the trade-off (benefit) is each individual MIXING program is extremely powerful… capable of housing 16 different sounds on as many as 16 different MIDI channels (of course you can layer multiple sounds on a single MIDI channel so that you can recall complex layers)… Say you need to play piano and strings layered in your right hand and a bass in your left… simply place these three sounds on the same MIDI channel and use the NOTE LIMIT parameters of the MIXING EDIT to accomplish this
PART 6 = Piano (CH.6) ‘Bb2’ and above *Insert Sw = on
PART 7 = new Strings (CH.6) ‘Bb2’ and above *Insert Sw = on
PART 8 = Bass (CH.6) ‘A2’ and below *Insert Sw = on
We still haven’t left the first of 128 MIXING setups!!!
Using the MIXING program to house multiple sounds is the smart way to put together your VOICES for quick access – particularly if you require switching without glitching…
When you use this method, where you switch between PARTS by switching MIDI transmit channels within a single program, there are awesome possibilities: remember the MOXF have as many as four simultaneous arpeggios that can be activated. You can have a Voice in PART 1 responding to an arpgeggio pattern – which you can hold (either with the technology, with your left hand or with a sustain pedal), you can then switch to a second MIDI channel on your controller and play on top of the arpeggio or start another… If you set the ARP to HOLD, it will play indefinitely or until you hit a foot switch programmed to stop it, but if you are holding it manually (with your hand or a sustain pedal) it will continue, even while you are playing on top on another MIDI Channel, until you release the note or the sustain pedal… it is really very cool. Think of the possibilities!
In practical use you can setup your MIXING programs so that the main KEYBD sound is in PART 1, an alternate KEYBD sound is in PART 2… the SOLO/LEAD Voices in PART 3, SWEETENING (strings/pads) in PART 4, etc. so that you have a general layout for yourself that remains consistent throughout the setups… Each SONG/PATTERN is named (and of course has a number) when song #43 is called you know your main keyboard sound is on Channel 1, and your solo sound will be on Channel 3 – it becomes a no-brainer.
Develop a plan… If you fail to plan, then plan to fail.
Advanced Tip: Any SONG or PATTERN MIXING setup can be associated with a MASTER Mode Program. Excellent for when you are combining multiple internal sounds with an external MIDI tone engine device.
Summary: The SONG/PATTERN mode MIXING setups are not just for recording to the sequencer. They are for anytime access to multiple sounds is going to be required. Moving between 16 sounds in a seamless fashion is not only possible but enhanced in these modes.


