
MOTIF XF Control Sets
Control Sets MOTIF XF
You can view and set the parameters for the Controller Setups in the MOTIF XF itself or via the “MOTIF XF Editor” in your computer. To navigate to the Controller Sets in the MOTIF XF from Voice mode:
• Press [EDIT]
• Press [COMMON], if not already selected
• Press [F4] CTL SET (Control Set)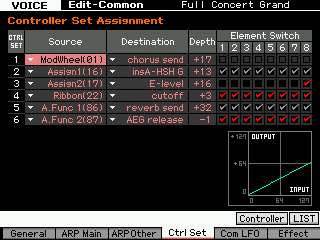
• There are 6 sets. Each “Set” includes:
• Source – the physical Controller and its Control Change number, if applicable.
• Destination – the target Parameter
• Depth – the direction and amount applied
• Element Switches – determines if an Element is affected (when parameter permits individual assignment)
Setting the SOURCE/DESTINATION:
Select a Source controller and assign a target Destination parameter.
Control “Elements” or “Common”:
The Element Switches activate/deactivate control for each Element. If the destination is ‘common’ (global) for all Elements you will see the marks ‘grayed-out’… if this is the case it is because all Elements will be treated together. The Common parameter destinations are “Volume”, “Reverb Send”, “Chorus Send”, “Portamento Time”, “Mono/Poly”, or any designated specifically as ‘common’; typically starts with a “C” as in “CLFO” (Common Low Frequency Oscillator) or when the Control Set is assigned to control an INSERTION EFFECT. When assigned to control the CLFO you have a controller assignment matrix (called the “BOX”) where you can further define how it is applied. It allows you to assign the Common LFO with great precision within the MOTIF XF’s 8-Element architecture. There are 3 controller matrices in the BOX. Destinations include Pitch Modulation Depth, Filter Modulation Depth, Amplitude Modulation Depth, Resonance, Pan position, and Element LFO Speed… and the amount is programmable per Element per Box! Additionally, the CLFO can be assigned to available parameters within the INSERTION EFFECTS and VOCODER. The Common LFO (covered separately) is extremely flexible – in addition to the preset Wave types you can create your own USER LFO and apply it to your synth sound.
If the destination can be assigned to a specific Element(s) you will see the destination parameter name as ELM-Lvl = Element level, ELM-Dly = Element delay, or ELM-Pan, etc. Parameters that are for the filter, amplitude, or pitch functions are always selectable per Element. You can select which Elements are to respond to this control setting.
Real-time Control over Insertion Effects:
Other possible destinations include real-time control over the powerful DUAL INSERTION EFFECTS (including the Vocoder parameters) that can be applied to a VOICE. Refer to the Effect Parameter List (page 95-104 of the DATA LIST Booklet) for an idea of potential here. When targeting a control destination if an effect parameter can be real-time controlled you will see an abbreviation of the parameter name appear in the Control Set. If not, the parameter will be designated with a number, as in “insB: P10”.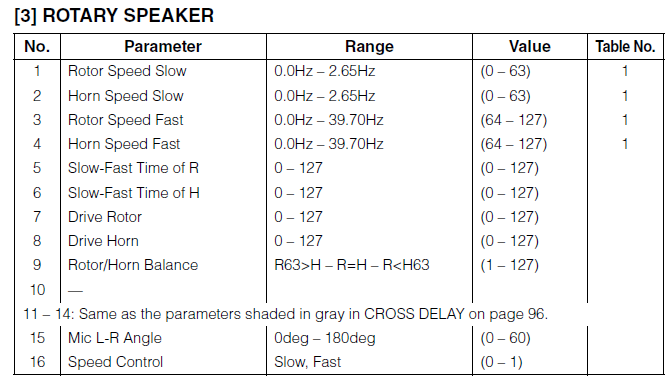
For example, call up the Organ sound PRE1:083(F03) “Or:16+8+5&1/3”;
This Voice uses the Rotary Speaker algorithm for INSERTION B. You will find data about this effect in the DATA LIST booklet.
Navigate to its Control Set;
• Press [EDIT]
• Press [COMMON EDIT], if necessary
• Press [F4] CTRL SET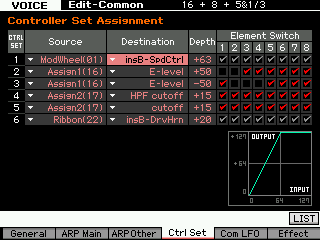
This Voice has the Destination set to “insB-SpCtl” which translates to “Insertion B: Speed Control”. It has two speeds (like a Leslie) Slow and Fast. This Control Set is using the Modulation Wheel to switch between Slow/Fast speeds. It is a “switch” – do not mistake this for the transition time (the ramping up or gradual slow-down in speed) – that is handled by parameters within the Effect algorithm. The switch selects either SLOW or FAST – how it transitions is extremely programmable within the Effect parameters.
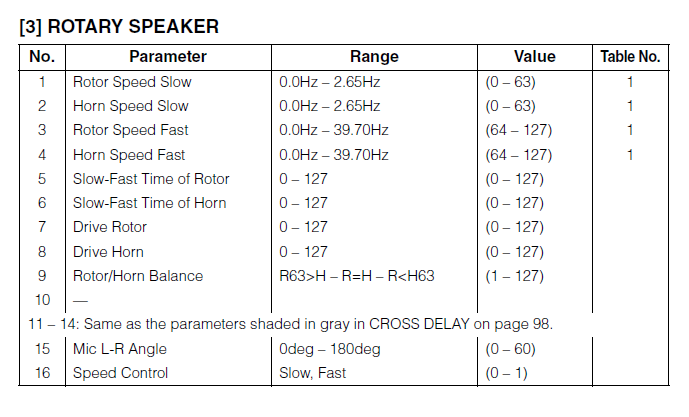
Most of the parameters of the Rotary Speaker algorithm are assignable for real-time control. There are 16 possible parameters in any processor. Speed Control is listed as MIDI Parameter Number 16. MIDI Parameters 10 and 15 are unavailable for real-time control assignment. If you attempt to select them you will see “insB: P10” and “insB: P15” instead of a parameter abbreviation – meaning they are unavailable. (MIDI Parameter Number 10: (typically Wet/Dry Balance) is totally unavailable because of the dreaded “phase cancellation” possibilities – it is not even listed. After all, in a real world situation either your entire signal is going through the speaker or none of it is going through the speaker. It is simply not a parameter that would logically be adjusted in this instance; and Number 15 “Microphone L-R angle” is the angle of the ‘modeled’ stereo microphone on the Leslie cabinet…simply not a parameter you would move in real-time. Mic angle is a “set and forget” parameter. Parameters that are unavailable typically have no musical or practical use. If you want to see and tweak this effect press [F6]:EFFECT/ [SF3]:INSB.
This is a source of many “how come?” questions – you will have to take the designer’s recommendation about the viability of the choices they made as to whether a parameter is practical and delivers a musical result. Just because moving the “mic angle” might seem like something you might want to try, trust us, we tried and it rendered no musically useful use (and in the real world is not a practical function, any way).
DEPTH:
The setting here must be set with care and some thought. The range here is –64 ~ 0 ~ +63. How the MOTIF XF responds to a setting will depend on which parameter and which controller is selected. A Depth setting of 0 defeats all other settings in the Controller Set (and renders them meaningless). In general, the higher the number the more it increases the range of control. Negative value settings reverse the effective direction of the controller. You will have to be logical here.


 For example, call up the Organ sound PRE1:083(F03) “Or:16+8+5&1/3”;
 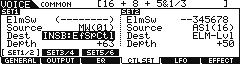 This Voice has the Destination set to “insB: EfSpCtl” which translates to “Insertion B: Effect Speed Control”. It has two speeds (like a Leslie) Slow and Fast. This Control Set is using the Modulation Wheel to switch between Slow/Fast speeds. It is a “switch” – do not mistake this for the transition time (the ramping up or gradual slow down in speed) – that is handled by parameters within the Effect algorithm. The