PERFORMANCE Mode Explored
The concept of this article is to take an in-depth look at one of the Motif XS Performances so that you can learn about some of the important decisions that need to be made to get the most out of them. Each Performance can be up to four Voices (each placed in a PART 1-4) and can include an AD INPUT Part, as well. All PARTS of a Performance can recall their Dual Insertion Effects. And since you have the capability to use up to four simultaneous ARPEGGIOS, each of the synth PARTS can be under the control of a separate ARP phrase. Additionally, five sets of arpeggio phrases can be associated with each Performance – allowing you to have 5 different musical segments. You can think of these as Verse, Chorus, Build-ups, Bridge, Fill-ins, etc.
You have the innovative [PERFORMANCE CONTROL] functions that allow you to dynamically control what is happening with each PART and the [SELECTED PART CONTROL] functions that give you the ability to apply 24 knob parameters to all four PARTS in common, or you can select a single PART and apply those 24 parameters to just a single PART.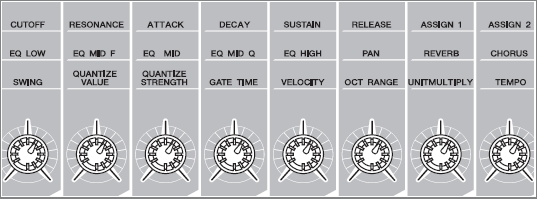
Definitions of Modes: VOICE / PERFORM
Note Limits: PART SPLIT versus ARP SPLIT
Real time [PERFORMANCE CONTROL]
Arpeggio Play Effects
Direct Performance Record feature
LEARN ABOUT PLAYING PERFORMANCES
In the Motif XS there are 384 User Performance programs. We do not refer to these technically as “Presets” here because you can change them – in fact, you are invited to customize each and every one of them. A Performance is a combination of up to four Voices. Each Voice is placed in a location called a Performance “PART”. The PART parameters can be altered without destructively changing the original VOICE. This is an important concept to understand so before we move on let’s make sure it is clear.
A VOICE is the basic playable sound program in the Motif XS. There are 1,024 Preset Voices in 8 banks of 128; additionally, there are 3 banks of 128 User Voice locations to store your variations or to load in new Voice data. Yamaha commissioned some of the best programmers in the world to create this data from the 355MB of wave ROM data in the Motif XS. You can use these Voices as instruments in your compositions. A Voice is what you recall and play as a single entity. You can combine more than one Voice into layered and/or split configurations; you could also combine multiple Voices into a multi-timbral setup where a sequencer would be used to address them separately. You place a VOICE into a “PART” when you move it to a PERFORMANCE or you move it to a SONG MIXING setup or a PATTERN MIXING setup. The purpose of the PART is so that you can alter the VOICE, by applying offsets, without destructively altering the original data.
Let’s take the “Full Concert Grand” piano VOICE as an example: You may want to combine this with other VOICES in a PERFORMANCE and need to transpose it up an octave – you do not want to destructively change the original VOICE data located at PRESET 1: 001(A01). This would be catastrophic because every Performance, Song and Pattern that used the “Full Concert Grand” would instantly be changed.
This is why you have PARTS: PARTS allow you to apply “offsets” to the original data without destructively changing the original Voice data.
The original Voice is “referenced” by the Performance; the PART parameters are applied to it without changing the original data. When you STORE a Performance what gets stored is the fact that you were referencing one of the original Voices and that you applied these OFFSETS to that data. We can alter many things about the “Full Concert Grand” in our PERFORMANCE without changing the original Preset Voice. This makes the Motif XS operating system very efficient and allows you great flexibility to customize exactly what YOU want to do with the Voice in THIS particular combination of programs. You don’t have to create an acoustic piano Voice just to use it in a SPLIT. The PART parameters allow you to edit the notes that will sound separately from editing the original Voice! The PART consists of a very significant set of parameters that allow you to vary the marjority of parameters without having to use a separate USER Voice bank location to store your tweaks.
For example, you might want to apply a specific arpeggio to it or change the Cutoff Frequency or the amount of reverb – but you don’t want to affect every instance where the “Full Concert Grand” is used. So a PART is a copy of the original data, to which you can apply (locally) these offsets. These changes do not permanently change or destroy the original VOICE data. This is very convenient and allows you to customize the VOICE for each composition or combination you wish to make.
A PERFORMANCE in its simplest and most basic form would allow you to take the “Full Concert Grand” piano and place it on the right side of the keyboard (by placing it in a PART and Note Limiting that Part); then place the “Velo Growl” acoustic bass and place it on the left side of the keyboard (by placing it in a second PART and Note Limiting that Part to the left side of the keyboard). Anytime you find more than one Voice combined with another to make a Split or a Layer or to make a combination Split/Layer, you would do this in a Performance. Up to four sounds can populate a PERFORMANCE and are addressed on the same Basic MIDI receive channel and this is fixed (in fact, individual MIDI channel settings does no even come into play in a PERFORMANCE – however, for clarity’s sake we will state it this way: if you were to play the XS from an external MIDI device, both Voice and Performance modes are addressed on the Basic MIDI Receive Channel as set in UTILITY). This is an important thing to understand about Performances – all the PARTS are on the same Basic MIDI channel. In its most complex form, a PERFORMANCE can also have each of the four PARTS with its own arpeggiator. Each arpeggiator can have 5 arpeggio phrases associated with it within the Performance, [SF1]~[SF5]. You can therefore switch between sets of phrase via the Sub Function buttons in realtime. Please recognize that arpeggios can be freely associated – just because a VOICE has a certain arpeggio in VOICE mode, does not mean that when you place it in a PERFORMANCE that the same arpeggio has to come along. It is not that restrictive, it is not restrictive or exclusive at all. You can assign any arpeggio you want to the VOICE in a PART.
Not all settings are automatically brought along when you place a Voice in a PART, and this is by design. You can set the XS to copy some of the parameters and apply them as OFFSET i.e., Part parameters.
Learning how to approach playing each of the Performances will require that you use some musical imagination. You must not be afraid to edit the data to fit your needs. The programmers at Yamaha could not possibly know where you need to place the PART Note Limit split point. This split point could vary depending on what you are playing and what key you are playing it in – this is one reason all the Performances are in USER editable RAM bank locations. Some of the edits you will make will be simply changing the split point of the PARTS in the Performance.
Split Points – this is the “Note Limit” or key range to which a PART will respond. Yamaha does not use the terminology “split point” in this PERFORMANCE mode here because there can be more than just an “upper” and “lower” division – because you can have four PARTS, the term “note limits” are used instead. Note Limit parameters are defined by the Note Limit High and Note Limit Low settings. There are two different Note Limit pairings you need to be aware of when it comes to the Performances. Since a Performance is made up of up to 4 PARTS and each of the 4 Parts could be controlled by an independent arpeggio, you must take care to know the difference between the following Note Limit parameters:
PART Note Limit – this will determine the note range that a particular PART will respond with sound in response to direct key presses.
ARPEGGIO Note Limit – this will determine the note range that will trigger (start/control) the arpeggiator operation.
You may not be able to effectively play all of the PERFORMANCES – they represent all different genres of music and no one is expected to be proficient in all genres. Often, if it is not your cup of tea, you may find no particular approach to connect to the PERFORMANCE. Others will appeal to you right away. But this article will give you a systematic way to approach each Performance so that you can get to know how to look “behind the scenes” and figure out how it was constructed.
ClaviJam PERF: USR 1:044:(C12)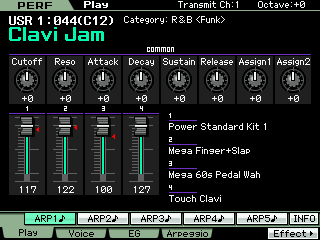 The main [F1] PLAY screen gives you information concerning what VOICES are in the four PARTS and the Volumes (written under the slider graphic). All of the Factory Set PERFORMANCES are made from Preset bank VOICES. This ensures that they will always recall the proper Voices – if User bank VOICES are used in a PERFORMANCE it is possible to load something in that might serendipitously reprogram a PERFORMANCE (more on that later).
You can press [F2] VOICE to view the Voices assigned to this PERFORMANCE and you can see and change the assigned Voices and their playable key ranges, Note Limits.
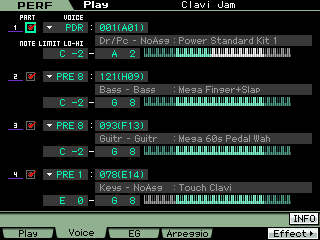 In the example shown there are four VOICES in the four PARTS – each is assigned to sound in a specific range of MIDI notes – the 76-key Motif XS7 was used for the screen captures.
Power Standard Kit 1 = C-2 ~ A2
Mega Finger+Slap = C-2 ~ G8
Mega 60s Pedal Wah = C-2 ~ G8
Touch Clavi = E0 ~ G8
If you press the [F4] ARPEGGIO button from the main screen, you will see that three of the four PARTS are assigned to arpeggios (red check mark). Here you can also view and edit what arp types are playing for each of the five possible [ARP1]-[ARP5] Sub Function buttons [SF1] through [SF5]. You can also set the tempo and the overall arpeggio Sync Quantize Value.
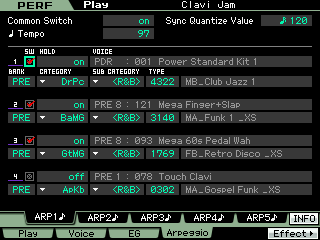 [F4] ARPEGGIO
The actual split point range for the arpeggio for each Part will be found in PART Edit parameters:
• Press [EDIT]
• Press a Track Select [1] – [4] to select a PART
• Press [F2] ARP MAIN
Drum “ARP MAIN” – PART 1: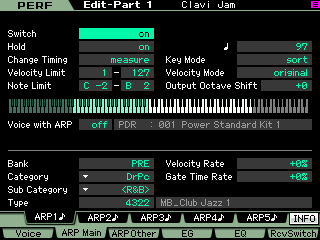 The Arpeggio Note Limit parameter will determine which notes will trigger the PART’s Arpeggio to start. In the screenshot you see the PART 1 (Drum) arpeggio data (top line will always indicate where you are currently). Any note “B2” and below will start the arpeggio drum phrase. Notes from middle “C” and above will not start the arpeggio drums. This can be useful knowledge – perhaps you want to begin playing the Clav Part, alone, without the drummer! Each PART can have a note range that will begin its playback. And as we will learn, you have other methods of triggering different aspects of the arpeggiator.
By pressing the Track Select buttons [1]-[4] in order you can find out that the PARTS have the ARPEGGIO assigned as follows:
PART 01: PDR:001 (A01) Drums “Power Standard Kit 1” ARP Note Limit = C-2 ~ B2
PART 02: PRE8:121(H09) Bass “Mega Finger+Slap” ARP Note Limit = C-2 ~ B2
PART 03: PRE8:093(F13) Guitar “Mega 60s Pedal Wah” ARP Note Limit = C-2 ~ B2
PART 04: No Arpeggio is active for this Part. This sound will be “live” on the keyboard
So although you can play and hear the Clavi part anywhere on the keyboard, only notes below B2 will start the rhythm section: the Drums, the Bass and the Guitar.
Bass “ARP MAIN” – PART 2: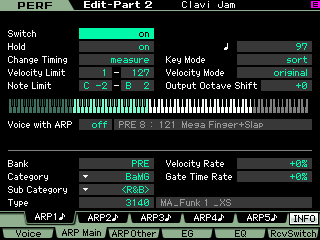 The bright green keys (E0-B2) indicate the actual available range to trigger the bass arpeggio: Note Limit = C-2 through B2, but on an ES7 the lowest key is E0.
Guitar “ARP MAIN” – PART 3: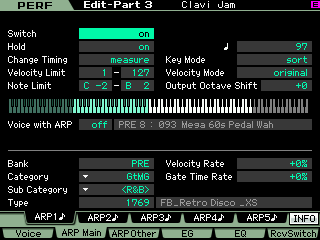 Play an Eb2 in your left hand: Since the three left-hand Parts are set to HOLD = ON, you do not have to continue to press the notes – the phrase, once triggered will automatically continue to play. You play the Clavinet PART normally. In fact you can play two-fisted Clavinet parts and have the band follow your every move. This may take some practice. Notes below middle “C” will provide ‘instructions’ to the rhythm section. This allows you to play something completely different with the Clavinet, while the Bass and Guitar Parts follow the tonal centers that you outline with your left hand. Take your time – discover this interaction between your ‘conductor’ notes and what the ‘Bass player’ and ‘Guitar player’ play – this can be not only fun but inspiring. It is like having your own interactive band and is quite a bit different from the standard “arranger keyboard”.
Real Time [PERFORMANCE CONTROL]
Press the [PERFORMANCE CONTROL] button found on the right front panel just to the right of the numbered Track buttons. This will allow you to control what is going on in a Performance at any time. Remember there are up to four PARTS, so the 16 Track Select buttons are assigned in four groups of four, as follows:
[1], [2], [3], [4] – PART SELECT
[5], [6], [7], [8] – ARP ON/OFF
[9], [10], [11], [12] – PART MUTE ON/OFF
[13], [14], [15], [16] – ARP HOLD ON/OFF
This is indicated on the front panel under the 16 Track Select buttons.
When you press a button [1]-[4] to select a PART you then have access to the 24 parameters (8 knobs x 3 rows of parameters) in the [SELECTED PART CONTROL] area of the keyboard.
These can be applied to the selected Part: Shown below the Control Functions is accessing PART 1 (shown) the Drum Kit.
Alternatively, if the [COMMON EDIT] button is illuminated – the 24 knob parameters can be applied to all four PARTS together (in Common): The CONTROL FUNCTION screen will indicate which individual PART 1-4 or the word “Common” will appear if you are set to control all PARTS simultaneously.
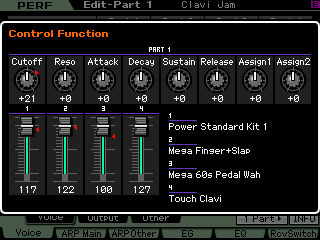 At any time you can also press the [MULTI PART CONTROL] button to control the REVERB SEND, CHORUS SEND and PAN position of any of the four PARTS. Knobs 1-4 are used for this purpose. And, of course, the CS (Control Sliders) are active, as well, as volume controls.
Navigating a PERFORMANCE:
When you press [EDIT] in a PERFORMANCE you have two levels of edit parameters. Those of you familiar with the Motif-series, know that these two levels are called the “COMMON” (affects all the PARTS together) and the “PART” (affects just a specific single PART). Things that are in COMMON are things like the Performance Name, System Effects, Master EQ, Audio Input, Master Effects, Controller Assign, etc.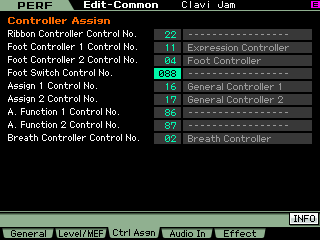 The upper left corner of the screen will always identify exactly where you are: PERFORMANCE – EDIT – COMMON
• Press [EDIT]
• Press [COMMON EDIT]
If you press a TRACK SELECT button [1] through [4] you can view the EDIT screens for PART parameters.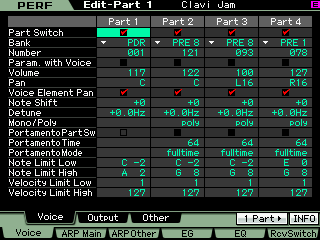 Notice that [SF5] reads “1 PART”; this button will toggle the screen between viewing all four PARTS (shown above) or viewing a single PART at a time (shown below).
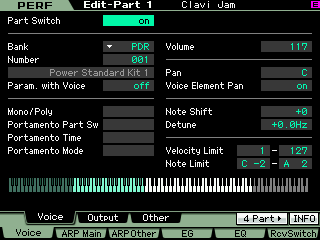 You can choose to view either depending on your preference at the time. Notice when you are viewing one PART at a time the [SF5] button will read “4 PART” indicates that pressing it will toggle you back to the list view.
The fundamental feel of music is very important and it is not just the drums. Straight time is the antithesis of swing. You have access to 8 parameters for the arpeggio via the “ARP FX” row in the [SELECTED PART CONTROL] area:
• Swing
• Quantize Value (Qt Val)
• Quantize Strength (Qt Str)
• Gate Time (GateT)
• Velocity
• Octave
• Unit Multiply (UnitMlt)
• Tempo
You access these as follows:
Press the [SELECTED PART CONTROL] button repeatedly to select row 3. Each PART can be manipulated individually by using the Track Select buttons [1]-[4] or you can apply these settings in COMMON by pressing the [COMMON EDIT] button.
There will be a separate Power User article outlining the SWING QUANTIZE. But briefly you see that there is +25 Swing offset applied to PART 1, the drums, and it is applied at the 16th note level (meaning that the even numbered 16th notes will be delayed by 25 clock ticks). Velocity is reduced slightly. Swing is as much timing as is it velocity. The Velocity of the swung note is reduced to 82% of normal.
Utilize the [PERFORMANCE CONTROL] button on the right front panel to isolate each PART in turn (use the PART MUTE function) and listen to the ‘feel’. Experiment with the parameters and hear how you can adjust the response of the parts. It is all about feel so subtlety reigns here.
To begin your experiments try the following:
• Mute all PARTS but the drums – you can do so by pressing the [PERFORMANCE CONTROL] button and then pressing Track Select [10], [11] and [12] turning off their LEDs.
• Select the drum PART – you do so by pressing the Track Select [1] button
• Access the ARP FX – you do so by pressing the [SELECTED PART CONTROL] button repeatedly to illuminate the LED next to ARP FX.
• Straighten the Swing – you do so by turning knob 1 to “hook” the red arrow and setting the value back to +0 (12 o’clock).
Sometimes you cannot appreciate the “swing” until it is not there. By setting the Swing value back to +0 it becomes apparent just how important it is to the feel of the entire groove. When you remove the SWING VALUE – all 16th notes occur precisely on their written values. The +25 value – we said – is delaying the even numbered 16th notes by 25 clock ticks and this gives it the SWING.
So instead of 16th notes falling at clock values of:
000 – 120 – 240 – 360 – 000 – 120 – 240 – 360 – etc…
The +25 Swing Value adds 25 clock ticks to the even numbered 16th notes:
000 – 145 – 240 – 385 – 000 – 145 – 240 – 385 – etc…
Try the same thing on ARP setup #3 (press [SF3] to recall the third arp pattern) but now isolate the bass line.
• Press [SF3] ARP3
• Press [PERFORMANCE CONTROL] if not already active
• Press Track Select [9], [11] and [12] to MUTE Parts 1, 3 and 4.
Listen to the rhythm of this Bass ARP – bass arps are as much about the rhythm as they are the notes; the notes are input by you when you trigger the keys. A real bass player plays with attitude – listen to the way certain notes are ‘deadened’ while others are full and solid… listen for “finger noises”… there is plenty of “feel” from the swing (ARP PLAY FX). Also of interest is try changing the “GateT” parameter (gate time). This is the “duration” or length the notes are held. Try shortening the notes slightly (lower the number slowly from 100%), listen to how it changes the duration of the bass notes. This is very important to the “feel” of the bass line. Feel is not only when the notes occur but how long they are held.
We often get questions about why we changed from preset DRUM PATTERNS (like in the original Motif, Motif ES, MO6/MO8) and went with ARPEGGIO Phrases for Drums grooves, and this is exactly why. The Arpeggio Phrase can easily and non-destructively be manipulated prior to committing them to Track Events – so you can mold the musical data to your liking be for you write it into the SEQUENCER Track Event list! And remember – just because a Drum groove is at the same tempo does not always mean it will work – it is the “feel”, the “attitude” (these subtle adjustments to the “swing”) that make it work or not work. This is the real power of the Arpeggio Phrases. (Besides we only provided a few hundred as ‘fixed’ patterns – now you have over 1900 Drum Phrases to start with!!!
DIRECT PERFORMANCE RECORD
Recording yourself playing a Performance is extremely easy. You do not have to leave PERFORMANCE mode, you simply press the RECORD button and make some quick decisions about how you want to capture your inspiration.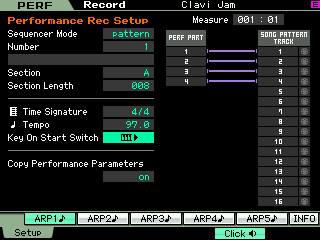
• Press [RECORD] – The PERFORMANCE Record Setup screen appears.
PERF RecSetup
• Select SEQUENCER MODE: SONG or PATTERN
• Select a blank NUMBER
(If the target is blank the SONG/PATTERN TRACK column at right will have only greyed out MIDI icons. A track that contains data will have yellow MIDI icons. The target Track will be replaced (overwritten).
SONG or PATTERN? In general, if you do not know exactly what you want to do, select SONG. Remember SONGS are linear and you can record as long as you like, then extract the data that you want to keep later. PATTERNS will require that you set a number of measures you wish to record. So Song mode when you want to “noodle” around and workout ideas, and Pattern mode when you have a specific goal in mind.
Above in the graphic PATTERN is selected. The target is PATTERN number 1, SECTION A, and it has been set to 008 Measures (optionally you can set from 001~256 measures as you require). We should mention, when the target Sequencer Mode is “Pattern”, the transport will STOP at the end of the SECTION LENGTH setting.
TIME SIGNATURE and TEMPO are automatically set from PERFORMANCE mode. The tempo of the arpeggio is automatically adopted by the Sequencer.
Also in the graphic above, “Key On Start Switch” is activated. This means that touching the keyboard will automatically start recording. Just a word on this: This is very useful when using DIRECT PERFORMANCE RECORD. You most likely have been experimenting with the PERFORMANCE prior to pressing the RECORD button. So the tempo of what you are doing is fresh in your head, so a count-in may not be necessary.
If you prefer to use the count-in, remember the arpeggio will start when you touch the keys in the arpeggio Note Limit region, even if the sequencer transport starts before this or after this. So it will be on YOU to play on time. What this means simply is, if you record with a count-in rather than using the “Key On Start Switch” and you hit the keyboard late (say you start on measure 003, your arpeggios will be start in measure 003. You must trigger a note in the region where the arpeggio Note Limit will begin arp playback. This is indeed the most flexible implementation of this function. It is musically useful to be able to start playback of a guitar arpeggio, for example, on the upbeat rather than the downbeat – basically turning the rhythm “inside out”. (One important difference between so-called “arranger” keyboards and the arpeggios as implemented here, is the flexibility to offset the timing (on purpose). You could actually play a pickup prior to the having the rhythm section come in. Use your imagination!)
As we mentioned there are two different split points to be concerned about. The PART’S Note Limit and then the ARP’S (trigger) Note Limit. For example, The Drum Kit PART in the “Clavi Jam” Performance is note limited to the region between C-2 and A2. Only drums up to and including A2 will sound. By Note Limiting the Voice PART like this the congas, shakers and clave sounds that are normally a part of the arpeggio phrase have been removed.
The last parameter on the Direct Performance Record SETUP setup screen “Copy Performance Parameters” is set to ON, and will faithfully COPY all settings from the Performance PARTS to the Mixing PARTS. This ensures the Performance will sound exactly as it does in Performance mode and that the Note Limits, arpeggio assignments, Effects and Send levels, etc., etc., are all identical in the targeted SONG MIXING or PATTERN MIXING program.
TIP: You can customize the drum arpeggio by note limiting the PART set to respond to it. Note Limits can be used to target just specific regions – this is particularly useful with the more than 1900 Drum Arpeggios. You can even set the High Note Limit lower than the Low Note Limit – creating a ‘hole’ in the region. Notes in between will not sound. Use your imagination! Some times you may hear an arpeggio drum groove that includes both trap drums and Latin Percussion – perhaps you want only the regular drums, you can set the PART NOTE LIMITS to eliminate the Latin Percussion. Or vice versa, perhaps you are only interested in the Latin Percussion. Or just the Hihats in a particular Arpeggio Phrase. Maybe you only want the snare. The PART NOTE LIMITS (remember) determine what keys will produce SOUND. (not to be confused with the ARP NOTE LIMITS – which determine which notes will trigger playback).
The other note limit is, of course, which notes will start playback of the drum arpeggio (trigger). This region is set to C-2 through B2. Therefore basically any note below B2 will start the drum arpeggio. But any note C3 and above will not. If you want the drums to start in sync with your playing make sure you do not accidentally hit a note above C3 before you press a note that triggers the drum arps. Also it is possible to start the drum arpeggio in this Performance without starting the Guitar arpeggio – the guitar arpeggio note limit is from E0 through B2. If you have a Motif XS 8 you can play a key below E0 that will start the Drums and the Bass but not the Guitar. The only point being made here is that you can customize the region that sounds for any PART and you can customize independently the region that will trigger the arpeggio to start.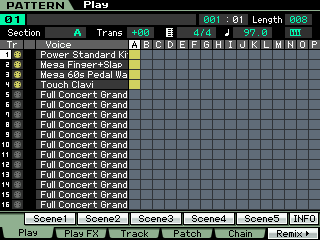
Once you have recorded your Performance to the sequencer you can go to that MODE and further work with your basic idea. You can add other PARTS – you can replace PARTS you don’t like. Say you like everything but want to record your own BASS line – yes, of course, you can! That is apart of the CONCEPT of DIRECT PERFORMANCE RECORD.
• Press [PATTERN]
As shown, four tracks have been recorded in SECTION A, where PART 1 goes to Track 1, PART 2 goes to track 2 and so on. The MIDI cable icons in the TR column and the boxes in Section A for the first four tracks indicate that data is recorded to those tracks (yellow).
It should be mentioned that even if you use the PART MUTE switch in the PERFORMANCE CONTROL area, the MIDI data will still be transferred to the sequencer (you can mute it or remove it later if you wish). MUTE only prevents you from hearing it – it does not prevent it from exisiting. All data is recorded. Knob movements, slider movements are also recorded. Additionally, any notes generated by the arpeggio phrase but that do not sound (due to VOICE Note Limits) are also transferred to the sequencer but will not sound during playback because the PART parameters are applied to the MIXING setup of the current PATTERN or SONG. So fundamentally (except for the PART MUTES) what you hear is what you get!
The PATTERN sequencer (used in our example) automatically makes four USER PHRASES from the Drum, Bass and Guitar arpeggio data, and from the Clavinet part played “live” on the keyboard. You can see this by pressing the [F4] PATCH button. There are 256 USER Phrases possible in each PATTERN (16 tracks times 16 Sections). Additionally, each Phrase can be given a name if you like… move the cursor to the PHRASE NAME column and press [F6] CHAR to input a Phrase name (if you like):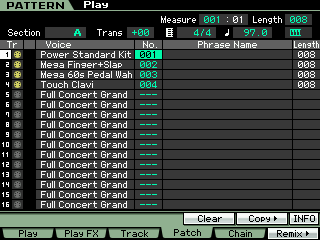 The data is now not an arpeggio any more. It has been written out to the corresponding track as MIDI event data. This Note data, once transferred to a Track, does not trigger the arpeggiator. This is different from the implementation found in the previous Motif-series synthesizers. However, it is still a good idea to turn the ARP ON/OFF button, OFF once you have completed your recording.
In fact, you may also wish to turn the PART’s ARP Switch OFF, this will allow you to assign the arpeggiators to other PARTS – yes, you can continue to use an arpeggiator to create other tracks in PATTERN mode.
You can now edit that data, cut-copy-paste that data to other locations. You can activate user Phrases by number (or name) in other Sections of this PATTERN. For example, if I wish to use the exact same Guitar part in Section “K” for example, I would simply move to SECTION K and activate Phrase No. 003 on the [F4] PATCH grid.
If I want to use the exact same Drum phrase in another SECTION, I simply need to activate Phrase No. 001 in that Section. However, if I wish to add something to it or change something about it (keeping the original data in tact), I would need to create a new unique User Phrase by copying this data into that new Phrase (it would have to have a unique Phrase No.). There are four different COPY jobs in the Sequencer – COPY TRACK will allow you to create a new Phrase (unique) in the target location. (See separate document on the “Understanding the COPY Jobs”).
Earlier in the article we mentioned the ARP PLAY FX. These allow you to alter the feel and swing of the arpeggio prior to writing the data to a track. From the main SONG or PATTERN PLAY screen you will notice [F2] PLAY FX. These allow you to do a similar adjustment to the feel and swing of data but post (or after) you have “painted” the data to a track. The “Play FX” are initially non-destructive. This means you are offsetting where the data occurs without changing the actual MIDI events on the Event List, you are simply temporarily offsetting them. This data can be made permanent once you have decided that it is what you like. You can apply quantize, quantize strength (%), Swing Velocity, Swing Gate time, Swing Rate, you can Note Shift data, Clock Shift data, change the overall Gate time, and change the overall Velocity Rate and Offset.
These PLAY EFFECTS can be made permanent in two ways:
1) Place the track in “overdub” Record – this will re-write the data according to the Play Effect offsets.
2) Use the “Normalize Play Effect” TRACK JOB – this will re-write the data according to the Play Effect offsets.
Both will then “zero out” the parameters settings. You must experiment with these parameters and hear the result because it is very much dependent on the data to which you apply it.
Behind the Arpeggios:
You may want to spend some time looking through the Data List 2 booklet at the 6,633 arpeggios and how they are categorized. Many of the arpeggio types have a particular kind of reaction to chords and some even can respond differently to velocity or can add random sound effects. Also you can set the arpeggios up to play continuously (this you know) but did you know they can be used to play just once? By setting the LOOP and TRIGGER MODE parameters you can control how the arpeggios behave. This can be used when you need to transfer a drum roll or fill-in at a particular place in your composition. There is much more to the arpeggios than just a first look might reveal.
ARP_”ES” versus ARP_”XS”
When viewing the [F4] ARPEGGIO screen (from the main PERFORMANCE screen) you can see the name of the Arpeggio TYPE for each Part that has an arpeggio active. If the last two letters of the arpeggio type are “ES”, this refers to how the arpeggio pattern will respond to what you play on the keyboard. It denotes either in the same fashion as the Motif ES/S90 ES arpeggios or according to the new advanced chord recognition algorithm of the “XS”.
In general, it is always good to experiment and to listen to the arpeggio… but so that you have a firm definition… From the Owner’s Manual:
ES TYPE Arpeggios
These Arpeggio types use the same multi track Arpeggio architecture as the MOTIF ES. This ES type of arpeggio has the following benefits:
• These arpeggios can create complex notes and chords even when triggered by one note.
• The arpeggio closely follows the notes played on the keyboard (but the area where the arpeggio is assigned) allowing a good deal of harmonic freedom and the possibility to “solo” using these arpeggios.
These Arpeggio types have several sequences each of which is suited for a certain chord type. Even if you press only one note, the Arpeggio is played back using the programmed sequence—meaning that notes other than the ones you play may be sounded. Pressing another note triggers the transposed sequence regarding the pressed note as a root note. Adding notes to those already held changes the sequence accordingly. An Arpeggio with such a playback type has “_ES” at the end of the type name.
XS TYPE Arpeggios
These arpeggios use a newly developed chord recognition technology to determine what notes should be played back by the Arpeggio. This XS type of arpeggio has the following benefits:
• The arpeggios respond only to any area on the keyboard where an XS type of arpeggio is assigned. Other areas of the keyboard do not effect the chord recognition. This allows very natural keyboard playing across the entire keyboard with arpeggio generated bass and backing parts.
• The arpeggio will always play harmonically correct parts. These are especially useful for bass and chordal backing parts.
These Arpeggio types created for use with Normal Voices are played back to match the chord type determined by detecting the notes you play on the keyboard. An Arpeggio with such a playback type has “_XS” at the end of the type name.
Translation: An “_ES” type arpeggio will respond to a single note “C” and yet play a predetermined phrase. For example, the PERFORMANCE called “Yah-Yo-Jah” USER 1: 034(C02) will play a minor organ chord when you play a single “C” note but if you play C-E it will be enough for it to outline a Cmajor Triad. Playing C-Eb is enough for it to outline a Cminor Triad. You can hear the organ part adjust. If you play “F” the pattern will adjust to the new key… and so on. Both the Bass and Organ Parts of the “Yah-Yo-Jah” PERFORMANCE are “_ES” type arpeggios.
An “_XS” type arpeggio can respond to alternate chord “voicings” (great for you jazz players out there). For example, the PERFORMANCE called “Bop ’til You Drop” (USER 1: 010(A10)) the bass player will recognize a 13th Chord even if you do not play the root. In jazz (and funk for that matter: Try also USER 1: 092 (F12): “Funky Jump”) it is an unwritten rule to stay-off the bass player’s note. There is no need for you to have to play the root to “tell” the bass player what to play. For example, on most arranger keyboards in order to get it to do advanced voicings, like a 13th chord, you would have to use the root in there somewhere. But the “XS type” arpeggiator is very hip! Say you want a C13th chord, you could voice it in your left-hand:
Bb – D – E – A or E – A – Bb – D
…neither of these chord voicings has a “C” in it (the XS-bass “player” will know and will provide the root). The Motif XS has been ‘taught’ some advanced chord recognition. Shown are two variation chord voicings for C13, instead of having to include the root, it is assumed in this case. Jazz players (and funk players) will appreciate this chord voicing trick. In order to know what an arpeggio will do you will need to play it!

Among the other things you can do with arps are the Accent and Random SFX functions.
You can see from the small sample (shown), the Arpeggio listings in the DATA LIST Booklet shows the Main Category, Sub Category, Arpeggio number, Arpeggio Name, Time Signature, Phrase Length, Original Tempo, Accent, Random SFX (sound effect), and Voice Type. This is to give you an idea about what the original data was intended to do… Of course, you do not have to use it as intended. And that is an important point to understand. The ACCENT column is typically going to be marked for many of the 1900 Drum grooves. You can set a velocity level that when you exceed that value you can add a drum accent phrase (typically a kick/crash). Some of the GtMG (Guitar Mega Voice) type arps and the BaMG (Bass Mega Voice) type arps will have random sound effects (knocks, scrapes, etc.).
These parameters are set on the following screen:
• Press [EDIT]
• Press Track Select [1]-[4] to select PART EDIT
• Press [F3] ARP OTHER
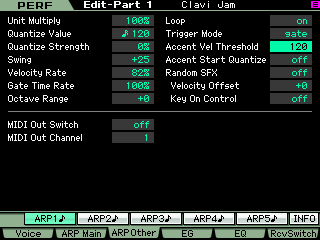
ArpOtherIn the left column you see the ARP PLAY FX parameters. In the right column you see the “Accent Vel Threshold” – In the “Clavi Jam” PERFORMANCE, by setting this to 120, any time I trigger a note in the drum arpeggio trigger area (below B2) with a velocity of 120 or greater a kick and crash accent will be played. This allows me to “punch” the accents. Other drum arps may have different “accent” phrases… please experiment!
The “Accent Start Quantize” when OFF will create the accent immediately when the velocity threshold is exceeded. If set On the accent phrase will be moved to nearest value according the selected arpeggio type’s quantize.
In the lower portion of the screen you can route any arpeggio OUT via MIDI on any channel. Please recognize that the arpeggios do not automatically go out via MIDI. Normally, your playing is set to transmit out via MIDI (not the arpeggios).
“PAINTING” ARPS TO THE SEQUENCER
When you record the output of an arpeggio to a track please recognize that there is no single “best way” to do this. The danger in doing any of these application guides is that we can only hint at the many ways that the data can be used. No manual or application guide can possibly cover all the possible scenarios. However, if you are worried that the arpeggio data will be immediately identified as coming from a Motif XS, this is really your own fault. There are more ways to vary the data, sculpt it into your own music, than there are arpeggios. Not only the PLAY FX but things like Real Time Loop Remix which allows you to apply an endless number of variations. There is the ability to edit part or all of the data… Replace part or all of the data… that is the concept behind all of this “Phrase Factory 2.0” stuff. (Phrase Factory 2.0 is our pet name for all the content and all the ways to vary that content within the XS architecture. The arpeggio phrases are simply starting points.)
If you think of the drum, bass and guitar PARTS in our example as musicians, what you do when you enter chord data is give them a musical chart (by playing your own chord progression) – much the same as handing a musical chart to actual musicians. The drum arp does what a drummer would do, bring their expertise in fashioning a groove to the music. The bass arp did what a good bass player would do, bring their expertise in fashioning a bass line out of my chord progression. The guitar arp did what a guitar player would do if you handed them a chart (they turn down), bring their library of guitar-ism to the music! Next week, you could approach this same Performance (Clavi Jam) and do something entirely different… it is simply a starting point. I’m amazed that simply changing the key causes me to change my whole approach to this same Performance… swapping the drum kit or changing the clavinet sound to an electric piano, and I’m inspired entirely differently.
The arpeggio data is written out as MIDI events which now can be edited, erased, deleted, and otherwise manipulated like all other MIDI data. This data is no longer described as Arpeggio data. The actual Arpeggiators are released and are now available to be assigned to other duties. Please note: while in the SONG or PATTERN mode only one track can be recorded at a time. If you wish to do more recording from this same Performance, you can return to the Performsnce mode and target a different SECTION (Section “B”, for example). If you wish to record a different Performance make sure you target not only a different Section, but you will need to EXCHANGE the Tracks of the data you previously recorded so you do not COPY PERFORMANCE PARAMETERS. And replace your previously assigned Parts.
I guess in the final analysis, the more you put into it, the more you get back out. Hope this article opens your thinking to just how the 6,633 arpeggios can be used. And we simply started from a Performance. And, of course, we must state that this is not the only way to begin working…
Enjoy! Make more music!

