HALF DAMPER FUNCTION, DAMPER RESONANCE EFFECT and KEY OFF SAMPLE
Half Damper function that lets you finely control the decay of the sound-and expressively recreate the complex characteristics of acoustic instruments, especially piano and stringed instruments. Damper Resonance recreates the sound of strings vibrating sympathetically when the sustain pedal is used to lift the ‘felts from the strings’. The KEY OFF Sample is responsible for the rather unique sound created when the felt falls back on to the string ending its vibrations. These advances in the synthesizer engine bring a new level of realism into performing – particular on acoustic piano sounds.
When the Half Damper switch is turned ON, you can use the Half Damper function with an optional Foot Controller FC3 connected to the FOOT SWITCH SUSTAIN jack. The Half Damper function requires the optional Yamaha FC3 pedal (sold separately). The FC3 sends sustain data values 0 through 127 for cc064, which is different from the FC4 or FC5. The FC4/5 are simply sending “On” or “Off” (0 or 127) values – like most typical momentary sustain pedals. But more than just the FC3 is required for a keyboard to respond to the half dampering. In other words, plugging an FC3 into a keyboard does not necessarily give you half-damper response – the keyboard must be capable of the feature. The MO6/8, original Motif and Motif ES, for example, do not have this functionality and cannot use the FC3 pedal at all for any sustain type function.
When the Half Damper function is set to ON (only FC3)
By connecting an optional FC3 foot controller to the back panel SUSTAIN FOOT PEDAL jack, you can use the Half Damper feature. The Half Damper feature reproduces the fine control of an acoustic piano’s damper pedal to control the sustain over time: pressing the pedal fully down makes the sound last longer, while letting up on the pedal part of the way slightly mutes the sustained sound. Effective use of the Half Damper feature lets you play piano sounds more expressively and realistically.
When the Half Damper function is set to OFF (regular sustain)
By pressing the footswitch (sustain) on/off, you can control whether the sound is cut off or continues playing, even when the keys are released. Keep in mind that some sounds may not be suitable for use in all situations with the Sustain footswitch. For example, for organ sounds that have no natural decay, the sound continues at the same level when holding down the Sustain footswitch. On the other hand, many sounds benefit from the use of Sustain, such as piano, which has a natural decay when a note is held. This is all dependent on the AEG (Amplitude Envelope Generator) for the Voice’s Elements. If the envelope is programmed to return to 0 level it will eventually decay completely even with a sustain pedal (same as in the real world). If, however, the AEG DECAY 2 LEVEL is not 0, the pedal will hold the sound at that level indefinitely. The “sustain” parameter in MIDI is called HOLD 1.
You can setup the XS/XF for the Half Damper function here:
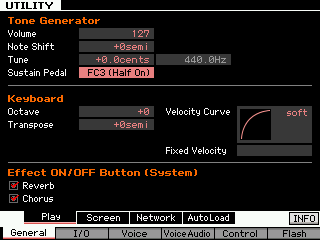 • Press [UTILITY]
• Press [F1] GENERAL
• Press [SF1] PLAY
• Select “Sustain Pedal” = FC3 (Half On) Settings: FC3 (Half On), FC3 (Half Off), FC4/5 _ If you are using an FC4 or FC5 sustain pedal set this parameter to “FC4/5.” You cannot use the half damper function with the FC4 or FC5.
The “Sustain Pedal” parameter selects the Foot Controller type connected to the FOOTSWITCH SUSTAIN jack.
Within in the VOICE data you can customize the Half-Damper response on a per VOICE basis.
From VOICE mode select the Voice you wish to program. For an example of how this works, call up Preset 1: 001(A01) FULL CONCERT GRAND
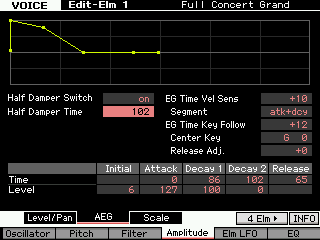 • Press [EDIT]
• Press Track [1] to select Element parameters
• Press [F4] AMP
• Press [SF2] AEG
• Set “Half Damper Switch” = ON
From this display you can make the “Half Damper Sustain Time” setting and level settings for the Amplitude EG, which determine how the volume of the sound changes over time. Also influencing this is the envelopes Release Time parameter. These can be used to control the change in volume from the moment a note is pressed on the keyboard to the moment the sound stops.
 HALF DAMPER SUSTAIN TIME: 0 ~ 127
Half Damper Switch: ON/OFF
RELEASE Time: 0 ~ 127
DECAY 2 LEVEL: 0 ~ 127 (if any value other than 0, sustain will be indefinite at that level as long as a key is held or sustain pedal is down).
Unlike a conventional damper pedal control which simply turns sustain on and off, the Half Damper function lets you finely control the amount of sustain and natural decay-just as with a real acoustic piano-by using a continuous pedal controller. When the sustain pedal is released the decay time after the key is released is determined by the RELEASE TIME parameter. When the Release time is less than the Half Damper Time you create a very piano-like effect.
Important notes:
_Keep in mind that two separate parameters must be set in order to use the Half Damper function, as outlined above. _The ON/OFF setting of the half-damper feature automatically affects the AEG (Amplitude Envelope Generator) settings. _The default setting for the “Sustain Pedal” parameter is “FC (Half On).” When using the FC4 or FC5, make sure to change this setting, depending on the particular footswitch you are using. _You can also control the half damper function by using Control Change messages from an external device. In this case, you do not need to set the Sustain Pedal Select parameter.
When the Half Damper function is set to OFF:
When you release the key while holding the Footswitch, the sound will stay at the “Decay 2 Level”, as shown below. For Voices having a “Decay 2 Level” of 0, the sound eventually decays naturally to silence. If however, the Voice has a “DECAY 2 Level” other than 0, the sound will remain at that 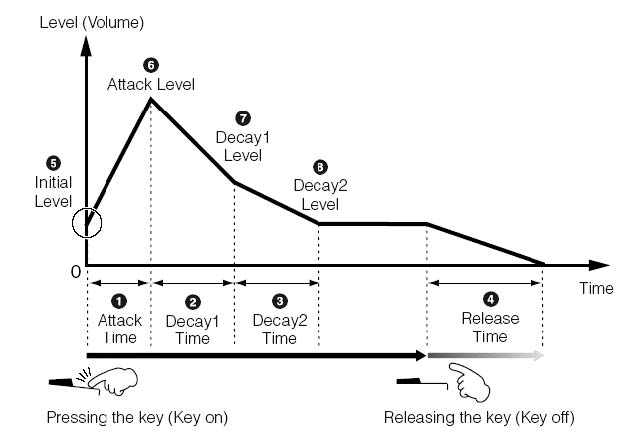 volume until key off. The “Decay 2 Level” basically determines whether a sound is percussive or self-oscillating. What this means in acoustic instrument terms is, percussive sounds will eventually stop sounding because the vibration which is set in motion by a hammer, strike or pluck eventually stops due to air friction or other forces like gravity. A self-oscillating instrument is one where the sound can continue as long as the musician applies “pressure” to that instrument When releasing the Footswitch, the operation is same as key off; the sound will start to decay, and finally decay to silence according to the Release Time. Level (Release Level) in the Motif XS envelope is assumed to always be 0.
When the Half Damper function is set to ON (FC3 only)
When you release a key while pressing the Footswitch fully down, the sound will decay to the Sustain Level (Decay 2 Level), according to the Sustain Time (Decay 2 Time) value.
In this case, you can control the decay time between the Sustain Time and Release Time by how far down you press the pedal. However, when you release the pedal after releasing the keys (key off event), the sound will decay according to the Release Time, as if the Half Damper function was set to off.
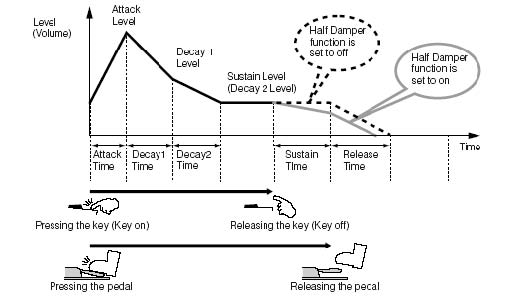
When releasing the key before the sound reaches the Sustain Level
When pressing the sustain pedal fully down, the sound will decay after reaching the Sustain Level (after the Decay 2 Time). When the Footswitch is not pressed fully down, the sound will decay immediately.
Damper Resonance – Insertion Effect
This is an Insertion Effect algorithm that reproduces the rich harmonics and unique sound characteristics of an actual grand piano when using the damper pedal.
This effect algorithm intended for use with acoustic piano samples, can be applied to any sound (with varying results). However, when used on the acoustic piano Voices you can add a very realistic sound-board simulation effect which is related to your use of the sustain pedal.
Experiment: You can isolate the soundboard effect by making the DRY/WET value “D/W63”, completely wet, then step on the sustain pedal while playing to bring in the soundboard. (In the screen shot above taken from the “Full Concert Grand: 001 (A01) Voice, the Dry/Wet parameter is currently Dry 33/ Wet.)
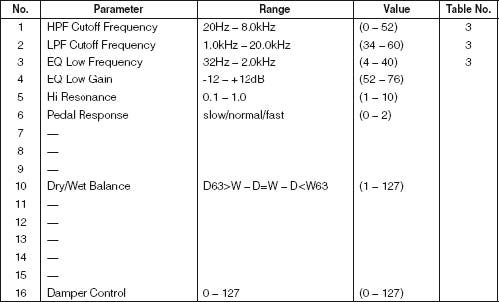
By setting “D/W63” – This is like hearing just the soundboard resonance. You can hear how it is “biased” to the sustain pedal (Damper Control) – in other words, there will be no sound at all until the pedal is activated. Setting “Damper Control” to anything more than 0 makes the soundboard resonance less biased to the pedal’s position. Using the FC3 to control this Damper Resonance you can control the amount continuously. The “Pedal Response” (PedalRsp) is the time it takes the soundboard’s ‘aura’ to rise to full volume in response to the pedal going down.
Once again subtlety is important for realism. Soundboard resonance is best felt rather than heard. And while it is a kind of reverberation that takes place inside the piano verses the kind that happens outside in the room environment.
KEY OFF SAMPLE Explained
The Key Off sample is responsible in the “Full Concert Grand” (Element 8), for the sound of the dampers (felts) falling back on the string at release (of the key or the sustain pedal). This works via the Xpanded Articulation Control (XA Control) – the element only sounds when a key is released (as if the key is being held by the sustain pedal, when the sustain pedal is finally released). The volume of the Key Off sample is determined, quite naturally, by the overall level to which the Voice has decayed. Again, you can experiment with the output level of this Element. Turn AS2 KNOB (knob 8) clockwise from twelve o’clock to increase the output level of Element 8. (Alternatively you can raise CS8, remembering to ‘hook’ the red arrow to activate control). As you release keys and/or release the sustain pedal, you will hear a “thud” and a change to how the piano sound ends – the felt dampers falling back onto the keys deadening their vibration. Again, subtlety is the key. It is best felt and not heard. It is really uncanny how this small thing can make the sound of the piano feel right. It makes playing any other piano sample not as much fun. Combine this with the soundboard resonance and we can hear how the technology nears closer to reality. This is “state-of-the-art”. “State-of-the-art” is a great phrase because it does not presuppose that this is the best it will ever be. It simply says: this is where we are with the technology now! Enjoy…


