Quantize: Before or After
QUANTIZE: BEFORE or AFTER
Quantize is the function that lets you change the positioning of notes against the time. In the Motif XF sequencer this can be done as you RECORD, or can be applied to your data after-the-fact. This is your choice. Quantize is one of those “tools” you find in modern sequencers that many feel funny about using. It is the ‘ultimate cheat’ because it moves your notes from where you actually played them to some other pre-determined position so that the timing is corrected. It is particularly useful for drum programming because it is difficult enough to play musical sounds in time, no less program drum grooves from an interface like a keyboard. When you press the RECORD button, the SETUP screen offers you an opportunity to set a Quantize value. This will be the smallest musical timing interval that the sequencer will record. For example, if you set the Quantize value to a sixteenth note (120 clock ticks), then all notes played will be placed on the nearest sixteenth note. This can only help you if you are consistently late or consistently early. If you miss the beat entirely and have absolutely no sense of rhythm, QUANTIZE can actually make things worse. It can be used to tighten up loose timing but it cannot fix things if they are too far off. Don’t blame the sequencer – it’s YOU!!!
The Quantize function is found on the RECORD SETUP screen, it is also found as a non-destructive PLAY FX and it is found as a sequencer NOTE Job.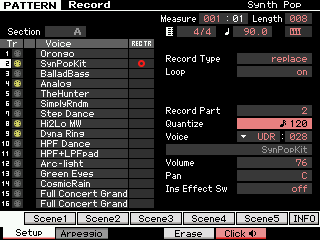
RECORD QUANTIZE: On the SONG/PATTERN Record SETUP screen you can opt to set the Quantize parameter – the setting here will mean that the selected value is the smallest possible timing subdivision you can document. In other words, your notes will always be moved to the nearest value as set. In the PATTERN RECORD screenshot Quantize is set to a sixteenth note (120 clock ticks), this value is usually good enough for tightening up recording when working on drums, but can be used at any time for any type of recording. It is a personal decision – once you quantize via this method it cannot be undone. You would have to record it again. The Motif XF allows you to quantize after the fact, if you would rather record without any timing correction.
PLAY FX QUANTIZE: From the main SONG/PATTERN screen you can press [F2] PLAY FX and reach a set of tools that allows you to “try out” various quantize and swing quantize functions before you commit to them. 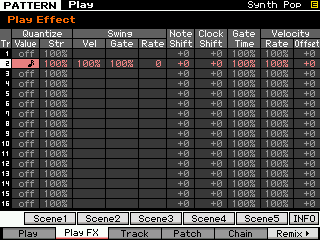 These non-destructive functions let you change quantize, the percentage quantize, even create a swing feel or triplet feel from what you played. You get to hear immediately how you are adjusting the data – there is a NORMALIZE Job that will allow you to make your settings permanent by rewriting the data in the track. PLAY FX are a great way to experiment with the positioning of the notes and more. Swing functions include Velocity and Gate (duration) parameters which can radically change the feel of what was played.
QUANTIZE JOB:
• Press [JOB]
• Press [F2] NOTE
• Select Job number 01: Quantize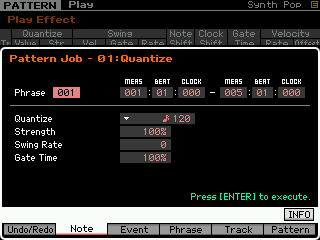
Quantize can be strict or loose because it is programmable. If, for example, you are a little off at a particular point in the song you can use the quantize job to move your notes to nearest musical value of your choosing. The resolution of the XF sequencer is 480 pulses per quarter note. This means it divides each quarter note into 480 equal parts. That is, 1920 clock ticks per 4/4 measure. These clock ticks are often referred to as: pulses per quarter note or ppqn.
480ppqn = 1/4 note, 4 quarter notes per measure in 4/4
240ppqn = 1/8 note, 8 eighth notes per measure in 4/4
120ppqn = 1/16 note, 16 sixteenth notes per measure in 4/4
60 ppqn = 1/32 note, 32 thirty-second notes per measure in 4/4
320ppqn = 1/4 note triplet, 6 quarter note triplets per measure in 4/4
160ppqn = 1/8 note triplet, 12 eighth note triplets per measure in 4/4
80 ppqn = 1/16 note triplet, 24 sixteenth note triplets per measure in 4/4
Picture in you mind’s eye that quantize is as follows: the resolution of the sequencer is 1920 pulses per 4/4 measure. Each of these “Clock ticks” is a pin sticking up; 1,920 of them… and your notes are like ping-pong balls, that when dropped, must land on one of these pins.
There are major pins (1 foot long) every 480 (those are your quarter notes. There are pins (half as long) every 240 pins (those are your eighth notes). There are pins half again as long every 120 pins… and so on.
Although quantizing during record can be used to tighten-up your timing, you have the options of recording your data without quantize and applying it, where necessary, after the fact. This is accomplished with the Quantize NOTE Job. When you apply quantize after the fact, you have more options about how this timing correction is applied… including allowing you to artfully change the feel of the music. We should mention that, of course, you can individually Event Edit each event manually, changing its position, velocity and duration as necessary, by simply hitting [EDIT] from the SONG or PATTERN main screen.
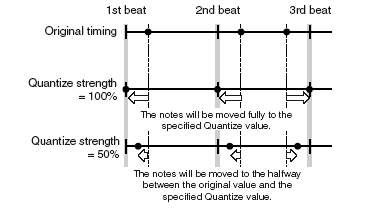
Let’s say you are trying to land on an “1/8 note” pin and you are late by 12 clock ticks, er, a pins. Quantize (at 100% Strength) will move your ping-pong ball (note) to the nearest pin that represents the value you select. If you set the “Strength” to 50% what this means is that it will move your note half the distance to the strict value. In my example you missed the 8th note pin by 12 ticks late, meaning you might have landed on clock tick 252 when attempting to land on clock tick 240. A quantize to the nearest 8th note (240) with a 50% Strength will move you 6 ticks toward a value divisible by 240; to 246… which is half way between 240 and 252.
 When using the QUANTIZE job you can select a measure, beat and clock tick range over which to impose it. You can select a quantize value, a Strength %, a Swing Rate (which offsets the upbeat value up to 50% of the quantize value) , Gate Time (changes the duration of notes, careful here – this will mess with your feel). Once you execute a quantize, listen closely to what it has done. You can UNDO it, as well. The last JOB executed on a track can be undone.
• Press [JOB]
• Press [F1] UNDO/REDO
• Press [ENTER] to execute
For more on the subject of SWING and PLAY FX QUANTIZE please see the following article:
“Swing Quanitze and the Play FX”

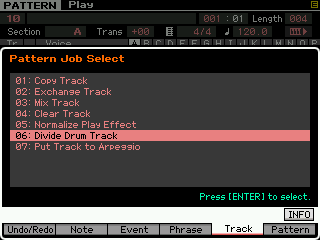 Divide Drum Track” – which is found by pressing [JOB] > [F5] TRACK from the main PATTERN screen is a sequencer JOB that basically allows you to use the first 8 tracks of the sequencer to initially construct your drum track. Then once you have worked out the drums you can reassemble them on to one track. So this assumes you are starting your composing from the drums, or that you are working in SONG mode and are using the PATTERN mode as a construction area to create your drum track, which you will export to the SONG mode. You will be using the sequencer’s first 8 tracks as a work area and when you have completed your work you can clean up and free those tracks for music data.
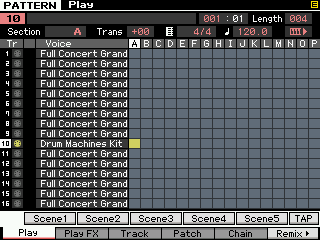 If you recorded your drum groove on Track 10, the Divide Drum Track JOB will analyze what you have played and EXTRACT the different components and split as before – but leave you with the original Phrase completely in tact on Track 10 – this can be useful when experimenting (you can keep the original, muted, while you work out ideas. Here’s how that will work.