One Sequencer Many Related Jobs
ONE SEQUENCER MANY (related) JOBS
There is no one method when constructing your drum tracks. You might choose to record in SONG mode using a basic drum groove as a working tool, and later “paint” the track with arpeggio data. Or you may use the PATTERN mode to refine your drum track… placing fill-ins where necessary. Learning about moving data between PATTERN mode and SONG mode and vice versa can be very useful in creating and placing data where you need it. Each of these (SONG mode and PATTERN mode) is part of the same sequencer. Certain functions are best carried out in one or the other. As we will begin to see in this section of the article, moving data back and forth will open opportunities for you and is easily accomplished. First we will describe moving data from a PATTERN to an associated SONG. You can move all tracks together with some functions or you can move individual track data with others. Then we will describe moving from SONG to an associated PATTERN. Again you have some functions for moving all tracks together and others that will allow you to select individual data and move it.
Not only can you “CHAIN” an entire PATTERN Section play order arrangement and move it to a linear SONG, but you have the ability to put individual Phrase data directly from PATTERN mode to SONG using the PATTERN Mode JOB: PUT PHRASE TO SONG. And conversely, you can use the GET PHRASE FROM SONG Job to grab specific data from a SONG and bring it into your PATTERN workspace.
If you are working initially in SONG mode, you can use the JOB: SPLIT SONG TO PATTERN to move entire measure regions (all tracks) of a SONG to a specific PATTERN Section. And conversely, you can use the COPY PHRASE Job to grab a specific individual Phrase data from a PATTERN and bring it into your SONG workspace.
Moving data PATTERN mode > SONG mode
PATTERN CHAIN: Pattern Chain allows you to string several different Sections together to make a one complete composition. It is like automating the playback order of the musical sections. It lets you try out different arrangements: AABACABAD. For example, create a Section [A] for the intro, a Section [B] for the verse, a Section [C] for the chorus, and a Section [D] for the ending — and you have the basic blocks to build an original composition. You are provided with up to 16 different Sections [A] through [P] simply for flexibility. You may want to make a COPY of a section and then make subtle changes to it so that it is not exactly the same. The created Pattern Chain data can be converted to MIDI sequence data and stored to a Song. To call up the Pattern Chain display, press the [F5] Chain button from the Pattern Play mode. A Pattern Chain can be created for each Pattern, letting you call up a different, dedicated Pattern Chain each time you select a Pattern.
The following events can be recorded to the Pattern Chain.
• Playback order of Sections
• Pattern track on/off—Track Mute status
• Tempo change
• Time signature change—Real time control of measure length (stutter effects possible)
There are two methods to create a Pattern Chain: Recording playback of a Pattern in the Pattern Record display in real time, and programming the playback order of Sections one by one in the Pattern Chain Edit display. The Pattern Chain data recorded in real time can be edited in the Pattern Chain Edit display. It is from the Pattern Chain Edit display that you can convert the Chain to a linear SONG. [SF3] SONG. (See the section of the Reference Manuall starting on page 171 for details about Pattern Chain function).
PUT PHRASE TO SONG: While Pattern Chain is excellent for moving all tracks from Pattern mode to a Song, the PHRASE JOB called “Put Phrase to Song”, allows you to move just a single Pattern recording (Phrase) to any location within a Song. This is useful if you have worked out a short drum fill-in or transition and want to “paste” it into your Song. Perhaps you used “Real Time Loop Remix” to create a unique transition phrase and you want to place it on the drum track in your SONG. From PATTERN mode:
• Press [JOB]
• Press [F4] PHRASE
• Select Job 07: Put Phrase to Song
• Press [ENTER]
Of course you can select the Pattern Phrase, you can target the SONG, the Track, select the Measure region, and you can Copy any samples assigned to the track.
Tip: One thing you will really like about setting up to work with SONG and PATTERN mode together is that much of the dialog box information will be setup for you. For example, say you are writing a composition in SONG 01 and working out parts of it in PATTERN 01. As you move back and forth the context sensitive operating system will recognize that you are moving between these two entities. Even if you are working on PATTERN 12 and SONG 03, the association will be made between the two you have selected. So, for example, once you establish a link between the SONG and the PATTERN, the Jobs that move data back and forth will use those locations. You establish this link by simply going to SONG mode and selecting a SONG number, move back to PATTERN mode – the link is automatically established (as it “remembers’ what you selected last). If you last selected PHRASE number 039, it will populate the dialog box with “Phrase 039” when you select this JOB. If you last selected SONG 22 it will populate the dialog box with “Song 22”.
GET PHRASE FROM SONG: The PHRASE JOB called “Get Phrase from Song”, allows you to import a region of measures from any location within a Song and create a Pattern phrase. This is useful if you have data you recorded in SONG mode and you want to bring it into the Pattern. In Pattern mode you can Remix it or apply any of the Pattern functions to that data. Or you might grab data from some MIDI file. Perhaps you want to use Real Time Loop Remix to create a really unique transition phrase and then you want to place it back on the drum track in your SONG. From PATTERN mode:
• Press [JOB]
• Press [F4] PHRASE
• Select Job 06: Get Phrase from Song
• Press [ENTER]
You can specify the SONG, the Track, select the Measure region, you can Copy any samples assigned to the track and of course you can select the Pattern Phrase.
Tip: Important to know about the Measure region setting: you will notice that the default region is 001-002. What you need to know here is that this is the minimum setting. In other words, 001-002 is 1 measure. It is from the top of measure 001 to the top of measure 002 (but does not include the information in measure 002). If you want to include the information in measure 002, set the region to 001-003. If you want to move a four-measure phrase using this JOB, you would set the measure region: 001-005.
Moving Data SONG mode > PATTERN mode
SPLIT SONG TO PATTERN: There may come a need for you to take an entire region of a linear SONG and move it (all tracks) to a PATTERN Section. If your original idea came about while in a linear SONG, and you want to take region of it and work on it (perfect it) in Pattern mode, this SONG JOB is invaluable.
• Press [JOB]
• Press [F6] SONG
• Select JOB 02: Split Song to Pattern
• Press [ENTER]
Again you will be able to set the measure region – for example, if you wanted to take the first 16 measures of your linear Song and make it a Pattern Section, you would set the measure region 001-017 (this would include all 16 measures). It will target the associated (last selected) Pattern and Section. And if an audio sample is involved the sample data will be copied to the PATTERN.
COPY PHRASE: To complete the ring of Jobs that move data to/from Song and Pattern mode, the SONG Job called COPY PHRASE allows you when you are in SONG mode to grab an individual Phrase from a PATTERN and place it where you need it in your current linear structure.
• Press [JOB]
• Press [F5] TRACK
• Select JOB 08: Copy Phrase
• Press [ENTER]
The ‘associated’ Pattern will be automatically entered, as will the last selected Phrase from Pattern mode. You have an option to select to copy any sample if the phrase includes a sample, and you can target any track and any measure of your current SONG. The targeted measure will be overwritten.
Routing Drums to individual Outputs
If a drum is not being assigned to go through one of the two INSERTION EFFECTS designated for the Kit, it can be routed to an assignable output. The assignable outputs include both the analog “asL” and “asR” but all the digital (FW) outputs “FW1” through “FW14”, plus “L&R”. Please see the ADVANCED APPLICATION: FW AUDIO SETUP tutorial for a detailed example of the routing possibilities, including the background that goes into the decision making process.

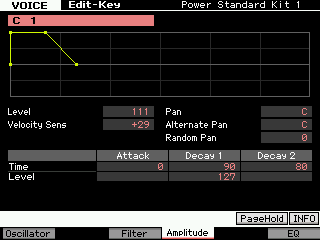
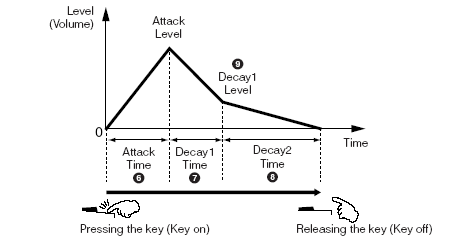 A Drum AEG is different from a Normal Voice’s AEG. The ATTACK TIME is how fast the level rises to full volume (Attack Level). DECAY1TIME is how fast it drops in volume to DECAY2LEVEL (which is fixed at 0). DECAY2TIME is how fast the signal dies away to zero. All percussion sounds eventually die out.
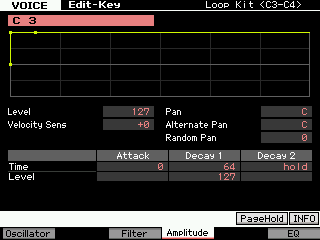
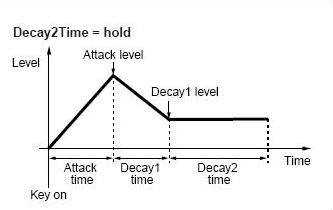 At left you see the AEG set where Decay2Time = 127. The envelope will continue indefinitely or what is considered HOLD. When you have a long audio clip this is the only setting that will allow it to play completely.