What is a Drum Voice?
WHAT IS A DRUM VOICE and HOW IS IT DIFFERENT FROM A NORMAL VOICE? A Motif XF Drum Voice is an extra special Voice. If you are new to Yamaha Music Production synthesizers, you may have never encountered a Voice architecture like this before. Just as there are “normal” musicians and then there are Drummers, the Drum Voice is a very special case. Typically, a Normal Voice will consist of just a single instrument, like a Piano, or a Flute, although sometimes you might find a combination VOICE like “Piano & Strings” or a String Ensemble or Horn Section. The Drum Kit Voice is actually a combination of up to 73 individual instruments. Each KEY in a Drum Kit Voice is an independent instrument. Even though you may initially think of the Drum Kit as the instrument a drummer plays, and you most likely have never run into a drummer with a 73-piece kit! But that is just what you have here in the Motif XF. Each key has a different drum instrument with its own set of parameters you can manipulate.
A drum kit, in music history, is a 20th century invention first used in Jazz… called a “Trap Kit”. But prior to the jazz trap kit, drums were very much played individually (and still are played individually in many instances). Think of a marching band. You have several people carrying single Bass drums, and even more carrying just a single snare. And some others who carry just a triangle… they are indeed individual instruments. And on Yamaha synthesizers the Drum Kit Voices is made up of 73 instruments or Elements. An Element is a multi-sample. In drums, the multiple samples are stacked vertically on a single key for velocity triggering – where in a so-called ‘normal’ Voice they could be laid out both across the keyboard (horizontally) and vertically.
The way Yamaha constructs the Drum Kit Voice is so that you can place any drum and or percussion instrument sample into a Voice – typically each sample is on a separate KEY, C0 – C6. Each KEY can have its own group of vertically stacked samples – when we say ‘vertical’ this is describing a velocity swap. (A velocity swap will mean that as you increase the speed at which a key is struck you will switch between samples. For example, call up the Power Standard Kit 1 play the snare drum mapped to E1. As you increase the velocity you will hear it switch between five different snare drum samples; the closed high hat on F#1 will switch between four different samples). Each KEY has its own Volume, pan position, filter, envelope, EQ, routing to the Effects, routing to the audio output, Pitch Control, etc., etc.
A Drum Kit is like 73 VOICES combined in one – each instrument occupies one key. This allows you a great deal of flexibility when creating your music. Each KEY can be selected and edited individually. You can even assign your own favorite drums into your own USER KIT. This is useful when the snare you like is in one kit and the kick you like is in another. Individual drum KEYS (instruments) can be routed to assignable outputs – combine this with the Firewire option and this can be a very important component in your professional recording activities. This means that even though a drum is a member of a kit (occupying/sharing a single track of your sequence), an individual sound within that kit can be routed to its own individual output. This makes the Drum Voice extremely powerful, extremely flexible and opens the door to unprecedented control in your music production.
Drum Key edits and assignments are accomplished in VOICE mode by pressing [EDIT] then pressing the Track Select [1] button to see EDIT – KEY parameters. Now when you touch a key on the keyboard, its information will come to the screen.
There are four tabs available: [F1] Oscillator, [F3] Filter, [F4] Amplitude and [F6] EQ.
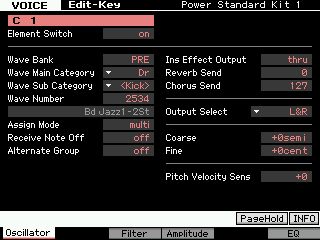 [F1] OSCILLATOR – On this screen you see the currently selected KEY, an Element ON/OFF Switch, the WAVE selection parameters (Bank, Category, Number), the Assign Mode (single/multi), Receive Note Off, Alternate Group, the Effect routing, the Output assignment, the tuning (Coarse and Fine), and the drum’s pitch sensitivity to velocity.
Turning the “Element Switch” parameter to OFF will deactivate a drum KEY entirely. Of interest is the Alternate Group parameter… Any samples placed in the same Alternate Group will replace the playback of any other in the same group. This is how the Closed High Hat, Pedal High Hat and the Open High Hat replace each other. And is how the Mute Triangle stops the Open Triangle. The RECEIVE NOTE OFF parameter is an important one to understand about drum sounds. You will notice that for most every drum sound this is set to OFF. This is what separates drum and percussion sounds from “normal” musical sounds. In a normal musical sound you hold the key down until you want the sound to stop and when you let go KEY-OFF is sent and the sound moves immediately to the RELEASE parameter of the Envelope. Well with drum sounds you do not HOLD the key down. You want the entire drum to sound without having to keep your finger on the key.
In order to get a full understanding of this parameter, press note A2 (the “A” just below middle “C”) do the following: This will be a CRASH cymbal; set the RECEIVE NOTE OFF parameter ON. It now will behave like a regular keyboard sound… meaning as soon as you release the key the sound will stop. This can be useful in creating a “choke” cymbal.
The Effect routing is per drum. A drum can be routed to the System Effects (reverb and chorus processors) or it can be routed to one of two Insertion Effects selected for the kit. When a drum is routed via the INSERTION EFFECT OUTPUT it is removed from the System Effects. When a drum is routed to an Insertion Effect it will arrive at the main drum kit output but it will have the insertion effect present. Any two Insertion Effects can be assigned to a Drum Kit Voice (found in [COMMON EDIT] > [F6] EFFECT). They are treated in parallel or routed from A-to-B or B-to-A. “Parallel” means each is separate and a drum can go through one or the other. The A-to-B and B-to-A routings are what is called “in series” (one after the other).
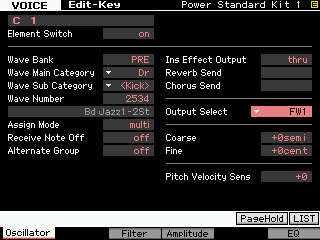 When routing individual drums to an individual FW output for audio recording purposes in a DAW software, you would use the OUTPUT SELECT parameter (shown highlighted at left). In order to use the individual (assignable) outputs the KEY should not be routed to an insert effect. And it will ignore any System Effect Send amount. By sending the KEY to an assignable output you are removing it completely from internal processing and are going to process it externally. Say you want to process the kick drum in Cubase on a separate output. On this screen you can send just the kick drum through an assignable output (say FW1)… then in Cubase you can process the kick drum discreetly (externally) and record it to a track in Cubase.
This is extremely powerful. Even though your kick drum is contained in a kit and that kit is in a MIXING setup, you can still individually route a drum to an assignable output, with its sound completely discreet. This is accomplished by editing your drum Voice, then placing the USER KIT in your MIX and setting the entire drum kit PART to OUTPUT SELECT = “drum”. This means that all the routing you do in a 73 Element drum kit will be respected when that kit is used in a sequence. This is extremely powerful. (See the Advance Application tutorial on FW AUDIO SETUP)
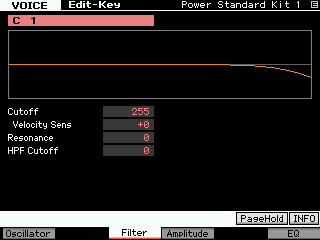 [F3] FILTER – Each Drum has it own filter. Basically a Low Pass Filter with programmable Cutoff, Resonance, Velocity sensitivity percentage and High Pass Cutoff parameter. Why a filter is important on synthesizers is to alter the fundamental tone (harmonic content) of a sound. In general, the more energy you put into playing (attacking) any acoustic instrument the richer it becomes in harmonics (see the article on EQUALIZATION in the Behind the Manual area for a discussion of harmonics). A Low Pass Filter, literally, allows the low frequencies to pass as long as they are below a particular “cutoff” point – this cutoff frequency is where the filter starts to attenuate (lessen) the loudness of certain harmonics. If you apply velocity sensitivity to a LPF, this means the harder you strike the key the more harmonics that will be allowed to pass… The faster a key goes down the higher the cutoff frequency moves – thus allowing a brighter, richer harmonic sound. This very much mimics what happens in the acoustic world. The harder you play the richer the tone. This is again, programmable per drum in a drum kit.
The High Pass Filter Cutoff frequency parameter allows high frequencies to pass and therefore attenuates lows. This is useful when you wish to remove low tones from a drum sound. As you increase this parameter you will reduce low frequencies in the sound assigned to this key.
 [F4] AMPLITUDE – Each Drum has its own amplitude envelope. Here you can also find PAN, ALTERNATE and RANDOM PAN options. Amplitude is how loud a sound gets and more specifically in the case of an envelope – how the loudness changes over time. All percussive instruments are hammered or struck in some fashion. This causes what is referred to a “transient peak”. Simply put, a loud spike at the time of the attack, the sound then decays slightly and the body of the sound continues before it disappears completely. Think of a bass drum being struck by a mallet… now think of the whole process in extreme slow motion. There is the click of the mallet as it initially contacts the drumhead. There is a rapid spike in loudness, this is shortly followed by the booming response of the drum as the head starts to vibrate and is enhanced by the shell (shape) of the drum. CLICK > BOOM. The click is a peak, the boom is somewhat softer and somewhat later in time… and finally the sound disappears. That is what the ATTACK, DECAY1 and DECAY2 parameters are all about. LEVEL is how loud, while TIME is how long it takes.
[F6] EQ – Each Drum has its own Equalizer. This device can be configured as a 2-band, single band Parametric or act as a straight level boost (+6dB, +12dB or +18dB). Being able to equalize (balance the tone and loudness) of each individual drum is extremely useful in getting the exact sound you want from your drums. Use this equalizer when you want your KICK drum to boom or you want more snap from your snare. In other products you only have an overall equalizer (if you get that)… in the Motif XF you have individual equalizers for each Element… repeat – you have individual equalizer for each Element.
You may wonder why a 2-band and a 1-Band parametric EQ (instead of a three band, four band or a graphic EQ)… The reason is it is assigned to a single drum sound. In any percussion sound there is the cause (the CLICK) and the response (the Boom)… two bands is more than sufficient for a single drum sound. A single band parametric (parametric means you can zero in on a specific frequency, boost or cut and control how wide an umbrella above and below is affected) is perfect for Element equalizing when you need to fix a specific tonal region.