Motif XF: Learning about the Sample SLICE and SLICE+SEQ Sample functions
LEARNING ABOUT THE SAMPLE ‘SLICE’ AND ‘SLICE+SEQ’ SAMPLE FUNCTIONS
Sample Slice:
Slice is a function that is designed to make audio loops (up to 8 measures) work at different tempos without adverse pitch change (munchkin-ization). It accomplishes this by analyzing the audio and breaking it into smaller segments (slices). Each slice is mapped to the MIDI keyboard on successively higher notes of a single Waveform assigned to a Pattern Sample Voice or Song Sample Voice. A chromatic scale of MIDI data is created (in a Phrase in Pattern mode/to a linear track in Song mode) accurately placing the trigger notes so that when the scale is played back it re-assembles the audio slices. This is analogous to how individual drawings can be made to animate the movement of cartoon characters by flipping them slower or faster in front of a camera. The Motif can create up to 128 slices maximum – the number of notes on a MIDI channel. The Slice function creates a MIDI phrase to trigger the audio slices. A Phrase is a Pattern mode structure. In Song mode the data is written to a linear track.
IMPORTANT NOTE:
The first section of this guide concentrates on PATTERN mode, however, you can also work in a linear SONG with a few alterations. The Motif XF uses context sensitive functions. Certain options only appear in the appropriate context. It matters what mode you are in when you sample or import your data. If you are using SONG mode, the Phrase data will be written once to a linear track, the Voice assigned will be inserted in the Track data (the XF will place a Bank Select and Program Change event at the top of the track to ensure that the phrase data recalls the appropriate Sample Voice). You can then use the “TR LOOP” function to make the pattern cycle. TRACK LOOP lets you cycle any region of data. Perfect for making a sliced audio loop work in a Song. Make sure you sample or import your data while you are in the Mode you intend to use.
Zipped download – Download this article (in PDF format) and the included tutorial example .wav: “SLICE_XF.zip”
SAMPLE SLICE: Import a wave into a PATTERN
In this example we will import a two measure drum sample (.wav) from a USB drive. You can directly import the sample from your computer via Ethernet, if you have established a network connection.
Context: Select a blank PATTERN, select SECTION [A], select Track 1
• Press [FILE]
• Set TYPE = “WAV” for our example data
In the Directory area highlight the file you would like to import (shown below).
When you highlight a useable file, a speaker icon will appear above [SF6] allowing you to quickly audition the data directly from your drive. (Note: provided the data is a stereo, 16-bit/44.1kHz audio file, .wav or aiff).
• Press the RIGHT CURSOR to move the bottom area of the screen. You can set a target PART (1), Key (note) “C3” and LOAD > “USR”
• Press [SF2] LOAD > [INC/YES]
This will create a new SAMPLE VOICE in the current PATTERN MIXING program. This USER SAMPLE VOICE (SP001) will be created in PART 1 and will be ‘local’ to this particular PATTERN MIXING setup. The sample will be able to be triggered by MIDI data that is recorded to Track 1.
Currently, no MIDI data exists to play it back because all we have done, thus far, is import the sample to memory.
• Press the PATTERN button to return to the main Pattern screen.
Note that the track has a grey icon of a waveform next to it. This denotes that currently a Pattern Sample Voice is assigned to that location in the MIXER but no MIDI data has been recorded to cause it to playback. Play the key to which you imported the sample, “C3”, in our example, to hear the sample. When we SLICE the sample, the Motif XF will automatically create a MIDI phrase to trigger and thus reassemble the audio. Sliced audio can be tempo adjusted without pitch stretching penalties.
Next you need to edit the sample – This type of audio SLICE function will work on LOOPS and audio clips of up to 8 measures in length. In order to do this:
• Press the [INTEGRATED SAMPLING] button.
Here you arrive at the SAMPLE SELECT screen. Each sample is given a number 001 through 128 according to the order in which you record or import the samples. Samples do not overwrite each other – they are always placed in the lowest numbered empty locations.
• Press the [EDIT] button. This will place you in SAMPLE EDIT.
(In the screenshot the Waveform number is 001).
[F1] TRIM: Here you see the wave was imported to Waveform 001, Track 01. In the example it is named [Justdr_2.wav].
Holding down the [SF1] AUDITION button will let you hear the sample. Press and hold the KEY “C3” will also allow you to audition the sound.
You can edit the Start Point, the Loop Point and the End Point. You can see that the END POINT parameter is connected in the screen to the TEMPO/METER/MEASURE parameters – this is a tempo calculator… (more about this feature later).
[SF2]: LP=ST is a quick way to set the Start point equal to the Loop point in one action.
[SF3]: DISPLAY – press this on long samples to ZOOM to a resolution that shows the region between the Start and End Point.
[SF4] “ZOOM OUT” / [SF5] “ZOOM IN” not only affect the view in the screen but will help you fine tune setting of critical points within the sample wave.
[SF6] NUM/INFO button (context sensitive) will either show NUM (number) when you can manually enter a value, or it will read INFO when you select a parameter where value entry is not available. This is where Information about the Sample Memory will be shown.
PLAY MODE: You can turn the “loop” on or “reverse” the wave or set it to play as a “one shot”. When LOOP is ON, the sample will play through from START to END and then return to the LOOP POINT value and repeat from there. You can effectively tune the pitch of the sample by offsetting COARSE TUNE/FINE TUNE. You can also PAN the sample to a specific location in the stereo field.
KEY RANGE/VELOCITY RANGE: You can set the key range (the number of keys responsible for triggering this sample and its velocity range. When you have imported several samples to the same KeyBank this is where you set the ranges for them. You can import several samples to the same key as long as each had a unique Velocity range. A maximum of two samples can occupy the same ranges simultaneously – this is to accommodate stereo. This means you can stack multiple stereo samples in a KeyBank as long as each had its own velocity or unique note.
“Press [ENTER] to extract” – Setting the START and END POINTS are non-destructive edits until you press [ENTER]. They determine where a Note-on event will start playback and where that playback will either end or start looping. You can use these Start and End Points as ‘markers’. This is very useful when you want to copy a portion of a longer clip into shorter more manageable entities. With the Motif XF Tempo/Meter/Measure calculator, it is possible to accurately isolate a specific measure or beat and then copy that region to a new Waveform or KeyBank, while keeping the entire original data intact. However, when you press [ENTER] to extract data, the excess data is permanently discarded. So this “press [ENTER] to execute” function should be used with caution. Once you have discard data it is gone for good.
When you are sampling your own audio, you may find that the START POINT consistently is set to a value of 00004410. This is not an arbitrary value. The Motif XF sampler has a 100ms pre-record buffer. This is figured when you are sampling at 44,100 samples per second. When you are manually punching in the record/sample function, the exact moment you hit the button is assigned a value of 00004410… A sampler is always “sampling” (and discarding) data, your punch-in tells the Motif XF to start “keeping” the data, starting from 100ms before you hit the button. That’s right! What is kept is typically all we care about. This pre-record function allows you to be “human” which tends to make us just a little slow in response time. This pre-record is also useful when you are using the trigger level method to punch-in the record/sample function. Say the word you are singing is “petunia” – well, that starts with a plosive that will probably be recorded properly. But what if the word was “friends”? The ‘eff’ sound comes up out of silence and does not make a clean start triggering the record function. You might wind up with “__ends” instead of “friends”. This is when the 100ms pre-record is your friend.
When you set the START and END POINTS, the extract function will move the Start Point to 00000000 and make the appropriate adjustment to the END POINT.
Our particular example here has been extracted to contain exactly “00217344” samples
Let’s prepare to SLICE the loop. Slicing will allow you to playback the loop at various tempos without affecting the pitch of the audio. It does this by breaking the contiguous audio into smaller segments (slices) each to be assigned to a successively higher MIDI note. It then creates a chromatic scale of MIDI data with proper timing, accurate to 480 pulses per quarter note, to trigger the audio playback seamlessly. The different Slice Type algorithms will actually add additional audio to the slices to hide the fact that they are sliced when the tempo slows down.
• Press [F4] SLICE
This shortcut takes you directly to Sample SLICE JOB.
(Alternatively, you would have to go to [JOB] > [F1] KEYBANK > Job #11 > [ENTER])
In the screen above you see the SLICE setup page. This is basically a “trial and error” type operation. You will experiment until you hone in on the correct settings. The Motif XF will let you audition your results before you commit to creating a new waveform.
In the right column you can set the LOWEST KEY parameter. This refers to the note from which the chromatic MIDI scale will be created.
The Motif XF can create up to a maximum of 128 slices because there are 128 MIDI notes on a channel. It will start at the “lowest key” and go up to G8. If more keys are needed it will wrap around and start at C-2 and come up to the note just below the starting point.
You can select the Slice TYPE: either ‘BEAT’ for drum/staccato type stuff or ‘PHRASE’ for sustaining stuff. Try the lowest numbered Beat or Phrase algorithms first. Advance to higher numbers only after trying all the Sensitivity settings for the type. The ‘QUICK’ type is also available but it does no audio analysis for accurate timing. With the ‘Quick’ setting Slices are made by musical division only – meaning it divides the audio into mathematically equal parts rather than analyzing where the audio actually occurred. ‘Beat’ and ‘Phrase’ types will analyze and create slices where the audio occurs to the nearest 480ppqn . ‘Beat 3’ Type and ‘Phrase’ Types 1-4 all use some form of musical timing resolution to “subdivide” the slices and help in the analysis. You can use this to get different “feels” from the data.
Experimentation is the name of the game – once you learn the basics. Until you know what it is capable of, it is difficult to know how to experiment. But you will find that certain “sub-divisions” settings can radically change the overall feel of the audio when you time stretch it by changing the tempo.
It is imperative that you set the Measure and the Meter on this setup page accurately so that the Motif XF can slice the segments properly, musically, or not. The point is, the number of measures and the time signature are data the unit uses to figure out musical timing. Set the SENS (or Sensitivity) to “3”. This way you have room to move up or down if you get too many slices or too few slices.
• Set TYPE = BEAT 1
• Set MEASURE = 2
• Set METER = 4/4
• Set SENS = 3
• Press [SF4] APPLY to execute the SLICE.
This will take some time to execute (10-15 seconds). The function will analyze the data, divide it, map it to notes chromatically from C3 and create a MIDI sequence of notes to precisely trigger the playback of the audio.
When it is finished you can AUDITION the results in two ways before deciding to keep it or dump the results and try again. First, press and hold the [SF1] AUDITION button and listen to the results. Move the cursor over to TEMPO and set the tempo to the BPM you intend on using for the pattern.

• Press and hold the [SF1] AUDITION button and listen again. Check the results.
The second method of auditioning the data is to manually play the keyboard starting on the note you targeted during setup, “C3” in our example. Each note should contain a portion of the sample loop as you play up the keyboard. If the sample is a drum pattern (as in our example), you can tell if there are too many slices when a single kick or snare hit is split between multiple keys. You want each hit as clean as possible. Do not worry if you cannot play the chromatic scale as well as the Audition button (seq) because it has access to the timing and duration of each slice (the slices will not be equal unless you used TYPE = QUICK).
If it is not satisfactory, press [SF4] CANCEL, to return your (pre-sliced) original data.
• Press [ENTER] to accept the results.
If your results are good you must “Press [ENTER] to fix.”
And you should do so before exiting this screen. If you do not, the data is dumped. By pressing [ENTER] you are accepting the results and the Motif XF will create a new waveform, in the lowest numbered available waveform, 002, that will contain the sliced set of samples. It will also create a new Sample Voice and assign it to your MIXING setup, and it will “patch” a user phrase to the Pattern sequencer.
• Press [EXIT] to return to the SAMPLE SELECT screen
• Move to Waveform 002
Notice that it creates a new Waveform at 002. It keeps the original audio at 001. In this new Waveform there are now 17 KEYBANKS chromatically starting from C3.
This function creates a new Sample Voice assigned to PART 1 or your PATTERN MIXING setup. It will also place a new USER Phrase, 001, in your Pattern PATCH.

Pattern “Patch” is found from the main Pattern screen at [F4]. A Patch represents what Phrases are active in this Pattern Section.
• Press PATTERN to return to Pattern mode. The Waveform icon has been filled in with color and there is a box in SECTION [A] denoting that MIDI data now exists to play this Waveform.
• Press [F4] PATCH to view the PATCH (shown above).
This User Phrase 001 contains the MIDI data (the chromatic scale of notes) that will trigger the sliced sample waveform (see below). Any time you recall USER PHRASE 001 for TRACK 1, it will recall the USER SAMPLE VOICE containing the slice sample waveform.
• Press EDIT
The first event is a PC (Program Change) event to ensure that the proper SAMPLE VOICE is recalled when this PHRASE is selected.
Here you can also see that the first slice is placed at Measure 001, beat 1, clock 000 and is held for 238 clocks. Then the second event is Measure 001, Beat 1, clock 238 and is held for 239 clocks and so on. Each event represents where that particular hit occurred in time – down to a resolution of 480 pulses per quarter note. This is unquantized and is the real feel of the audio. Each Slice is triggered at a Velocity of 100. This is so that you can raise (accent) or lower certain events using the Pattern PLAY FX function found from the Main Pattern screen at [F2] PLAY FX or manually here on the event list. You may want to resist the urge to QUANTIZE the sliced phrase, as it will accurately represent the audio as originally performed. Quantizing it will change this original feel.
The SLICE process automatically takes care of creating a new User Sample Voice. This occurred when you pressed [ENTER] to accept the data. The new waveform (set of sliced audio samples) is placed in the lowest available Sample Voice 002 of the Pattern’s Sample Voice Bank MSB/LSB 63/50.
This is the Voice that is “associated” with the new USER Phrase. Before we leave the SLICE Job, one very important thing to know is that your new sliced audio waveform is made up of a chromatic map of notes. Shown below is the new waveform from our example, waveform 002. We are viewing a list of the data starting from C3, the first slice.
To select, view and edit the data from the next slice you can move the cursor down the list or you can hold [SF6] KBD + touch the C#3 note, then press [EDIT]. In this manner you can recall and edit each of the slices. Not only edit but COPY, DELETE, EXTRACT, REVERSE, TUNE, etc., etc., etc.
SONG MODE Considerations:
In Song mode much of the procedure is exactly the same, except that Song mode does not have Phrases to “PATCH” into Sections. The MIDI sequence data created by the SLICE function will be written linearly from measure one on the target track. The target track will have the same waveform icon next to it, signifying that the track contains data that is currently pointing to a USER SAMPLE “SONG” VOICE (bank: MSB/LSB 63/50).
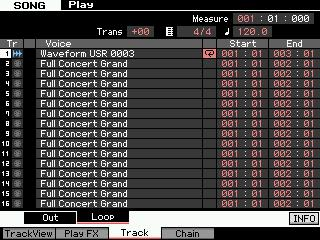
SONG Mode Loops
To get the 2-measure audio loop to repeat from the main SONG screen
• Press [F3] TRACK
• Press [SF2] LOOP
• Set the LOOP START = 001:01
• Set the LOOP END = 003:01
• Move the cursor to the small column directly below the Time Signature and press [INC/YES] to activate the LOOP (shown in screen shot above)
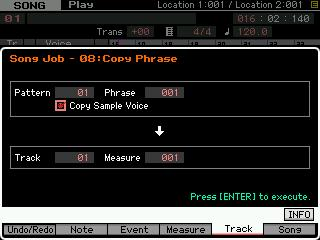
And in a similar fashion to Pattern mode, you can event edit the resulting MIDI data like any other track. The COPY PHRASE function found in SONG Mode > [JOB] > [F5] TRACK > JOB 08 allows the user to go into a Pattern and “get” any USER PHRASE and its associated data including the sample.
Here’s how it works: You go to Pattern mode and identify the Phrase number of the USER phrase you are interested in. Go directly to your Song (the Motif XF will remember the last Pattern you were viewing and reference USER Phrases within it).
The setting below shows the Motif XF ready to import Pattern mode Phrase:001 and insert in on TRACK 1, from measure 1 of the current SONG and it will include the Sample VOICE. This means then that you can use a SLICED Phrase from Pattern mode in a linear Song. You can either use the TRACK LOOP feature outlined above or cut/copy/paste the data like any other MIDI data.
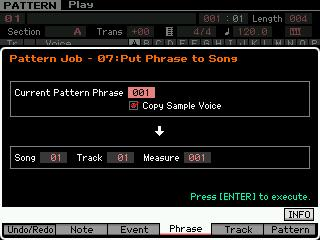
Alternatively, you will find a JOB in PATTERN mode that will accomplish the same thing. This is the “PUT PHRASE TO SONG” Job and works from PATTERN mode – the currently selected data is sent to the last selected SONG, and Track, starting from a specific Measure.
From PATTERN mode:
• Press [JOB]
• Press [F4]
SLICE+SEQ: Step-by-step
Sampling a wave into a Pattern using the SLICE+SEQ Function.
This is very similar to the SLICE JOB function outlined above with the following differences. SLICE+SEQ is a sampling type. It is a “macro” of sorts. This means it is a series of functions that have been linked together by the operating system for ease of use. It moves you through the process of recording (sampling), trimming (editing) then slicing (time stretching). The end result will be a sliced audio loop, where the SLICE routine described in the first half of this article left you with two waveforms: the original and the sliced version. This function will only create the Sliced audio phrase. It will discard the original audio loop. Again, the advantage of slicing a bit of audio is that you can then use it at various tempos or you can use to match the tempos of various samples.
• Go to [UTILITY] and set the I/O for the type of input signal you have connected: LINE or MIC. This is found under [F2] I/O. For our example we will describe a stereo connection from an audio CD player. Set the MIC/LINE to LINE.
• Select a blank PATTERN
• Press the [INTEGRATED SAMPLING] button. You arrive at the SAMPLE SELECT screen. Select a blank Waveform, 001-128
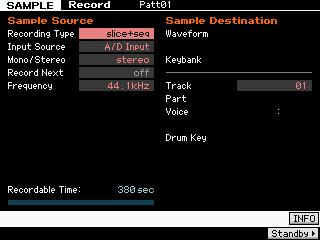
• Press [F6] REC> and setup the SAMPLE SOURCE and SAMPLE DESTINATION parameters
• Set RECORDING TYPE = slice+seq
• Set INPUT SOURCE = A/D Input
• Set MONO/STEREO = stereo
• Set FREQUENCY = 44.1kHz
• Set TRACK = 01 (Destination) is Track 1 – change as necessary to import more data.
• Press [F6] STANDBY>
Here you can select the TRIGGER MODE to “LEVEL”. Basically, how sampling will begin. TRIGGER LEVEL will start sampling whenever the level exceeds the threshold setting, once you arm the sampler. This can be ideal when sampling from CD.
(You might also use the MANUAL setting – where you arm and stop sampling by pressing a button). Lower the Trigger Level to 1 – CDs have little or no background noise. Although you might have to select a slightly higher level if you are sampling from vinyl or a tape that has surface noise.
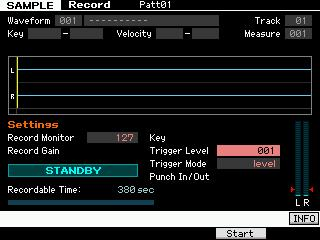
Test the level – get it as close to the top without clipping. The Input Gain control is on the Motif XF back panel next to the left input. When you have good level stop the playback of the CD. Cue it to the index of the track you want to record. Now we arm the sampler.
• Press [F5] START to arm the sampler. It will change from “STANDBY” to “WAITING”
• Start playback of you CD player to start sampling. The Motif XF will draw the waveform as it samples.
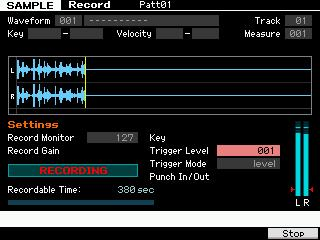
•Press [F6] STOP to end sampling.
• Press [SF1] AUDITION or touch the KEY (C3) to immediately hear your sample.
The Motif XF will show you the waveform. The Start point is always 00004410 if you sample at 44.1kHz because it has a prerecord feature set to 100ms. This way, even if the level trigger mode misses a little bit of the beginning of the audio, you can back up the start point to get it.
Check the START and END POINTS by highlighting those parameters and zooming in. TRIM the START and END POINTS as necessary, then execute the EXTRACT function. This would discard the unused data from samples 00000000 – 00004410. It would also renumber the data so that the Start Point would be 0000000 and the end point would be adjusted accordingly. That is memory that you can get back.
[F6] Slice
• Press [F6] SLICE
Here you are given parameters to set up the slice function.
• Press [ENTER] to execute
When completed you get the option to AUDITION [SF1] and to set a tempo at which to audition the results.
• Set the TEMPO to the desired value and audition again.
• Also audition the notes on the keyboard to determine if you have too many slices or too few slices.
• If too many, lower the SENS (Sensitivity) setting. The lower the sensitivity, the fewer the slices.
• After resetting the Sensitivity and/or Type press ENTER to execute again.
• It does take a few seconds per measure to process. Sing the Jeopardy theme while you wait …and remind yourself that you could not accomplish what it is doing in less than an entire day.
• Audition it again using both methods.
• If satisfactory, press [ENTER]. (Until you press [ENTER] you have not accepted the results). By pressing [ENTER] you accept the results and the Motif will create a new waveform at 002 and dump the original sample from waveform 001. It will also create a USER PHRASE and place it in the Pattern Section PATCH.
• Press [PATTERN] to return to the main Pattern screen. Note the waveform icon next to Track 1.
• Press [F4] Patch to see how the Motif XF has inserted the user phrase 001 that will trigger your sliced audio. It is very important to the concept of the Motif XF ISS to realize that in the above SECTION PATCH, track 1 is now an “audio” track because it contains a Phrase that is triggering an audio sample. If you were to deactivate this Phrase (un-PATCH it), and then activate the Phrase on track 16, then Track 16 would be the audio Phrase.
You can create as many sliced audio phrases as you need per Pattern Style. 16 Phrases, whether MIDI or Audio can be activated simultaneously, obviously. But If you were to activate the above USR 001 in SECTION P, no matter what track you activate it on, it will playback your audio Phrase correctly recalling the appropriate associated Sample Voice.
• Press [EDIT] to view the EVENT LIST
Here you can see that each slice has a MIDI note-on to trigger it at the appropriate analyzed time.
SLICE Summary: The SLICE job and the SLICE+SEQ sample Type are two ways to go about creating Sliced audio phrases. Once the data has been sliced it is housed in a new Waveform that can be further manipulated. You can use individual hits to make Drum Kit. With the example here, we have isolated a kick, snare and hihat sound which can be used within a drum kit. In this fashion, if you can isolate a drum hit, you can use it to build your own custom drum kits from any audio sample. Another thing that can be done with a sliced waveform in PATTERN mode is to use the Real Time Loop Remix function to create brand new variations on the data.
ADVANCED: Unlimited Possibilities
Pattern Mode: REAL TIME LOOP REMIX
Now that you have sliced this test wave, let’s try some unique advanced functions. The Real Time Loop Remixfunction gives you a variety of semi-random presets for dividing the MIDI sequence data and altering the note positions and note lengths, letting you create completely new variations of a Pattern. This function is particularly effective when applied to a track that contains a sample voice created by using the Sampling Slice feature; i.e., with the SLICE+SEQ sample type or samples processed using the Sample SLICE Job.
It can be applied to any MIDI phrase whether or not it is a user sliced sample. Set up the parameters (outlined below), and then press the [SF5] APPLY button to execute the Remix operation. You can do this while the sequencer is stopped or while it is playing (thus the “Real Time” in the name. You will instantly hear the results of the Remix. If you’re not satisfied with the results, try another Type/Variation and press [SF5]. If you want to keep the changes, press [ENTER] to fix. To return to the original display without altering the data, press the [SF4] CANCEL button.
Since the remixed data is stored as a new phrase and assigned (“patched”) to the current track, the original phrase data remains as an unassigned phrase. For example, if you have a simple drum groove in Phrase 001, if you press [SF5] APPLY to REMIX the phrase and then press [ENTER], the Remix will create a new user Phrase in the lowest numbered empty user Phrase location – i.e., 002. It will automatically “Patch” this new Phrase into the Section, leaving the original Phrase (001) unassigned but available if you need to recall it. Real Time Loop Remix does not delete your data – it only creates new data. Each new Phrase that you CREATE is added to your library of Phrases. You can have a maximum of 256 Phrases per Pattern.
Type: Determines how the data in the selected track will be divided and rearranged. The division and rearrangement rules are different for each remix type. The type is also shown graphically in the display and gives a general idea of where the activity is concentrated.
Settings: 1~16
Variation: Determines how the original MIDI sequence data will be modified.
Settings: Normal 1~16, Reverse 1~16, Break 1~16, Pitch 1~16, Roll 1~16, and Fill-in 1~48
• Normal 1~16…. The original data is only divided and rearranged. 16 variations are provided.
• Reverse 1~16 …In addition to division and rearrangement, some portions of the data may be played in reverse (if, and only if applied to a “sliced” user sample phrase). 16 variations are provided.
• Break 1~16 …In addition to division and rearrangement, some portions of the data may be deleted to create breaks (gated effect). 16 variations are provided.
• Pitch 1~16…In addition to division and rearrangement, some portions of the data may be pitch-shifted (if, and only if applied to a sliced user sample phrase). 16 variations are provided.
• Roll 1~16……….In addition to division and rearrangement, some portions of the data may be played with a roll effect. 16 variations are provided.
• Fill-in 1~48… Some portions of the data will be arranged to create a fill-in type effect. 48 variations are provided.
Each combination of TYPE and VARIATION will give a consistent result when applied to the same data. In other words, if you apply TYPE 1, VARIATION NORMAL 1 to the exact same phrase – the result will be exactly the same each time. Therefore, you can count on the results if ever you need to return to it. Applied to different data, of course, the results will be different – like when applied to a variation of the original phrase – but each time applied to the same data, the results will be predictable.
Interval: The Interval parameter determines in which measures the remix will occur. A setting of “1” would mean that each measure would be remixed. A setting of 2 would remix every other measure, and so on, through to once every 8 measures. This is useful, for example, when you want to take the eighth measure of a Phrase and make it transition to a new Section.
Reverse and Pitch Variations apply specifically to sliced sample segments. When these are applied to regular MIDI phrases, do not expect to hear reverse or pitch changes (this is reserved for phrase data controlling sliced audio only). You will hear different timing and note length changes, however.
When you apply the Reverse or Pitch variations to a sliced phrase, it will actually alter the sample waveform by either reversing playback of certain segments or offsetting the original tuning of certain audio contained in the segment. These are destructive edits. You can go to [INTEGRATED SAMPLING] –> [EDIT] –> [F2] PARAM and view each individual segment of the audio phrase and tweak each one, as necessary …even manually edit the pitch with the Coarse Tune/Fine Tune parameters or you can change how the segment plays with the Play Mode parameter (Play Mode determines direction: one shot, reverse, loop)…
Reverse is actually the unit reading the wave from the End Point to the Start Point, rather than the normal way.
Being able to EDIT the individual sliced segments is useful because every now and then you REMIX a phrase and it gets really, really close to the ‘perfect’ phrase but you want to change just a few of the events. Knowing how the Reverse and Pitch work on samples can be a valuable tool. See the section on “Editing the individual Slices” later in this article for more details.
Let’s try it on the audio we just sliced
• Press [PATTERN]
• Begin playback of our sliced audio
• Set the Tempo to around 97.0 BPM (close to the original tempo of the audio).
• Press [F6] REMIX>
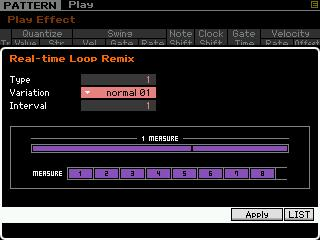
On the downbeat, press [SF5] APPLY
Notice how it adds a kick drum on the upbeat between 3 and 4, and it eliminated the snare on beat 4, and moved it back to the “and of four”. With the setting above the INTERVAL is 1 – so the variation is applied every measure. Try different settings. Remember, press [SF4] CANCEL to return to the original phrase. Don’t try and hear them all, there are over 2,048 variations just with “Normal” Variation.
The lower the TYPE and VARIATION number the subtler the change, the higher you go the more radical the change. The graphic just below the words “1 Measure” indicates roughly where in the measure the variation will occur. Use this as a general outline. Not all settings will provide change, it always depends on what data is being remixed.
Try some REVERSE VARIATIONS:
Type = 2, Variation = reverse 01, Interval = 1
You may notice little change on many of the reverse – as our audio clip is 8th note based, while many of the reverses may be 16th note based.
Try some PITCH VARIATIONS:
TYPE = 1, Variation = pitch15, Interval = 1
Try ROLL, BREAK and FILL-IN VARIATIONS.
Experiment. Not every variation is useful. You decide if it is a keeper or not – you play producer
Editing the individual Slices:
Once an audio waveform has been sliced, it is divided into several time segments and a MIDI note based on when that segment occurs is placed in a MIDI Phrase. Actually, a new waveform is created – so your original data is still there, intact. Below is a screen shot showing our audio wave after it has been sliced. A new Waveform 002 has bee created and mapped chromatically from C3. The first segment is shown selected below.
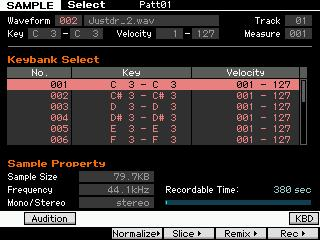
By holding the [SF6] KBD (keyboard) and touching note C#3 you can recall the next slice in the chromatic map.
Once a KEY has been selected its data will fill the screen when you press the [EDIT] button.
As each KeyBank is selected and recalled via this method, you can view its data when you press [EDIT]. Once in [EDIT], press [F1] TRIM > the Start Point, Loop Point and End Point can be edited as required. It is possible to use the Real Time Loop Remix function to construct a drum kit.
Here’s how that concept works:
Say you have audio drum loop and you like sounds. If you setup to slice it and get the Sensitivity set so you can get a clean drum hit on each KEY, you can then manually play these as a drum kit. The KICK will be isolated to a single Key, the SNARE will be isolated on a separate Key, and so on. Now you can record yourself playing this sliced Drum set using the sounds you found in your sample.
LOADING MULTIPLE .Wav or AIFF files
You can create a Pattern Sample Voice or Song Sample Voice that contains all of your audio phrases. For example, let’s say you have a couple dozen audio loops that you have selected from a CDROM and wish to use in your current composition. (Often commercially available sampling CDs have both an audio disk and a .wav disk).
If you place all of the .wav files you want to import into a single FOLDER on your USB drive, you can use the Motif XF’s new “LOAD MULTI” feature to load them all in one operation.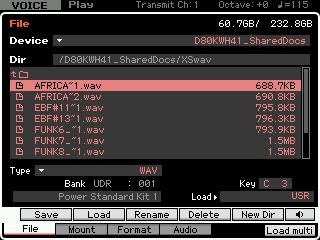
This function allows you to load all the .wav files in the same folder and automatically maps them to KEYS chromatically from the designated KEY.
• If you target a Normal User Voice, each sample will be loaded into a single Waveform, one Keybank (note) for each sample wave.
• If you target a User Drum Kit, each sample will be loaded into a separate Waveform, each mapped to a single Key (C3).
If you target a User Sample VOICE within a SONG or PATTERN, this will be similar to loading them into a Normal User Voice, that is, each sample will be loaded into a single Waveform, with one Keybank (note) for each sample wave.
• Press [F6] LOAD MULTI instead of the normal [SF2] LOAD.
In the screen shot above a series of .wav files (audio loops) are going to load into USER DRUM Kit starting at middle “C3”. Loading a series of audio loops into a drum kit makes it convenient to set them up for use together in a ‘live’ situation. Drum Kit Voices have envelopes that can be set to play the entire audio clip without having to hold your finger on the key and/or without having to have a sequenced MIDI note hold the key. You can also set them so that any one of them silences any other of them so triggering wave #2 will silence wave #1. This is called ALTERNATE MODE and is how the closed hihat stops the open hihat from sounding (very useful with audio clips).
If working in the SEQUENCER, a single USER Sample Voice can hold all of your audio clips (up to a maximum of 128). In this single waveform you can EDIT them make sure each one is looped perfectly (sic), etc. Then you can SLICE the audio loops one at a time, because the Motif XF will target a new Sample Voice and create a new waveform containing the slices. As you create new Sliced PHRASES via this function, the Motif XF will create the MIDI data in the lowest numbered empty USER Phrase. Don’t worry it will not overwrite a previous USER Phrase (it will replace it in the current Section PATCH) but the data still exists in its USER Phrase. Continue to slice and create Phrases in the manner – you can PATCH them, manually, into Sections later. Remember on the PATTERN mode [F4] PATCH screen you can activate or deactivate a Phrase at any time. The limit to the number of sliced Phrases you can playback simultaneously is 16, of course, the number of tracks per Section.
Housekeeping
The samples you create in a Song or a Pattern are “local” to that Song or Pattern. You will not see them, for example, if you recall the next empty Pattern or Song. The sample data, being “local”, is automatically saved when you save the Song or Pattern to card or disk. The waveform is, however, accessible when you go to Voice EDIT –
You will find your waveforms on a list of user waveforms. Additionally, the Motif XF adds a new feature called “VOICE CONVERT” which lets you take audio recorded to the INTEGRATED SEQUENCER and quickly convert it to a MIXING VOICE. This not only makes it easy to add INSERTION EFFECTS, and the like, but a MIXING VOICE can then be saved to the general population of normal USER Voices.
This means that you have an opportunity to use this data elsewhere, or to build regular Motif XF Voices from them. The Motif XF also allows you to copy data, including the samples, from Pattern to Pattern or even from a Pattern to a Song or vice versa.


