Motif XS/XF “Velocity Zone” Arpeggios and Velocity Limits
“Velocity Zone” Arpeggios and Velocity Limits
The arpeggio functions on the Motif XS/XF are complex. With each new version of Motif, the arpeggio function has improved. In the original Motif (classic) you had 256 arpeggio types in four categories: Sequence, Phrase, Drum Pattern, and Control.
One of the features of the 8 Element Voice architecture is each of the Elements can be set to respond not only to a region of keys across the keyboard, but to specific velocities. This fact combined with the complete precise repeatability of the Arpeggio Phrase opens the door to some exciting possibilities. This article will explore some of the possibilities so you can see how this greatly increases the flexibility of arpeggios – and ultimately by studying some of the preset Arpeggio Types you can get ideas on creating your own. After all, that is where this all leads. The shear number of arpeggios provided can be intimidating – but as you begin to learn about what is on offer, you are bound to get ideas for your own custom data.
In 2003, the Motif ES expanded on the concept. The original concept of the Motif-series was Music Production. We often talked about what could help keyboard players when they get writer’s block. Writer’s block is something that we all experience – so how can the technology provide some inspiration, without dictating everything? How can the synthesizer be more creative tool? The concept of “Phrase Factory” is, simply put: a way that the content provided in the arpeggio patterns can be manipulated into new and uniquely individual musical data. The Motif ES provided 1,787 arpeggio types, in 18 categories: Synth Sequence, Synth Chord Sequence, Synth Hybrid Sequence, Acoustic Piano & Keyboard, Organ, Guitar & Plucked, Guitar-Keyboard MegaVoice, Bass, Bass-Keyboard MegaVoice, Strings, Brass, Reed & Pipe, Synth Lead, Synth Pad & Musical FX, Chromatic Percussion, Drum & Percussion, Combination and Control.
Added to the Phrase Factory arsenal of weapons was “Real Time Loop Remix” – a way to really create an unlimited number of variations on the phrase data generated by the arpeggios. And also added was the MegaVoice technology to add unprecedented realism to the generated musical phrases.
In 2007 the Motif XS, in keeping with its theme to be over-the-top, provides 6,633 arpeggio types in 17 Categories and 15 Sub-Categories. And a newly re-vamped Real Time Loop Remix function. Not to mention that four separate different arpeggios can be used simultaneously. In 2010 the Motif XF provided 7,881 arpeggios. Of course, you are provided tools to make your own (256 USER Arpeggio locatons).
So what is an arpeggiator and how does it work? Basically, arpeggios started out as musical sequences of notes that automatically played up and/or down the scale – a broken chord. Fast-forward to the 21st century where arpeggios now have real musical content that can be complex musical parts with chord voicing intelligence. Guitar riffs, bass lines, drum grooves, and more, are now fair game.
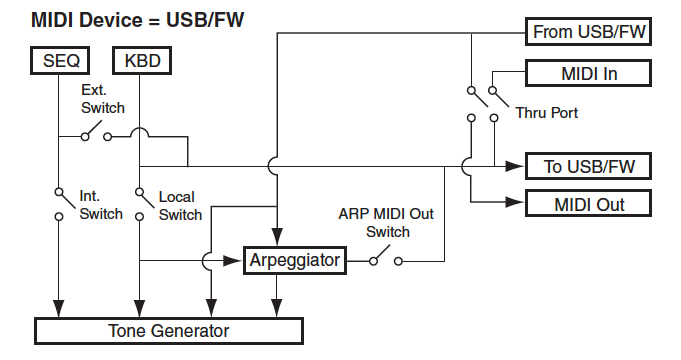
Here are some fundamentals of how the synthesizer deals with your note-on events: When you press a key that information can either trigger a synthesizer sound directly or its note number value can be delivered to the arpeggiator, which then generates a pattern of note-on events related to the currently selected arpeggio Type and arpeggio Key Mode. The KEY MODE is important because it determines what the arpeggiator does with the key press events it is sent. For example, does it play the arpeggio data in a predetermined fashion? Does it playback the arpeggio data in the order in which notes are sent in? Does it allow the direct key press to continue on to the tone engine? Or does it block the trigger event and only play the pre-arranged content? Let’s start the discussion with a look at how arpeggios can deal with Velocity. Velocity is the speed with which a note-on event is pressed and typically translates to volume output.
Per Element Velocity Limits:
The Velocity Limit parameter within the Element: These determine what note-on strength will make an Element respond with sound.
Here is how you can explore this:
Call up the VOICE: “Festival of Harmony”
Located at: Pre7: 103(G07)
• Press [EDIT]
• Press Track Select [1]
• Press [SF5] 4 ELM so you can view all four active Elements simultaneously
• Press [SOLO] and solo Element 1
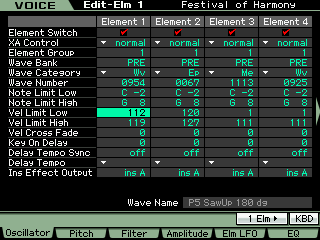
It is set to sound only when a note-on event is triggered between a velocity of 112 and 119
• Play the keyboard and hear the contribution of this Element in response to the arpeggio
• Now turn the main Arpeggio ON/OFF button OFF.
• Play the keyboard manually and attempt to trigger a note in the velocity range 112-119.
Now you will see/hear that only when you play a note-on event that is within the narrow velocity range of 112 through 119 will this Element make sound. (Please take note just how difficult it is to actually play a note in this narrow region of velocities consistently – this is one reason this is done with a pre-programmed arpeggio)… That note-on event can be either you pressing a key or it can be from the data generated by the arpeggio pattern (when ARP ON/OFF = ON).
It is the data in the associated arpeggio pattern that must send a note-on value between 112 and 119 to make Element 1 sound. A note-on event between 119 and 127 will make Element 2 sound. Repeat our experiment while soloing Element 2… then with Element 3 and finally Element 4.
If you play a note harder than 112, (ARP ON/OF = OFF) Elements 3 and 4 will not sound at all.
So Sherlock Holmes would conclude: Therefore, my dear Watson, the notes generated by the arpeggio pattern are in excess of velocity 112! And we can conclude that note-on velocity is a critical parameter.
The wispy sounding Element 3 and the analog pad sounding Element 4 do not invite you to play with big velocity, so as long as you do not nail notes hard, you are unaware that once you exceed 111 – those Elements to do not sound at all. Return the Voice to normal (undo the SOLO function by pressing the [MUTE] button). Turn the main ARPEGGIO ON/OFF = ON.
There is another parameter that is also a Velocity Limit that controls at what velocity from the keyboard the arpeggio will start.
Here is where that is found:
From the Voice main screen
• Press [EDIT]
• Press [COMMON EDIT]
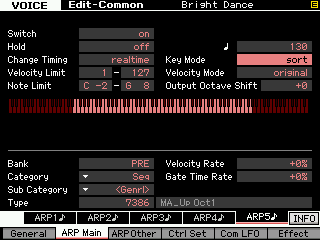
• Press [F2] ARP MAIN
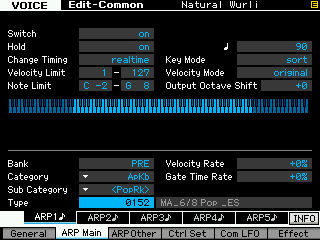
Here you will also find a parameter called “Velocity Limit”.
To see how this works: Set this to 90 – 127

Now when you play the Voice “Festival of Harmony” with a velocity below 90 only the wispy Element (3) and analog pad (4) Elements will play… but when you want to bring in the arpeggio + the pad, simply play with a greater velocity 90 or above and the arpeggio will start.
So you have a Velocity Limit for the overall Voice’s response to the arpeggios (this is why it is found in COMMON EDIT). But you also have, at the Element level, an individual Velocity Limit for when an Element will respond with sound. And, as mentioned, it is in response to a note-on event from you playing the keys or from the arpeggiator output. That is why I illustrated this by having you turn ARP ON/OFF to OFF.
To make this point clear try an example using a Drum Voice… if you set the COMMON EDIT > [F2] ARP MAIN > Velocity Limit range to 126-127… and assigned the KIT VOICE a “DrPc” arpeggio, and set ARP ON/OFF = ON… the Drum Voice would play normally in response to key strikes; that is until you struck a key with a velocity of 126 or 127 at which time the arpeggio would start. So the ARP MAIN “Velocity Limit” parameter is responsible for triggering the start of the arpeggio.
The fact that the “Festival of Harmony” Voice has Elements with specific velocity ranges, and arpeggio patterns designed to send notes at specific velocities to the Elements assigned in those specific ranges, is what makes the Voice so very unique.
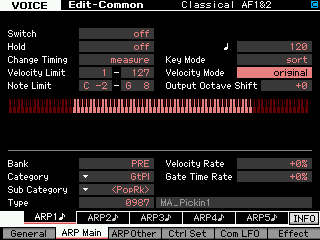
The note-on velocity of the source phrase data is transferred to the arpeggio type. And when you assign an arpeggio type to a VOICE you can have that Voice respect the original source velocities or not. The parameter is called the “VELOCITY MODE” – it can be set to “original” or “thru”.
original – The Arpeggio plays back at the preset velocities included in the Arpeggio sequence data.
thru – The Arpeggio plays back according to the velocity of your playing. For example, if you play the notes strongly, the playback volume of the Arpeggio increases.
Experiment: Set the VELOCITY MODE to THRU on the “Festival of Harmony” and see that you must exceed 112 for the arpeggios to happen… this is because YOUR playing is doing the determining. Not the ORIGINAL Velocity as recorded in the original Arpeggio data.
Wouldn’t it be helpful to know [the velocity output] of the arpeggio if I want to use those same arps in a different voice? Do the velocity limits of the Element and those of the arp assigned to the voice have to match?
I am sure the programmers were made aware of the different Categories of arpeggio types as shown on page 62 – as the manual states it is probably a “good idea” but it would depend on what you are trying to accomplish. The VOICE “Festival of Harmony” uses the arpeggios in the PadH (Pad High velocity) category… You can see this when you go to the following screen:

Press [EDIT]
Press [COMMON EDIT]
Press [F2] ARP MAIN
Each of the [SF] buttons 1-5 will recall a different ARP, for example:
[SF1] = CATEOGRY: Hybrid; SUB-CATEGORY: Zone Pad; TYPE: #6424 “MA_PadH_Pad Seq1”
The Arpeggio Velocity Ranges will (should) cover the entire velocity range 1-127. “PadH” or Pad High range, has velocities 1-112 for the pad sounds and two regions for arpeggio response 113-120 and 121-127.
A “2Z” or Two Zone Velocity arpeggio will have just two ranges or zones to cover the full 127. It is listed as 1-90 for the first zone and 91-127 for the other zone.
If you have a Voice with two Elements and one is set to respond to note-on events from 1-90. And the second Element is set to respond to velocities of 91-127… then an arp pattern will trigger one or the other depending on the velocity of the note events contained in the arpeggio source material (and the VELOCITY MODE setting).
A “4Z” or Four Zone velocity arpeggio will have four ranges to cover the 1-127 spectrum, as follows:
1-70, 71-90, 91-110, 111-127
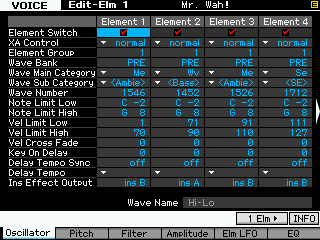
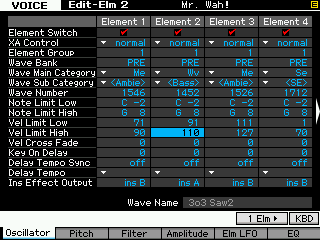
Take the Voice: PRE 7: 126 (H14) Mister Sinister. It has several Hybrid > Zone > 4Z arpeggio assigned to it. This is a four Element Voice. But get this: The Element Velocity Limits are set as follows:
EL1 = 1-70
EL2 = 70-104
EL3 = 91-127
EL4 = 108-127
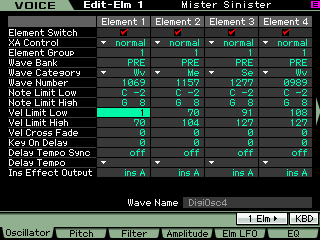
…Not quite matching the 4Z velocity ranges – and this causes the unique pattern where at times the Element sounds play simultaneously _ like in any poly-rhythmic situation – there may be simultaneous hits. So if you create an arpeggio pattern with different velocities you may trigger only one Element or there is a possibility of triggering different combinations of Elements.
• A note-on event of 66 triggers only the thick “DigiOsc4” wave of Element 1.
• A note-on event of 86, for example, only triggers the”Radio Noise” wave in EL2…
• A note-on event of 105, triggers the hihat sounding “ElectricPerc2” (EL3)
• But a note-on event of 112 triggers both the hihat-ish EL3 and the hollow synthy “Mg Bass1” (EL4)
…you get the idea… With this Voice, press [EDIT] and use the [SOLO] button (as before) to hear the rhythm that the arp is sending to each Element. Each is contributing to the whole arp pattern. And if you record the data to the sequencer you will see the velocities are what are making the rhythm pattern.
You do not have to match the discreet velocity zones – that is thinking way too “inside”… you can have the Voice Elements have different ranges and the ranges can overlap – which causes combination sounds (multiple elements at once). The arpeggio source data can be created right in the Motif XS Sequencer – the arpeggio pattern can be made up from up to four tracks. Now, often these tracks are misunderstood. All four tracks will apply to the same arpeggio pattern – so they should be seen as rhythm rather than different instruments (as with a traditional track).
Okay, let’s go one more step… in creating an arpeggio like this one, you can see how the four tracks of the arpeggiator were used… each setup a different rhythm… because often arpeggios are more about the rhythm than the notes….
Element 1, which acts as the “bass” here, is decidedly on the upbeat (the “and” of the beat) “1+2+3+4+“
Element 2 plays a hide and seek role at the top and near the end of the 2 measure cycle
Element 3 plays a role like a hi-hat pattern
Element 4 is on the back beat 2 and 4, solid “1+2+3+4+”
This has been a quick peak at Velocity Zones… and how they apply to Arpeggios. Explore your favorite Voices; there is much to be learned by exploring!
Enjoy!