Motif XF: Assigning a Mic to a FW bus

If you have not done so already, please see the Setting up a Microphone to the Motif XF A/D INPUT article first, as it covers the basics.

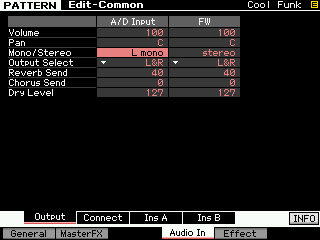
Normally, the A/D INPUT Part is assigned to the main Left and Right outputs. 
OUTPUT SELECT = L&R
However, when you are working with an external DAW, like Cubase for example, you may want to assign the A/D INPUT Part to its own discreet audio bus. This will allow you to record the vocals to their own audio track.

ADin

Bus: A vehicle for moving one or more passengers from point A to point B via a specific route.

 In audio a bus is a vehicle for moving audio signal from one point to another along a specific path. Multiple signals can be routed on any bus, or the bus can be for an individual signal. It depends on your goal.

By default all PARTS are routed on the main “L&R” stereo bus.
All 16 internal PARTS, the A/D INPUT PART and the FW INPUT PART are all assigned to ride the bus route: “L&R” It may at times be convenient for you to isolate a PART on its own bus, or you may decide to send several PARTS together on a specific bus – the goal so you can record them to their own track. In this case, you may want to route your vocal mic (plugged into the A/D INPUT on the Motif XF back panel) on a discreet bus, isolating it from the other sounds, to its own track in your DAW (Cubase).

 The Bus Routes

On the [F4] AUDIO IN screen, highlight the OUTPUT SELECT parameter.

Press [F6] LIST to view a listing of the possible output buses to which the A/D PART can be routed.

AudioInFW1

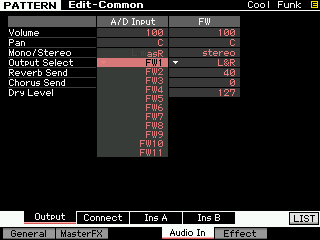
The “L&R” options refers to both the analog main outputs and the FW digital stereo bus.

The “asL&R” option refers to the analog (only) Assignable Outputs on the back panel of the XF

These are followed by seven odd/even pairs of FireWire buses: FW1&2, FW3&4, FW5&6, FW7&8, FW9&10, FW11&12, and FW13&14

Then you have the individual “asL” (analog only) assignable Left and the “asR” (analog only) assignable Right

Then each of the fourteen assignable FW buses as Mono sends: FW1, FW2, FW3, FW4, FW5, FW6, FW7, FW8, FW9, FW10, FW11, FW12, FW13, and FW14

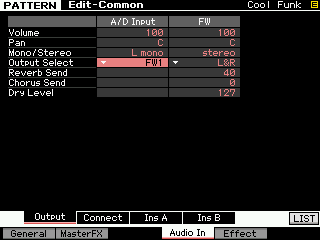
Since your microphone is a mono input and plugged into the “L Mono” Input, you want to assign the OUTPUT SELECT to a Mono bus:

Set OUTPUT SELECT = FW1

AudioInFW1assigned

What you have done is re-route the microphone’s signal on a different path. It no longer will travel through the SYSTEM Effect (so the Reverb and Chorus processors are not accessed), it no longer travels through the MASTER EFFECT, nor does it go through the MASTER EQ. You have re-routed so that it goes on its own discreet path toward the computer via the FW on a bus route “FW1”. Right now, it is the only passenger on that bus. It does however, go to the FW1 output with the INSERTION EFFECTS (if you have assigned any to the A/D INPUT).

This means you can use your powerful Motif XF Insert Effects on your microphone and you can record with them – because they are hardware there will be no latency issues or delay in hearing what you are getting. This is not LOW LATENCY – this is NO LATENCY – because you monitor the effects direct (prior to the signal going to the recorder)! This means you can use a powerful VCM Compressor and the VCM EQ501, or any two INSERTION EFFECTS.

Signal Arrives in the Computer
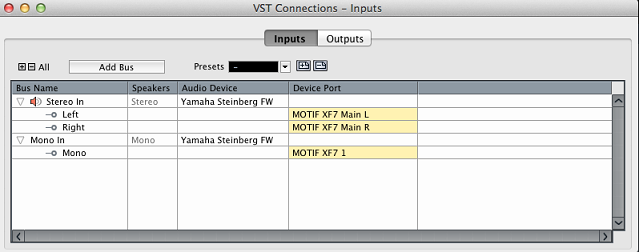
In Cubase you need to create a connection that will receive the signal we just routed.
Go to DEVICES > VST CONNECTIONS > INPUT

VSTConnectIN Stereo

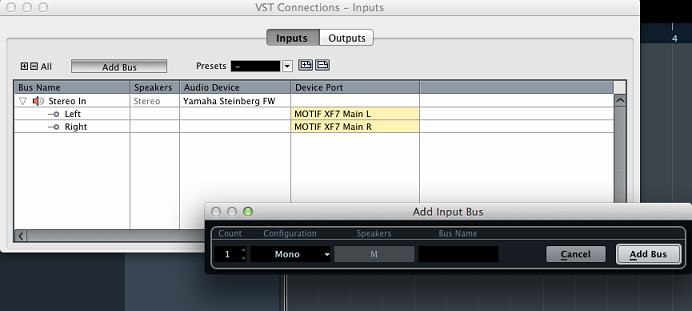
Here you can “ADD BUS” > MONO (Shown above the ADD BUS Mono window)
Set the AUDIO DEVICE to “Yamaha Steinberg FW”
Set the DEVICE PORT to “Motif XF 1” (below: the MONO IN has been created and assigned to “Motif XF7 1”)

VSTConnectINaddMono

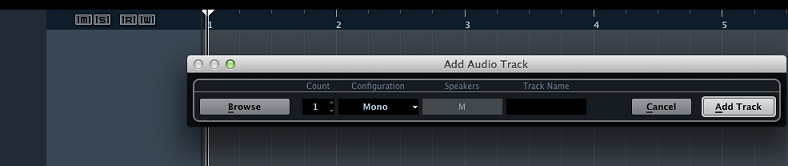
Next you need to create an AUDIO Track on the main Cubase screen.
Go to PROJECT > ADD AUDIO TRACK > MONO

AddMonoTrk

Assign the INPUT to that audio track to the MONO bus you just created.

MonoIN Track

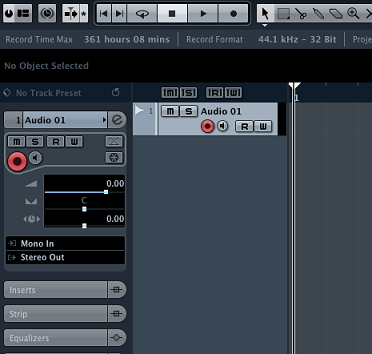
You have routed the A/D INPUT PART to the Motif XF’s “FW1” OUTPUT. 
You have created an INPUT to receive the OUTPUT of the Motif XF – that input is set to receive “Motif XF 1” via the Yamaha Steinberg FW1 Motif XF bus. 
You have created an AUDIO TRACK that is using that audio bus as its source.

Tweak of the Week: Strings Motif XS/XF

Pre 4:001(A01) Violin Solo 1

Let’s take a close look at a single Voice to learn some things about how to approach playing it and getting the most expression out of the assigned controllers. Although the Voice is a solo violin it has 8 oscillators each tasked with a specific role in recreating the instrument.
This Voice is made up of 8 Elements.

  • Press [EDIT]
  • Buttons [1]-[8] are Element Select buttons
  • Buttons [9]-[16] MUTE and UNMUTE Elements 1-8, respectively
  • Press [1] to view Element 1 parameters

You can view the Elements one at a time you can toggle the view to see 4 Elements in columns

  • Press [SF5] 4 ELM

In order to see Elements 5-8, select any Element [5]-[8] by pressing the Element Select button.

Element 1 is a stereo violin sample, that will play only when both the [AF1] and [AF2] buttons are OFF. Note range is G2 and above (it’s a violin!)
Element 2 is a stereo combination used to fill the notes below the range of the violin (a real violin has no notes below G2 to sample)
Element 3 is a stereo violin sample, that will play only when the [AF1] button is ON
Element 4 is a stereo violin sample, that will play only when the [AF1] button is ON
Element 5 is stereo combination used to fill the notes below the range of the violin, that will play only when the [AF1] button is ON
Element 6 is stereo combination used to fill the notes below the range of the violin, that will play only when the [AF1] button is ON
Element 7 is Non-Vibrato violin across the keyboard, that will play only when the [AF2] button is ON
Element 8 solo spiccato (attack) violin sample, that plays at all times but has a specific velocity response that requires a very rapid note-on (more on this later)

What this means:
_ When you first call up the Voice you are set to play Elements 1, 2 and 8. You will hear only Element 1 if you play normally within the range of a real violin.
_ When you press [AF1], Elements 3, 4 and 8 will sound within the range of the real violin.
_ When you press [AF2], Elements 7 and 8 will sound within the range of the real violin.
_ Elements 5 and 6 and 8 are “combination” Waveforms which means they contain data combined from the entire family of bowed strings… Violin at the top, Viola in the upper mid, Cello in the lower mid, and bowed Bass in the low end… filling out the entire range with a SPICCATO bow stroke.

With the Violin Solo 1 Voice called up;

Press [EDIT]
Press [MUTE]
Turn off all Elements but Element 1 and 8. You do so by Muting Elements 2-7, that is: Press buttons [10], [11], [12], [13], [14] and [15] to turn their LEDs OFF.

This isolates the actual Violin range and the two Elements that give this Voice its heart and soul.

Press [1] to view Element 1
Toggle the [SF5] Four ELEMENT/One ELEMENT view to view the single Elements parameters:

Element 1:

Element 8:

Play and observe its behavior. Use the [SOLO] button to switch between ELEMENT 1 and ELEMENT 8. You will notice how responsive to all velocities the Element 1 is and how Element 8 only responds to very increased velocities/ Element 1 has a long infinite sustain… as long as you hold the key the bow is in motion. Element 8, by contrast, has a very percussive and quick bow stroke. So when you want to ATTACK a phrase with an emphasis, you can use velocity to articulate the bow stroke. Of course, this is programmable. Let’s view the [F4] AMPLITUDE parameters which control how each Element behaves as to its volume.

The AEG or Amplitude Envelope Generator describes how the loudness of the sound behaves from Key On until the Key is released. The signal rises to full volume in the amount of time described by the ATTACK TIME parameter (0 is a short amount of time 127 is a long amount of time… this is set by ear, musicians do not use clocks for this – we often get questions about how come this is not in milliseconds; its because it would not matter, you do it “by ear”). The signal then proceeds to DECAY LEVEL 1 at DECAY TIME 1, and so on… If DECAY LEVEL 2 is anything but a 0, the sound will HOLD as long as the KEY or the SUSTAIN PEDAL hold that key-on event. When released, the RELEASE TIME parameter describes how long before sound completely disappears.

Contrast the AEG of Element 1 (above) and Element 8 (below):

But how is the Spiccato bow stroke (Element 8) prevented from sounding at low velocities, you ask?

  • Press [8] to select ELEMENT 8
  • Press [F4] AMPLITUDE
  • Press [SF1] LEVEL/PAN

Here you can find how Element 8 is set to respond to LEVEL VELOCITY SENSITIVITY

At a Value of +32 for each increase in units of velocity gives a corresponding increase in level output… a basic linear IN/OUT

When you increase the value north of +33, lower velocities cease to trigger any output level… until you reach +63, where only the maximum velocity causes any output. This is useful, as you can hear in creating crossfades between different Elements… and Element can remain “hidden” until the velocity of the performer reaches certain intensities, it is not a hard ‘swap’ but a more gradual fade…

A “Level Velocity Sens” of +50 combined with the “Curve” of +3 are the determining factors of how the Spiccato bow Element is controlled in this Voice. The prominence of the Bow in the upper (violin range) is ensured by the Amplitude Scaling ([SF3] SCALE) – this basically controls how loud an Element is across the range of the MIDI keyboard C-2 through G8:

Now let’s take a peak at the CONTROLLERS:

While in EDIT Controller Assignments are global to the VOICE (meaning they will address, or not, all Elements) so they are found under the [COMMON EDIT] functions.

  • Press [COMMON EDIT]
  • Press [F4] CONTROL SET:

You will notice that vibrato is built-in to the sample Waveforms of the strings on many of the Voices. The VOICE “Violin Solo 1” uses the XA CONTROL (Expanded Articulation Control) function’s [AF2] button to switch from the violin samples with vibrato to ELEMENT 7 – the Violin Waveform without vibrato (Non-Vibrato).

In the CONTROL SET, you can see how the MOD WHEEL is assigned to “E-LFO PMD” (Element Low Frequency Oscillator Pitch Modulation Depth) and “E-LFO FMD” (Element Low Frequency Oscillator Filter Modulation Depth) – basically it is vibrato and filter movement. So you can apply your own vibrato with the Low Frequency Oscillator. The LFO’s name is very descriptive. Humans recognize consistent vibrations between 20 cycles per second and 20,000 cycles per second as musical sound. Outside of that range frequencies are interpreted differently. Above 20,000 cycles dogs can hear, fortunately for us, we cannot. Below 20, the musical tone breaks down into separate, distinct events. And finally, we interpret them as rates rather than music. Vibrato is the change in pitch both up and down a few times per second – so the LFO is used to apply a “rate” of change in the ‘few times a second range’… if you will.

Experiment. Notice the Ribbon Controller is doing COARSE TUNING – another way to apply vibrato, for those of you who want to do it organically. Place your finger in the center and roll it back and forth to apply manual vibrato.

The ASSIGN 1 (KNOB) will increase the SPICCATO Bow Element’s Level if you need more Attack stroke.

The ASSIGN 2 (KNOB) will raise and lower the Cutoff Frequency – this is an OFFSET setting – it is ADDING (Clockwise) or SUBTRACTING (Counterclockwise) values to the 8 individual Element’s Filters: In this Voice they are 12dB per Octave Low Pass Filters. While you can set each Elements LPF individually, when performing the KNOB is assigned to control each Element (each Element is checked with a red mark indicating that it is applied to all 8 Elements).

Just as a quick comparison, call up the next VOICE: Violin Solo 2 AF1 PRE 4:002(A02)

Explore this Voice with what you have learned. Notice how [AF1] here applies the Spiccato Element… try performing violin phrases with the [AF1] button method of applying the bow stroke, versus the velocity method of applying the bow stroke as in the “Violin Solo 1”.

© 2025 Yamaha Corporation of America and Yamaha Corporation. All rights reserved.    Terms of Use | Privacy Policy | Contact Us