How to make drums better?
Is it A distortion and B compressor fundamental all of I need?
Yes, It is.
1. I haven't some words special about it.
But one problem. It could be better than have send control from even key to FX.
Why all keys is equal fx? Only thru, A or B. I would like to send a value.
2. I found Harmonic Enhancer. Is it good practice to use with snare or kick?
What is good for acoustic cymbals or hats?
acoustic, pop, funk, soul
PS Sorry default sounds like pans
The sends to insertion effects are fixed. It's not a bad thing to wish for - maybe propose it in Ideascale or find an existing idea that already has and upvote and/or comment.
When you use "Thru" you gain per-drum-key control of sends to the Variation and Reverb effects.
I don't know what to say about the drums since I don't use them as we have a drummer.
You notice that the common thread during live demos is that the presenter seems to always say that the drums are from some other source than the keyboard. Although part of the reason may be the speed of creating a drum part with software I've got to think part of this is also execution of the drum sounds themselves. It's something surely for Yamaha to look into why drums are not very featured in demos due to some deficit that is made up with other external software.
Current Yamaha Synthesizers: Montage Classic 7, Motif XF6, S90XS, MO6, EX5R
1) Edit a drum part
2) Touch "BD" at the bottom so you're looking at the drum key settings including sample (Waveform) and effect
3) If effect type is InsA or InsB then change to Thru. You'll see options appear at the bottom line for this drum key's variation or reverb sends. Each key gets its own set of system effect sends when the insertion effects are set to Thru. If effect is already "Thru" change it to InsA or InsB and watch those options disappear.
You can also look at the effects routing page and change the drum key between a drum key that's set to "Thru" vs one set to InsA or InsB and look at the arrows pointing from the drum key's output to the effects. Another representation.
The OP wishes for a way to control either the wet/dry or "depth" of insertion effect for each drum key. That's not possible - it's a limitation by the design of drum parts. However, just like I wish for tempo to be a destination in control assignments - wishing for control over insertion effect depth per-key is just as valid. So that other statement is about empathy, validation, and also an expression of current limitations.
Note that any drum key set to "InsA" or "InsB" can still participate in system effects. There is a global (for the Part) send from the insertion effect outputs to the variation and reverb sends. Meaning each key not set to "Thru" will have the same common setting for reverb send and same common setting for variation send.
Current Yamaha Synthesizers: Montage Classic 7, Motif XF6, S90XS, MO6, EX5R
Yes, drums are a bit gnaff.
I think Yamaha planned to create a merged part of 8 FM-X parts, such that you could make a drum kit with FM sounds... but somehow the parameter jumping didn't work out during testing, so they released the "SMART Morph" instead, complete with the aliasing, as though this was a feature.
This still leaves it possible to make an 8 part FM-X drum kit, pushed out to the invisible back end Parts (9 through 16) - then you have individual FX - but must use the Pattern Sequencer to drive them.
FM-X for making individual, tonally controllable drum parts is pretty good. Can make THICK sounds and have as pitches of kicks as you want from a single part, same with toms. And apply as much distortion and compression as you need, uniquely to each drum. And route to a common Delay in the Performance Variant.
It's a LOT of work. But it's somewhat fun, especially with good headphones. Will kill your neighbours if you design drum sounds with loud monitors.
From the article on MONTAGifying Motif: “Rule the Earth” analysis…. (Although written for the MONTAGE, with adjustments for the number of output buses, the MODX and MODX+ work the same way). “Rule the Earth” is one of the converted Factory Motif XF Performances)……
Drum Routing
Drum Kit PARTS are different from Normal PARTS, and it is not just that old joke about drummers being different from musicians, in a Drum Kit PART each KEY is autonomous. Each Key is a different instrument. While in the typical Normal PART all Keys make up one instrument. A Drum Kit is a conglomeration of individual drum and percussion sounds herded together into a single entity. Mostly each instrument occupies a single Key, although there are exceptions: the Hihat occupies three keys, the triangle occupies two keys... for different articulations. Each Drum Key has its own Waveform, its own Volume control, its own Pan position, its own Filters (HPF and LPF), its own AEG, its own EQ, it can even be tuned individually and can either receive or ignore NOTE-OFF. Where there is a Normal PART, the Keys usually share these things as a group; in a Drum PART, each KEY can stand alone. Each Key can even be routed to its own audio bus Output.
How can this be accomplished?
Let's say we want to take BD, SD and the three HHs and route them on their own buses to the DAW.
Drum Kit PARTS, like Normal PARTs, initially default to being assigned to the "Main L&R" Output. We can, on a DRUM KIT PART, select PART OUTPUT = "Drum". This allows us to then route individual KEYs to an assignable Output:
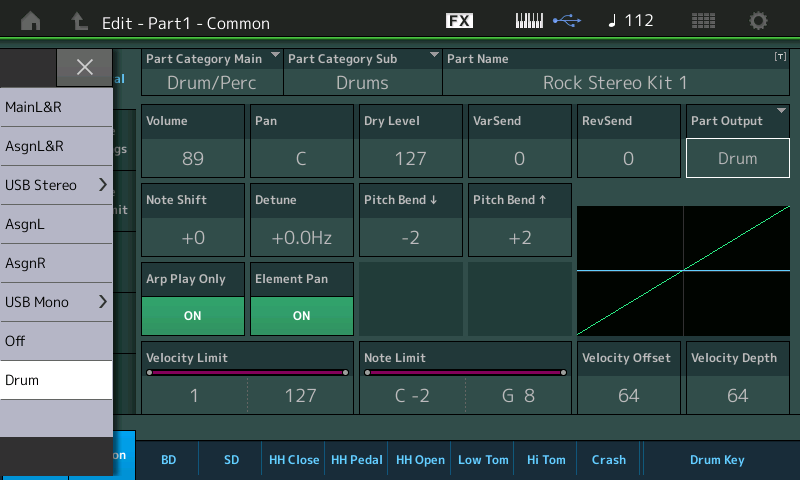
What we need to understand about the DRUM PART is how it works as a whole. A Drum Kit, like all PARTs, can have two INSERTION EFFECTS. And just as we saw in the Normal PART, an individual Element could be routed to Ins A or Ins B as we may desire. Once we have set the Kit's PART OUTPUT = “Drum”, we can select to send individual Drum Keys to Assignable Outputs. Set the Connect = Thru - this bypasses the Insertion blocks. you can see this in the flow chart shown on the screen exactly how each Key’s signal is routed:
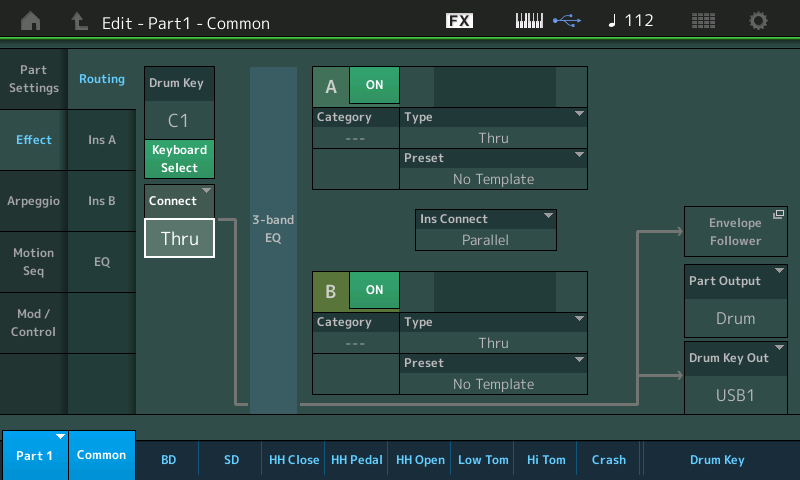
This will be important to understand about Drum Kit routing. The screen above shows the Drum PART (PART 1), Common, Effect, Routing. As you touch a KEY (“Keyboard Select” is active, green), you can see its routing connection through INSERT A, or INSERT B or THRU. The THRU option will allow you to send that drum and isolate it to its own DRUM KEY OUT. Shown below is the Bass Drum (C1) Key's "Osc/Tune" screen. "Connect" = Thru and the "Drum Key Out" can be set as desired:
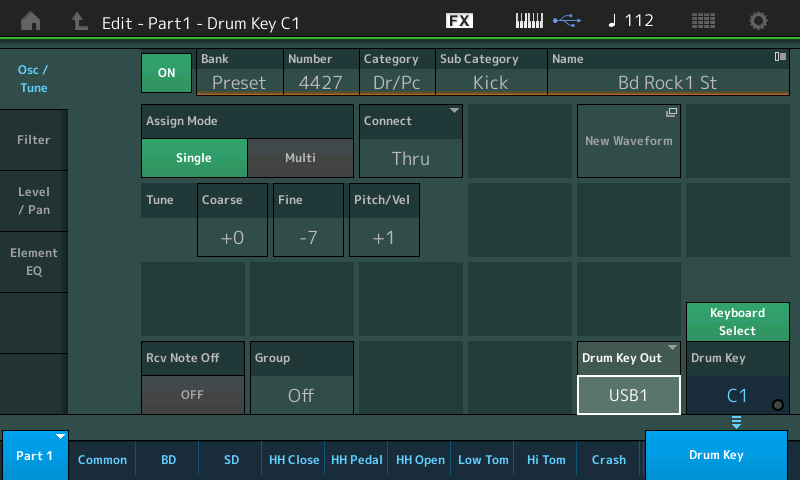
It is set by touching the DRUM KEY OUT box to view the option pop-in menu:
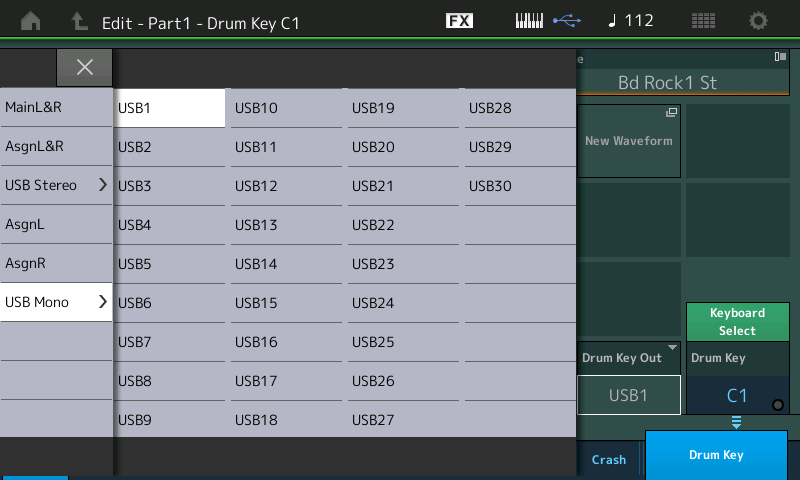
- Press the snare Key D1 to recall its data.
- Set the “Drum Key Out” = USB Mono > USB2.
- Touch each of the three Hihat Keys (F#1, G#1, A#1) Assign each in turn to “USB Mono > USB3”.
Such an assignment can only take place when the overall PART OUTPUT for the entire Kit has been set to “Drum”, then the individual Drum Key has been set to THRU (bypassing the Insertion A and B blocks). Within a Drum Kit Part, a Drum Key can “share” the Insertion Effect with the other Keys, so in the Drum universe the Insertion Effects are the “shared” effects.
Options
Lets take a look at the Drum Key options. For the sake of learning, let’s recall the factory Kit “Dry Standard Kit”. Using the Part Category Search, Select the “Dry Standard Kit”. More of a neutral sound, the character is different.
As you press various Keys in this Kit, while viewing the Part Common Effect Routing screen, notice that some Keys are routed to the Insertion blocks while others are routed THRU:
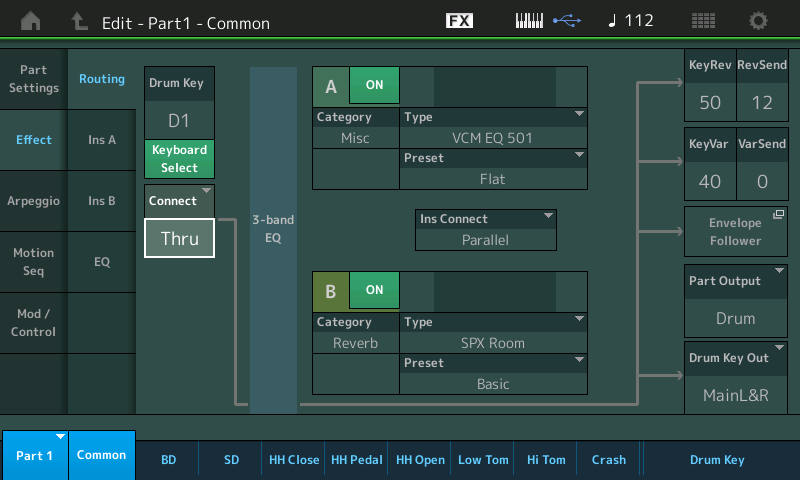
If you wanted to route the SD on D1 to an assignable Output, you would have to set the Connect parameter = “Thru”. Doing so insures its isolation from the other Drum Keys which may be using the Insertion Effects, When Thru is selected, and the PART OUTPUT = Drum, you will see the "Drum Key Out" option appear (lower right corner).
If you CONNECT the Drum Key to an INSERTION EFFECT block, for example, shown below D1 is 'connected' to the INS B block (SPX Room reverb):
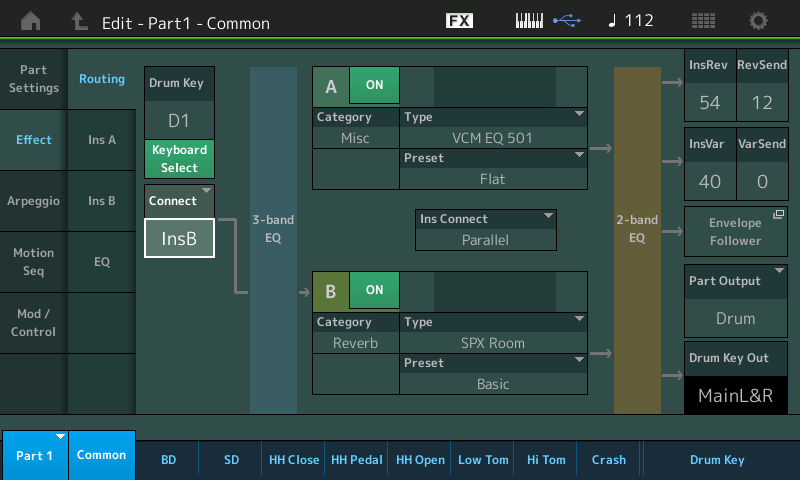
The "Drum Key Out" parameter will be unavailable (shown in black background which is the equivalent of being grayed out) for selection. Once you opt to use an INSERTION EFFECT, the signal will be returned to the “shared” system output with the rest of the drum Keys in this Kit.
Take your time with the routing options. An entire Drum Kit, all 73 Elements, each have the option to ’connect’ via the ROUTING scenario. If you want to route the entire Kit as a Stereo Instrument simply set the PART containing the KIT to "PART OUT" = "MAIN L&R", but if you want to route some of the drums as individuals, you must set the "PART OUT" = "Drum". This is the impetus for each KEY being able to be assigned to the MONTAGE Output matrix and having that assignment respected.
In a Drum PART, you may find certain drums routed to INSERTION Blocks in groups. For example, in the "Dry Standard Kit" it is the Tom-Toms on D2, C2, B1, A1, and G1 that are utilizing the VCM EQ 501 as a group. Anything you route to INSERT BLOCK A would share the EQ setting designed for the Toms.
If you are not going to use the Toms in your particular composition, you can certainly reallocate the INSERT EFFECT A block to do something else. Again, there is no one way to use the resources, but knowing how to explore them can help you when you need to accomplish something. I have often talked to long-time Motif users, who never realized that Insertion Effects could be applied usefully within a Drum Kit because they did not understand the routing and therefore could not see the potential. The INSERT CONNECTION parameter (located between the two Insert blocks) is set to "Parallel" meaning that these two effects can be used independently. Drums are not like a guitar where you are going to put multiple effects in a row - you might want to dedicate one of the Effect blocks to a group of drums (like the Toms) and the other to create an ambience for the Percussion.
In most MONTAGE/MODX/MODX+ Kits you will notice that Latin Percussion is covered in the two octaves bewteen middle "C", C3 and C5. And it is these that are using the SPX ROOM to create a "percussion environment": giving the ability to treat the reverb on the percussion separately from that on the prinicipal drum kit sounds. This bit of subtle difference can give your “Drums” more presence in your mix, instead of just a drummer, you can create the illusion of a drummer and several percussionists. If you begin to listen to your favorite recording, notice how percussion instrument sounds “fit” when there is also a drummer. Good use of placement (both Volume and Pan position) is critical.
[quotePost id=119611]How to make drums better?
Is it A distortion and B compressor fundamental all of I need?
Yes, It is.
1. I haven't some words special about it.
But one problem. It could be better than have send control from even key to FX.
Why all keys is equal fx? Only thru, A or B. I would like to send a value.
2. I found Harmonic Enhancer. Is it good practice to use with snare or kick?
What is good for acoustic cymbals or hats?
acoustic, pop, funk, soul
PS Sorry default sounds like pans[/quotePost]
The easiest cheat for the gnaff drum sounds is to head to the EQ Page of each sound and put it to 12 or 18dB up. Dirty trick, but can add that bit of distortion you want, and make them hit much harder. And saves you one effects slot. Though you'll definitely need the compressor if you do them all at 18dB up to ramp down the peaking.
[quotePost id=119617]From the article on MONTAGifying Motif: “Rule the Earth” analysis…. (Although written for the MONTAGE, with adjustments for the number of output buses, the MODX and MODX+ work the same way). “Rule the Earth” is one of the converted Factory Motif XF Performances)……
Drum Routing
Drum Kit PARTS are different from Normal PARTS, and it is not just that old joke about drummers being different from musicians, in a Drum Kit PART each KEY is autonomous. Each Key is a different instrument. While in the typical Normal PART all Keys make up one instrument. A Drum Kit is a conglomeration of individual drum and percussion sounds herded together into a single entity. Mostly each instrument occupies a single Key, although there are exceptions: the Hihat occupies three keys, the triangle occupies two keys... for different articulations. Each Drum Key has its own Waveform, its own Volume control, its own Pan position, its own Filters (HPF and LPF), its own AEG, its own EQ, it can even be tuned individually and can either receive or ignore NOTE-OFF. Where there is a Normal PART, the Keys usually share these things as a group; in a Drum PART, each KEY can stand alone. Each Key can even be routed to its own audio bus Output.
How can this be accomplished?
Let's say we want to take BD, SD and the three HHs and route them on their own buses to the DAW.
Drum Kit PARTS, like Normal PARTs, initially default to being assigned to the "Main L&R" Output. We can, on a DRUM KIT PART, select PART OUTPUT = "Drum". This allows us to then route individual KEYs to an assignable Output:

What we need to understand about the DRUM PART is how it works as a whole. A Drum Kit, like all PARTs, can have two INSERTION EFFECTS. And just as we saw in the Normal PART, an individual Element could be routed to Ins A or Ins B as we may desire. Once we have set the Kit's PART OUTPUT = “Drum”, we can select to send individual Drum Keys to Assignable Outputs. Set the Connect = Thru - this bypasses the Insertion blocks. you can see this in the flow chart shown on the screen exactly how each Key’s signal is routed:

This will be important to understand about Drum Kit routing. The screen above shows the Drum PART (PART 1), Common, Effect, Routing. As you touch a KEY (“Keyboard Select” is active, green), you can see its routing connection through INSERT A, or INSERT B or THRU. The THRU option will allow you to send that drum and isolate it to its own DRUM KEY OUT. Shown below is the Bass Drum (C1) Key's "Osc/Tune" screen. "Connect" = Thru and the "Drum Key Out" can be set as desired:

It is set by touching the DRUM KEY OUT box to view the option pop-in menu:

- Press the snare Key D1 to recall its data.
- Set the “Drum Key Out” = USB Mono > USB2.
- Touch each of the three Hihat Keys (F#1, G#1, A#1) Assign each in turn to “USB Mono > USB3”.
Such an assignment can only take place when the overall PART OUTPUT for the entire Kit has been set to “Drum”, then the individual Drum Key has been set to THRU (bypassing the Insertion A and B blocks). Within a Drum Kit Part, a Drum Key can “share” the Insertion Effect with the other Keys, so in the Drum universe the Insertion Effects are the “shared” effects.
Options
Lets take a look at the Drum Key options. For the sake of learning, let’s recall the factory Kit “Dry Standard Kit”. Using the Part Category Search, Select the “Dry Standard Kit”. More of a neutral sound, the character is different .
As you press various Keys in this Kit, while viewing the Part Common Effect Routing screen, notice that some Keys are routed to the Insertion blocks while others are routed THRU:

If you wanted to route the SD on D1 to an assignable Output, you would have to set the Connect parameter = “Thru”. Doing so insures its isolation from the other Drum Keys which may be using the Insertion Effects, When Thru is selected, and the PART OUTPUT = Drum, you will see the "Drum Key Out" option appear (lower right corner).
If you CONNECT the Drum Key to an INSERTION EFFECT block, for example, shown below D1 is 'connected' to the INS B block (SPX Room reverb):

The "Drum Key Out" parameter will be unavailable (shown in black background which is the equivalent of being grayed out) for selection. Once you opt to use an INSERTION EFFECT, the signal will be returned to the “shared” system output with the rest of the drum Keys in this Kit.
Take your time with the routing options. An entire Drum Kit, all 73 Elements, each have the option to ’connect’ via the ROUTING scenario. If you want to route the entire Kit as a Stereo Instrument simply set the PART containing the KIT to "PART OUT" = "MAIN L&R", but if you want to route some of the drums as individuals, you must set the "PART OUT" = "Drum". This is the impetus for each KEY being able to be assigned to the MONTAGE Output matrix and having that assignment respected.
In a Drum PART, you may find certain drums routed to INSERTION Blocks in groups. For example, in the "Dry Standard Kit" it is the Tom-Toms on D2, C2, B1, A1, and G1 that are utilizing the VCM EQ 501 as a group. Anything you route to INSERT BLOCK A would share the EQ setting designed for the Toms.
If you are not going to use the Toms in your particular composition, you can certainly reallocate the INSERT EFFECT A block to do something else. Again, there is no one way to use the resources, but knowing how to explore them can help you when you need to accomplish something. I have often talked to long-time Motif users, who never realized that Insertion Effects could be applied usefully within a Drum Kit because they did not understand the routing and therefore could not see the potential. The INSERT CONNECTION parameter (located between the two Insert blocks) is set to "Parallel" meaning that these two effects can be used independently. Drums are not like a guitar where you are going to put multiple effects in a row - you might want to dedicate one of the Effect blocks to a group of drums (like the Toms) and the other to create an ambience for the Percussion.
In most MONTAGE/MODX/MODX+ Kits you will notice that Latin Percussion is covered in the two octaves bewteen middle "C", C3 and C5. And it is these that are using the SPX ROOM to create a "percussion environment": giving the ability to treat the reverb on the percussion separately from that on the prinicipal drum kit sounds. This bit of subtle difference can give your “Drums” more presence in your mix, instead of just a drummer, you can create the illusion of a drummer and several percussionists. If you begin to listen to your favorite recording, notice how percussion instrument sounds “fit” when there is also a drummer. Good use of placement (both Volume and Pan position) is critical.[/quotePost]
The great sharing though I haven't yet understand all the content. Have a good time!
1. I haven't some words special about it.
But one problem. It could be better than have send control from even key to FX.
Why all keys is equal fx? Only thru, A or B. I would like to send a value.
There is a Send amount from each Drum Kit KEY going to the System (Reverb and Variation) Effects. When a Drum Kit Key is routed to an Insertion Effect it is the same as taking it out of the main stereo Drum mix and routing it on a separate feed to one or the other of the Insertion Blocks.
Take your time — you can follow the routing of each of the 73 Drum Keys using the screen. The Keys that give a Drum Kit it’s personality are typically located in the two octaves from C1 ~ B2. In other words, a Rock Kit would have a Rock oriented drum set located between those notes, a HipHop Kit would have drums oriented to HipHop between those same keys.
There is no Send amount when you re-route signal from an instrument to an Insertion Effect. The “Insertion” effect is called this because the entire signal source (in this case a Drum Element) is routed through the Effect.
A real world example of an ‘inserted’ effect would be talking the output of an electric guitar and plugging it into a Distortion stomp box, then taking the output of the distortion and going to sound system — the Distortion is, literally, inserted INLINE with the guitar signal.
The common SEND/RETURN routing scenario is used when each channel on a mixer has a Send amount to go to, say, a Reverb - responsible for the room acoustics that the entire band is playing in. A portion of the signal is routed via the Send. The sum total of all Sends are mixed prior to entering the Reverb processor… and one reverberated the entire wet signal is returned to the Main L&R as a composite (merged) signal.
Insertion delivers a kind of isolation.
Send/Return is a fully shared, communal situation.
If you study the “Distorted Kit”, you will see (by selecting each Drum, in turn), which ones are sent to the Distortion Insertion Effect block. The Insertion Blocks are setup in “Parallel” so you can route a drum to one OR the other… if you set it to B>A the Selected Key will go to the Compressor before going to the Distortion.
2. I found Harmonic Enhancer. Is it good practice to use with snare or kick?
What is good for acoustic cymbals or hats?
In general, you can do whatever sounds good to you. But know this, an Harmonic Enhancer works to do just what it says… and while it might sound logical when your stated goal is “Bright Drums”
Be careful you don’t wind up with “Crispy Drums”. Let you ears be you guide.
But before I would explore an Effect to ‘fix’ the problem, Yamaha has provided you with several Equalizers - whose sole purpose are to brighten/darken your Drums in the context of the music that surrounds them. Remember, you are EQ’ing to make the drums FIT with your chosen instrumentation. No one EQ setting or trick works in all situations. Context is very important.
First, each of the 73 Drum Keys has its own “Element EQ” which can be configured as a “2-Band EQ”, as a “Parametric EQ”, or as a straight 6, 12, 18dB Boost.
In addition to each Drum Key having its own “Element EQ” - the entire Kit goes through a “3-Band EQ” prior to the Insertion Blocks, and a configurable EQ/Filter post (after) the Insertion Blocks. This one can be configured as an 2-Band EQ or as a High Pass, Low Pass Filters w/Peak or Shelving available.
I would work with the plethora of Equalizers available to your Drums before I would ever mess with the Harmonic Enhancer on Drums (just my personal take).

