Notifications
Clear all
MODX/MODX+ Series Synthesizers
6
Posts
4
Users
0
Reactions
898
Views
Topic starter
Should Keyboard Control be manipulated during live performance, to add and subtract parts? Methinks not. For example, I can ADD an organ part to a piano part by highlighting it, but to SUBTRACT the organ part, I need to 1. Deselect organ keyboard control; 2. Also highlight the piano part.
I'm guessing setting Scenes is a better option.
Also, even after the organ Keyboard Control is deselected, organ keeps playing, this time without the piano part. Is this functioning as intended?
Posted : 12/12/2021 7:28 pm

You need to utilize scenes to do this live. Because of the way keyboard select=OFF Parts work when they are selected (quirky IMO) - you cannot just touch these buttons without, as you say, de-selecting. So you would need to press [PERFORMANCE] (HOME) to deselect. It's not preferable to have to remember to do two things when in the heat of a song. This is where the SCENE buttons come in.
If you want to press a touchscreen button - use MUTE buttons. They don't act strange like the keyboard control buttons do.
Current Yamaha Synthesizers: Montage Classic 7, Motif XF6, S90XS, MO6, EX5R
Posted : 12/12/2021 7:37 pm

Should Keyboard Control be manipulated during live performance, to add and subtract parts? Methinks not. For example, I can ADD an organ part to a piano part by highlighting it, but to SUBTRACT the organ part, I need to 1. Deselect organ keyboard control; 2. Also highlight the piano part.
I'm guessing setting Scenes is a better option.
Also, even after the organ Keyboard Control is deselected, organ keeps playing, this time without the piano part. Is this functioning as intended?
There are several ways to accomplish the task of switching between an organ and a piano. As you realize, interacting with the screen KBD CTRL buttons or even the MUTE buttons is not optimal while performing. They are best used when editing and setting up to record/playback data with the on board sequencer.
Because the instruments you maybe switching between might be Multi Part programs, using the screen buttons is not how you want to do this when performing…takes too long and is not designed for that purpose.
When performing you can either make an immediate switch using pre-programmed [SCENE]s or you use the Super Knob (or FC7 pedal) to make the change as gradual or immediate as you desire.
Super Knob Morph Method
The “CFX + FM EP 2” is an example of how the Super Knob morphs between an acoustic piano (CFX) and an electric piano (FM-X)… this could as easily be between a piano and an organ or any instrument sounds you desire — even if each consist of several Parts. Recall “CFX + FM EP 2” — When the Super Knob is at minimum you are playing the piano, as you raise the Super Knob (or advance an FC7 pedal plugged into Foot Controller 2) you will be turning down the acoustic piano and raising the volume of the electric piano. When you reach maximum you are playing just the electric piano.
In this example, they crossfade, but this can be programmed to be an immediate change if you prefer. You have control over how the crossfade takes place — you can overlap the sounds, you can program it so that it is immediate.
You’ll notice that both Parts have KBD CTRL active — this allows you to address both simultaneously, yet control when they are sounding independently.
The two buttons located slightly above and on either side of your Super Knob (Super Knob Position) can also be used to switch these two instrument sounds immediately. The button just to the left of the Super Knob (11 o’clock) will recall minimum (acoustic piano) and the button just to the right (1 o’clock) will recall maximum, in this case the FM-X electric piano.
[SCENE] Method to manipulate KBD CTRL
A Scene is like “snapshot” memory. It can memorize for instant recall various settings and parameters you may wish to access while performing. You set them up ahead of time detailing what you wish to happen at any moment.
If you want the organ sound active initially, you would do the following:
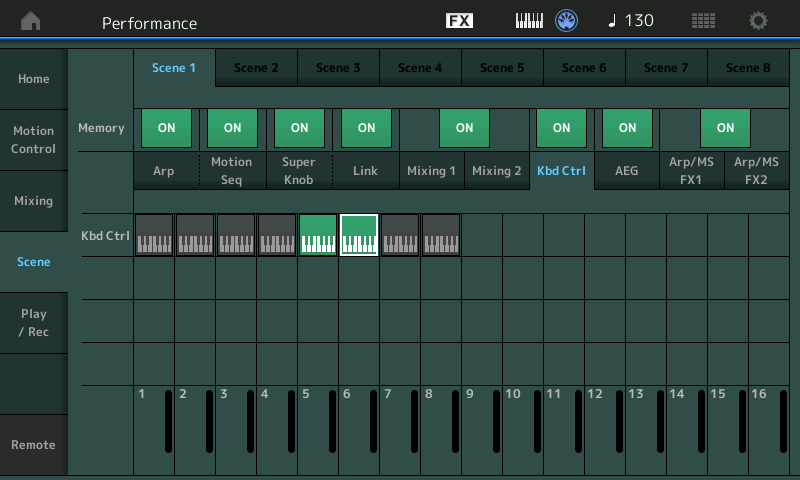
From the HOME screen:
Touch “Scene” in the first column
The currently active Scene will appear in bright blue across the top of the screen
Find the KBD CTRL Memory Switch and set it to ON
Tap the “KBD CTRL” just below the memory switch to view the Parts 1-8 and their KBD CTRL switches.
Activate (green) the Parts that make up the organ sound.
Along the top select “Scene 2”
Deactivate the organ KBD CTRLs (grey) and activate (green) the KBD CTRLs for the piano Parts.
Return to the HOME screen… now using the BLUE [SCENE] buttons to move between organ and piano.
Press [STORE]
Name and store your Performance to User memory.
Any of the first 8 Parts can be manipulated with KBD CTRL… using the Scene buttons to make the change allows you to seamlessly switch between different combinations of the Parts 1-8.
Extra Credit
These are two of the ways you can switch the sounds you are performing — really, leave screen interaction for when you are editing and/or preparing to perform. The MONTAGE has dedicated front panel buttons that offer other methods to operate on the fly… but with the MODX, you’ll want to prepare for the contingencies ahead of time…
Scenes can also memorize Volume, and Mute status, both of which can be used to accomplish your goal. The difference between using these versus the KBD CTRL memory switches, is how the sounds transition.
Using KBD CTRL allows seamless transitioning between instruments… means you can hold the last chord of the organ, press the next Scene button to recall the piano without cutting off the organ sound. Once you press the [SCENE] button all subsequent Notes will play from the piano (the organ will hold until you let go of its trigger keys).
Volume and Mute memory (found under the Scene Mixing heading) are immediate cutoff of the Parts sounding.
Hope that helps. If you need more info post back here.
Posted : 12/12/2021 9:02 pm
Topic starter
The third way to add/subtract parts would be simply to use the sliders, right?
Thanks for your responses!
Posted : 13/12/2021 6:42 pm
The third way to add/subtract parts would be simply to use the sliders, right?
Thanks for your responses!
Absolutely, this should work. And all volumes set this way can be saved in Scenes, too.
Will add to polyphony count though, if this is a problem, as it's only a volume reduction, not turning those parts off. The notes are still being played by the synth engine, just not hearable.
But you might find ideal blends this way, of subtle hints of the flavours of the other sounds that reminds and/or foretells the listener of what's before or soon.
Posted : 13/12/2021 9:11 pm
The third way to add/subtract parts would be simply to use the sliders, right?
This can work but might be difficult if the instruments take up multiple Parts… and sometimes the Sliders are not in charge of Part Volume. There are Performances where the Sliders have limited or no effect on the Part Volume because a different Controller is being used to apply change, either full or partial control.
Thanks for your responses!
You’re quite welcome.
Posted : 13/12/2021 9:17 pm
