Goodmorning everyone.
I immediately ask the question:
With cubase I made 3 midi tracks on which I have to play (for an exam). Obviously I used all possible midi standards for maximum compatibility.
I would like to reproduce the midifiles with MODX and store them in some memory location so that I can use them at any time, complete with all the changes I will make (such as instrument, volume, etc.)
I tried to load from USB and so far it works ... but once saved on memory stick and restarted MODX there are no memory locations.
Is there a chance to do all this? It would be very important.
Thanks a lot to everyone
I tried to load from USB and so far it works ... but once saved on memory stick and restarted MODX there are no memory locations.
You need to associate (link) the Song with a MODX Performance.
Your .mid file will be stored to the MODX internal memory once you Load it from your USB stick
The Performance that you use is stored elsewhere in the MODX internal memory.
Once you put them together you can create a -link- between them.
Here’s how:
Play the data from Cubase — build the MODX Performance
You will setup the Performance — using as many as 16 Parts. Once you have the Instruments placed in the Parts press [STORE], give the Performance a unique Name (very important). Tap “Done”.
This will Store your Performance to the MODX User Bank.
Load the .mid file to the MODX Sequencer if you have not already done so... if you have previously loaded it, then it will still be in memory
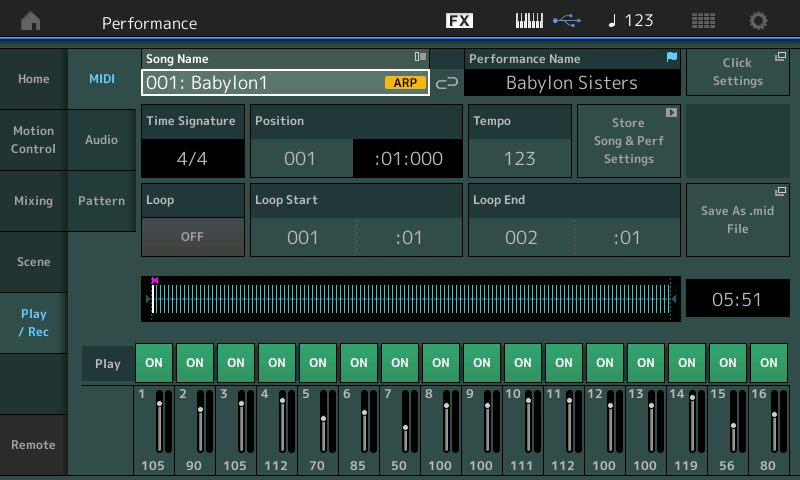
__ From your Performance HOME screen, tap “Play/Rec”
__ Touch “MIDI”
The title box will allow you to scroll through all the Songs you currently have in memory. Find your Song... or
__ Find a blank Song location, tap the Song title box to see a pop-in menu
__ Tap “Load” > set “Content Type” = .MID File
__ Load your .mid to the MODX
Now that you have the Song title next to the Performance name you want to use
Verify everything plays as you expect, make sure the Tempo is correct...
Tap the box “Store Song and Perf Settings”
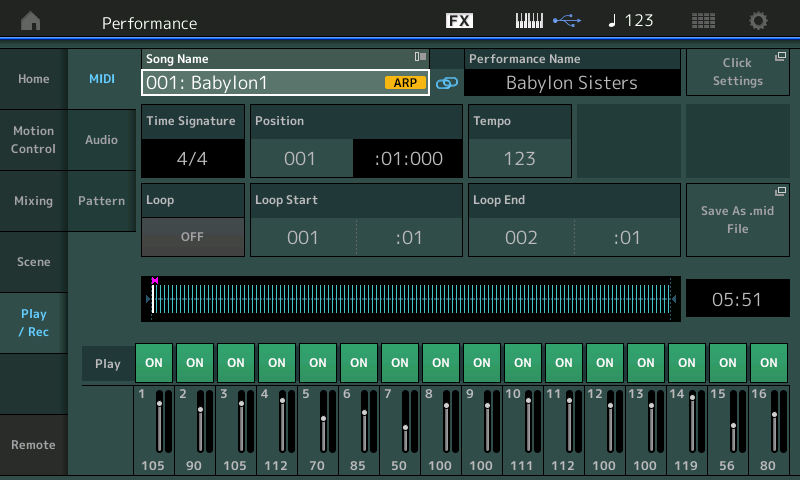
An icon will show the (blue) link between the Song title and the Performance — anytime you recall this Song title, it will automatically recall this User Performance.
Make a USER File .X8U (this will save for long term storage, your Performance.
Your Song will remain in internal memory. Songs and Patterns are Saved when you Save a “BACKUP FILE” (along with everything).
Extra Credit:
You only ever need to load a .mid file to the MODX once.
When you load a .mid file from a USB stick, the MODX places it in a special SONG (or PATTERN) Folder.
Press [UTILITY] > “Contents” > “Data Utility” > The folders are named... tap “Song”
Here you can find/manage each Song that you have loaded or created using the MODX.
The items loaded here will remain in memory until you directly DELETE them, or you “Initialize All Data” in your MODX or you restore a BACKUP FILE that does not contain these titles. Basically, you have to want to remove a Song or Pattern.
Loading User Files, does not overwrite your Songs or your Patterns.
Play the data from Cubase — build the MODX Performance
But I don't work now with PC (no more cubase). Midifiles I've already created and now I would like works directly with .mid
Read again the post answer whether you have Cubase or just the .mid file
You already have your MODX Performance?
no I have to start today to create everything
So how can we help you?
You are very kind!
all I need is a step-by-step diagram on how to load midi, save, and find it when I recall it. I think what you suggested works, I just have to try it. Unless there is another quick and easy procedure ...
Bad Mister, I followed your instructions to the letter, but when I turn off MODX and turn it back on, loading that created performance does not bring any midi with it.
Here's what I did:
created a new performance (INIT AWM). I assigned the appropriate instrument to each track, then "Play / Rec" - MIDI and I loaded my midi from the stick. So I renamed the performance with the same name as the loaded midi. The blue chain has appeared. I did "Store Song and Perf Settings" then, for further confirmation, I pressed the STORE button. I turn it off, turn it back on ... and on that performance there is no more midi. How should I do?
Bad Mister, I followed your instructions to the letter, but when I turn off MODX and turn it back on, loading that created performance does not bring any midi with it.
That is backwards...
When you power on your MODX
From the HOME screen of any Performance
Touch “Play/Rec”
This recalls the Sequencer
Touch “MIDI”
Select you Song title...
This will automatically recall the Performance.
The Song goes and gets the Performance.
The same Performance could be associated with many Song titles.
Think of the Performance as “the band”
The same band (instrumentation) could be associated with 100 Songs.
Each Song recalls the Performance.
Perfect.. seems to work fine. But... Could I edit midifile in any way? For ex... only changer reverb or kind of instrument... Obviously for save this edits
You could change instruments and reverb amount by editing the Performance and [STORE] (overwrite).
Current Yamaha Synthesizers: Montage Classic 7, Motif XF6, S90XS, MO6, EX5R
You could change instruments and reverb amount by editing the Performance and [STORE] (overwrite).
thanks... I tried but seems don't store my choices...
And again, for the benefit of all confused users like me ... do you think this video can explain how to link a midi to a performance? Obviously the final part, when the modx is restarted, I have to change it
do you think this video can explain how to link a midi to a performance?
No... no... no... that is way too hard to follow.
Rather than correct every thing that is wrong with that video... see the step-by-step below. I can see you are not understanding the workflow, quite yet. There are two things that you will be working with ... one is the Performance (the instruments)... the other is the Sequence (the music).
For the sake of clarity and for those who are confused... please recognize that any step-by-step routine can be modified by you... this means you do not have to work on these two components separately. In other words, you can create the Performance and Store it before you start recording the sequence... OR you can edit the Performance, while you are working on the sequence data, adding new instruments as you go (as long as you remember to STORE the changes to your Performance).
But just realize, if I am going to show someone how it works, I would show the simplest setup method.
Then when they are ready, they can begin to customize the work flow, as they require. So you do not have select all your instruments first, you can go back and forth.... BUT. remember if edit the Performance, you must press [STORE] and write your change into the Performance... every time you make a change.
The Sequence - any change you make is automatically saved!
Here’s what we will do (this could be the script to a video)
1 — Build our Performance, Name and Store it to User Bank
2 — From the Home screen of our Performance we will prepare to start recording Tracks
3 — Record tracks, one-by-one;
4 — Link the Sequence to the Performance; Power down and back on... then we will recall the Sequence.
STEP 1: Pre-Production: Hire the Musicians — Building our Performance
Notes: We will illustrate how to create a Performance for Sequencing to the linear “MIDI Song”. We will cover traditional one instrument track at a time recording. Our example will be three instruments (however, you can use as many as you desire up to 16... we will show you three, the others are setup in a similar fashion).
From the HOME screen:
Press [CATEGORY]
Set “Bank/Favorite” = All
Set “Attribute” = All
Tap “Init”
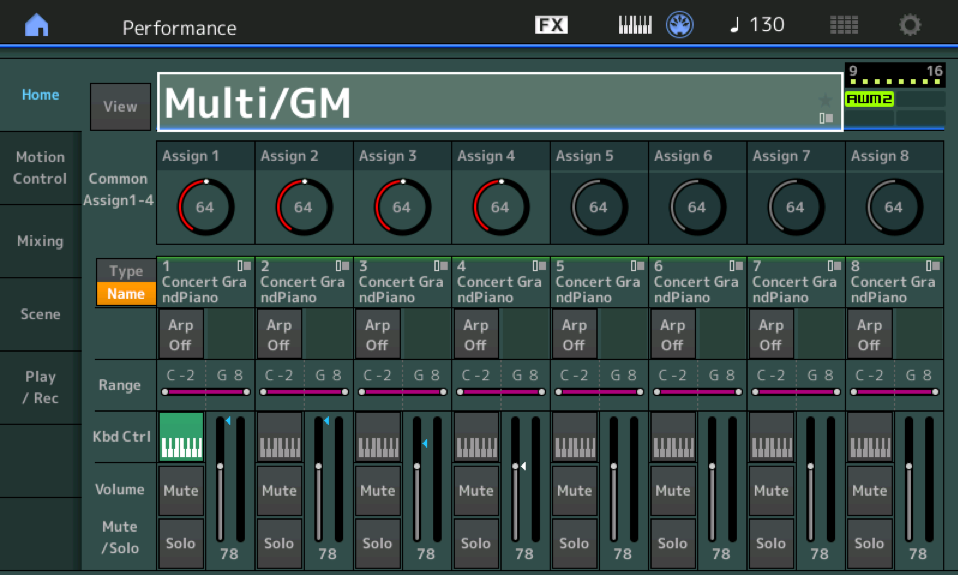
Select “Multi/GM”

This is the starting point for creating your own multi Part Performance. It places a “dummy” Part in each location which you can replace with the instrument of your choosing.
Press [HOME]
Tap “FX” on the very top line of the screen.
Find the “KBD CTRL LOCK” set it On
This will ensure that when we select an instrument for a Part, only the selected instrument will sound. When you are building Performances for layered play, you would want each new selection to sound immediately along with the others, but when Sequencing, we only want only our selection to sound. The KBD CTRL LOCK fixes the KBD CTRL to Part 1. This means if you are on the HOME screen Part 1 will play, but when you select any other Part, 1-16, then only the selected one will sound. This is perfect when sequencing instrument-by-instrument.
Return to the HOME screen or press [EXIT] to return.
In the screen, tap “Part 1” to select it
The pop-in menu appears, tap “Category Search”
The “Part 1 - Category Search” screen appears.
Set “Bank/Favorite” = All
Set “Attribute” = Single
The search field will show green programs — these are the MODX SINGLE Part instruments for track sequencing
I’m ready to select my band:
Part 1 = Drum Kit = Real Drums 1
Repeat the selection process for each Part you wish to use... example:
Part 2 = Bass
In the screen, tap “Part 2” to select it
The pop-in menu appears, tap “Category Search”
The “Part 2 - Category Search” screen appears.
Part 3 = E.Piano
In the screen, tap “Part 3” to select it
The pop-in menu appears, tap “Category Search”
The “Part 3 - Category Search” screen appears.
Rinse and repeat ...
Once you have assembled the band...
Press [STORE]
Name the Performance
Tap “Done”
We now have our band (Performance) and as mentioned, you can use as many instruments, up to 16, as you want.
Storing it to internal memory means it is in the User Bank.
STEP 2: Let’s Go to the Studio Get Ready to Record
From the HOME screen you can launch the Sequencer by any of the following 3 methods...
1 - Press the RECORD button - this launches a new Song or Pattern (use ONLY when creating NEW sequences)
2 - Press the PLAY button - this returns you to the most recently viewed sequence
3 - Tap “Play/Rec” in the first column of the screen, this returns you to the most recently viewed sequence
We are recording a New Sequence, so go ahead and press the [RECORD] button
This takes us to either a new MIDI Song or new Pattern.
You would select “Midi” (Song) when you just want play linearly
You would select “Pattern” when you wish to record in shorter looping sections.
Here is the important thing to know... Every Part has its own dedicated Track. The Part that you select will sound when play the keyboard The Part that is sounding, will be the Track that records.
“What you hear is what you get”
STEP 3 Record your data to the Sequencer...
The original Track when recorded - if you do not like what you have done - press [RECORD], set “Rec Type” = Replace.
Replace Record will wipe out whatever is in the Sequencer.
If you like your initial recording and are ready to move to Track 2, *select* Part 2, press [RECORD], then set “Rec Type” = Overdub.
You use Overdub Record... any time you are adding new data to existing data.
You use Overdub Record... any time you are adding new data to existing data.
Repeated for emphasis.
STEP 4: Finalize and create the link
Tap the box that shows the Song/Pattern Name and give your composition a Name.

When you have completed your recording... you can tap the box “Store Song and Perf Settings” or “Store Pattern and Perf Settings”.
A blue chain link icon appears indicating the bond between this Sequence and this Performance.

This literally takes the Song or Pattern Title and stamps it with information that allows it to go and retrieve this particular Performance whenever you select this Title.
— Power down and back on... then we will recall the Sequence.
Power down the synth
When you power on, go to the HOME screen of any Performance (any Performance... it does not matter)
Tap “Play/Rec” or press the [PLAY] button to move to the Sequencer
Highlight the Song/Pattern Name box... if you recorded a linear Song you’ll touch “MIDI”, if you sequenced a Pattern of course, you’ll tap “Pattern”.
Use the Data Dial to recal your Song or Pattern... the linked Performance will automatically appear.
Hope that helps clarify it.
