Hello,
I saved a performance with an audio file attached. When I turn the MODX back on, the audio file is not present and I always have to repeat the reload operation ... How can I solve?
Also I would like to know if I can start the "play" of the audio file when I start playing. Thank you all
Sal.
Hello,
I saved a performance with an audio file attached. When I turn the MODX back on, the audio file is not present and I always have to repeat the reload operation ... How can I solve?
Also I would like to know if I can start the "play" of the audio file when I start playing. Thank you all
Sal.
When you STORED your Performance, you did not save an audio file attached. This could just be how you are saying this. It is not clear if you are using a “Live Set” or a “New Waveform” — which makes a huge difference in giving you an answer as to how to proceed.
If you mean by “audio file” - Audio recorded to a USB stick - that audio is saved on the USB stick, not to your Performance.
You don’t mention LIVE SET at all… but perhaps you mean you linked the USB Audio File to a Performance via a Live Set slot… If this is the case, it is the Live Set slot that links the Audio File with the Performance.
The Audio File is not apart of the Performance unless you import the audio wave into a NEW WAVEFORM… Then you assign it to an Element. By assigning it within the Performance it will play like any other Waveform— when you touch the Key that you assign to trigger it.
Since streaming a .wav from an external device like a USB stick must be started with Transport [PLAY] button, and creating a New Waveform will allow you start playback by touching a Key, you may wish to explore this method.
It is not clear where your audio is actually stored… nor the nature of that audio. Most Waveforms last only a few milliseconds to a few seconds each, but if you have a lengthy audio file: a maximum of 6 minutes 20 seconds can be housed in a single New Waveform.
Let us know.
The audio file is hosted on a USB stick, and lasts 1 'and 45 ". I created a live set in INIT DRUM and assigned the waveform but the playback only lasts 1", not knowing any other solution I used the audio pairing.
Can you give me further explanations on how to create a live set with one or more wave files assigned to different keys and also how to know if the 1Gb memory is already used ?? thank you and greet you
Sal.
Drum Kit Audio Clip
The audio file is hosted on a USB stick, and lasts 1 'and 45 ". I created a live set in INIT DRUM and assigned the waveform but the playback only lasts 1", not knowing any other solution I used the audio pairing.
Can you give me further explanations on how to create a live set with one or more wave files assigned to different keys and also how to know if the 1Gb memory is already used ?? thank you and greet you
Sal.
An audio wave that is Stereo (44.1kHz) and 1 minute and 45 seconds long will use approximately 17.5MB
(based on 10MB per stereo minute).
I assume you would like the entire audio clip to play… in order to accomplish this you must place the Wav on a Key of a Drum Kit.
Background
Drum Kits differ from Normal Instruments in the following behavior. When you press a key to trigger a Normal Instrument sound, you are used to holding the key down to turn On the instrument sound and you release the key to end its sounding. Duration of key engagement is important. Drum Kit sound behave differently. Most Drum and Percussion sound ignore key off. In other words when you hit a drum sound the entire waveform plays without you having to control duration with key engagement. They mostly play from start through end without you having to hold the key. Think of a Crash Cymbal once you tap the key the entire amplitude envelope plays from beginning to end without requiring you to hold the key.
While the Waveforms of a Normal instrument all are combined to make a single instrument like a flute, or a piano. A Drum Kit each Key is autonomous and has a separate Drum or Percussion instrument on each Key.
The takeaway here is, by putting your audio clip (wav) in a Drum Kit, you can create an amplitude envelope that ignores Note Off. This means you can set it so it plays from beginning to end once triggered… without you holding down the key for the entire time.
Drum Kit Rules
A Drum Kit allows you to place Waveforms on any of 73 Keys, C0 thru C6.
A Waveform can be made up of multiple audio samples — and because Drum/Perc occupy just a single key usually, each can be assigned to play at a specific Velocity Range
When using a Drum Kit for audio clips we’ll stick to one per key (to start).
Assigning Wav to Drum Kit
Recall an INIT DRUM Kit
Press [EDIT]
In the lower Right corner touch Drum Key, and activate “Keyboard Select” (green)
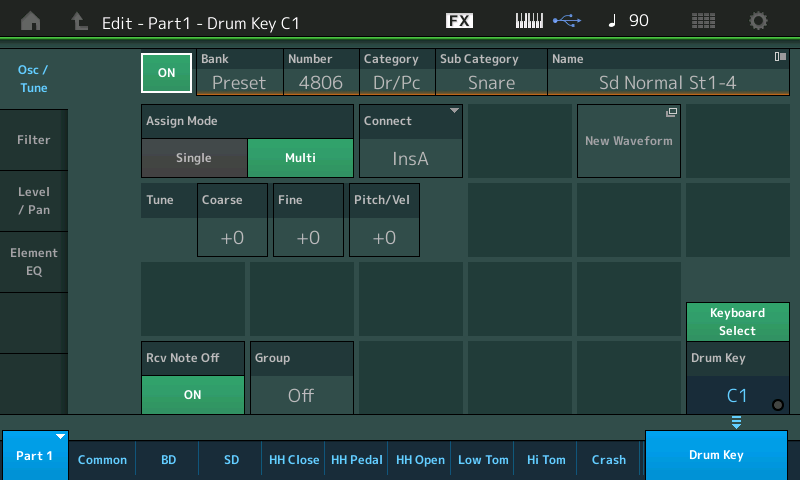
Touch the Key you wish to assign the audio clip, for this example: touch C1 (it can be any Key you desire, but we’ll just use C1 for the example).
Touching the Key automatically recalls all the parameters that control this Drum Key.
Tap the box labeled “New Waveform”
You will be taken to a screen where you can LOAD “Audio File”

You are also shown the amount of Sample Memory you have out of the 1GB Total. (Sorry, my screenshot is from MONTAGE so it says 1.8GB instead of 1GB)
If you insert the USB stick containing your Waveform you can load it directly into memory.
You are looking at the contents of your USB stick.
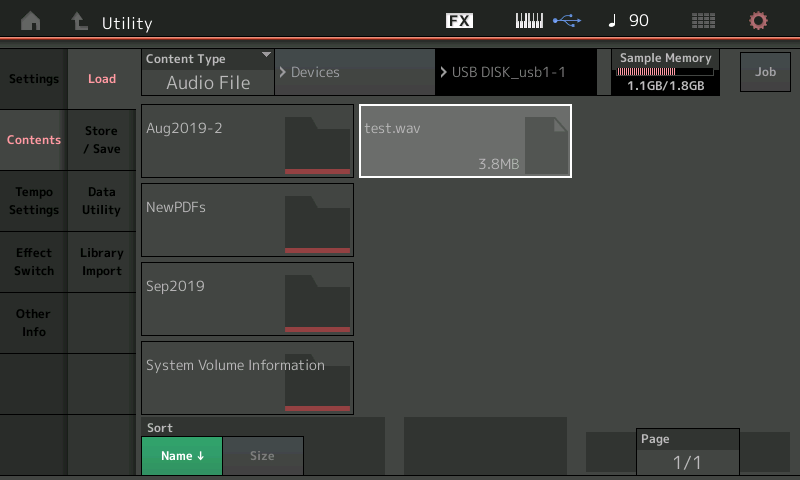
Tap the .wav to Load it to memory.
Press [EXIT] to return to our Drum Key screen.
If you now play “C1” you will hear a very, very short version of your audio clip. (This is because most drum and percussion sounds last only a couple hundred milliseconds).
In the lower left corner set “Rcv Note Off” = Off
Tapping the Key will allow the sound to continue without you holding the key down
Next, we’ll set it so it can play the full length of the audio clip (1 min 45 seconds)
Touch “Level/Pan”
Here we can adjust the amplitude envelope - this controls how the sound begins and continues.
Set Decay1 Time and Decay2 Time to maximum.
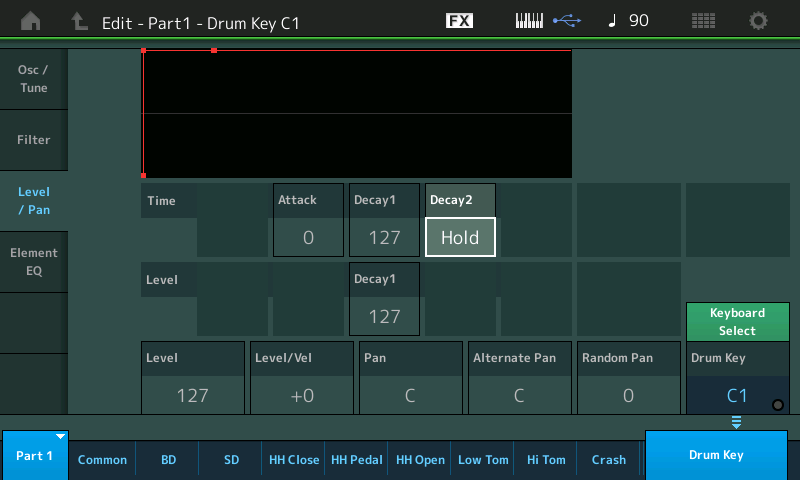
Decay1 Time = 127
Decay2 Time = Hold
Notice the Key’s “Volume” is set in the lower left corner… 127
Now that you have the amplitude envelope set to play forever (Hold)
You may notice if you trigger the key multiple times you will hear multiple versions playing — this can be sonically confusing.
Touch “Osc/Tune” set "Assign Mode" to “Single”
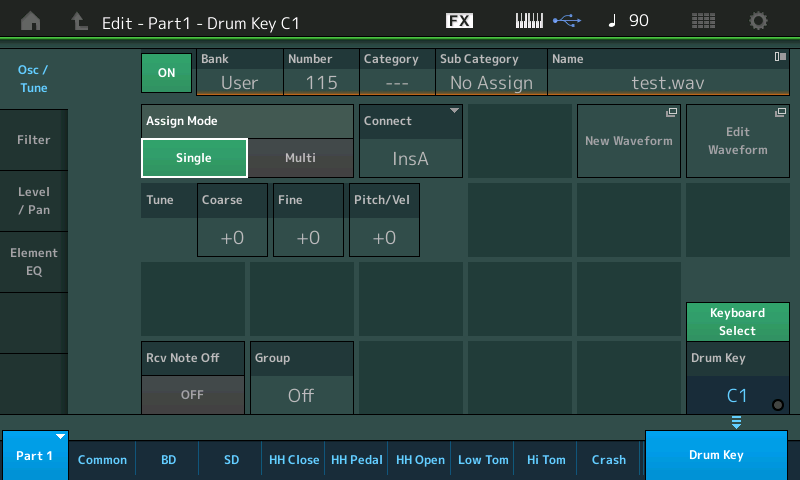
Each successive Key press of C1 will stop the previous… so only one plays at a time.
(Just FYI - before we finish, we’ll end this tutorial with how you can setup an ‘emergency stop’ function. As you can imagine striking the key by mistake could cause the entire minute 45 to complete (no good)).
Sample Waveforms can get lost when you start to play the synth along with it. Setting the Volume = 127 does not always give you enough Output level to be heard over your own synth playing. Fortunately, you can BOOST, significantly, the audio level of any Waveform.
Touch “Element EQ”
This recalls the Equalizer; change it from “2-Band” to “Boost +6” or “Boost +12”.
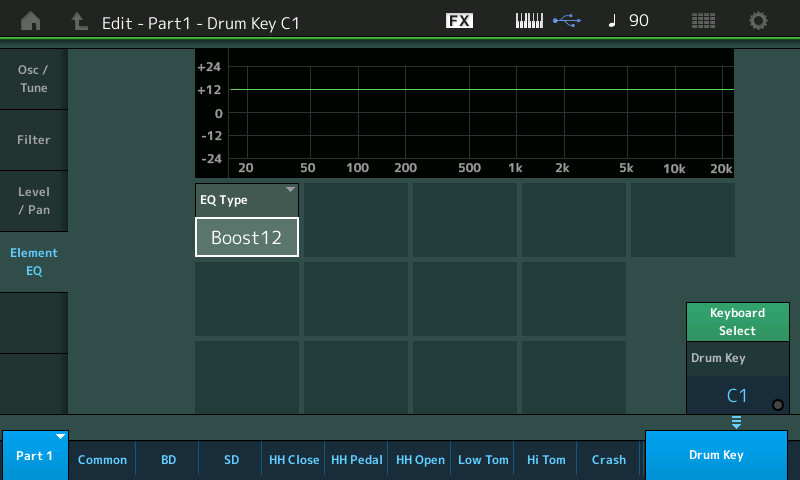
There is a +18dB which you should only use in the case where your Waveform is extremely low in level. I recommend if you determine you need to use +18dB to fix the audio clip, it is worth the time and effort to reSample your Waveform and try to fix its extremely low level at the source. +6dB is normally enough, +12dB can be used safely…
Emergency Stop
We can setup a Key (a blank Key) - one that produces no audio Output. It’s sole purpose will be to STOP the play of the 1 minute 45 second playback
We used C1 as the audio clip’s home Key.
On the “Osc/Tune” screen, next to “Rcv Not Off” = Off, set the “Group” = 1
Any Keys in the same Group will stop all other Keys in that Group from playing.
This is how the Closed Hihat stops the Open Hihat from sounding.
What you can do is program the adjacent Key “C#1” to any sound
Set the Volume = 0
Place it in Group 1
Touching this key will STOP the audio Clip in the same Group - immediately.
If you assign audio loops, for example to the naturals, and place them all in the same Group… then you can switch between which loop (just one) will be sounding. Use the sharps/flats as STOP play keys.
Assigning This Kit to a Performance
In our example, we have just 1 Waveform on C1, and an emergency stop Key on C#1.
Return to the HOME screen

Move the cursor down to the Range area… set the Range to “C1” thru “C#1”
Move the cursor down to the Velocity Range… you can see I have set this up so that only if I hit a key with a velocity of more than 80 will the Audio Clip play… I did this just so you can see you can “hide” the start of your Audio Clip to a specific range of Notes and Velocity.
See the split screen graphic — it shows you a small crosshair indicator of where across the keyboard you are and what velocity you are playing. Only when that crosshairs moves into the blue box will the audio clip sound
Final Notes
You can customize this as you require.
Any key can be your Stop key it does not have to be in an easily reachable area (remember it is an emergency stop and will only be needed if unfortunately you start playback by mistake.
You can place you Audio Clip on a Key that is convenient for you.
You can use the Sequencer to trigger playback.
The Pattern Sequencer can be setup so that “Key On Start” will begin play
I’m not completely clear on how you are going to using the audio clip…
But you can customize this routine as you may require for best results.
thanks for everything,:o 😮 you have been largely exhaustive.
Would you explain to me how to assign 4 different wavs in one live set.
Each Drum Key, C0 thru C6 can hold a different wave. Instructions would be exactly the same as above. Just target a different Key.
Once you have placed all your waveforms into your Drum Kit… STORE the Performance.
From the Performance HOME screen:
Hold [SHIFT] + [LIVE SET]
The next available LIVE SET slot will have a flashing cursor around it
Touch whichever slot you want to assign it to.
Thank you for all the wise answers you have given me and I can't wait to go back to the rehearsal room to be able to put them into practice.
I would like to take advantage of you and ask you how to solve this situation too:
- I would like to combine the pressure of single keys, the execution of a short midi track, both in loop and in a single execution (for example I want to play AFRICA of TOTO and combine the intro 1 with Brass to "C0" and the intro 2 with Mallet at "D0")
- Also I would like to ask you:
although I am very satisfied with my MODX8, I would like to replace it with MONTAGE7 and CP88 but I have not yet clear, apart from the cost, why prefer MONTAGE to MODX.
Thanks for the time you want to dedicate to me.
Sal.
I would like to combine the pressure of single keys, the execution of a short midi track, both in loop and in a single execution (for example I want to play AFRICA of TOTO and combine the intro 1 with Brass to "C0" and the intro 2 with Mallet at "D0";)
When you say “I want to play…” to me that means: you want to play, but then you say “combine the intro 1 (?) with Brass to “C0”” — which means to me you only want strike “C0” and have the technology actual “play” the Intro. And a different mix of instrument (Intro 2, I presume) when you strike key “D0”.
This synth does NOT do that type of thing …unless you create an audio sample of you playing Intro 1…you can then assign that to any key you want. And then do a second audio sample, Intro 2, and assign that audio clip as a MODX Waveform to “D0”.
We’ll be happy to help you assign the audio samples to MODX Performance Part. What do you intend to use to create (and edit) the audio samples?
If I’m misunderstanding you, do you find any examples of what you wish to do among the 2227 factory Performances - that might help me envision what you want to happen. I have created a MODX/MONTAGE Part where each Key across the range of my MODX/MONTAGE7 has a different audio loop. Each at precisely the same tempo, and Grouped so that triggering one key stops play of the previous loop and simultaneously starts the playback of the loop assigned to the current Key. To put this into the MODX/MONTAGE I load in an audio clip (.wav) and create a Waveform mapped to the various keys. You can even stack them so a soft strike plays one phrase and a harder strike plays a counter phrase. In another, because the tempos of each clip are precisely the same, playing any two keys simultaneously plays their rhythm patterns together — endless combinations of percussion
although I am very satisfied with my MODX8, I would like to replace it with MONTAGE7 and CP88 but I have not yet clear, apart from the cost, why prefer MONTAGE to MODX.
Working with a MONTAGE and/or MODX is a different experience. You will understand immediately where the cost differences are… itemizing them and trying to assign a dollar value (cost) to each item is really an exercise in futility.
The specifications and features are listed on the Yamaha.com website please read through them.
The most obvious are building material, internal power supply, number of front panel features (knobs, sliders, buttons, ribbon), audio outputs available both analog (4) and digital (32) up to 192kHz with fewer channels ), Keybeds/aftertouch)
The MONTAGE and CP88 are at the top of their line expect a more elegant interface and expect maximum road-worthiness.
You can live in a house or you can live in a mansion… sure they can both have bedrooms and living rooms, and a front yard… but expect more when you choose the mansion!
I don't want to use samples,
let's say that I would like to create a pattern from a song (imported via midi with only two tracks) and make one key play track 1 from measure 5 to measure 7 and another key to track 2 from measure 10 to 12
I don't want to use samples,
let's say that I would like to create a pattern from a song (imported via midi with only two tracks) and make one key play track 1 from measure 5 to measure 7 and another key to track 2 from measure 10 to 12
No, the MODX doesn’t do that.
You can trigger Pattern Scenes by using the red front panel [SCENE] buttons. The Keys of the MODX are used to trigger AWM2 samples and/or FM-X synth sounds. The Keys can start the Sequencer Transport (Key On Start).
