Motion Sequencer Detailed;
Hello all, want to know Motion Sequencer please,
(1) There is any specific sounds for motion sequencer to apply or any sound?
Turning on/off MS button but not apply on sound.
Kindly guide me everything about motion sequencer, step by step. I’m very grateful to you.
Thanks.
Motion Sequence is a way to automate changing various parameters inside any PART of any Performance.
Read this first: https://www.yamahasynth.com/modx-category/mastering-modx-motion-sequences
... because it walks you through - see excerpt:
BACKGROUND AND THEORY
Before we recall and look at the example Performance, let’s take a moment to get some new terminology clear. While the concept of a sequence is clear to most of us, what actually is a "Motion Sequence" really?
... and so on
Note that when I use a popular search engine and type in the following search string:
yamaha modx "motion sequence"
The first "hit" is the link I gave above.
Current Yamaha Synthesizers: Montage Classic 7, Motif XF6, S90XS, MO6, EX5R
Sorry again but I don’t know how to active motion sequencer
How to use Motion Sequencer?
When I’m turning on/off MS button but not apply on sound.
Kindly guide me motion sequencer, step by step. What can I do first 2 3 steps...
Thanks.
Read this first: https://www.yamahasynth.com/modx-category/mastering-modx-motion-sequences
That tutorial tells you step by step which menus and buttons to press to look at and edit the various parts of motion sequence.
I realize you're dealing with MODX - but Montage is the same for motion sequence - so you can look at:
https://www.yamahasynth.com/montage-category/motion-sequence-close-up-1
This walks you through a specific Performance (Pad Pulsations)
Press [PERFORMANCE] (HOME)
Touch PART 1 on the touchscreen
Choose "Edit" from the popup menu
Touch "Common" (blue) low left corner or press the lower [COMMON] button on the right front panel which gives you access to the workings within the selected Part
Touch "MotionSeq" > "Lane" (shown below)
Below: Lane 1 is selected, the LaneSW is On, Sequence 1 is selected.
I edited the above from the tutorial to match MODX since it doesn't have part select physical buttons.
That brings up a menu
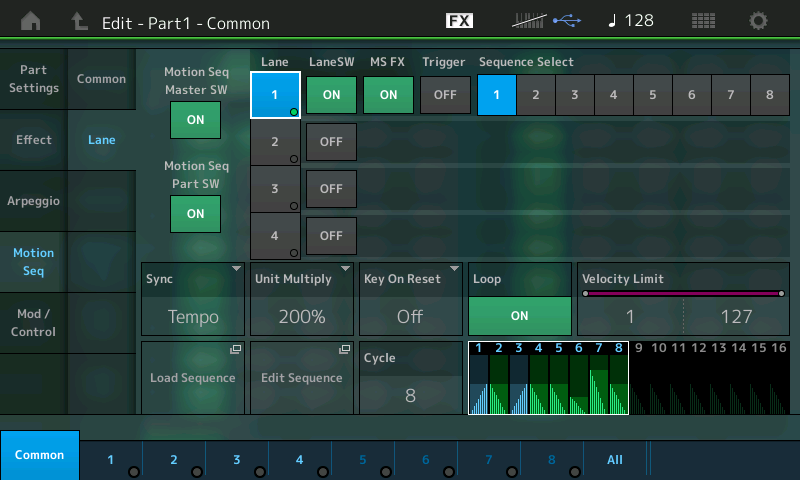
.... I mean, I could keep copying pieces from the tutorials - but they really do walk you through it.
Current Yamaha Synthesizers: Montage Classic 7, Motif XF6, S90XS, MO6, EX5R
First, you have to decide what you want the Motion Sequencer to do. Hopefully, you read through the article on “Motion Sequences”.
A Motion Sequence allows you to automate parameter movement or even Super Knob movement (which can move scores of parameters).
The steps for applying it yourself follow:
Please use the Performance item selected in the example below... by using a single Part, single Element Performance it is easier to focus attention on just what is happening to this one sound source.
Select the Preset Performance “Percussive Dance 2”
This is a Single Part, Single Element sound featuring a Low Pass Filter.
From the HOME screen:
Tap Part 1 to see the pop-in menu
Select “Edit”
Touch “Mod/Control” > “Control Assign”
Move the cursor to highlight the “Display Filter”
Using the Data Dial turn it fully clockwise to “All”
This lets you view “all” of the possible 16 Control Assign Destinations... they are shown 4 to a Page, 4 Pages. There are two Pages of assignments (7 total) in this particular Performance. We need to make sure there is a Control Set available — there are 9 available!
Just to the left of the “Display Filter” box is the “Auto Select” Option. Touch it make it active (green).
Turn [ASSIGN KNOB 1]
You can see it is assigned to do “Cutoff”
Turn this Knob to get an idea of how Cutoff changes the sound. More harmonics as you turn it up (clockwise), less harmonic as you turn it down (counterclockwise).
Observe that it is linked to the Super Knob movement. If you turn the Super Knob it controls the Cutoff.
Turn this Super Knob to minimum for now we want to assign the movement of Cutoff to the Motion Sequence.
You can create a Motion Sequence that accomplishes this same effect of opening and closing the Filter Cutoff Frequency. A Motion Sequence is like automating a parameter change.
First, we will add a Control Assignment. “Destination 8” for the Motion Sequence Lane 1.
Move the cursor and set the “Display Filter” = MS LANE 1
For now we’ll leave the Destination empty - we’ll come back to it in a moment.
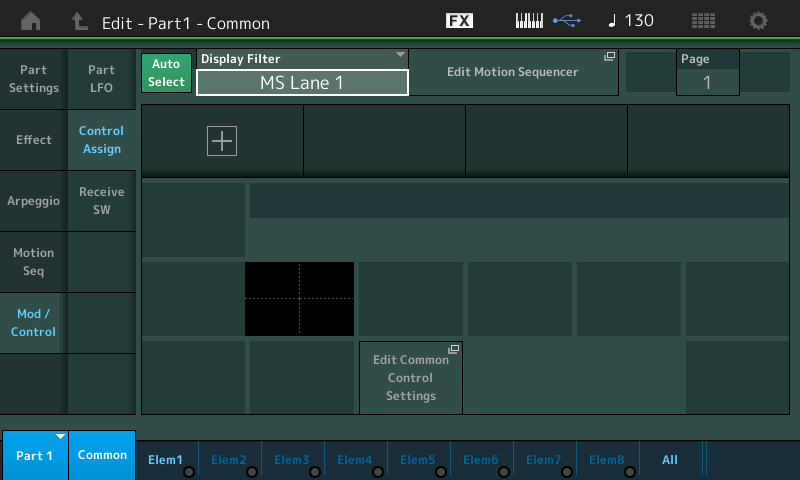
Tap the box just to the right of “MS Lane 1” that says “Edit Motion Sequence”
Touch the box to turn the “Motion Seq Master SW” = On
And touch “LaneSW” next to the Lane 1, to turn it On
A default Motion Seq with 16 steps (Cycle) appears.
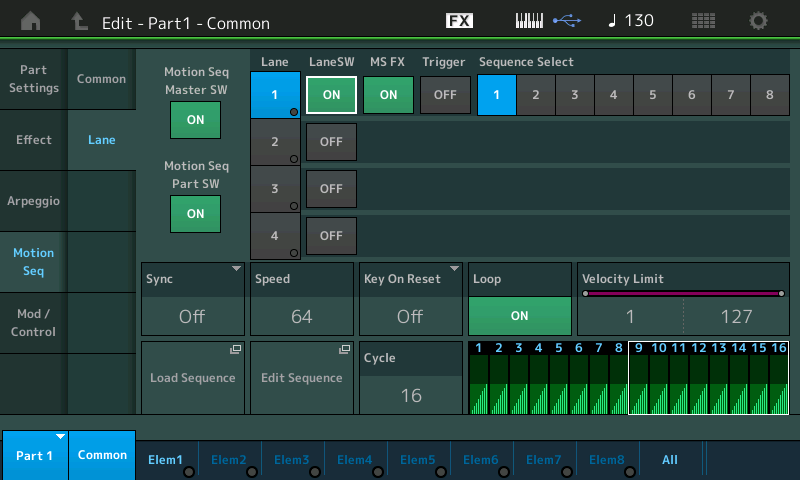
Touch the box “Load Sequence” and find the “Preset” folder
Let’s just use the first preset “Big Bell 1”
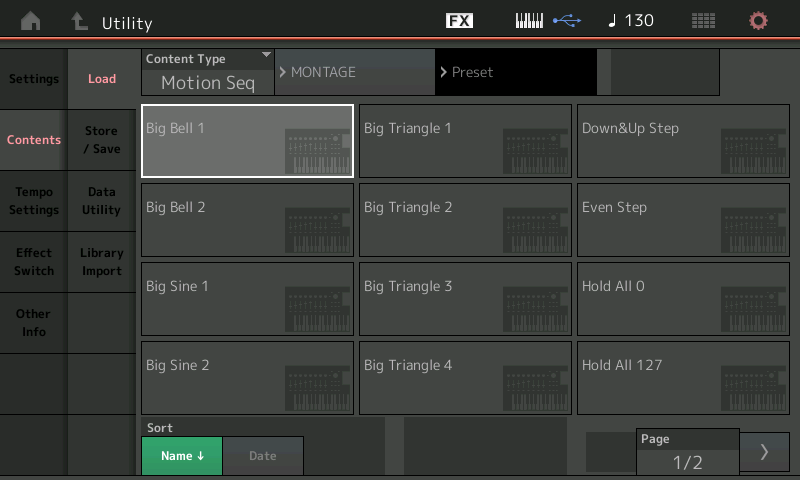
You will be returned to Lane screen. You can see the shapes (movement). In order to simplify things set the Cycle = 2
The graphic (bell shape) can be thought of as movement... If it was controlling Volume you can imagine the sound getting louder then softer. If it was controlling Pan position you can image the sound going right then left. If it were assigned to a Low Pass Filter’s Cutoff Frequency you could imagine the filter opening (more highs) then closing (less highs)... and so on.
We have not assigned it a parameter yet ... let’s do so.
In the first column touch “Mod/Control” to return to the Control Assign area we entered from...
Tap that “+” to add a Destination for Motion Sequence 1, Lane 1
A default parameter will appear... tap it to see all the options.
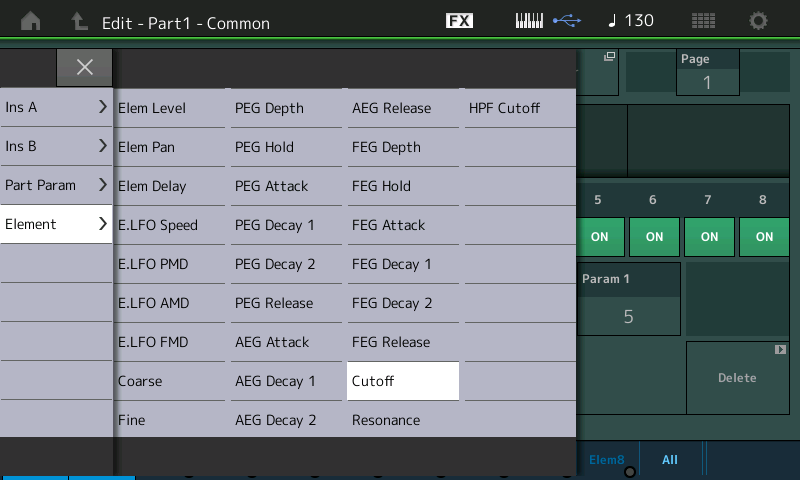
Select “Element” > “Cutoff”
Press [ENTER
Source = MS Lane 1
Destination = Cutoff
(You can see on this screen that this MS is set to affect all 8 Elements, there is only one in this particular example, but we point that out because you can select which Elements will be affected by this movement. Remember each Element has its own Filter, it’s own volume, it’s own Pan position, etc., etc., etc. Try different Destinations for the "MS Lane 1"
Touch the box near the top of the screen "Edit Motion Sequencer" to return to it
Change the Speed and start to experiment with the parameters.
That should get you started... The SCENE buttons (red) act to change the Pulse from Pulse A (not lit) to Pulse B (lit)
You have a row of KNOB functions on the upper left front panel that you can select press the button to select the "Arp/MS" row
Notice that you can change the Amplitude (knob 3) and the Shape (knob 4) of the Bell shape.
If you have more questions please post back
